
Appearance
Build and maintain the menu
Open Operations management → Dish Management. Prepare shared attributes before creating items. This keeps names such as Small, Large and Extra Cheese consistent across the menu.
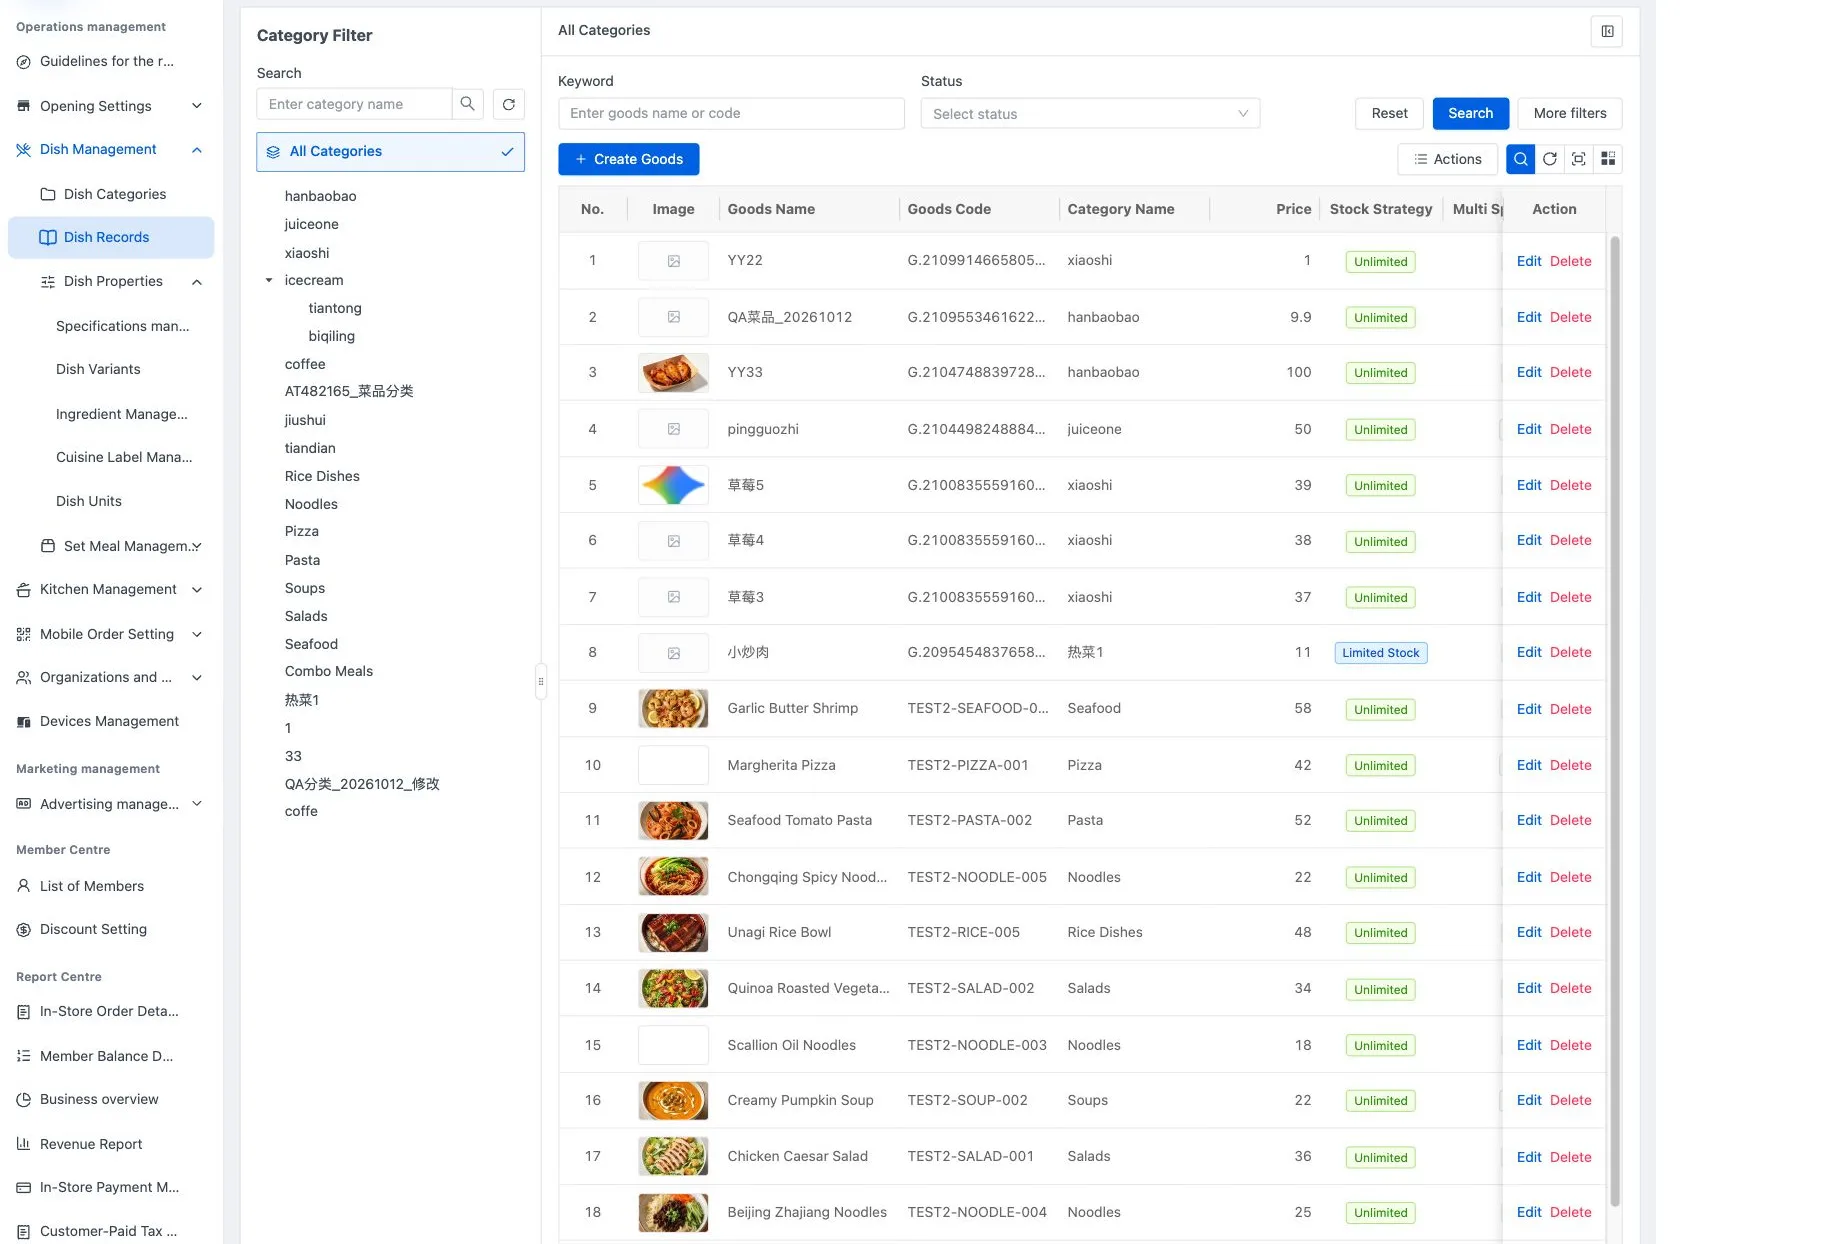
Categories and display order
Open Dish Categories under Dish Management. Create a first-level category, select it, then add second-level categories where needed.
Check both the name and parent when selecting a category. Moving a category changes its display order on the POS, mobile ordering and kiosks. Disabling it hides both the category and its items on those terminals. A category containing items cannot be deleted.
Shared item attributes
Open Dish Properties to prepare the following:
| Attribute | What to enter | Where it is used |
|---|---|---|
| Specifications management | Size or portion name, such as Small or Large | Select it on an item and set that item's price for each size |
| Dish Variants | A category, preparation-option name and no, fixed or proportional surcharge | Enable preparation options on an item, then decide whether selection is required or multiple choices are allowed |
| Ingredient Management | An add-on category, name, selling price and optional cost, image or remark | Select add-ons on an item and optionally limit their total quantity |
| Dish Units | A unit such as cup or piece | Item basic information |
| Cuisine Label Management | Name and label type | Tax labels identify items for tax rules; other types are reserved |
Dish Variants manages preparation choices such as sweetness or temperature; the item form calls them Practices. Ingredient Management manages add-ons, called Ingredients on the item form. The cost price is separate from the price charged to customers.
The attribute lists also provide item-linking actions. For specifications, bind or unbind items in the association window, then use its finish-and-check-prices action to review selling prices. A shared specification name does not define one price for every item.
A proportional preparation surcharge is a percentage of the item’s base price, added to that price. A base price of 100 with a 10% surcharge becomes 110.
Add an item
Open Dish Management → Dish Records, the item catalogue, and select Create Goods.
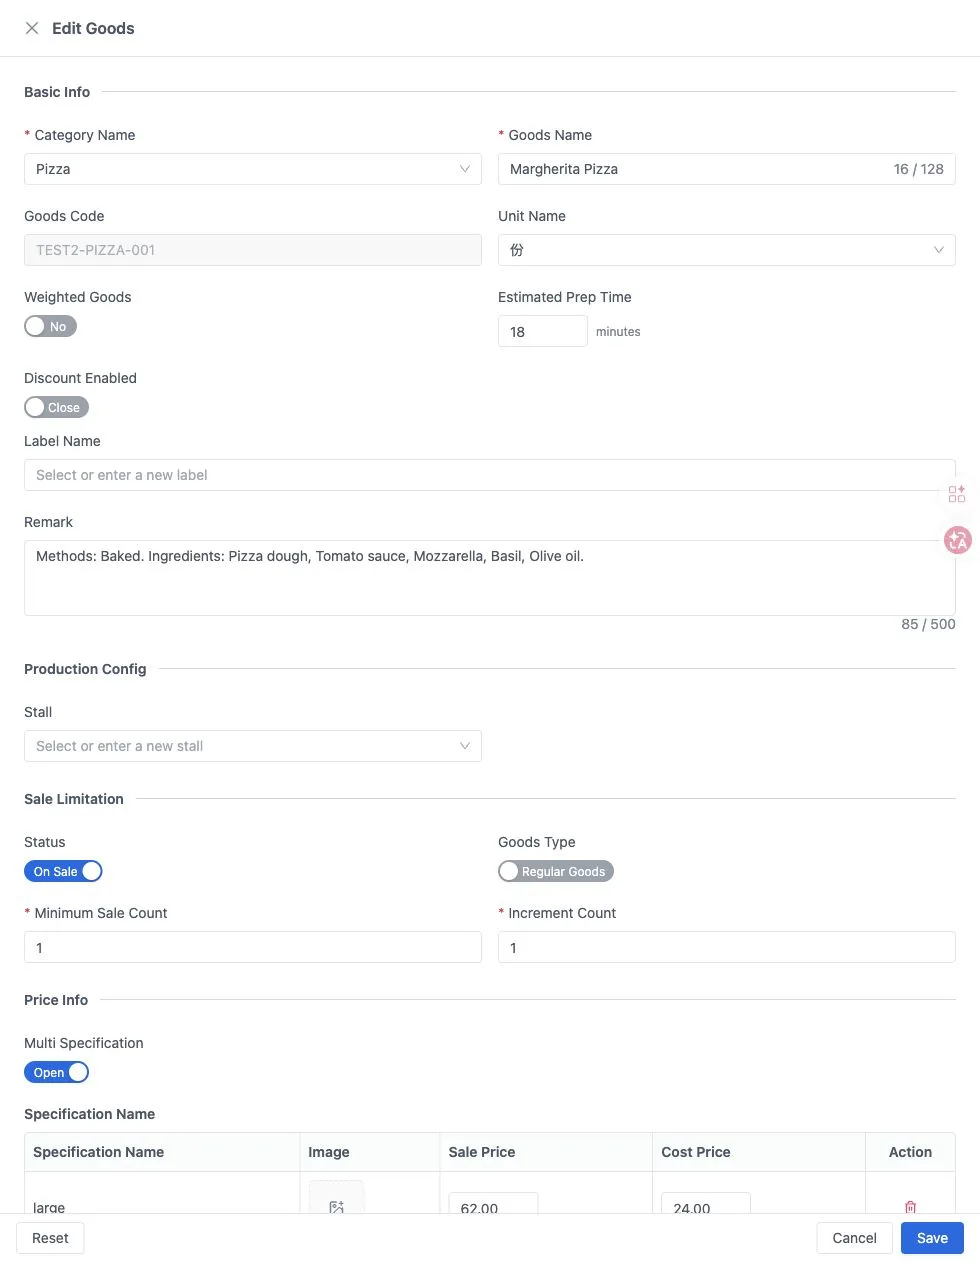
- In Basic Info, choose Category Name and enter Goods Name. The Goods Code is generated by the system. Choose a unit and optionally add preparation time, labels and a remark.
- Set Weighted Goods and Discount Enabled to suit the item.
- Choose a kitchen Stall in Production Config.
- Set On Sale/Off Sale and the goods type. For items sold by count, set Minimum Sale Count and Increment Count as needed.
- Enter the price, or enable multiple specifications as described below.
- Select preparation options and add-ons if needed. Add a clear image, up to 2 MB, and a description.
- Select Save. Check the catalogue, then check the item at an ordering terminal after synchronization.
New category, unit, label or stall names entered within the item form are saved with the item. Of these inline additions, only labels may repeat an existing name; use distinct names for categories, units and stalls.
Weighted items have no minimum starting quantity or quantity increment. The POS uses the actual weight entered by staff or received from a connected scale.
Package Only items are available when building set meals in the back office. They are not sold independently on the POS, mobile ordering or kiosks. Item names may repeat; use the unique product identifier or code to distinguish them.
Price each size separately
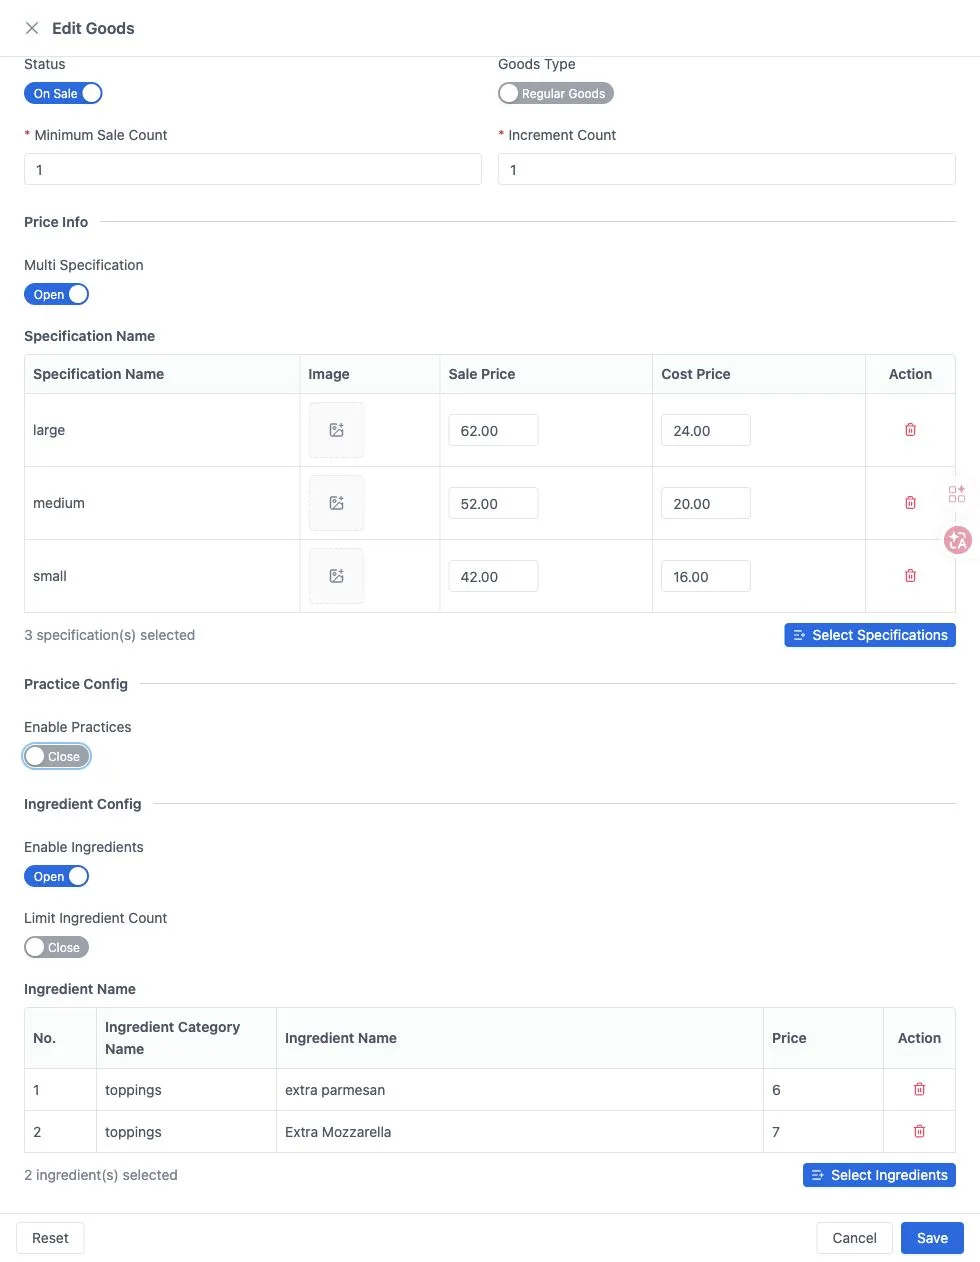
Enable Multi Specification under Price Info and select Select Specifications. Add the required sizes, then enter Sale Price for every row. Cost Price and a size-specific image are optional.
For example, Margherita Pizza has separate small, medium and large rows. Review every row before saving. Removing a row removes that size from this item's configuration.
Set preparation choices and add-ons
Enable Enable Practices and select the available preparation options. Set required selection and multiple selection as needed.
Enable Enable Ingredients, then use Select Ingredients to add the available extras. To impose a limit, enable Limit Ingredient Count and enter the total limit. It counts portions across all add-ons: two portions of one extra plus one of another use three portions of the limit. Save and check the choices, extra prices and quantity restrictions at the actual terminal.
Import a larger catalogue
In Actions, download the import template. Keep the original column headings, order and worksheet layout. Complete the file, choose the batch-import action and select it. Review the feedback and check the imported catalogue.
The template has six fields:
| Field | What to enter |
|---|---|
| Item name | The menu name, such as House Coffee |
| Code | The item code; use text format to preserve leading zeros |
| Item price | The selling price as a number |
| Unit | The store's unit, such as cup or piece |
| Category | The item's category |
| Description | A description of the item |
The import supports template fields only. Configure specification combinations, preparation options and add-on links separately afterwards. A category named in the import is created automatically if it does not exist.
Enter the store's actual item data in the template and use the import feedback to correct problem rows. If an import fails, check the existing catalogue to identify what was imported before correcting and retrying the file.
Actions also contains batch listing, delisting and deletion. Review the selected scope and confirmation before applying a batch change. For everyday maintenance, use the row's Edit action or change its sale status.
Build a fixed set meal
Open Dish Management → Set Meal Management → Standard Set Meal and select Create Package. Enter a name, category, package price and status; optionally add an image and description. Use the item-selection action to choose its components, review the selected list and item total, then save.
Current normal packages use single-specification items and a fixed composition. Multi-size combinations and choose-your-own groups are not available. Review the package selling price separately from the component total.
Assign kitchen stations
Open Operations management → Kitchen Management → Post-Kitchen Management and use Create Stall to create station names. Then select the appropriate Stall on each item. The back office lists the number of linked items. Bind printers and set copy counts in the POS.
Daily sales limits and sold-out control
Stock quantities are managed in the POS item-management function. Select an item there to set a daily sales limit or a total quantity limit according to available supply. The back-office item form does not maintain stock.
If an item is missing from a terminal, check its sale status, category status, Package Only setting and the main POS connection. For an item with sizes, also check the configured selling prices.