Appearance
Detailed Guide
Turn on and connect to the network
Power On
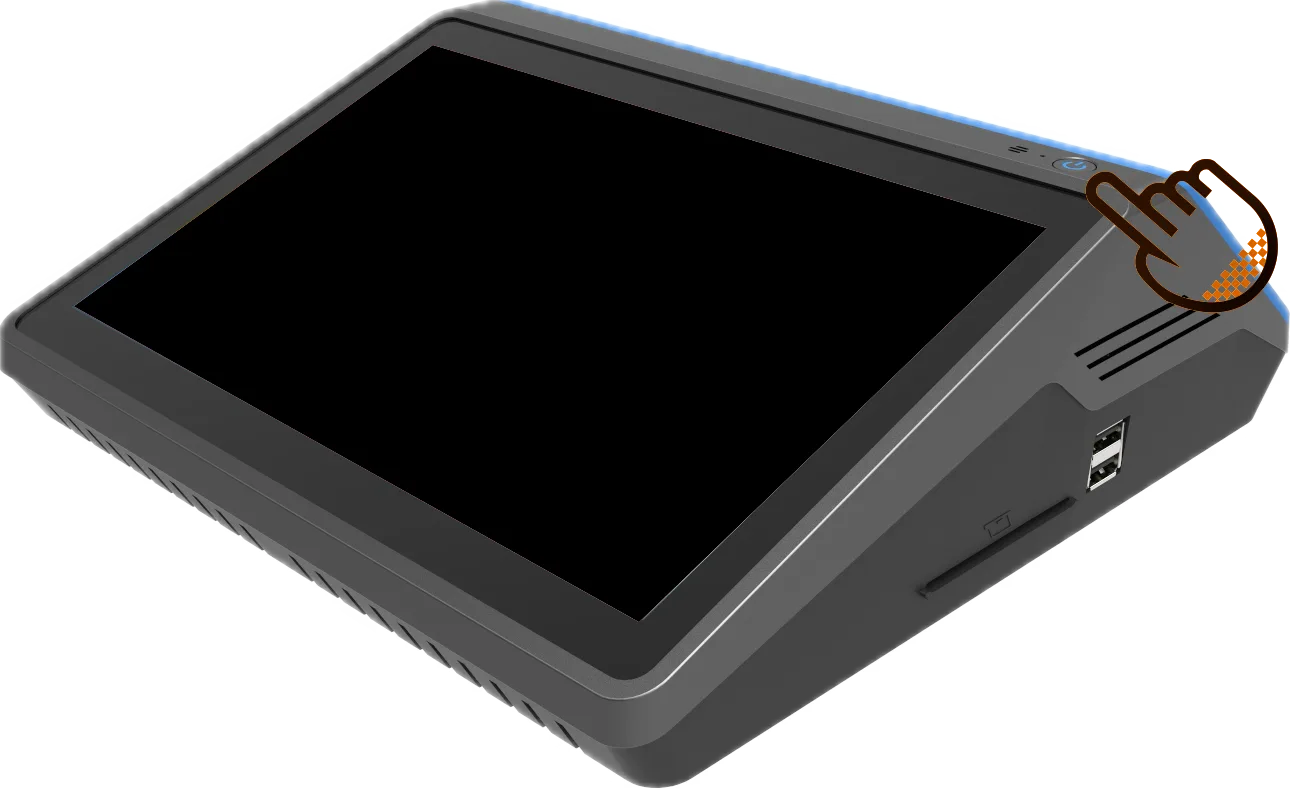
- Taking the model FH100-A3-D as an example, after turning on the power, long press the power button in the upper right corner for about 3 seconds;
- After the boot loading page ends, it enters the login page.
Networking
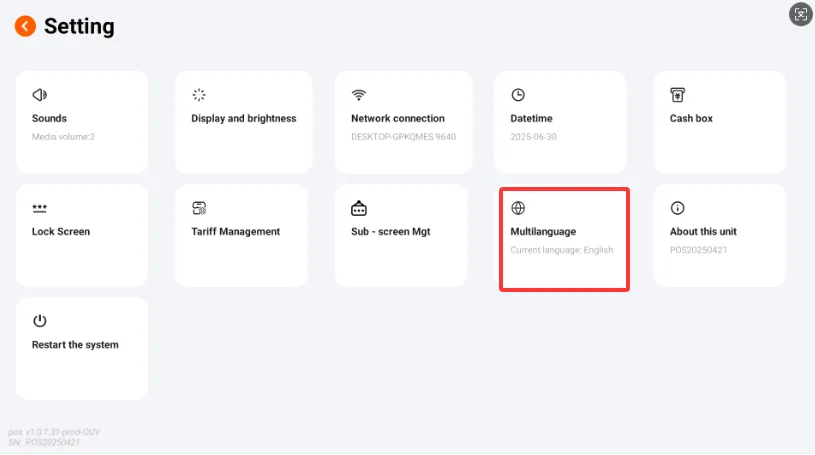
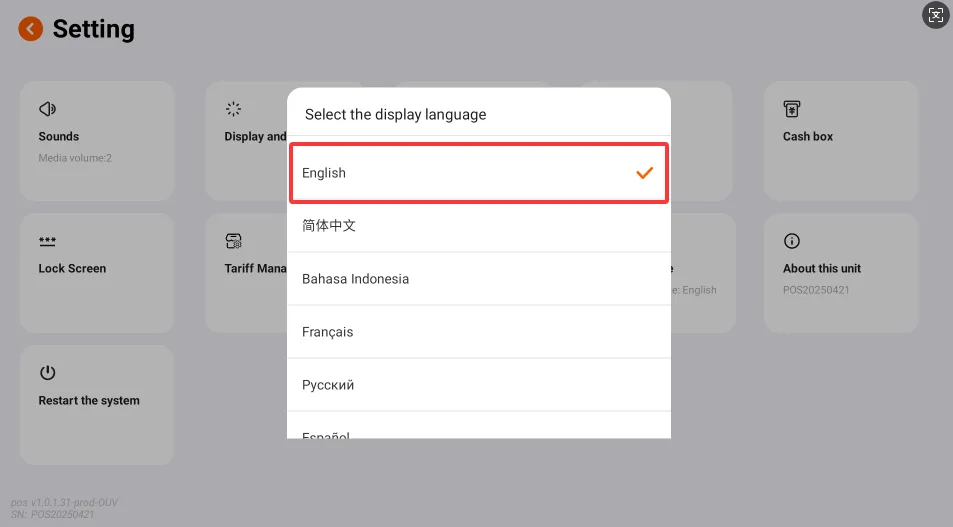
- Open settings in the bottom right corner of the page, find the language option, and you can first select the language as needed.
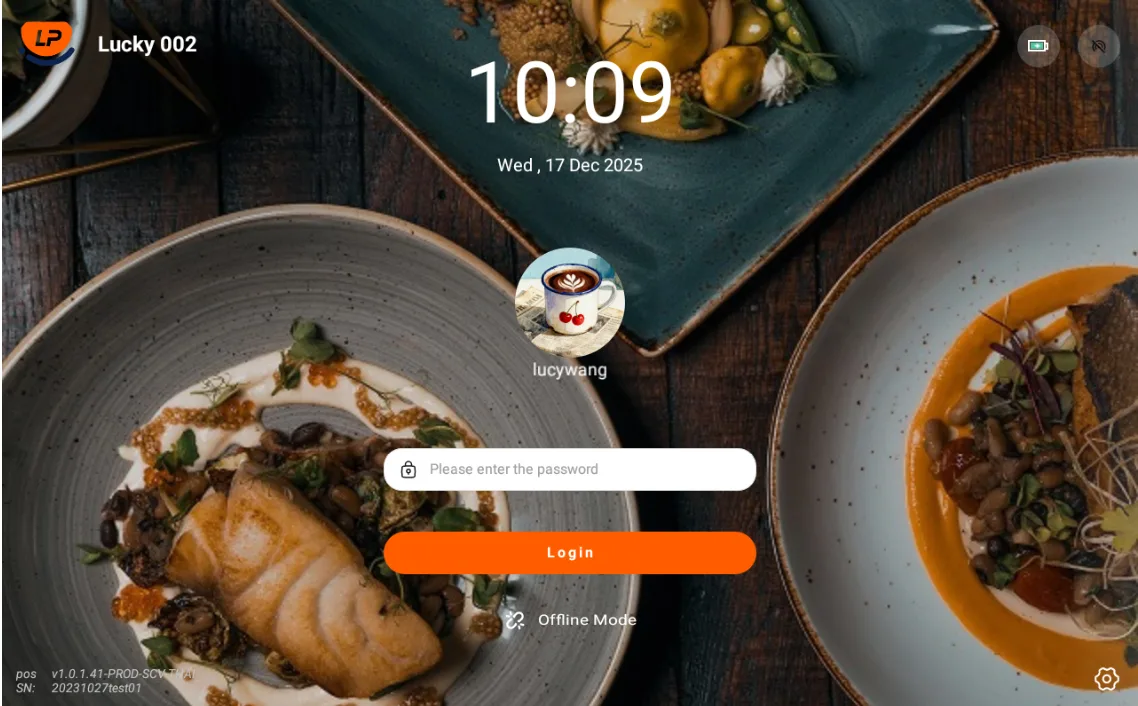
If there is no network connection when starting up, click the red text at the top of the page to pop up the network connection dialog box, then select an available network connection in WLAN;
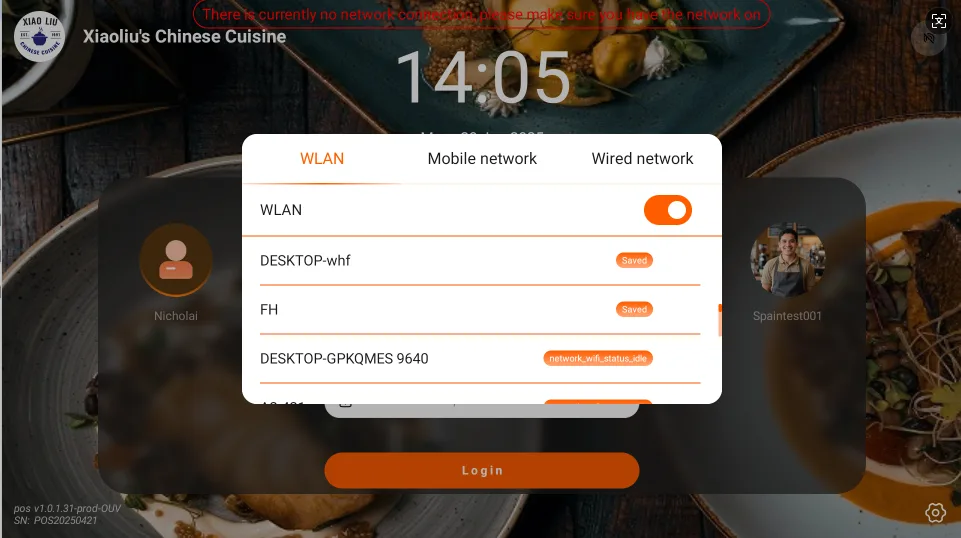
Mobile Network is used to enable SIM card data traffic (requires device hardware support);
Wired Network can configure a wired network with a fixed IP connection.
Log in to the system
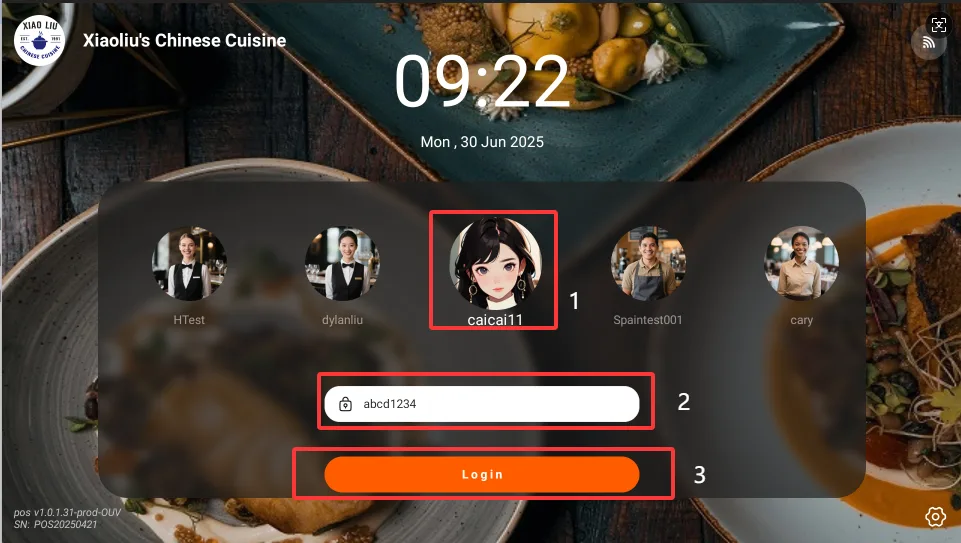
- The on-duty cashier enters their account and password;
Note
For details on the method of creating cashier accounts, please refer to "Instructions for Using the Store Management System"
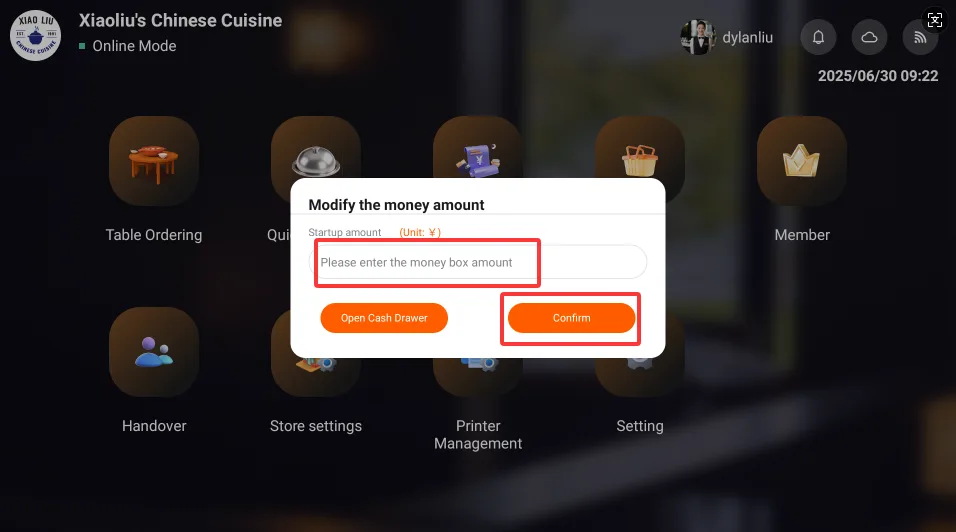
- After logging in, a pop-up window will display the amount, where you can enter the reserve amount;
Note
This portion of the money is usually used for cash change, and the real amount entered during login will be used for the statistics of income and expenditure when logging out of the account upon shift handover.
- When there are multiple accounts, swipe the account you need to log in to the middle of the page, then enter the password. After completion, click [Login], and open the system home page after the account and password verification is correct.
Offline Login
- Offline mode can be entered when the network is laggy or unavailable.
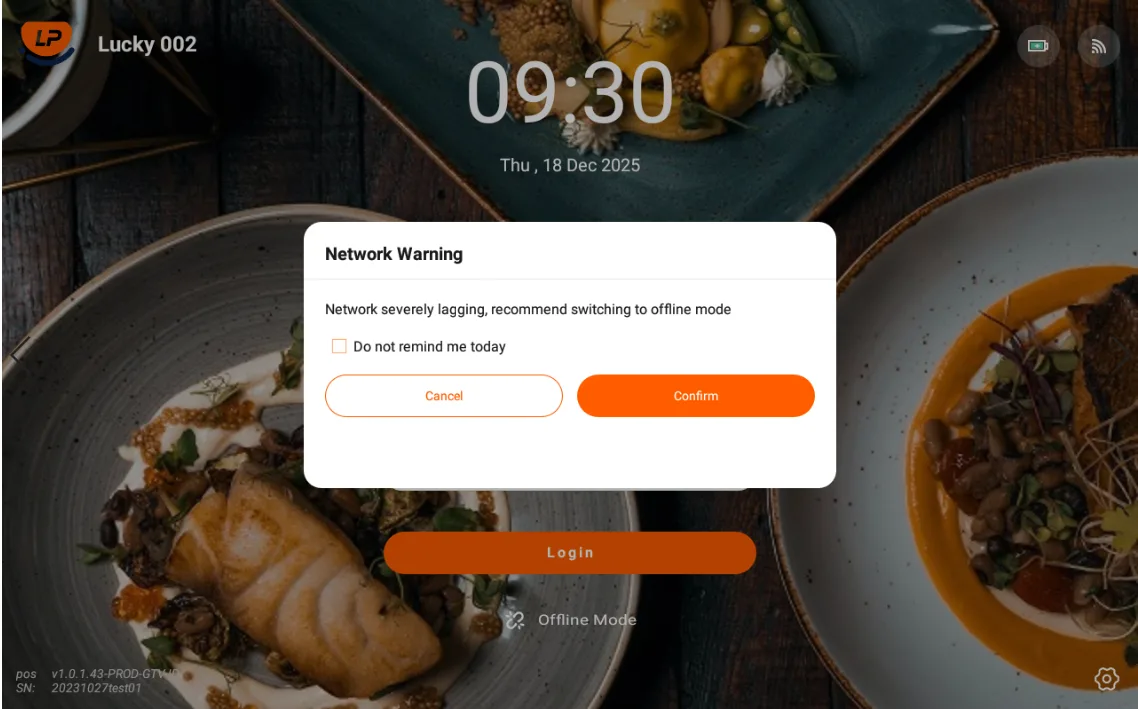
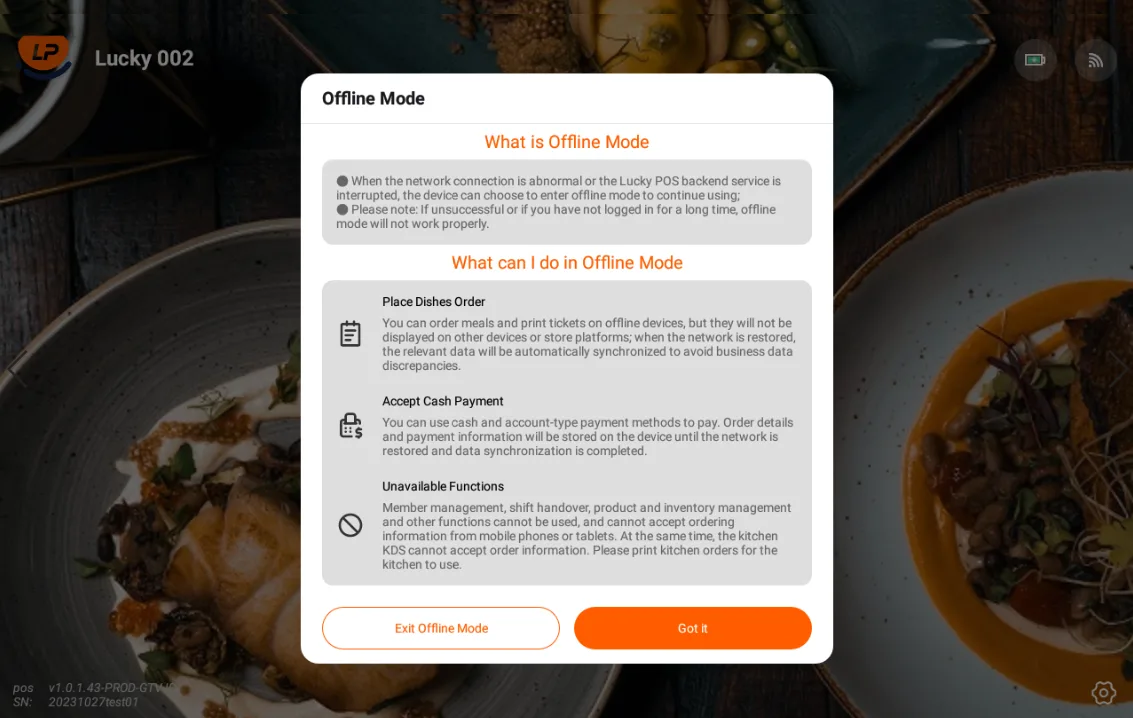
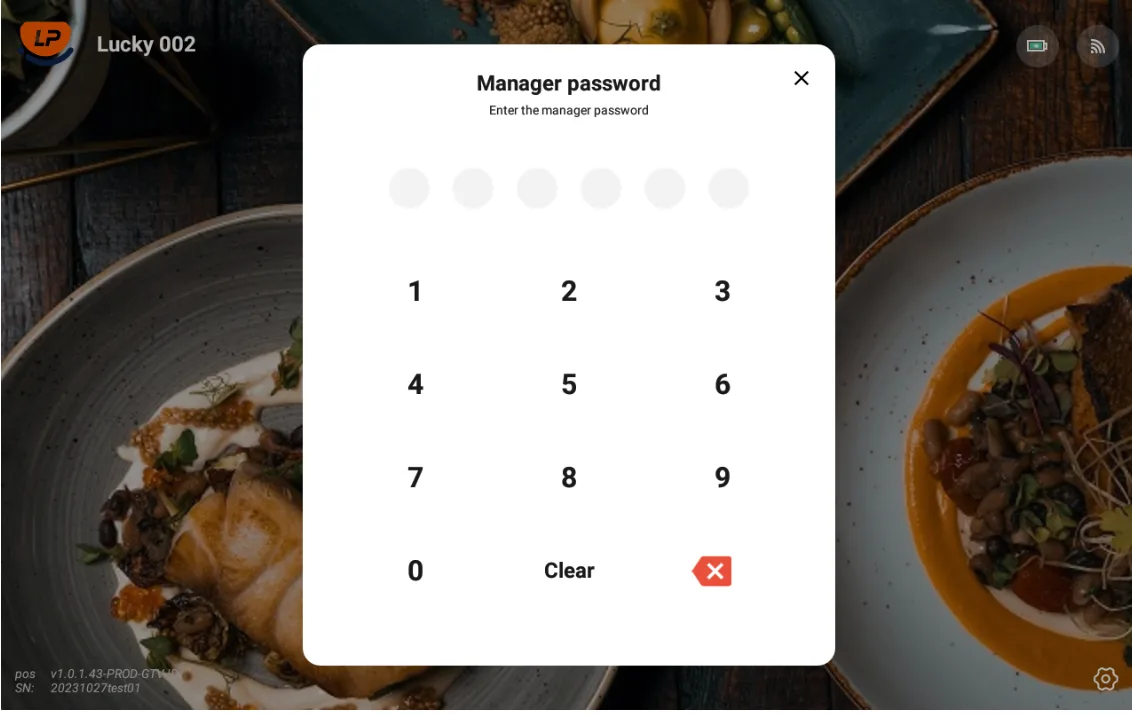
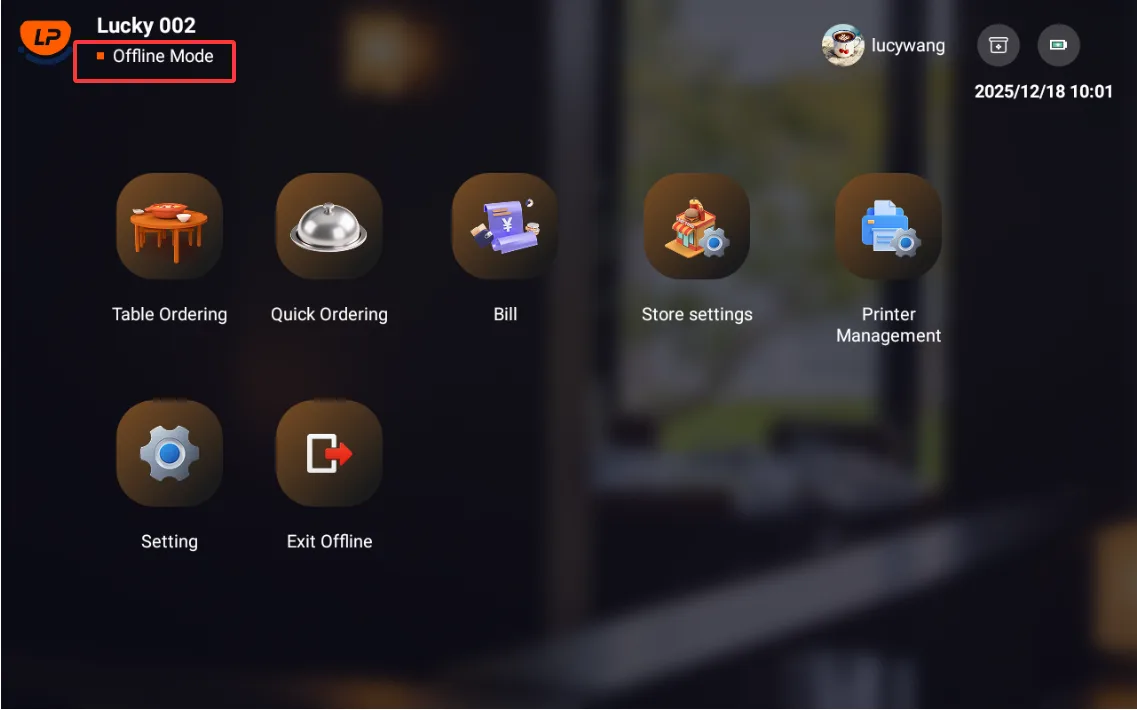
Note
- Offline mode follows the same operating flow as online mode.
- Orders created in offline mode must be checked out before you can exit offline mode.
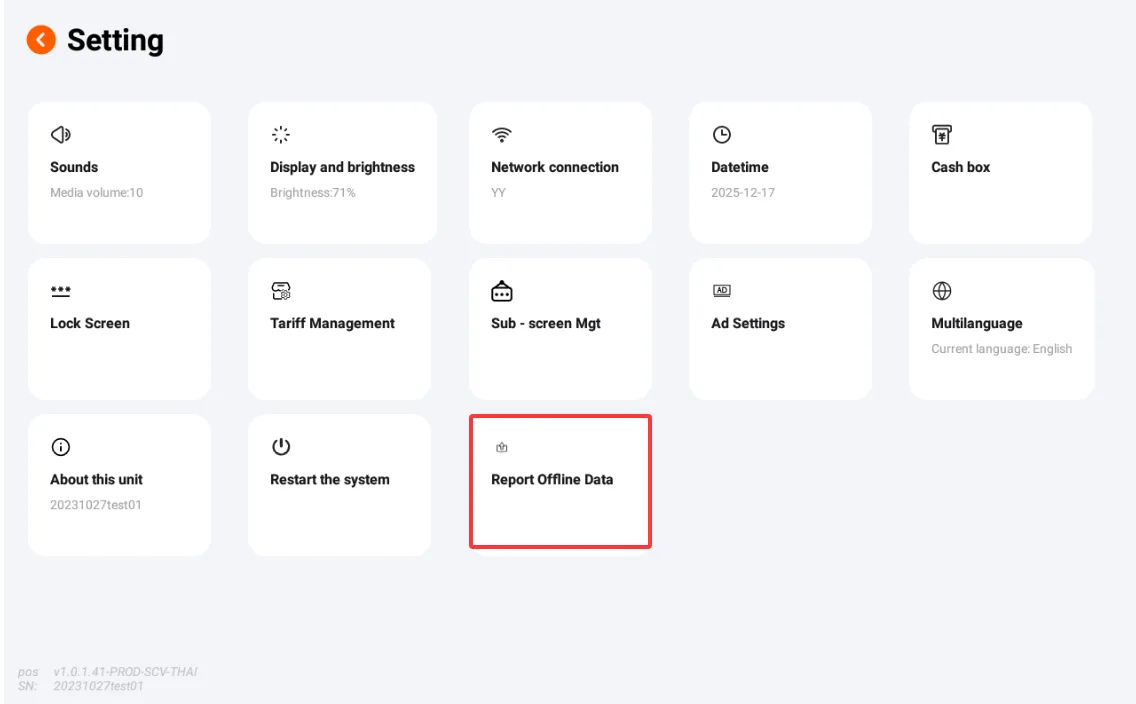
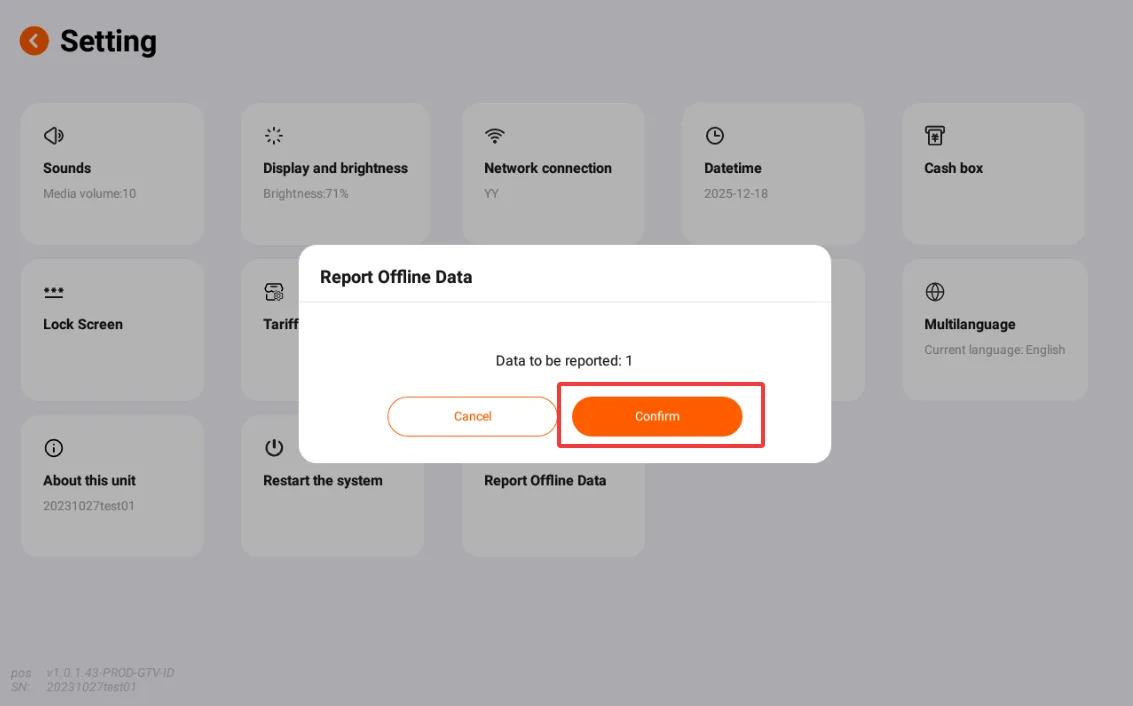
- After exiting offline mode, open the settings page in online mode and tap Report Data to upload the offline data.
Time Calibration
Check and adjust time display:
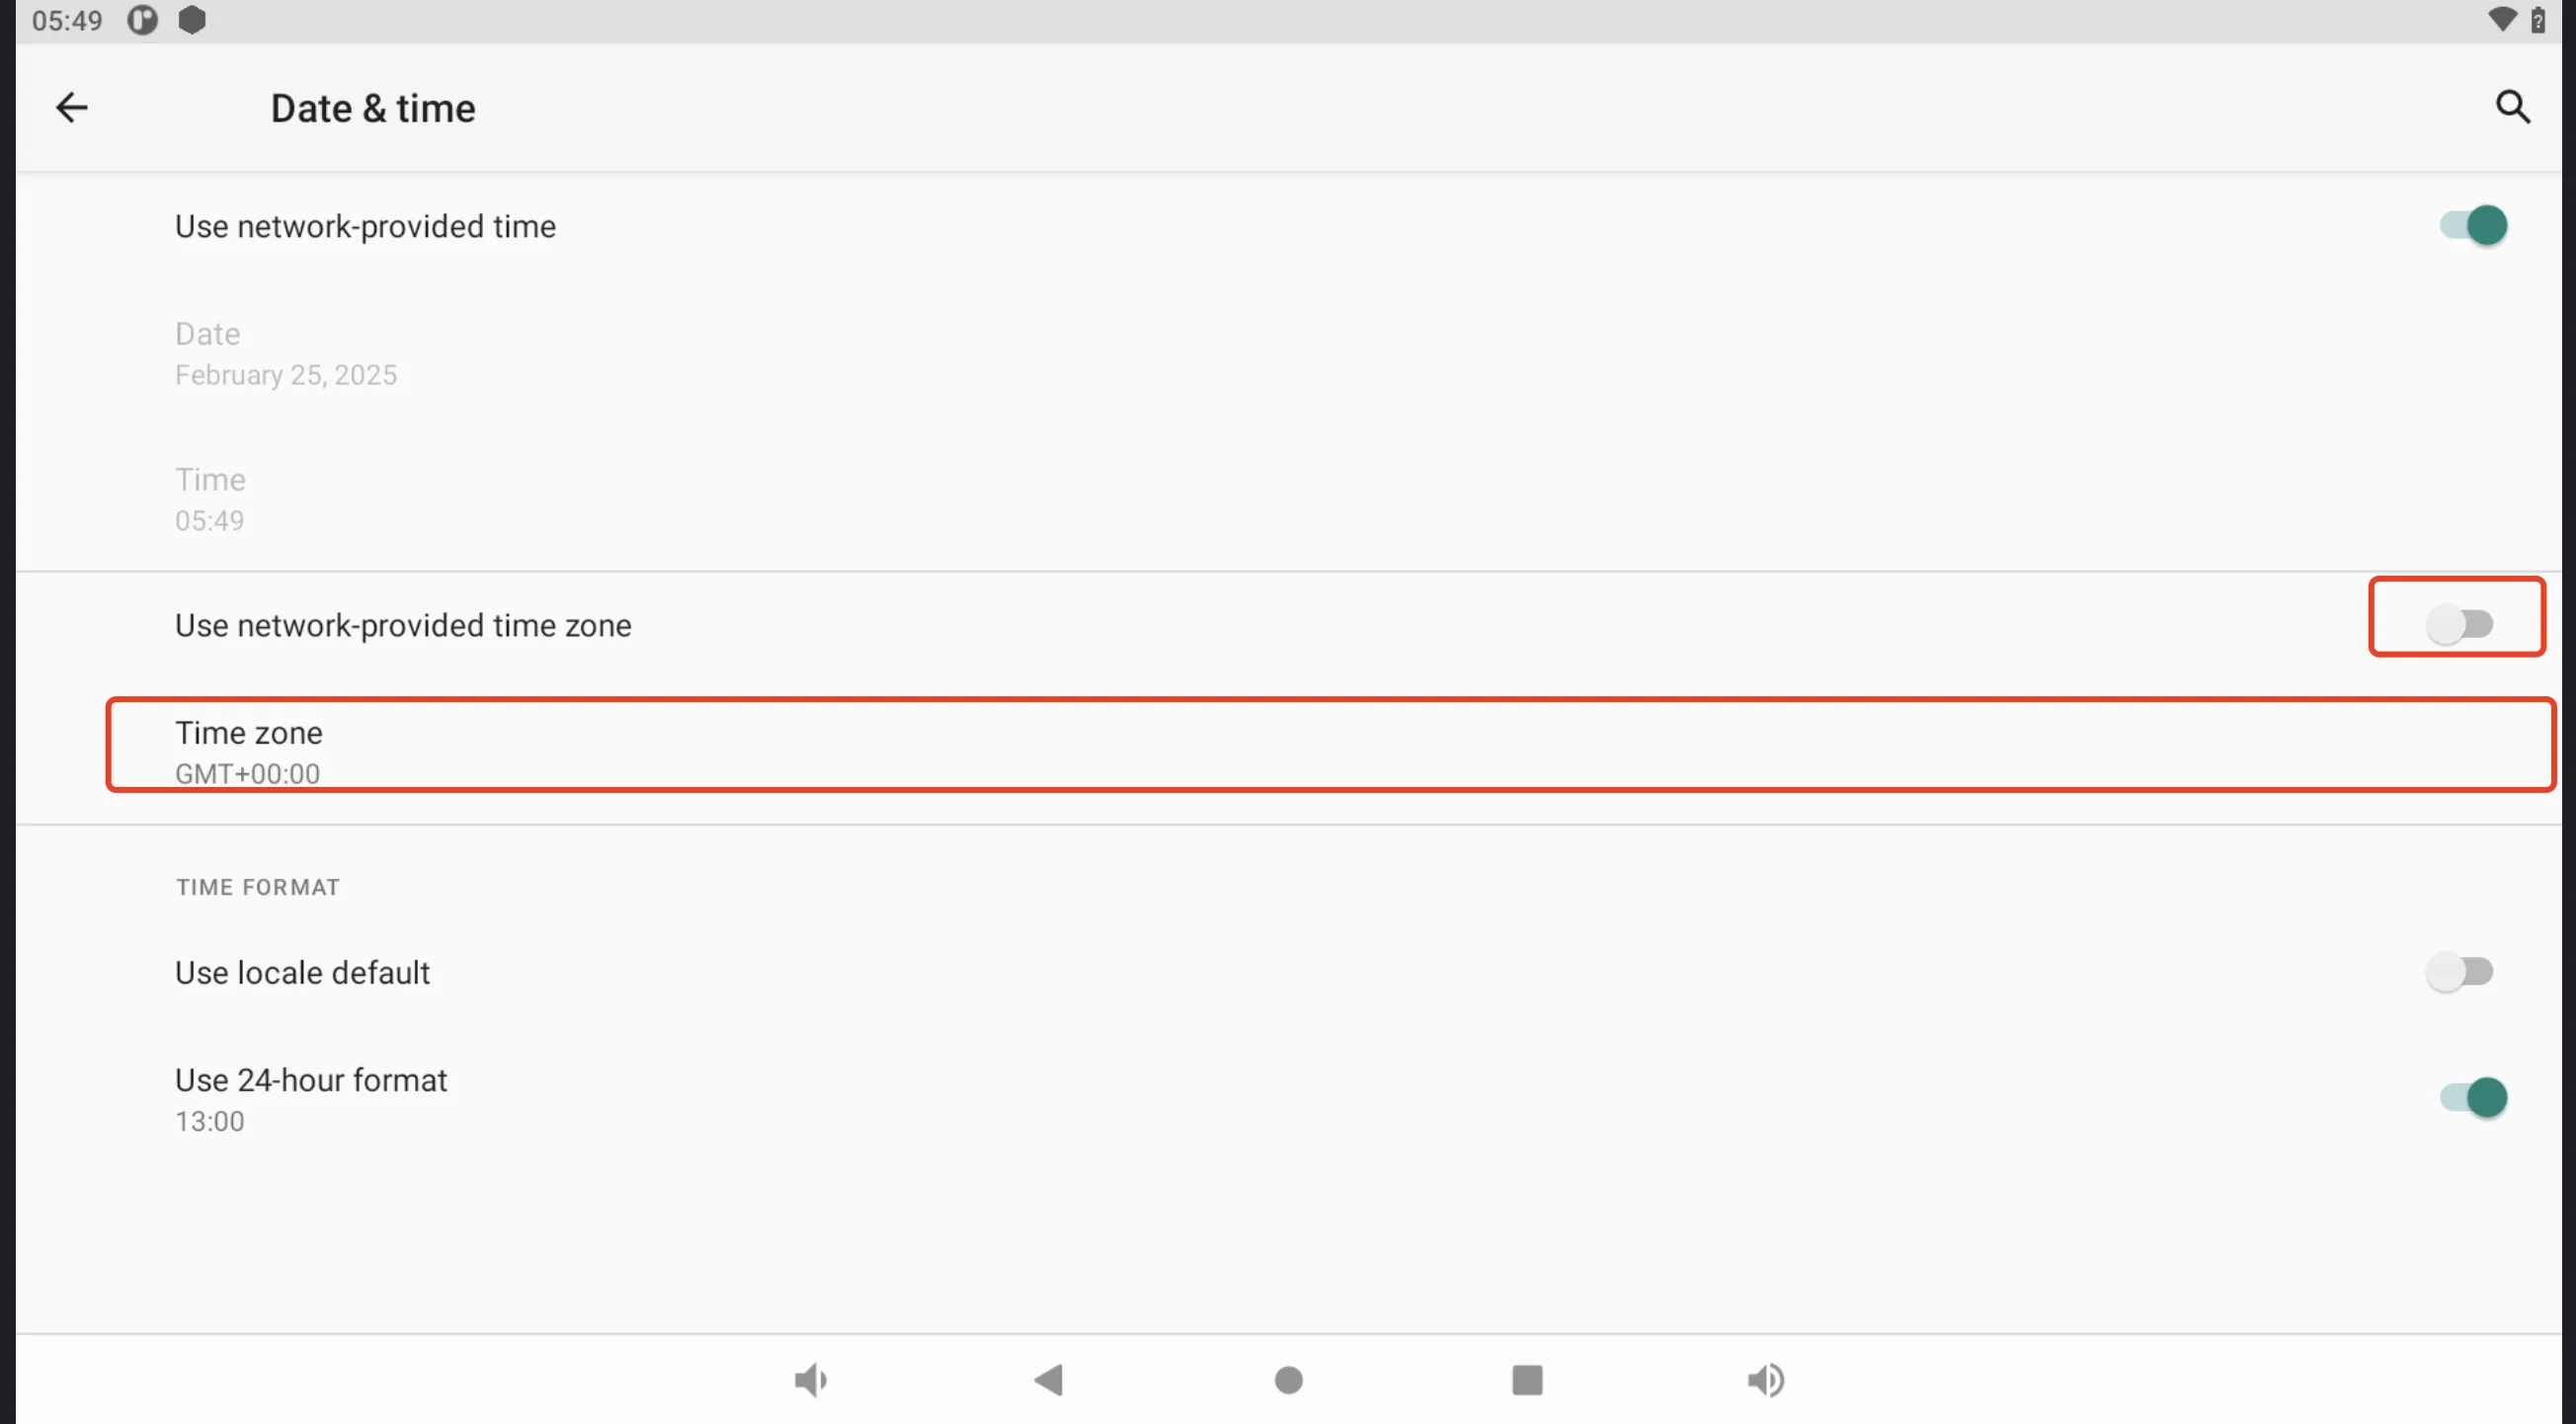
- Check if the time displayed on the device is accurate. If it is not, please calibrate the time by modifying the time zone.
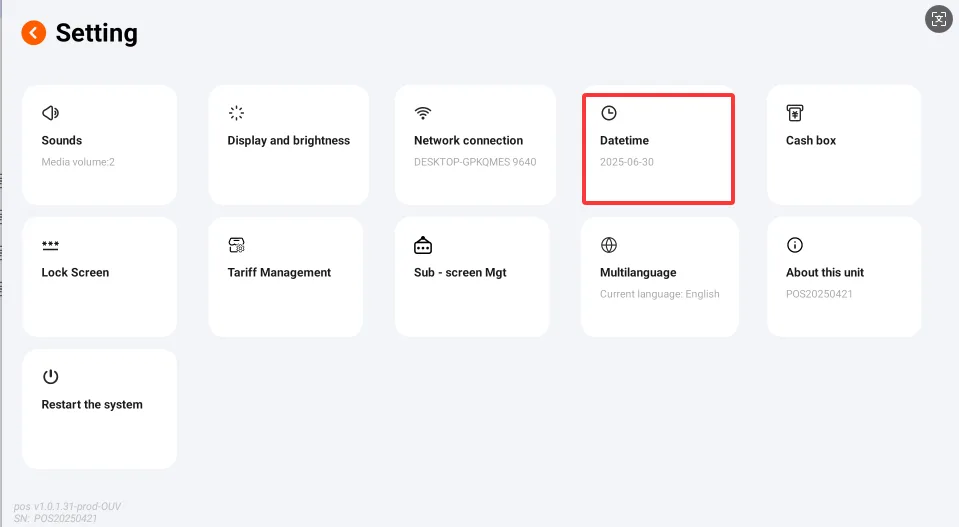
Enter the settings interface:
- Click the "Time" card to enter the time settings.
Use network time zone (applicable when a SIM card is inserted):
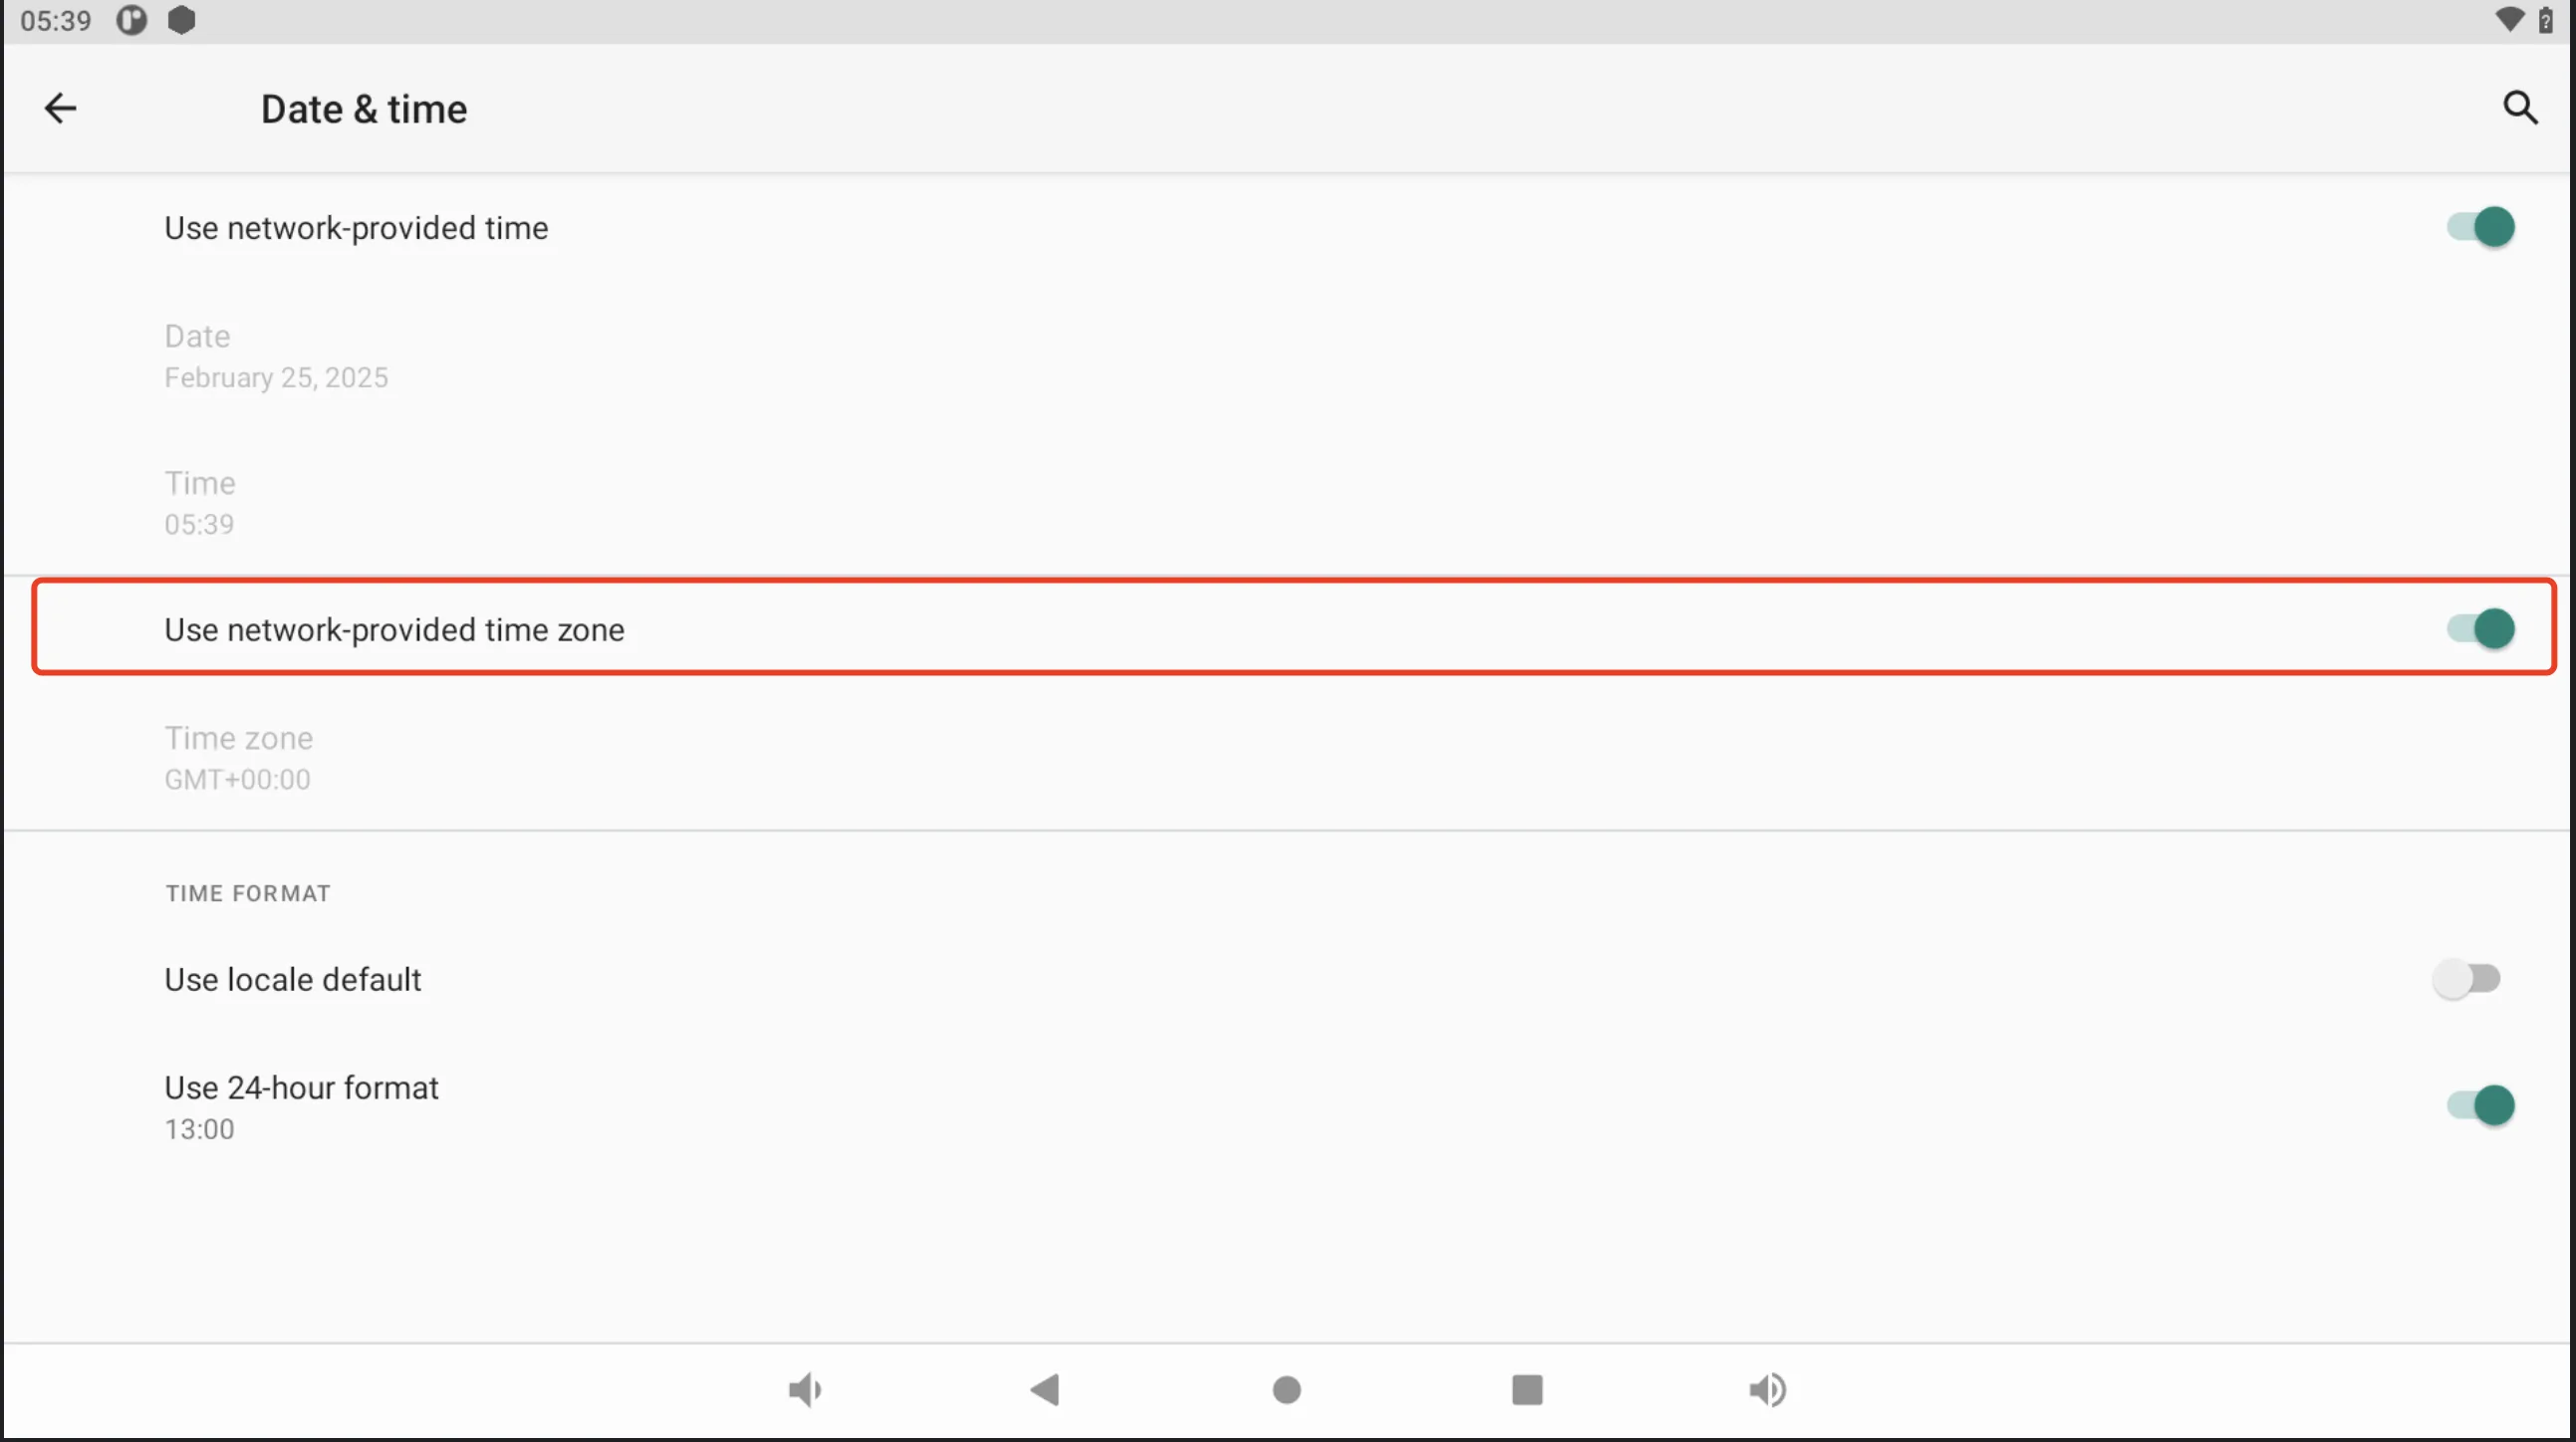
- Turn on the switch for "Use network time zone". If this method fails to set the time correctly, please follow the method for devices without a SIM card below.
Manually set the time zone (applicable when no SIM card is inserted or "Use network time zone" is ineffective):
- Turn off the button for "Use network time".
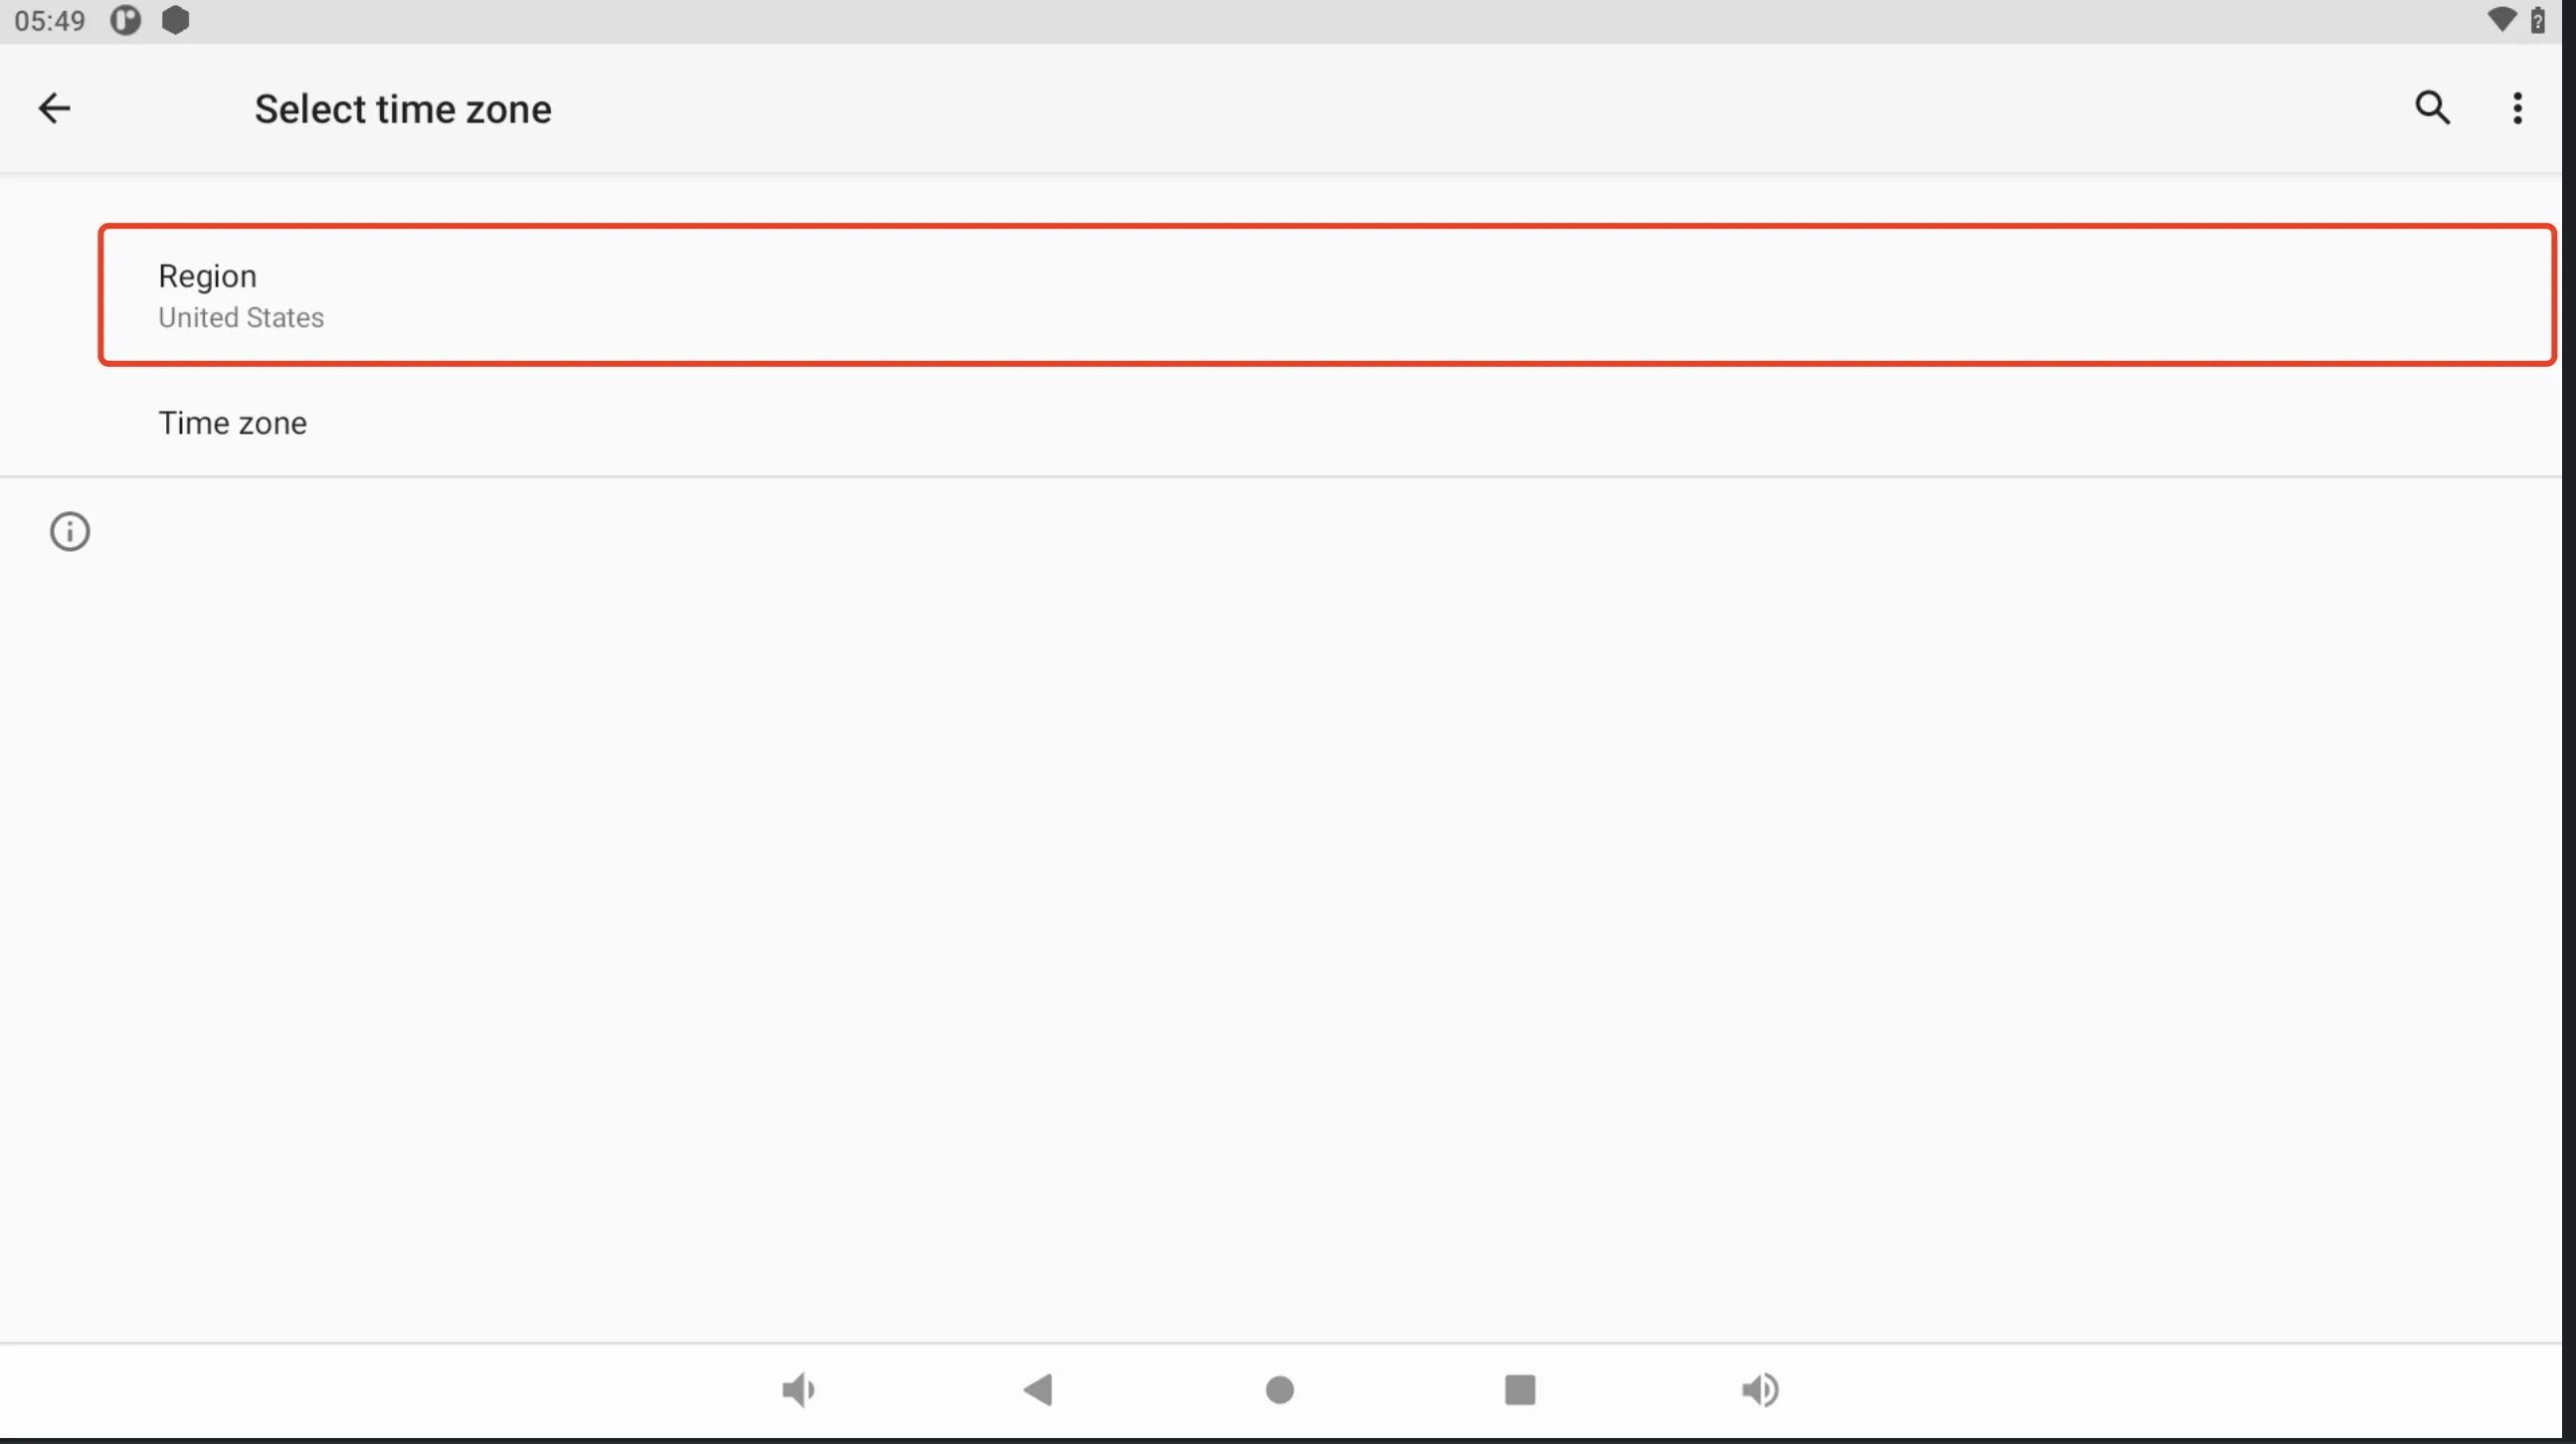
- Click "Time Zone" to enter the time zone selection page.
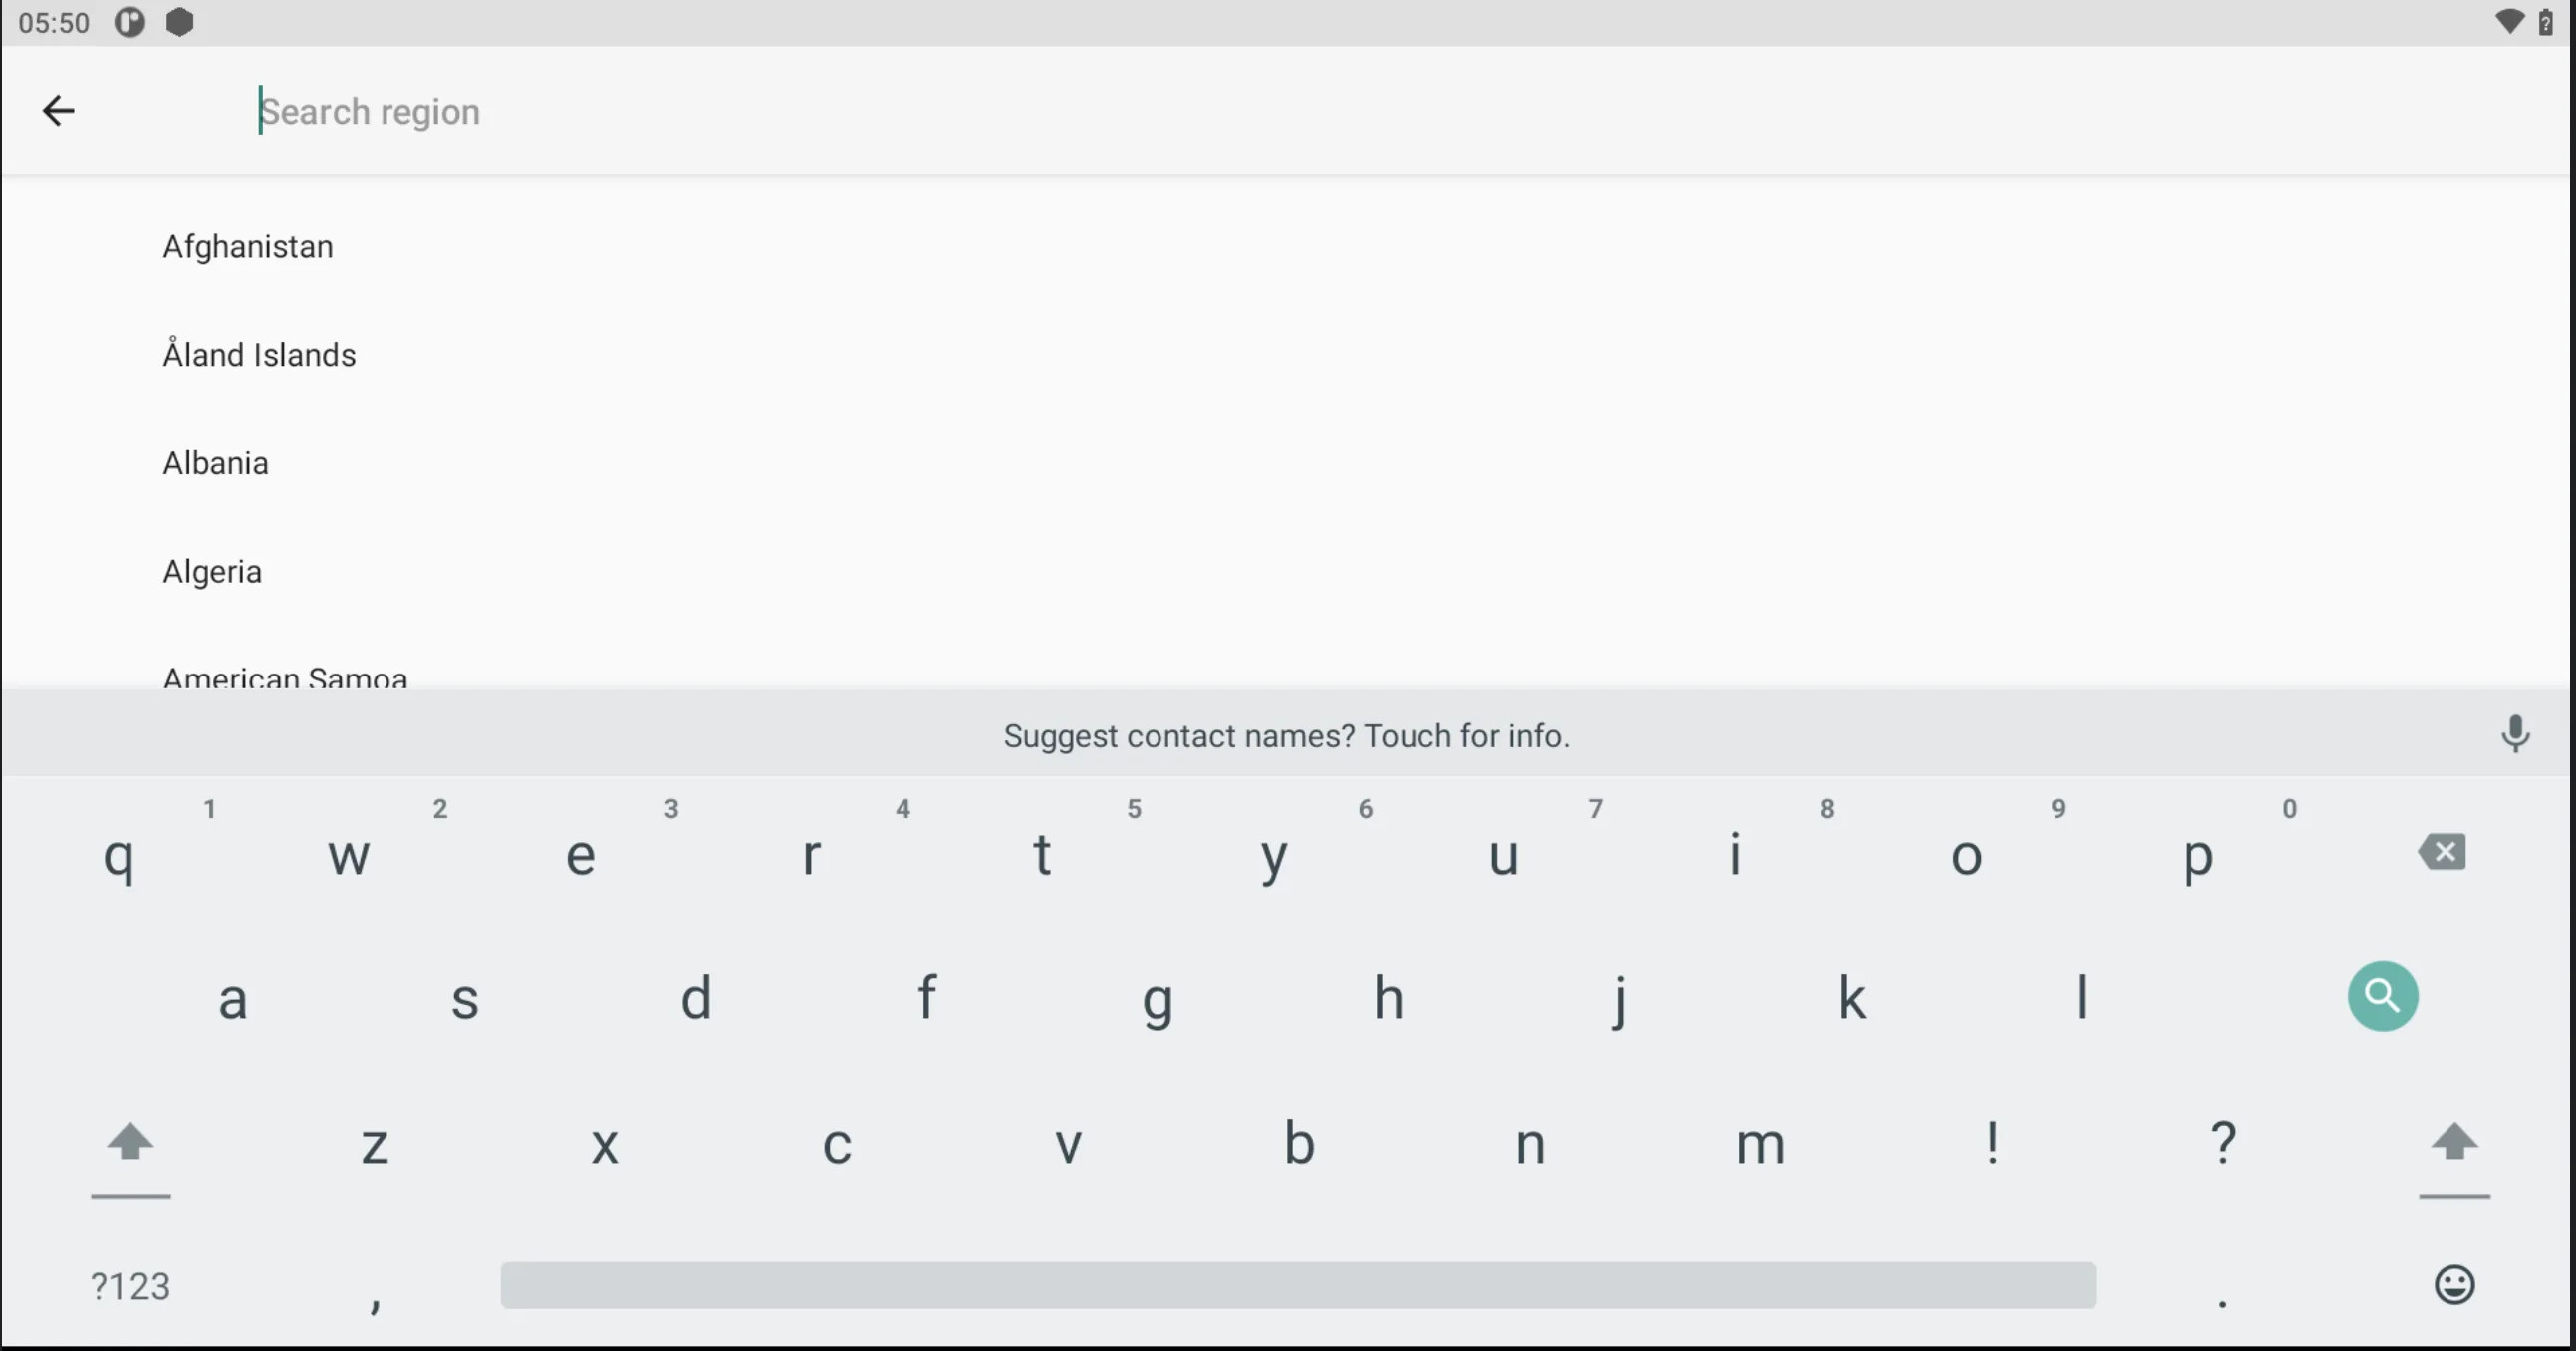
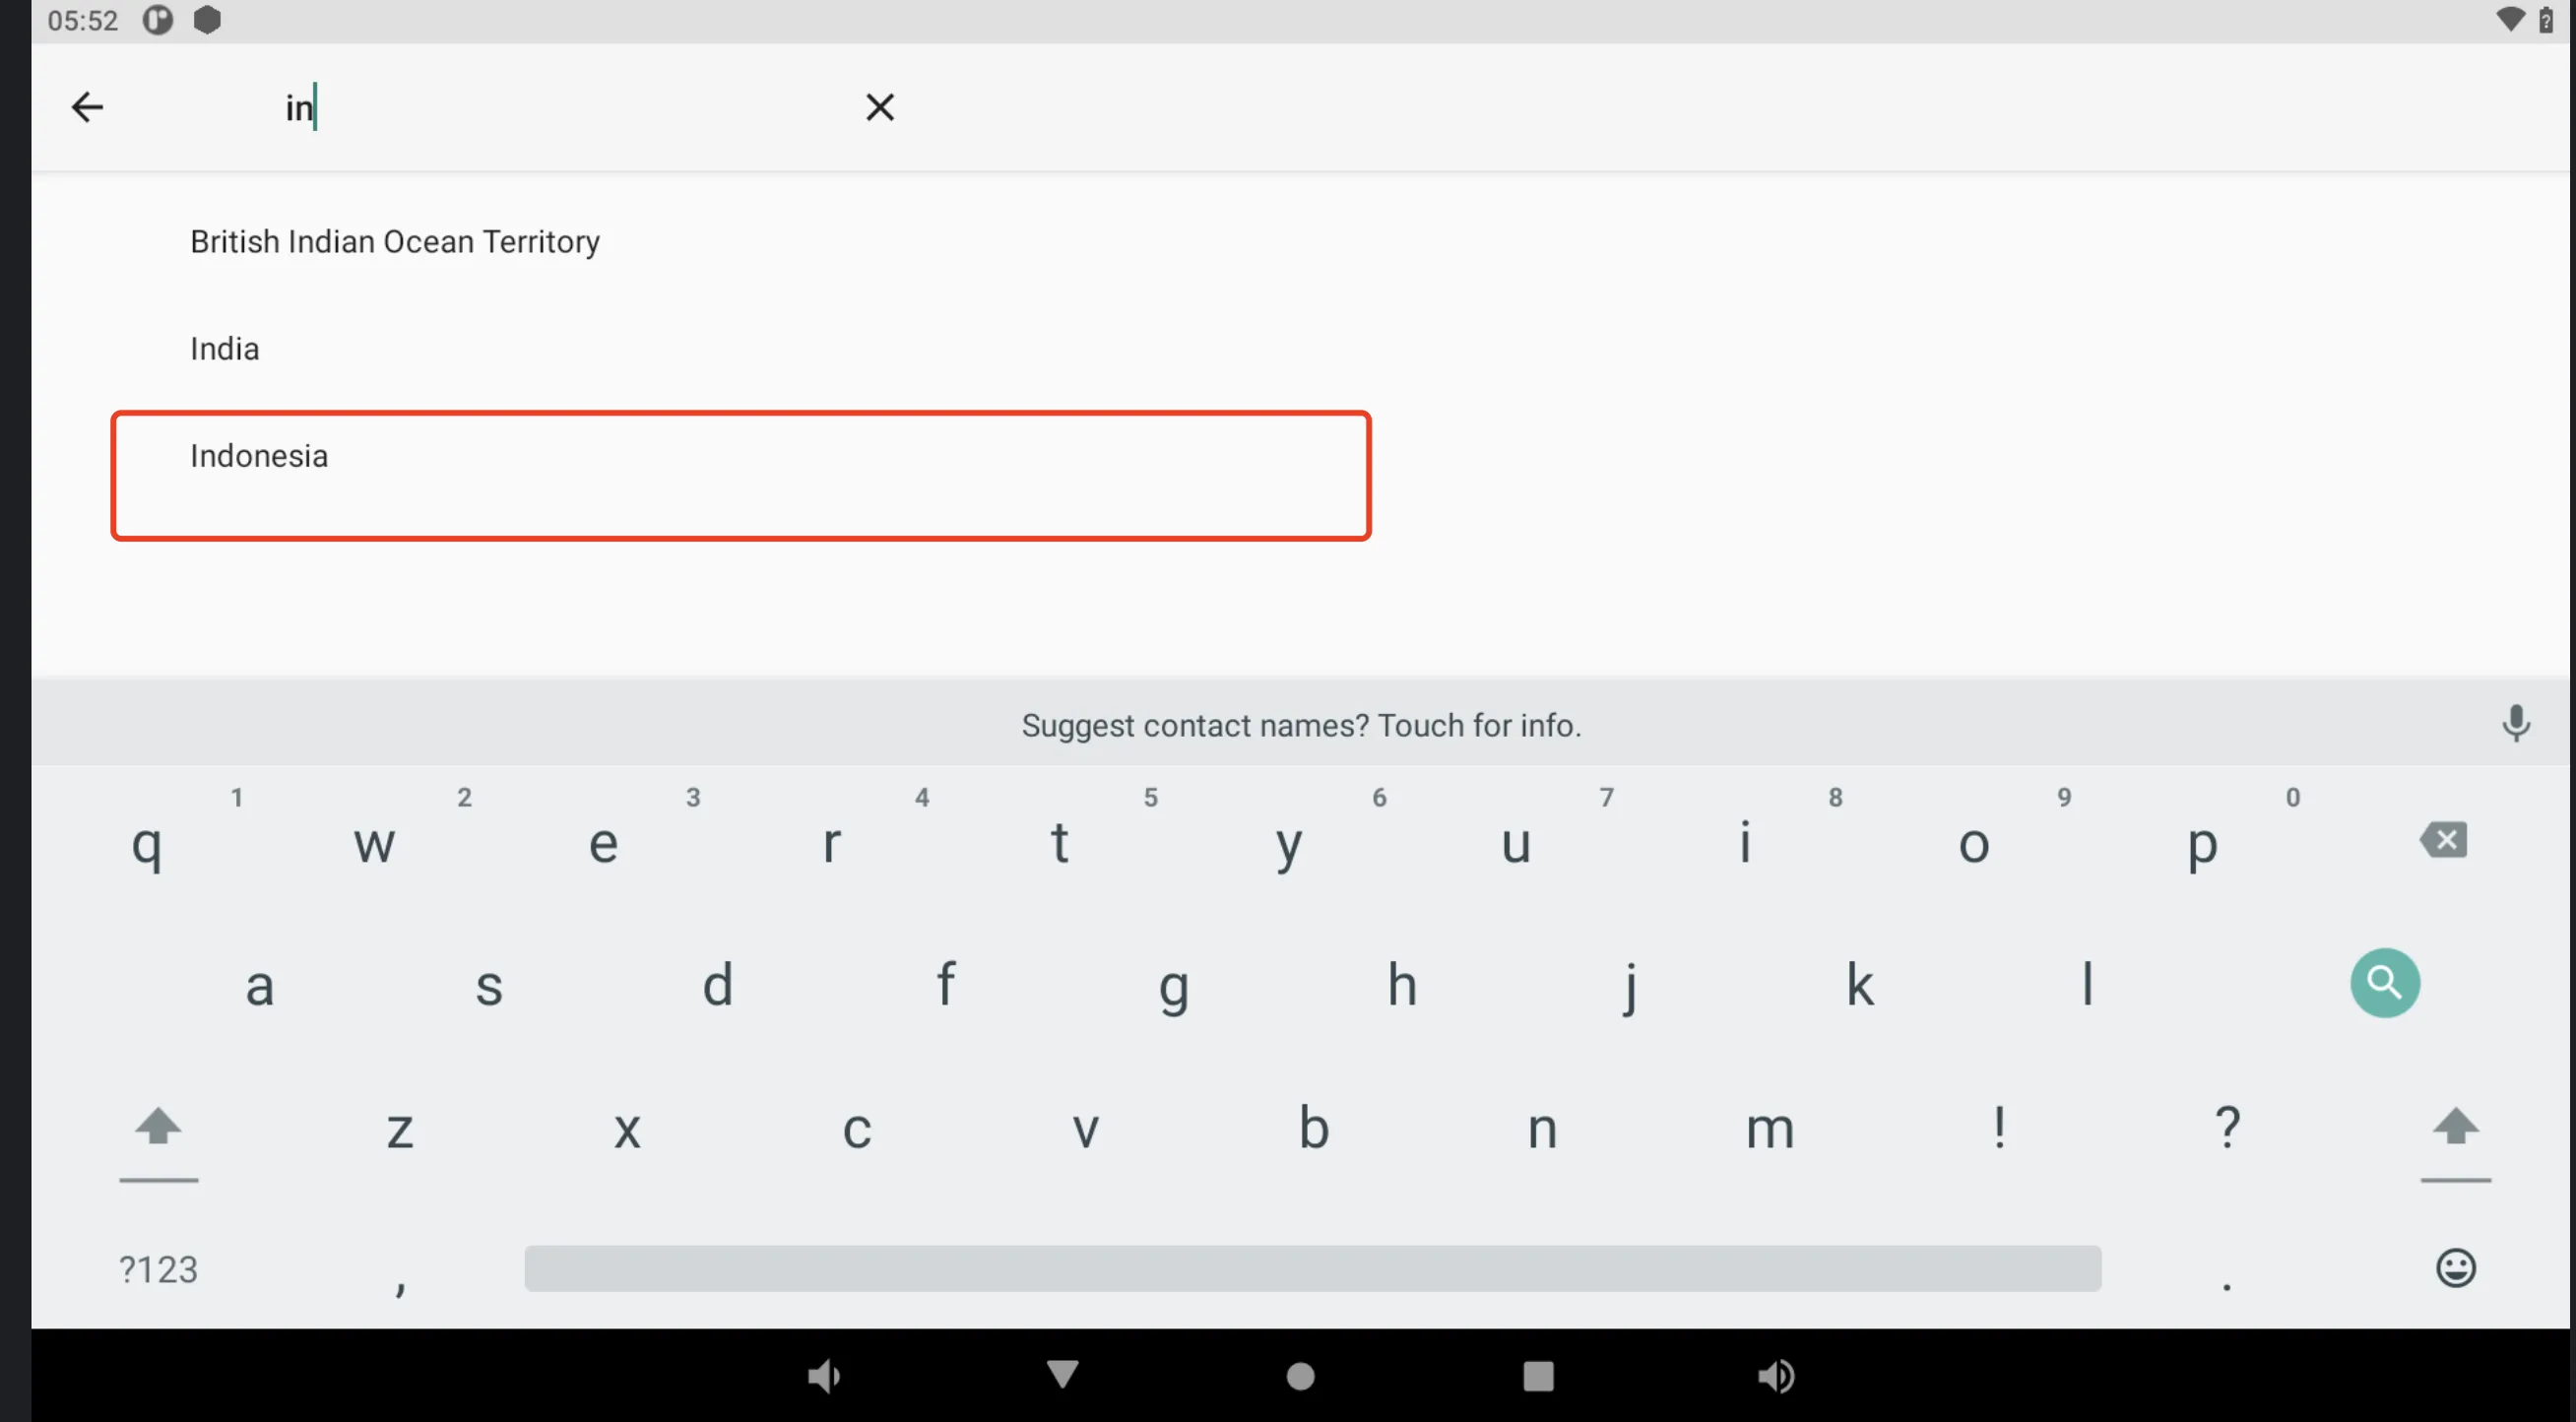
- Select the region where the store is located in the 【Region】 (supports search function).
- Select the time zone corresponding to the region where the store is located.
- Confirm whether the selected content is correct
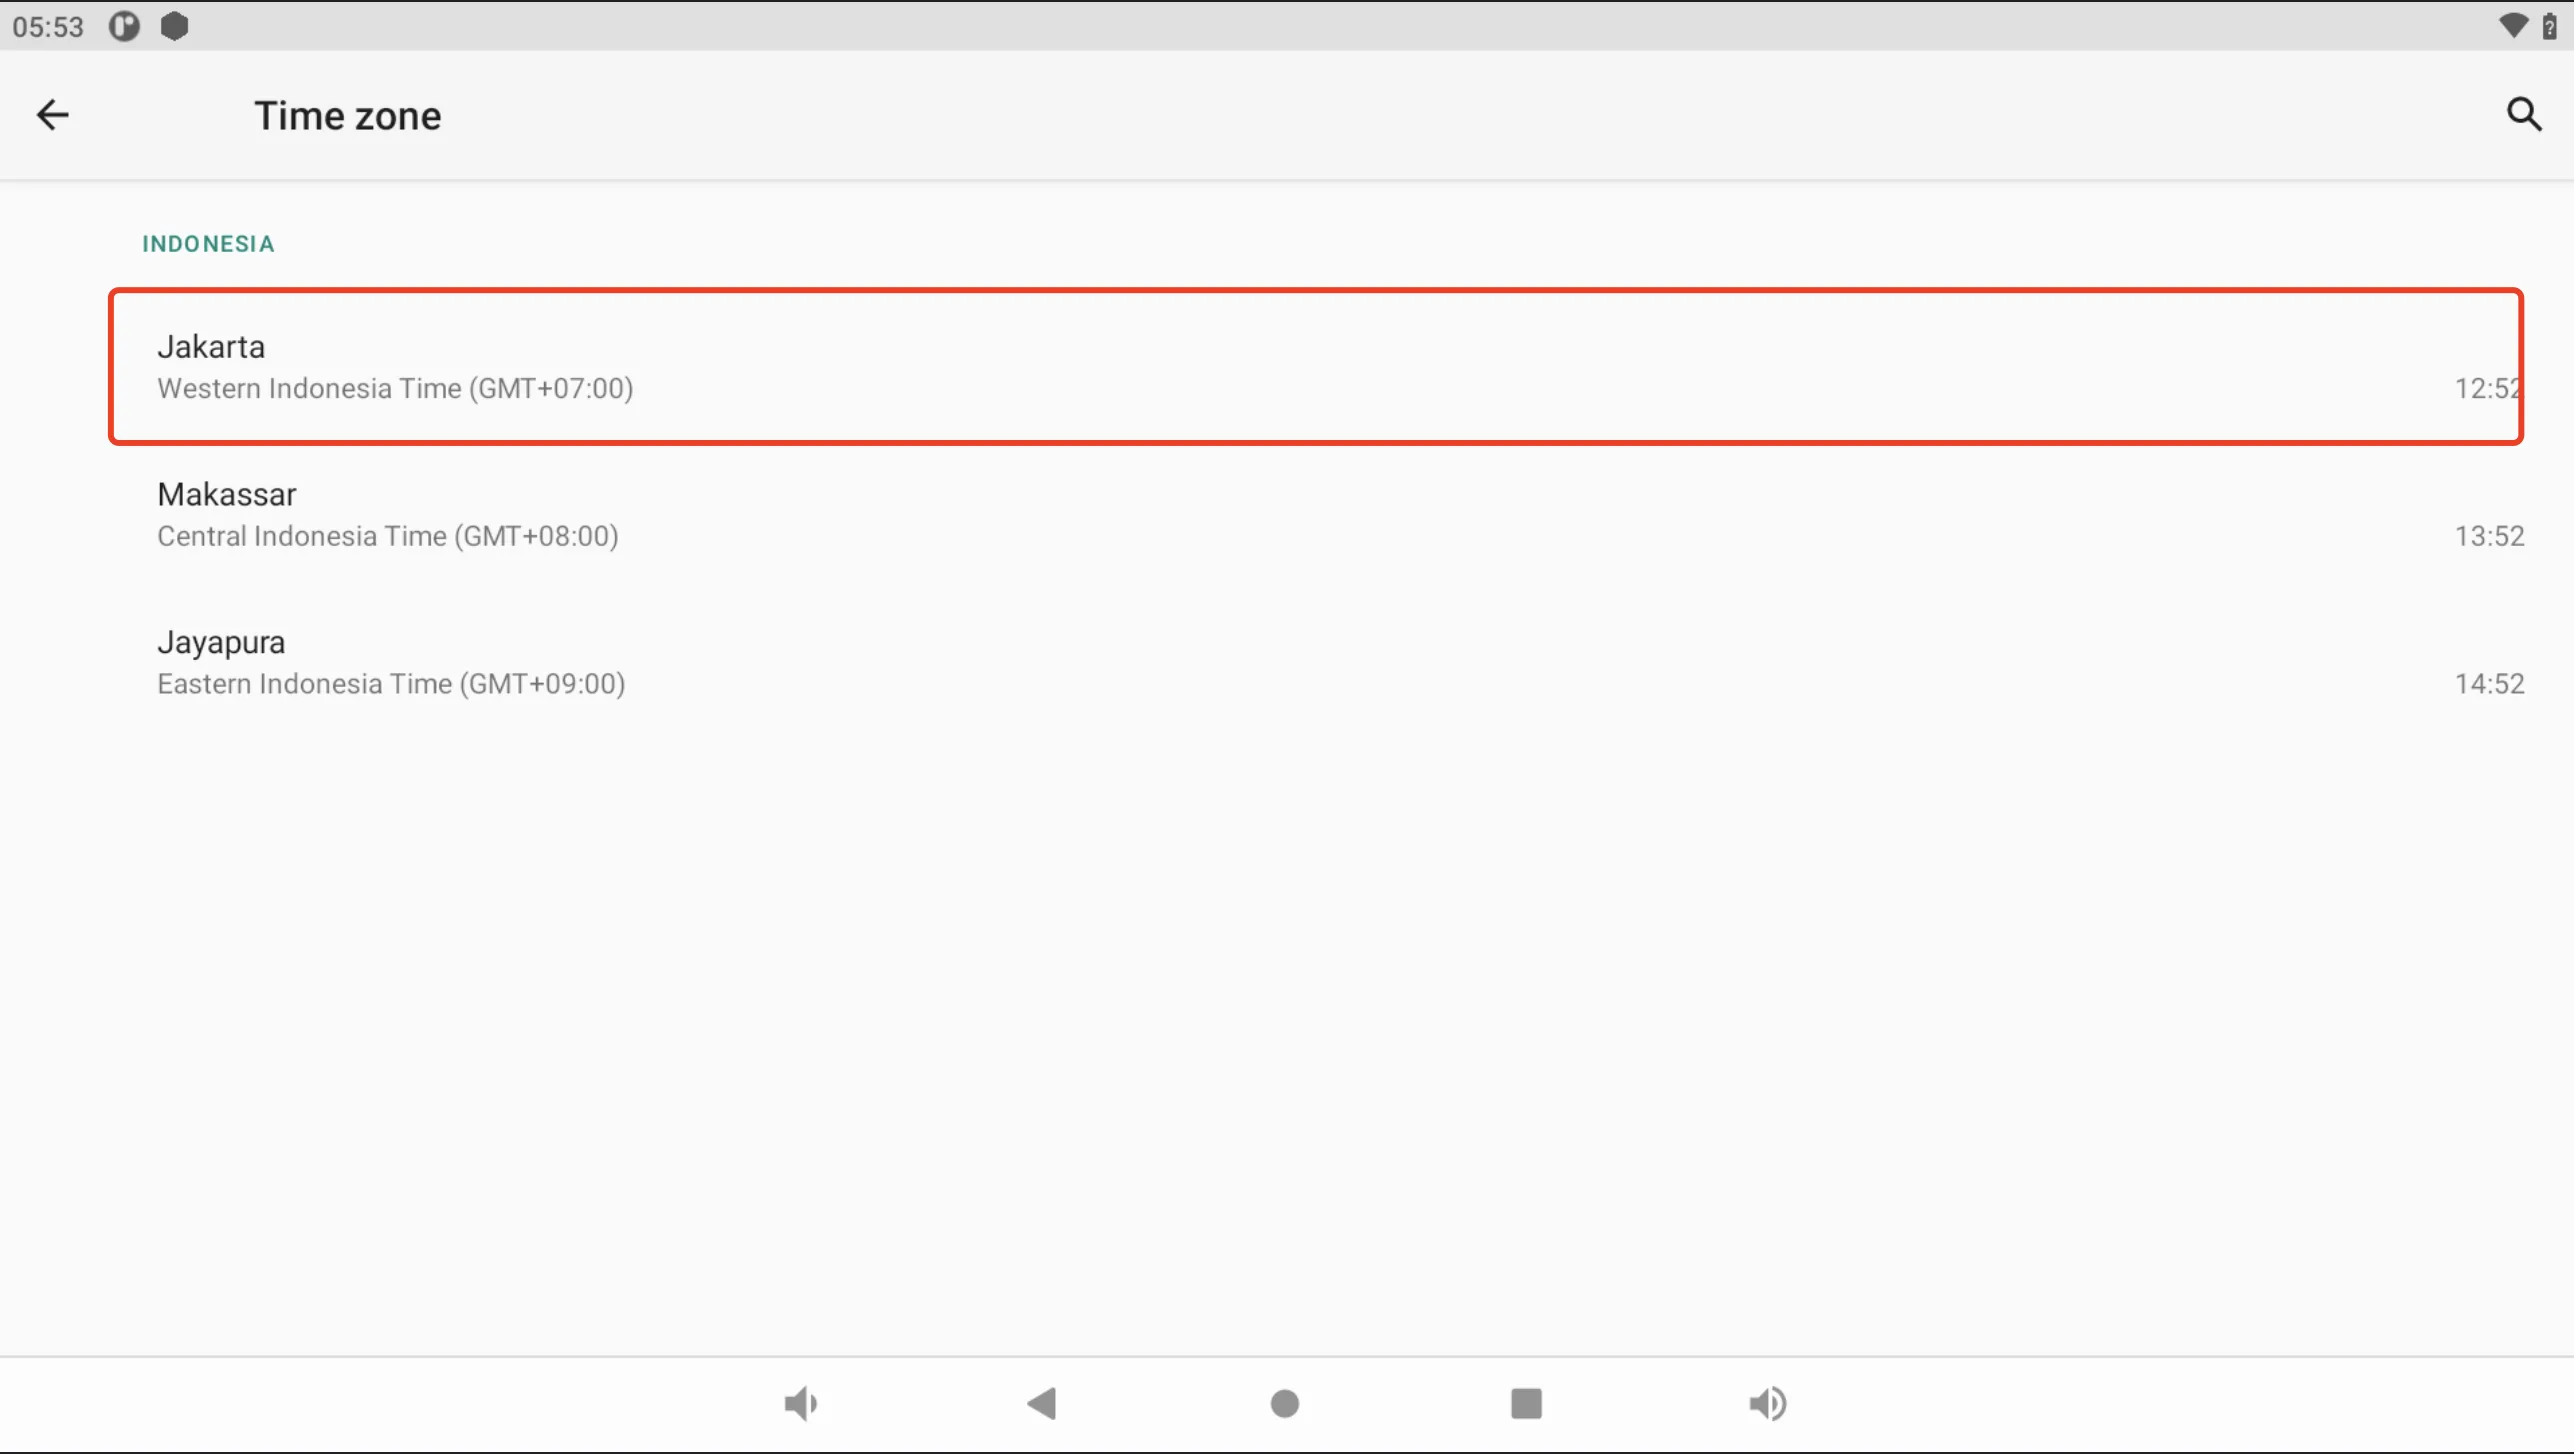
Complete the settings and return to the main interface:
- If all settings are correct, click the back button in the upper left corner to return to the software's home page
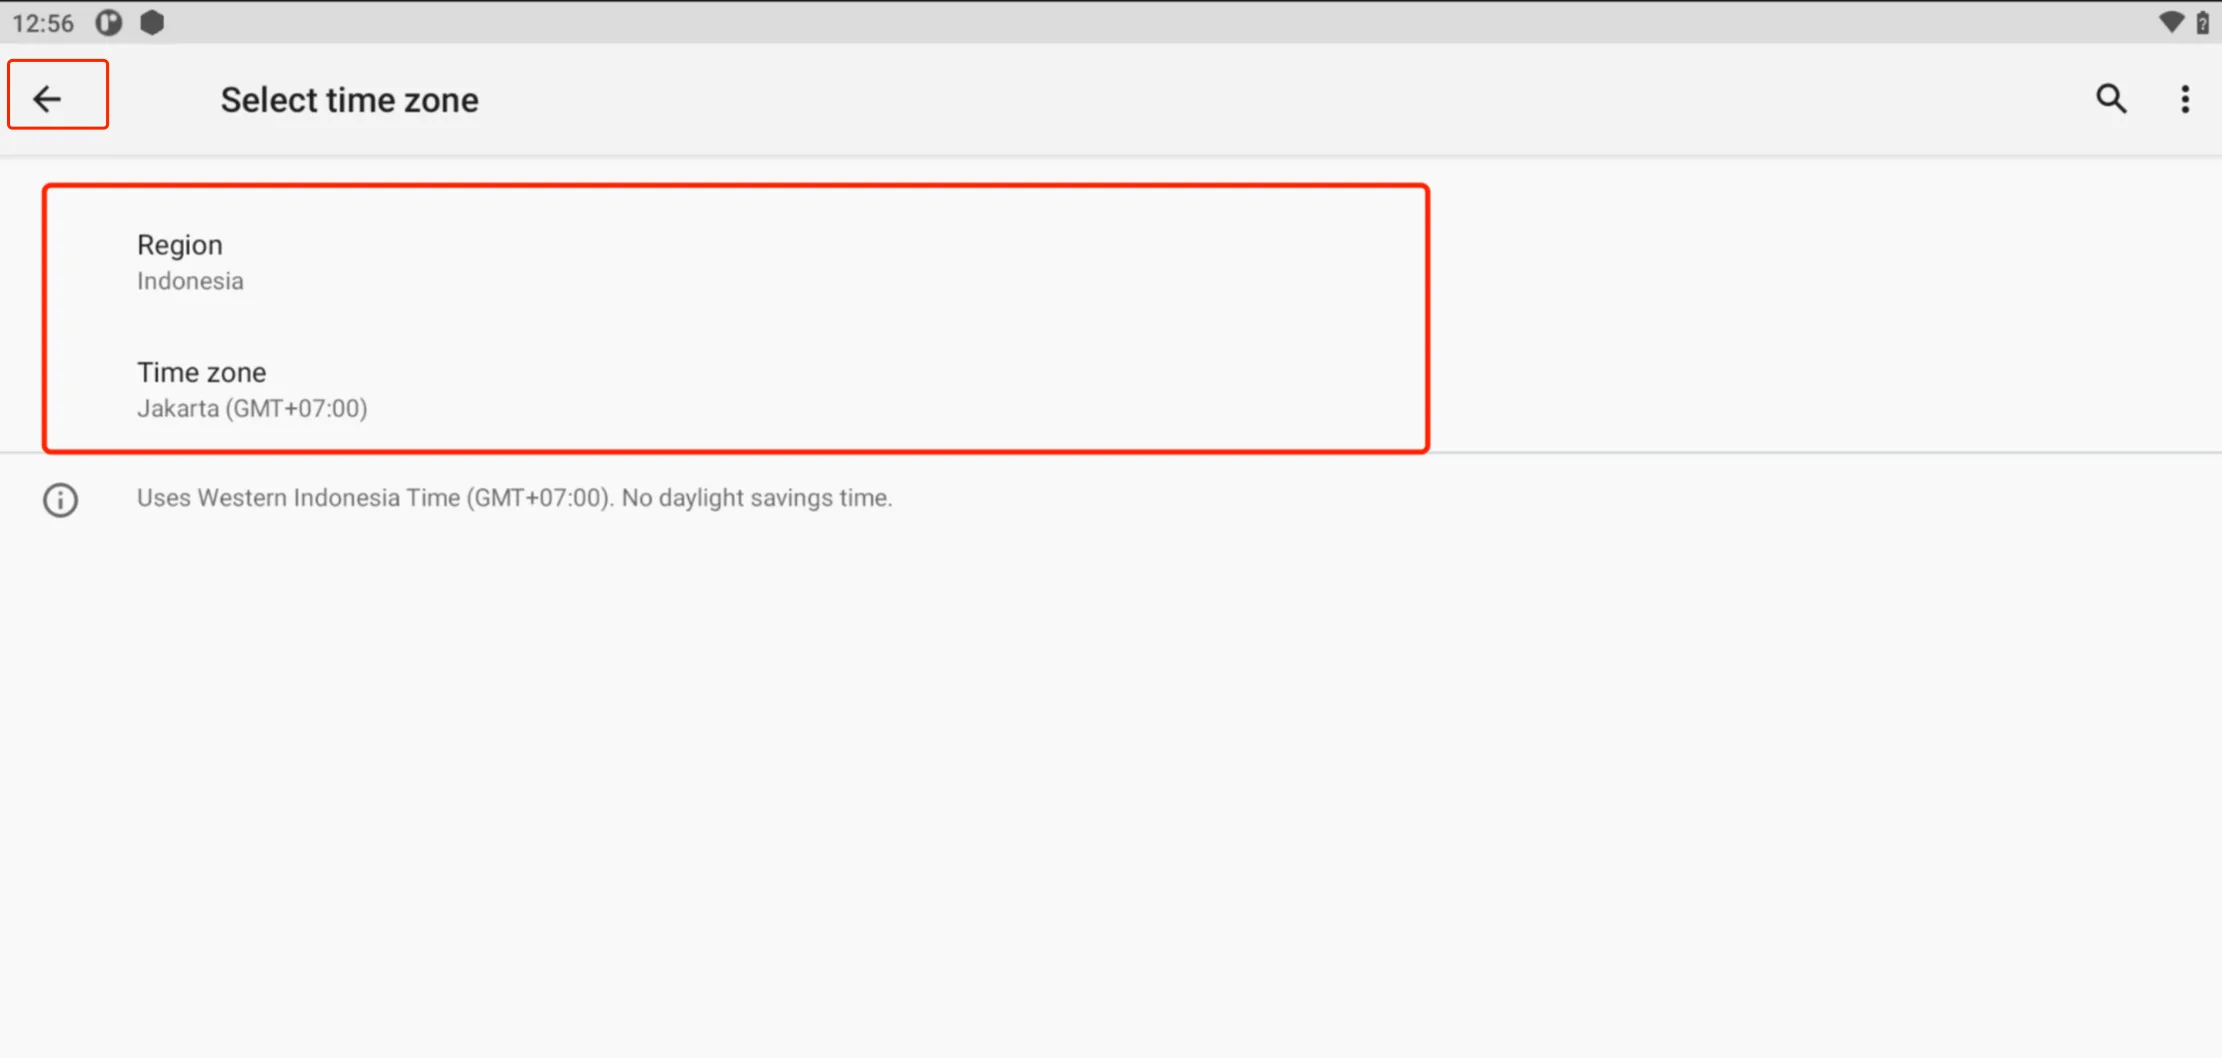
Following the above steps can ensure that the time on your device is consistent with the local actual time, avoiding schedule or other issues caused by inaccurate time.
Printer Configuration
- First, select the "Printer Management" option in the settings interface. Here, all configured printers will be listed. If your device comes with a built-in printer, it will automatically appear in the list, and you only need to click it to start configuration.
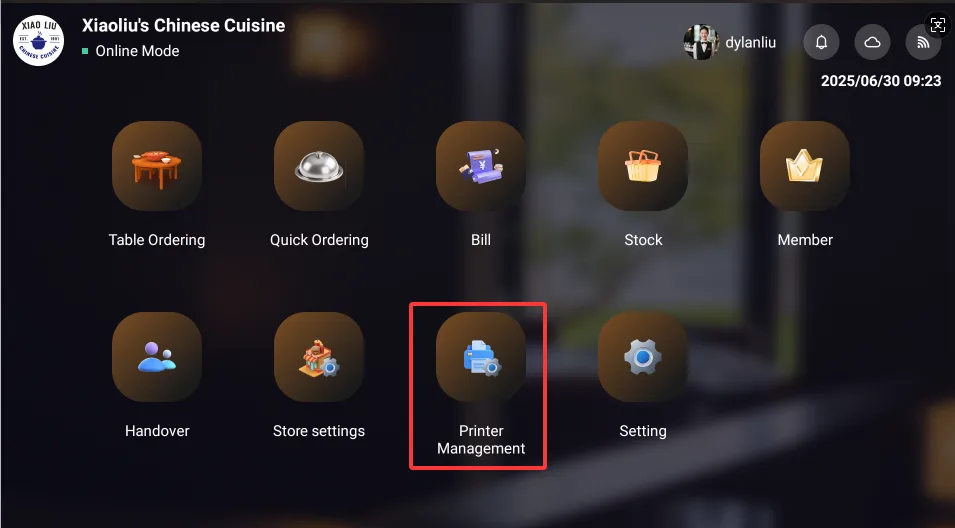
Ordinary Printer
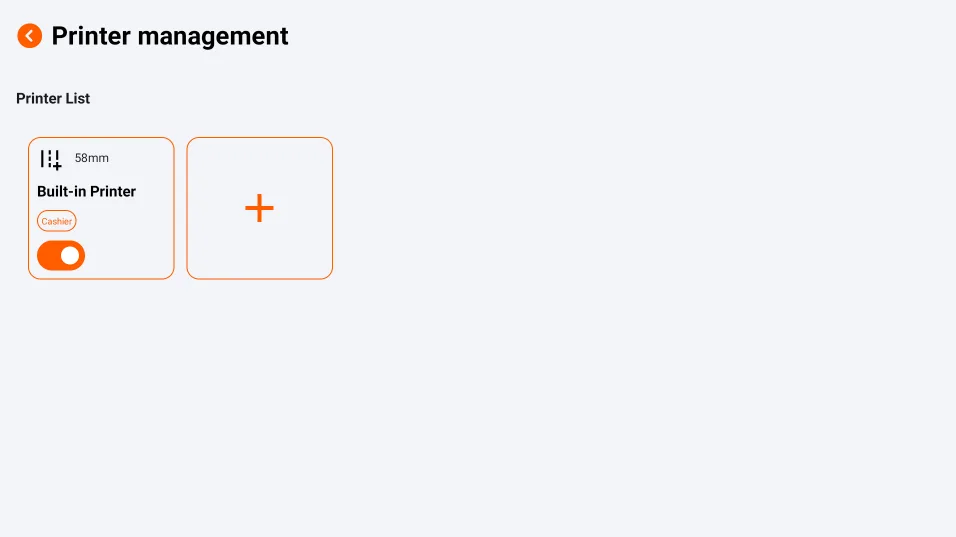
Next, if you want to add a new printer, click the "+" button and select from the provided connection methods:
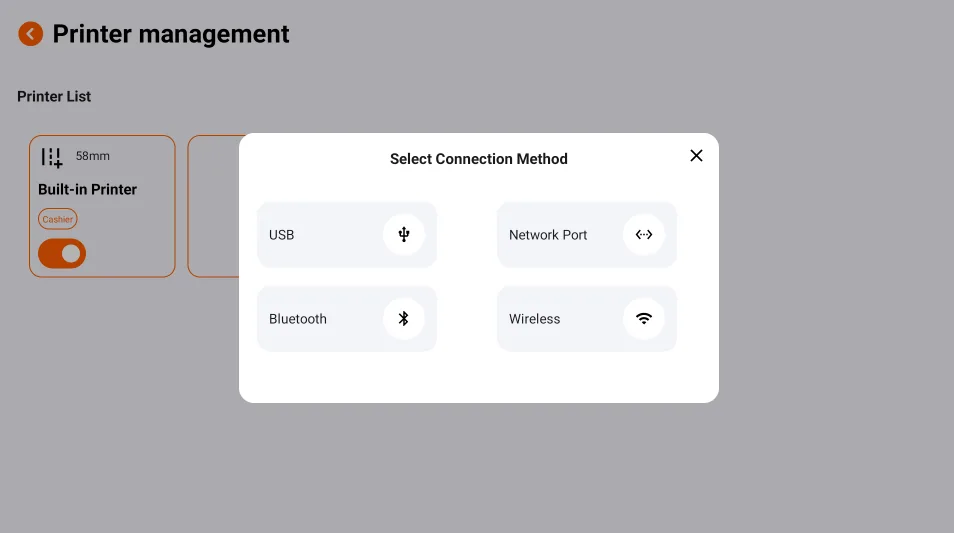
- When using USB connection, ensure that the printer is directly connected to the cash register via a USB cable.
- If you choose to connect via Ethernet, you need to ensure that the printer is connected to the same local area network as the cash register via an Ethernet cable.
- For Bluetooth connection, confirm that the printer's Bluetooth function is enabled.
- If you choose a wireless connection, you need to ensure that the wireless function of the printer is turned on.
After selecting the connection method, you will enter the connection information configuration interface, where you can:
Set a printer name that is easy to recognize.
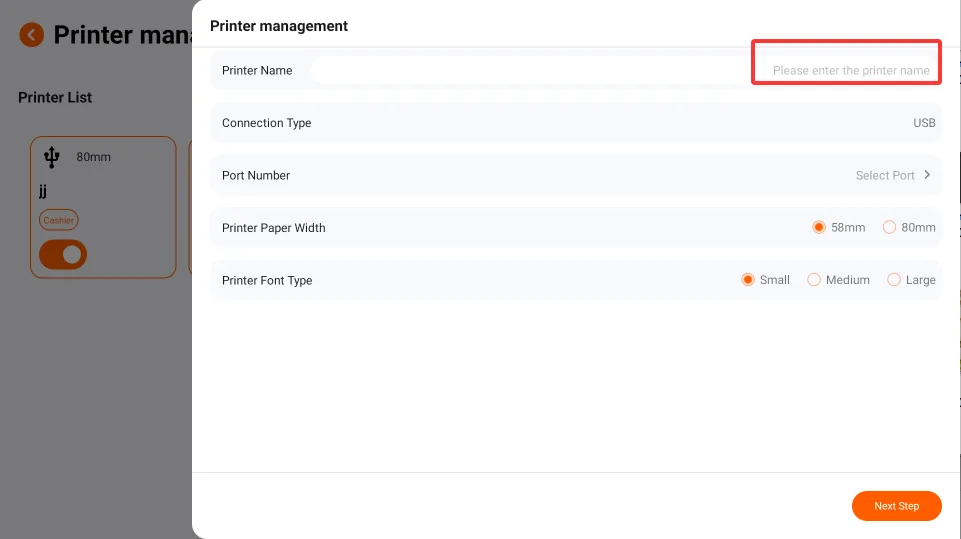
Complete the corresponding connection operations according to different connection methods:
USB Connection: Directly select the corresponding USB device from the list.
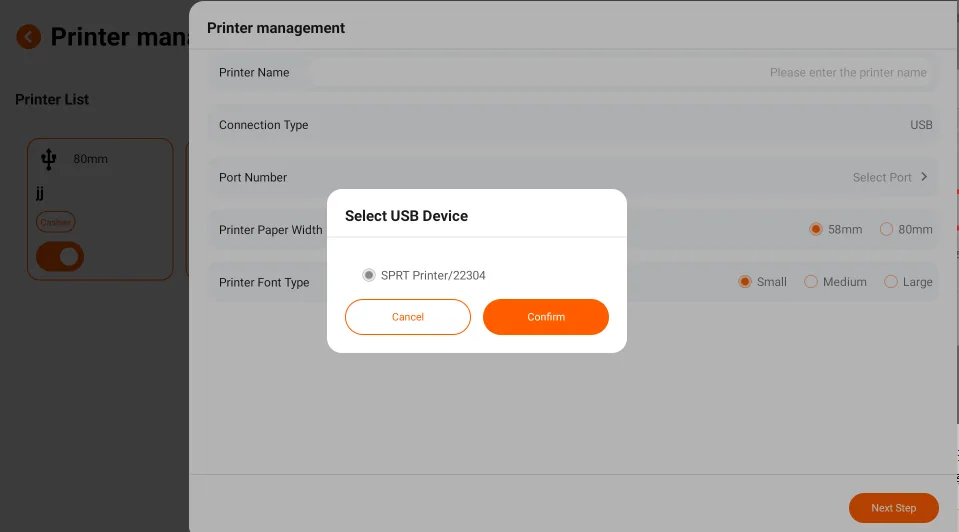
Network or Wireless Connection: Enter the printer's IP Address (some printers will automatically print a self-test page containing this information after connecting to a network cable; if not, you can manually print a self-test strip by holding down the [FEED] button and turning on the power switch).
If the displayed IP Address is not in the same network segment as the current network, or if it is not displayed, try enabling DHCP to automatically obtain it:
- **DHCP Enabled:**Connect the device to the router via Ethernet cable, open the paper tray cover, insert printing paper, press and hold the 【FEED】 button while powering on the device, wait for the red light to finish flashing, then press the 【FEED】 button 3 times in succession, and finally close the paper tray cover. The printer will print out a prompt message;
- **Obtain the fixed IP of the current network segment:**After enabling the DHCP function, open the paper tray cover while the device is powered on, press the 【FEED】 button once, then close the cover. After successful acquisition, a prompt message will be printed.
The above operating methods apply to some printers. For details, please refer to the official user manual of the printer.
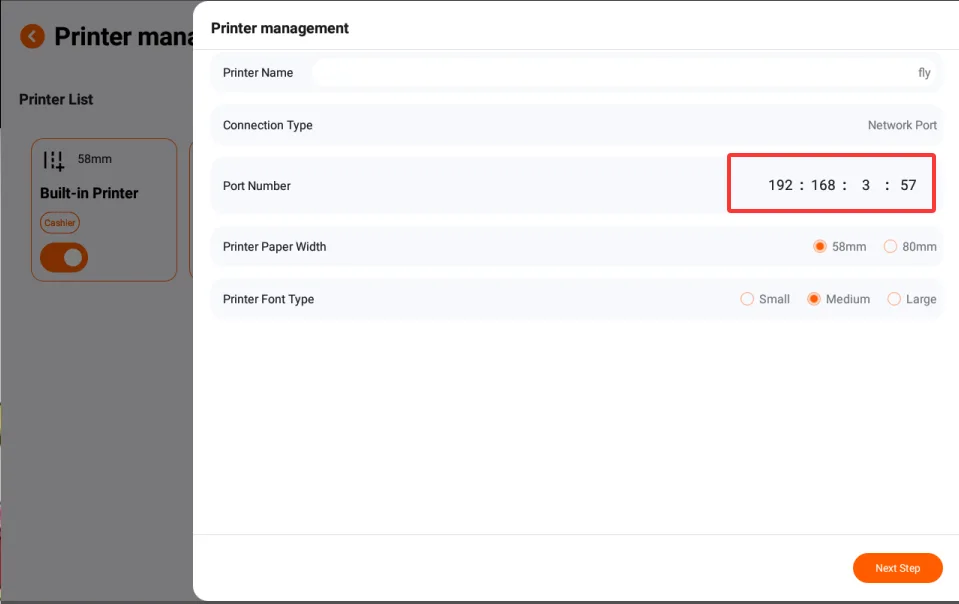
Bluetooth connection: Select the printer from the list of available devices, and you may need to enter the default configuration code (such as 0000, 1234). Please refer to the user manual for details.
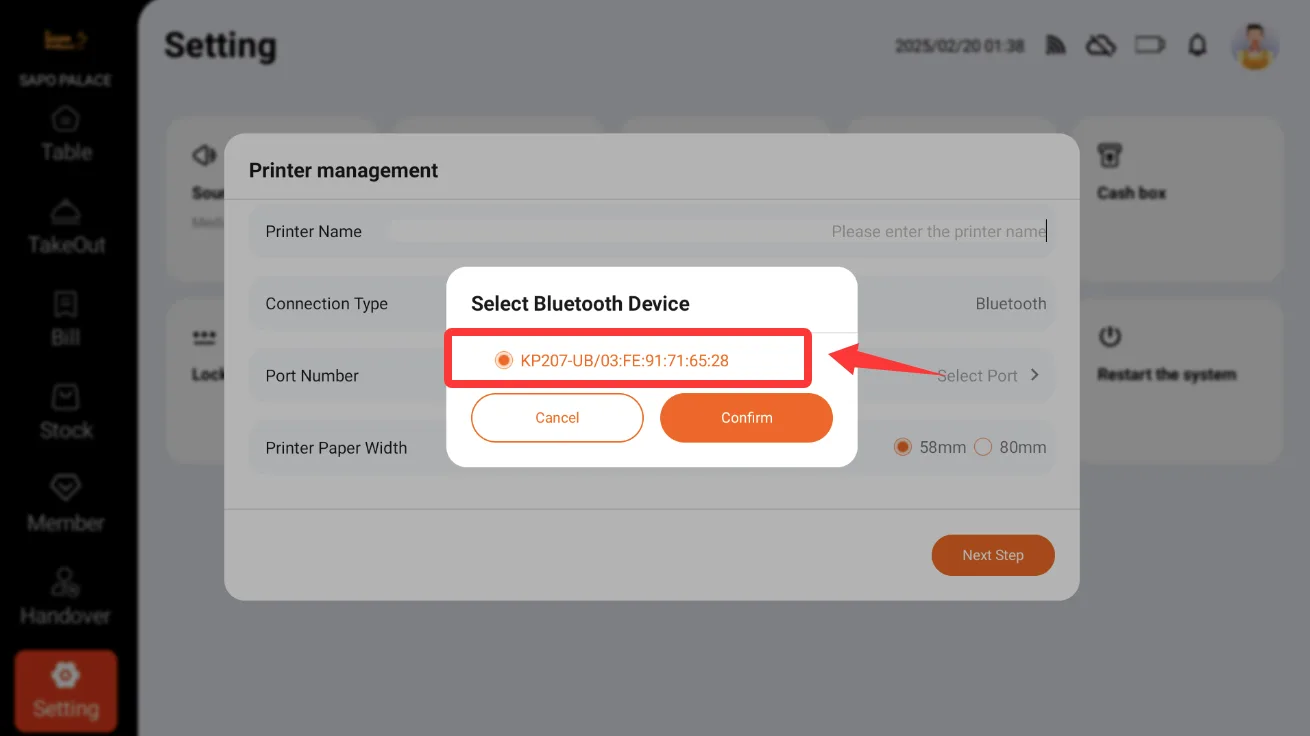
Finally, select the appropriate width of printing paper according to actual needs,
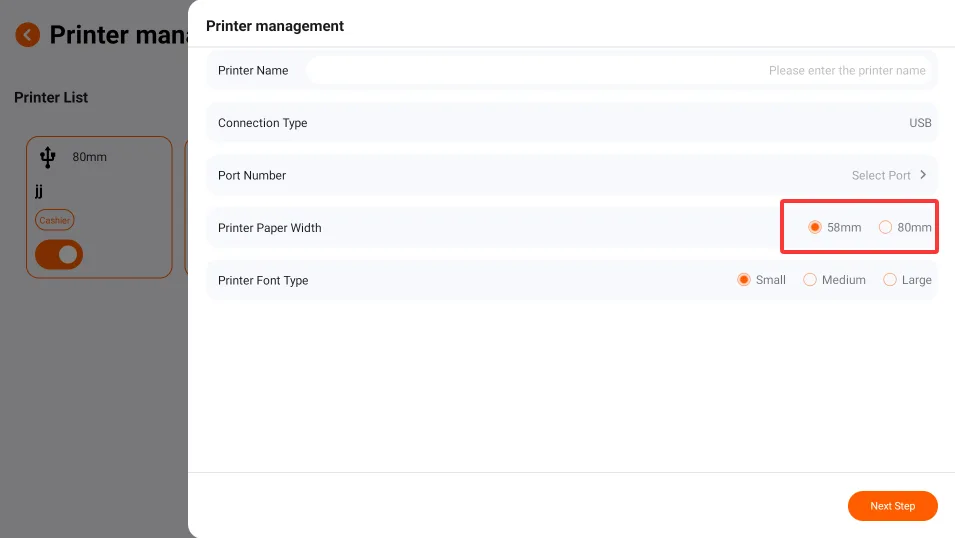
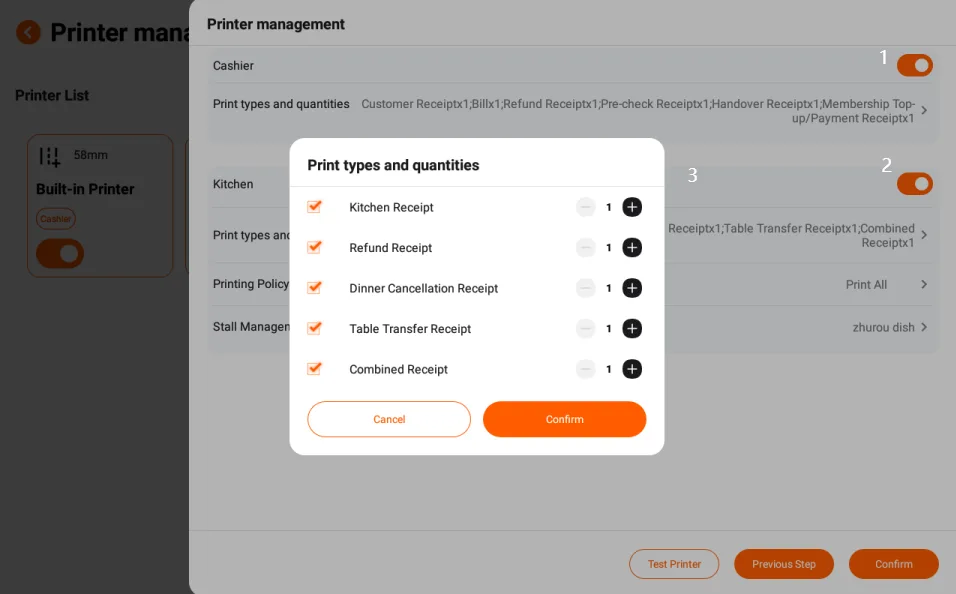
Then click Next to enter the printer content page. Here, check the desired printer content, set the print quantity, and then click [Finish] to complete the configuration process.
When selecting a stall, a stall selection list has been added on the last page of the printer.
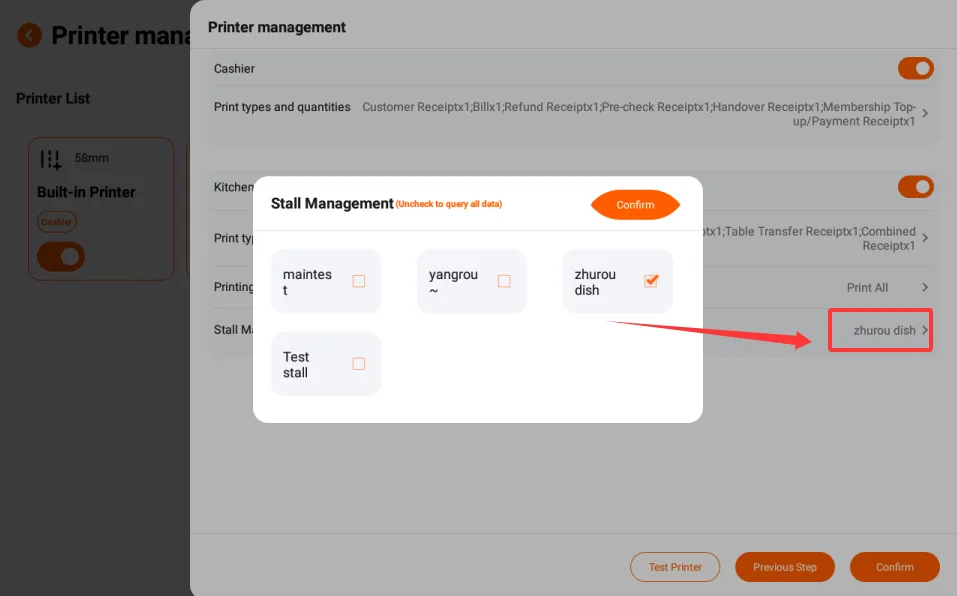
The stall has been successfully checked. The POS kitchen printer will only print the dishes associated with this stall.
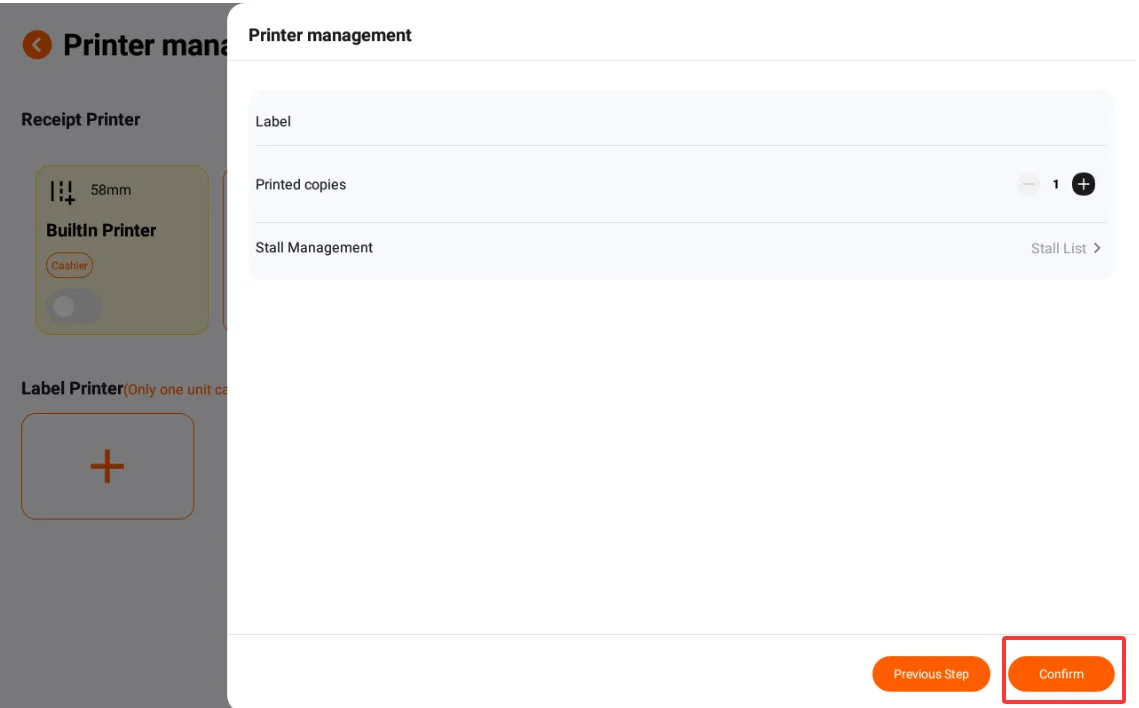
Label Printer
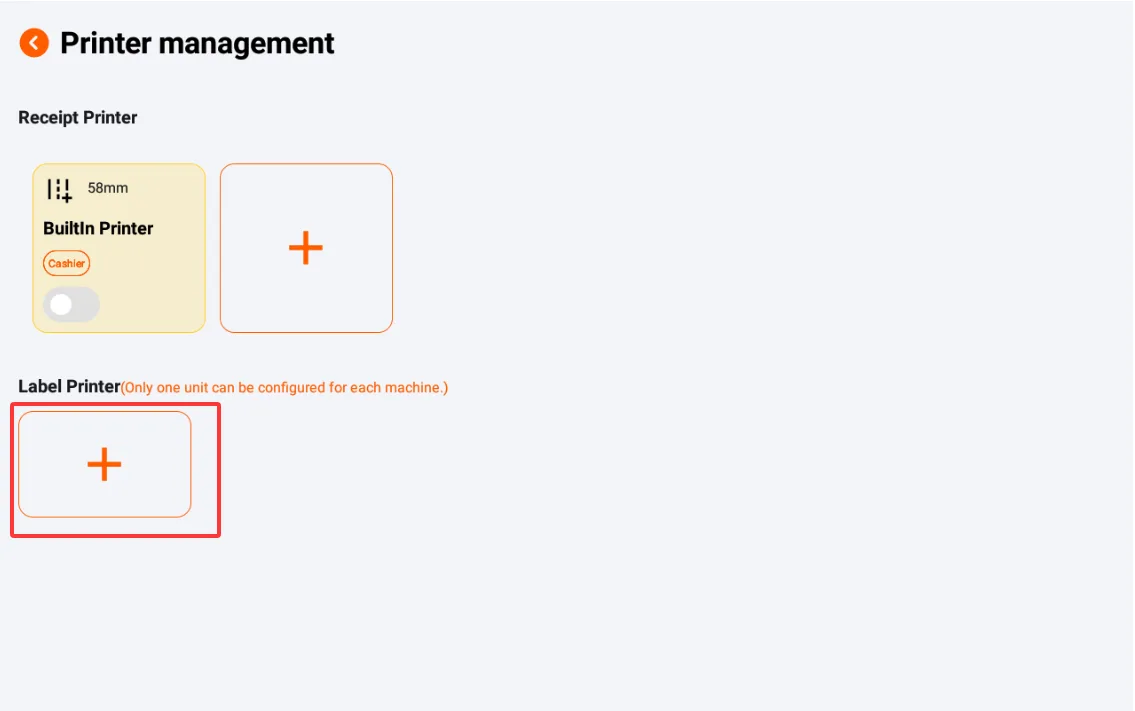
Click the "+" on the label printer
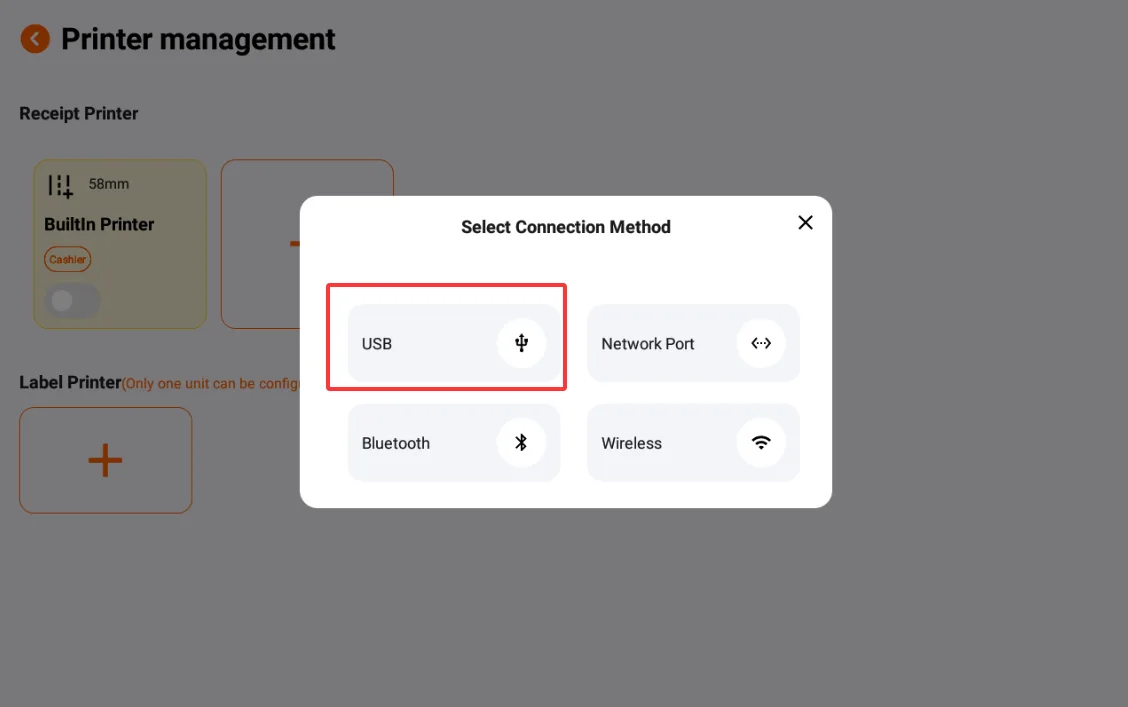
Select USB
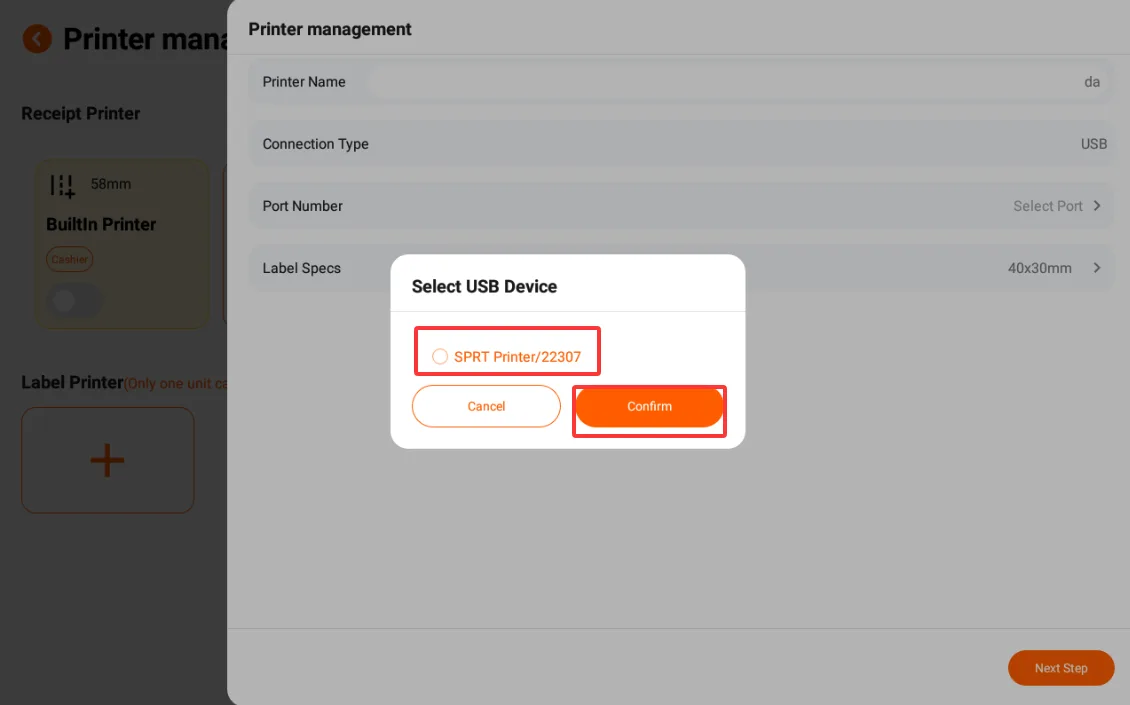
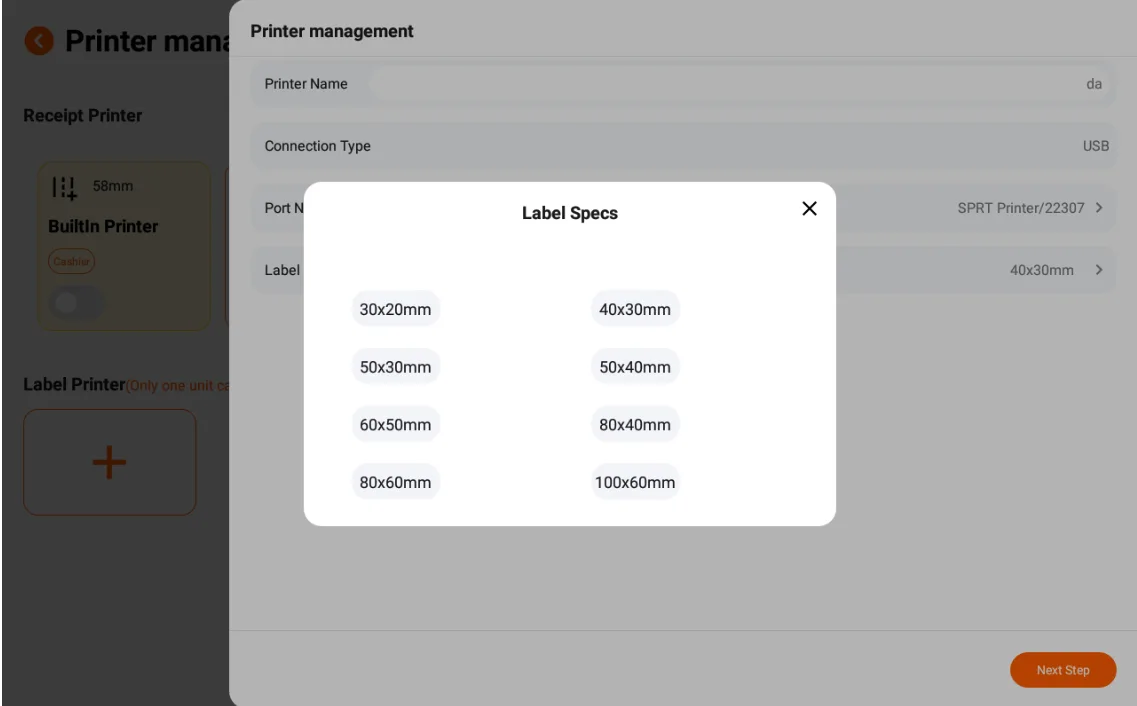
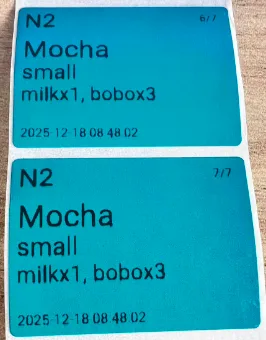
Enter the printer name, select the printer, select the paper size, click Next, click OK, and the addition is successful.
Note
- The printed content is mainly divided into two parts: cashier and service kitchen.
- It is particularly important to note that if the store is equipped with KDS (Kitchen Display System) kitchen display devices, there is no need to enable the printing module in the kitchen section. In this case, please set up the printer through the KDS device to print the order transmission slip, and its operation method is the same as that of configuring the printer through the cash register.
Tabletop Operation
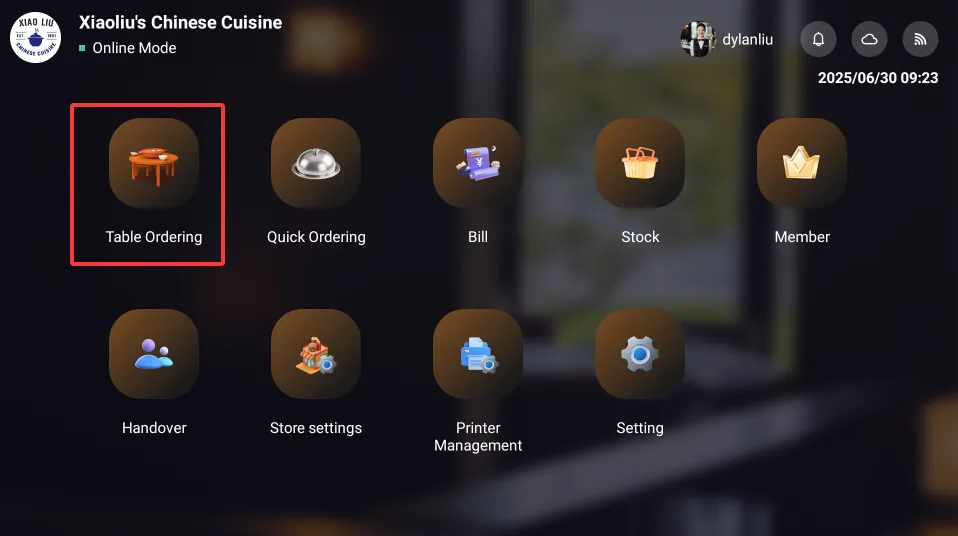
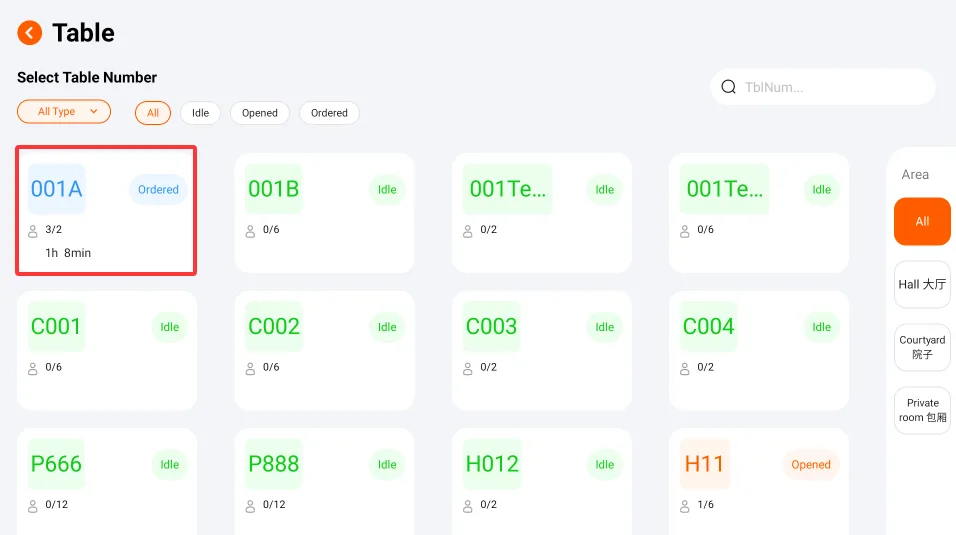
- When entering the system, the default displayed page is the "Table/Dining Table" page, which shows the status of all dining tables in this store;
Note
- Stores need to create basic information such as tables in advance before they can be used. For details on the creation method, see "Instructions for Using the Store Management System"
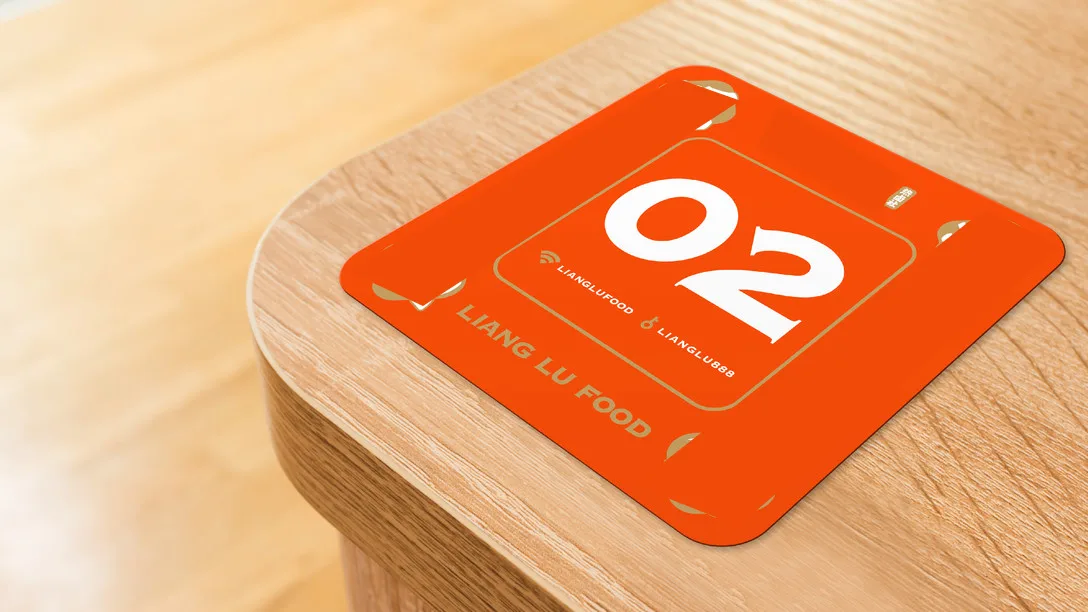
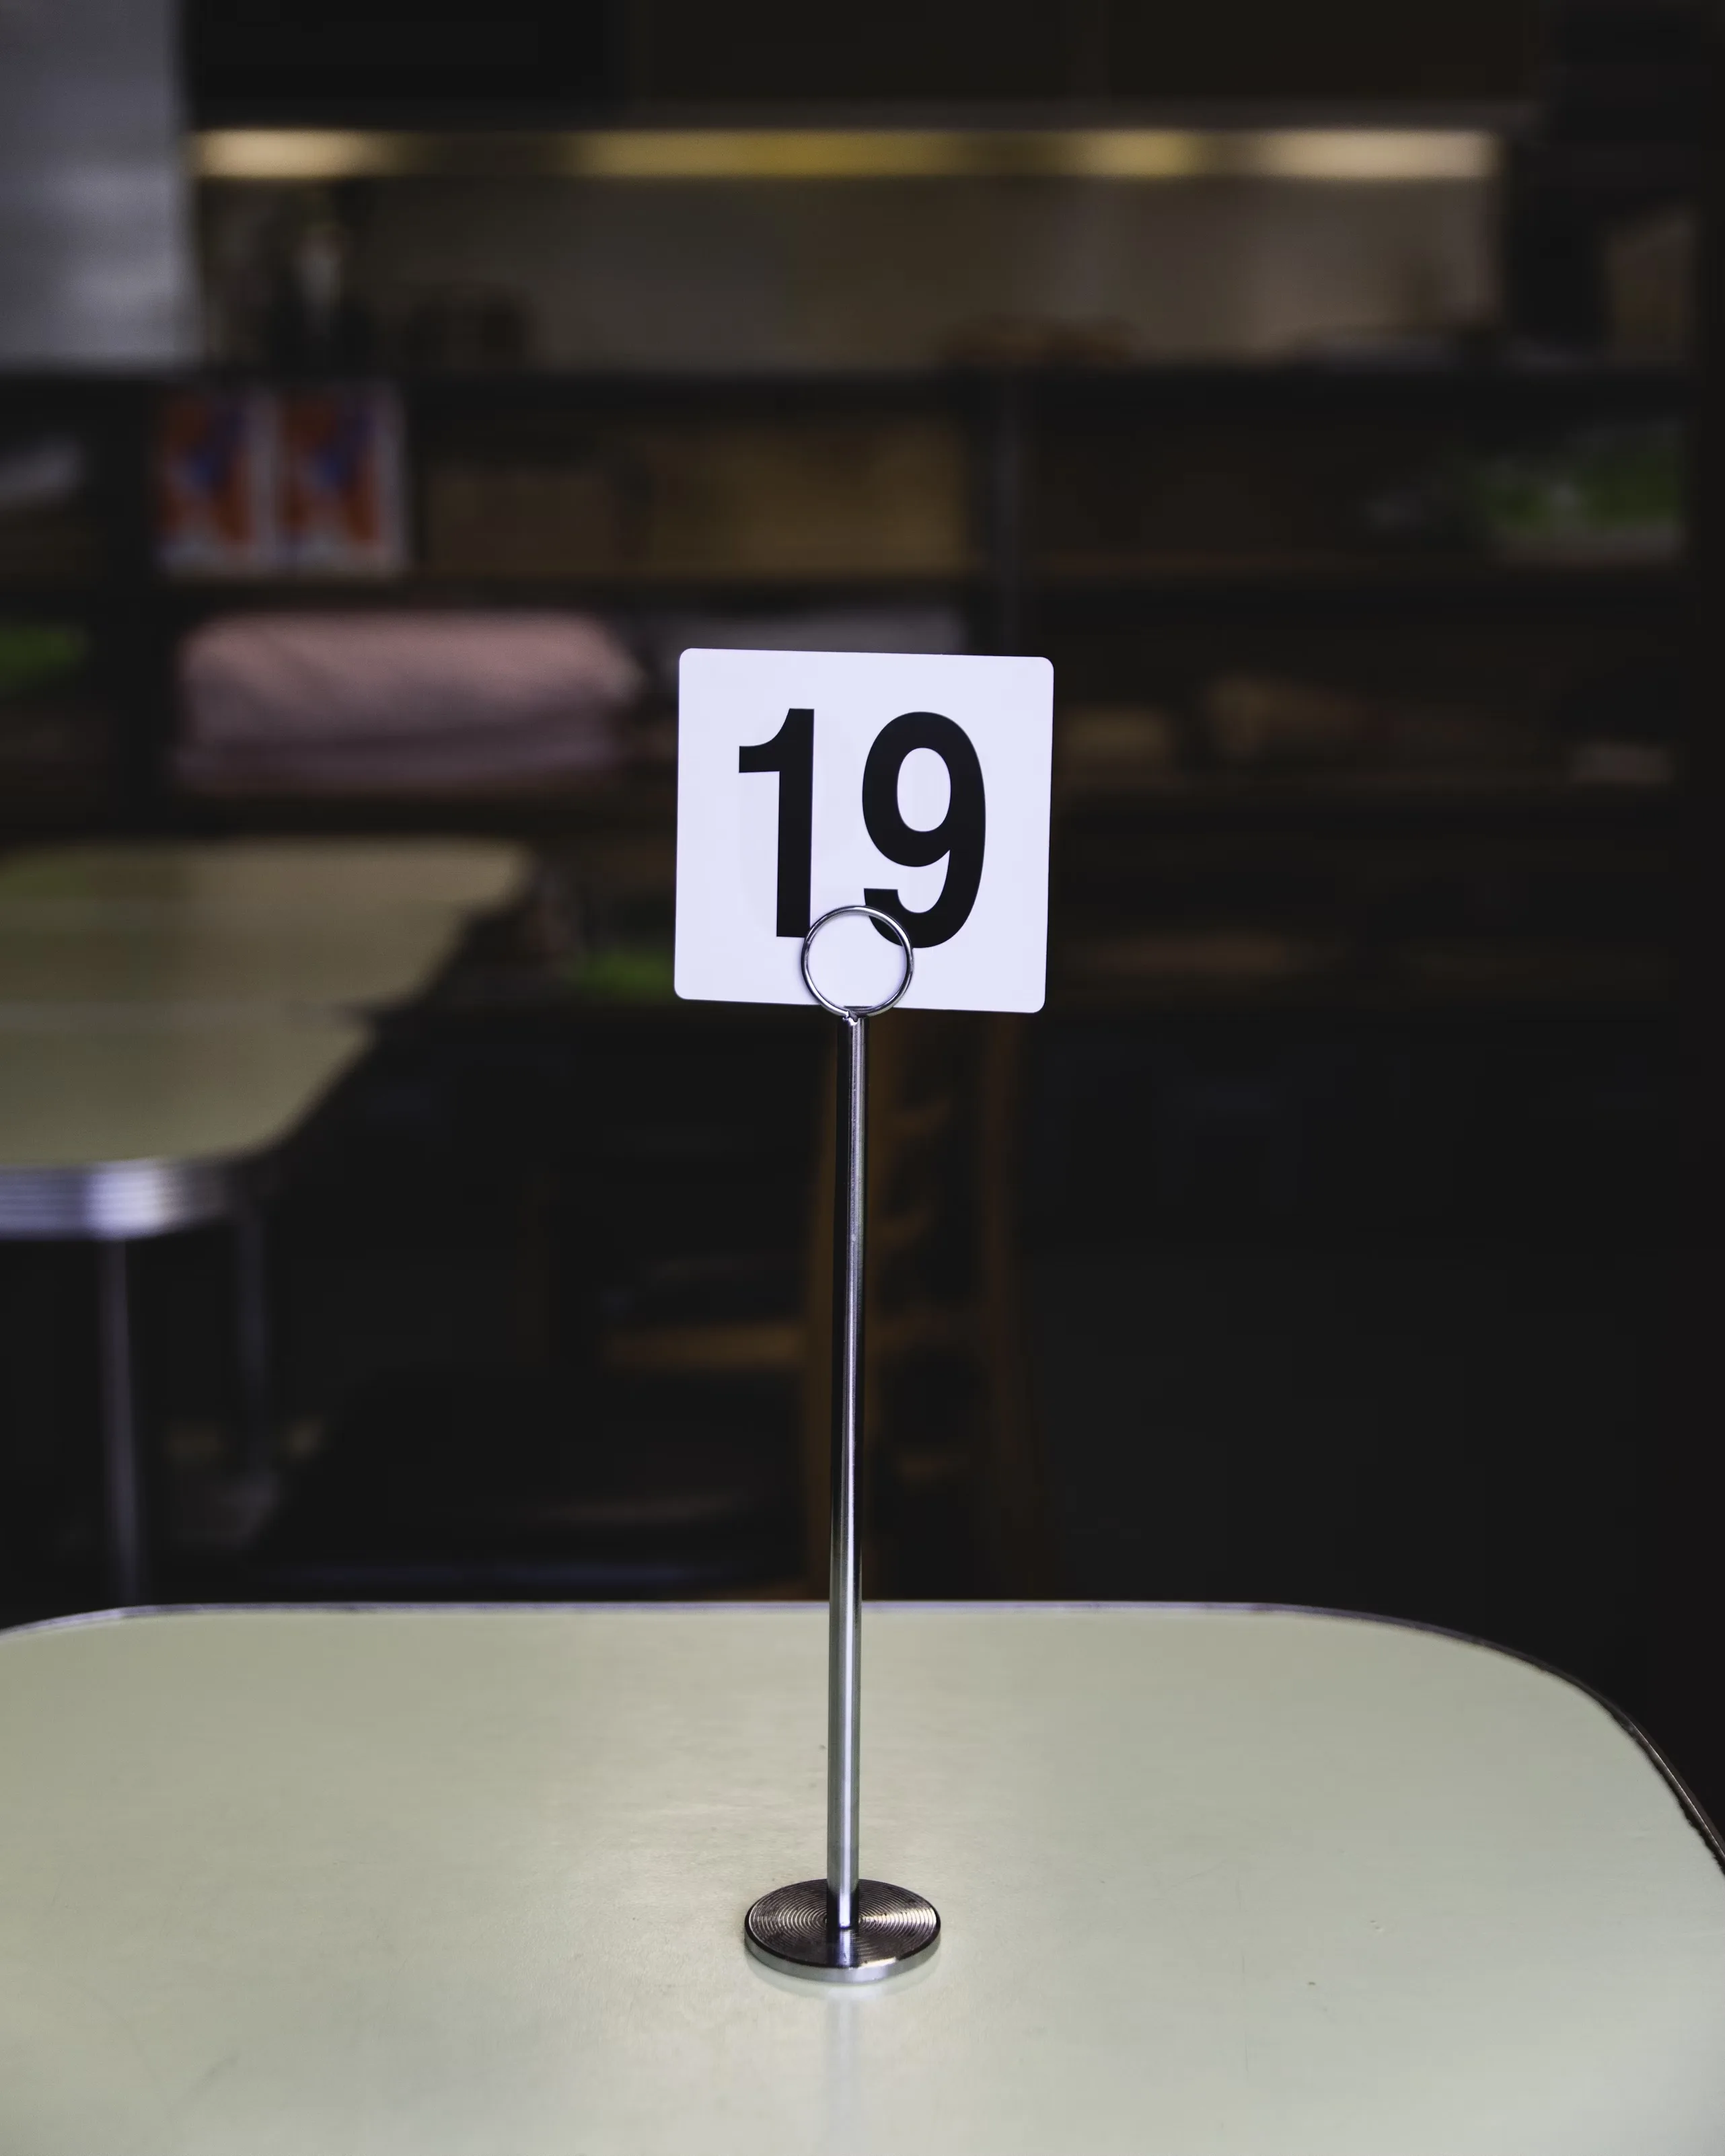
- The table number cards shown do not necessarily correspond to the actual table numbers; they can also be meal number cards. That is, instead of numbering the tables, a meal number card is provided to guests after they place their orders. Guests can choose their own tables to sit and dine, and service staff will serve the meals according to the meal number cards in the guests' hands. After the meal is served, the meal number card will be taken away and reused for ordering at the cashier counter.
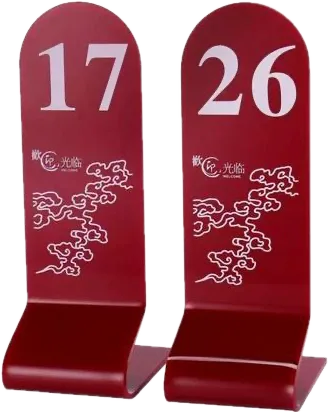
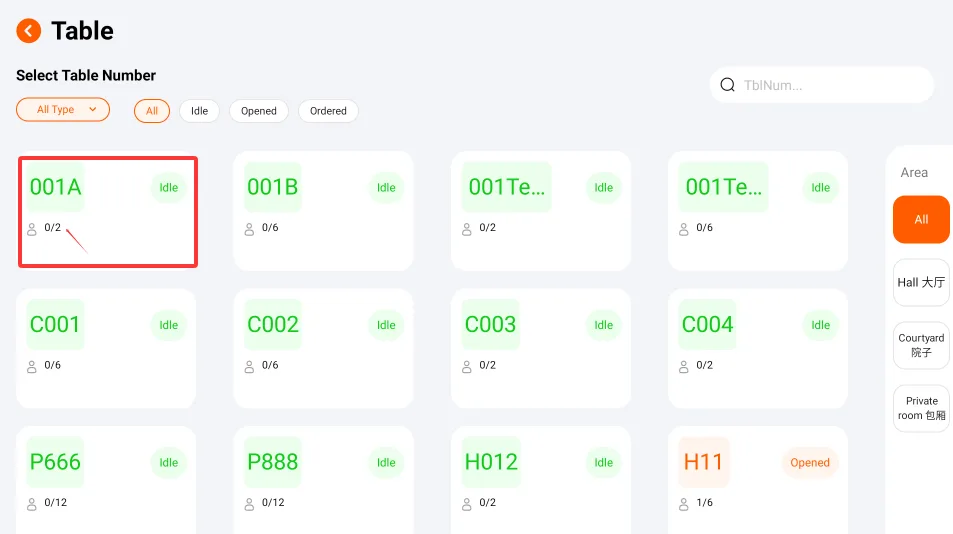
- The dining table will display different types and locations (configured in the background), with all items displayed by default and support for filtering and viewing;
- The dining table has three states:
- Opened Table: This refers to the situation where a table has been opened but no order has been placed. The source could be that the table was opened in this system but no order was placed, or that a guest scanned the QR code on their phone to open the table but has not yet submitted an order, or that a service staff member opened the table via a tablet but has not yet submitted an order.
- Ordered: As the name implies, it refers to something that has already been ordered;
- Idle: Tables that are idle and not currently being used by any guests.
- The table card will display the number of diners it can accommodate, among which the tables that have been opened and those with orders placed will show the current actual number of diners;
- The ordered tables will display the dining time, calculated from the moment of ordering;
- Cashiers perform different operations on tables in different states according to on-site requirements, as detailed in the description below.
Guest arrives at the store - Opens a table and orders dishes
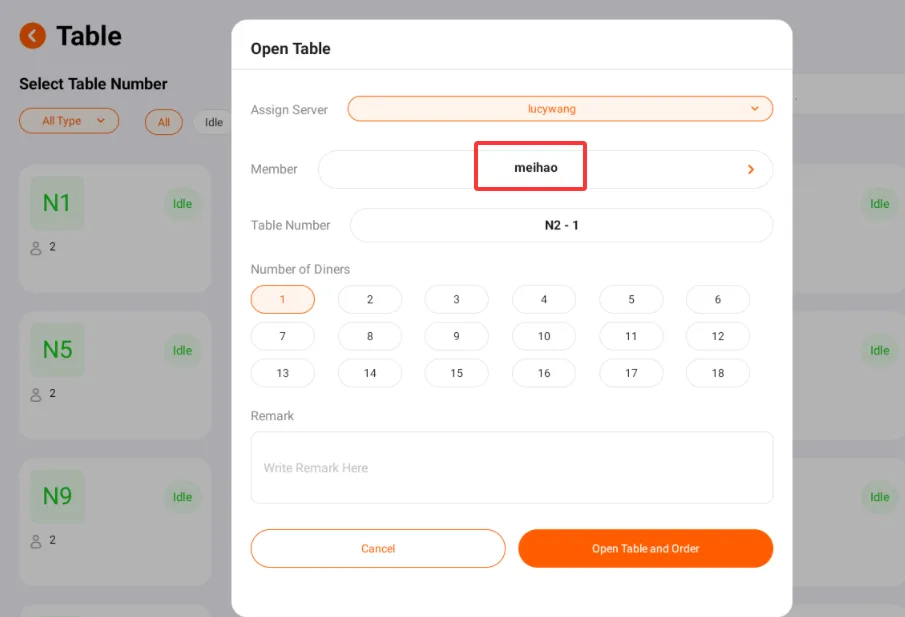
- When a guest arrives at the restaurant to dine, select a suitable vacant table based on the number of diners and click;
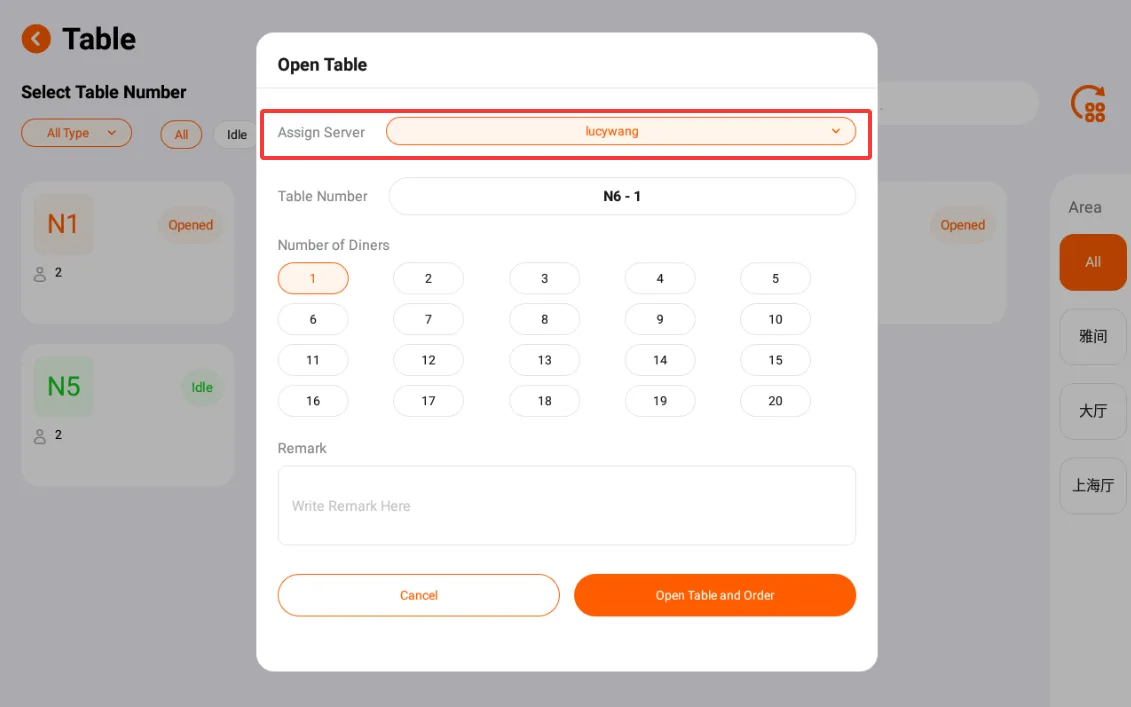
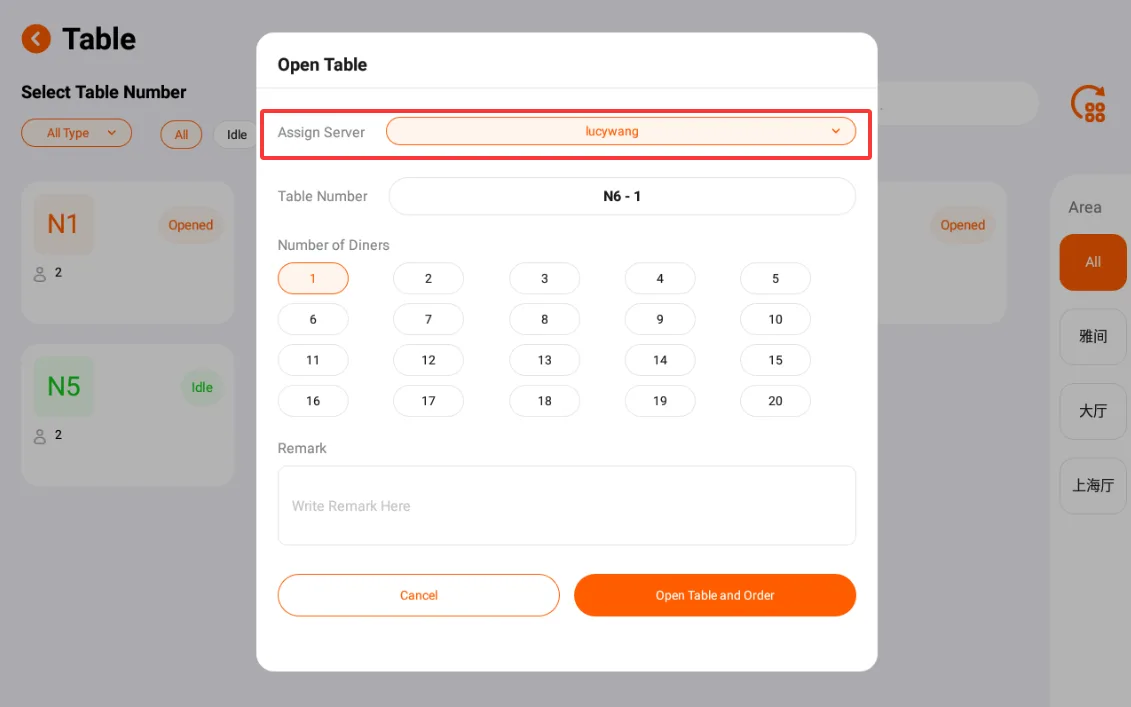
- Select the actual number of diners in the pop-up window, and if necessary, enter the guest's remarks;Assign a waiter, click the drop-down box on the right, and select the corresponding waiter's name;Click [Open Table and Order].
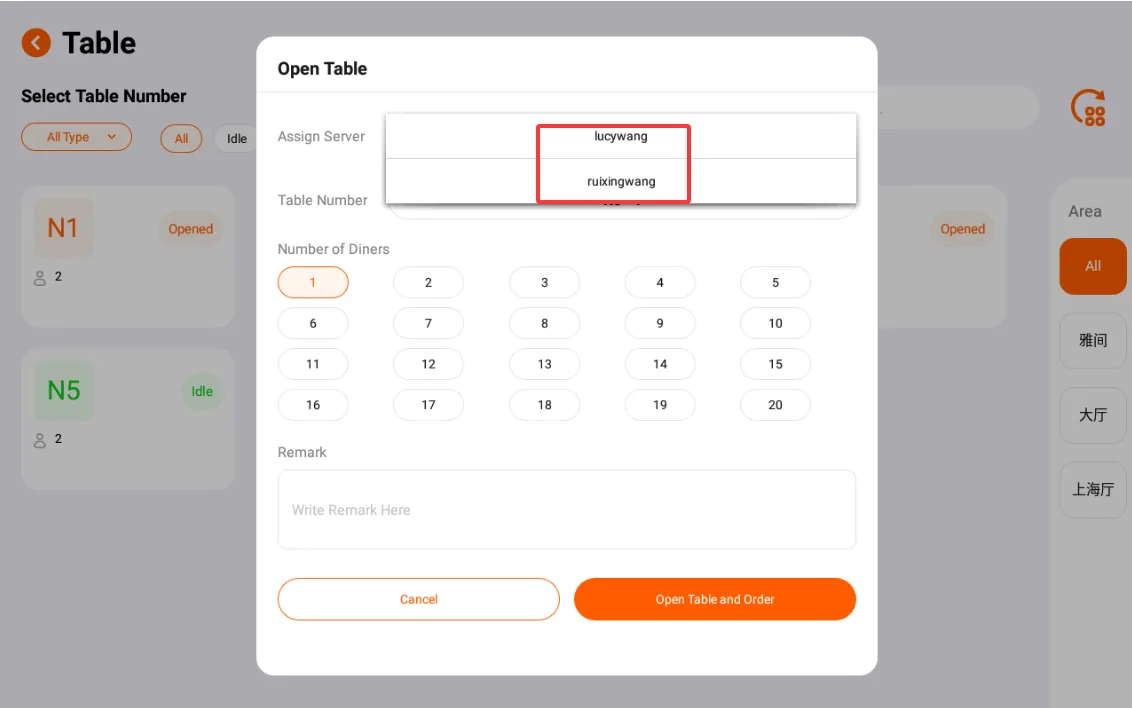
Select Member
When opening a table and choosing to bind a member, click the member dropdown box. The input box supports entering the member number, mobile phone number, email, and scanning the member QR code with a barcode scanner. When the member makes a payment, the payment information of that member will be directly displayed. 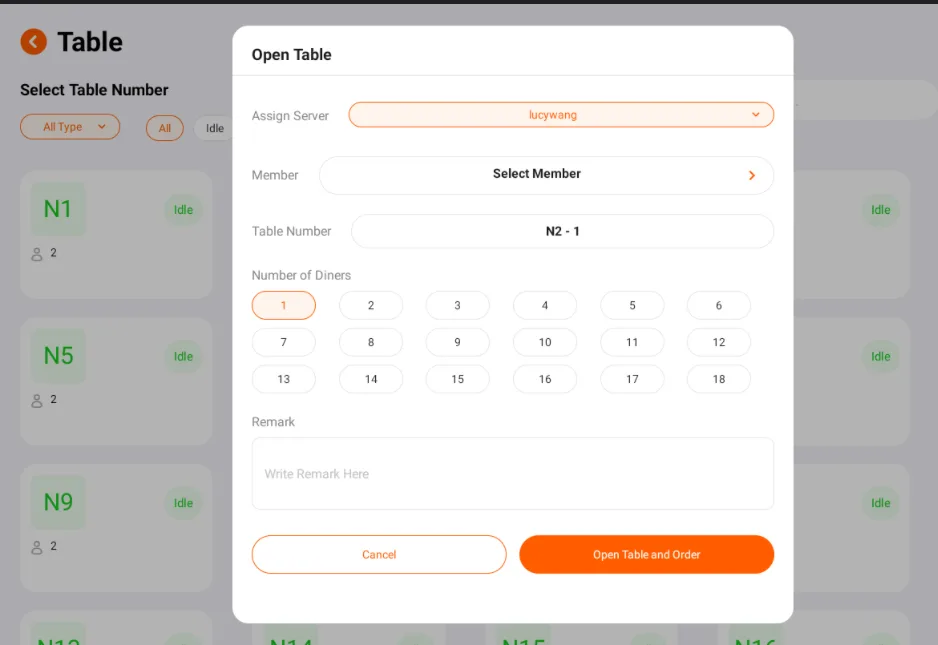
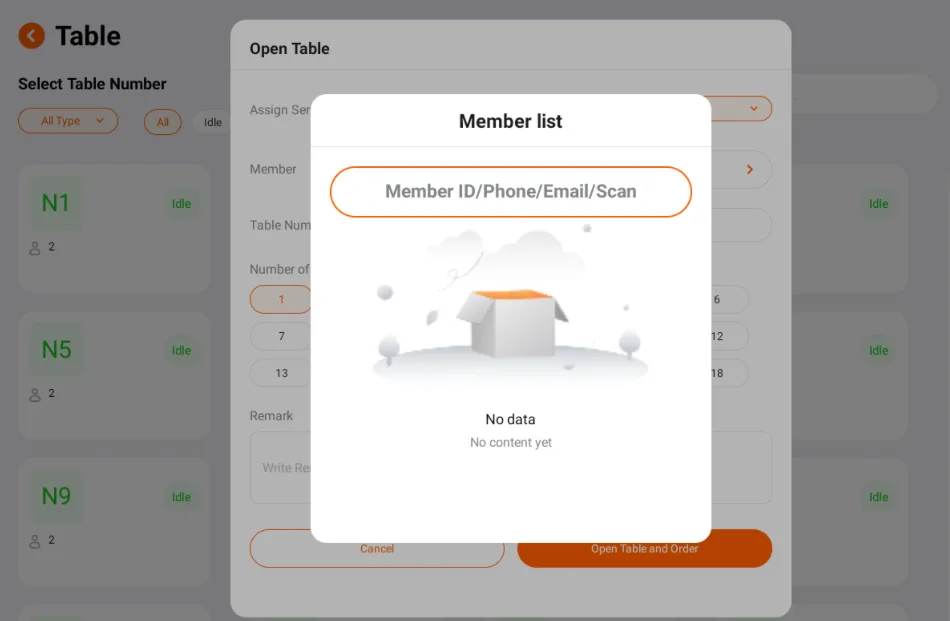
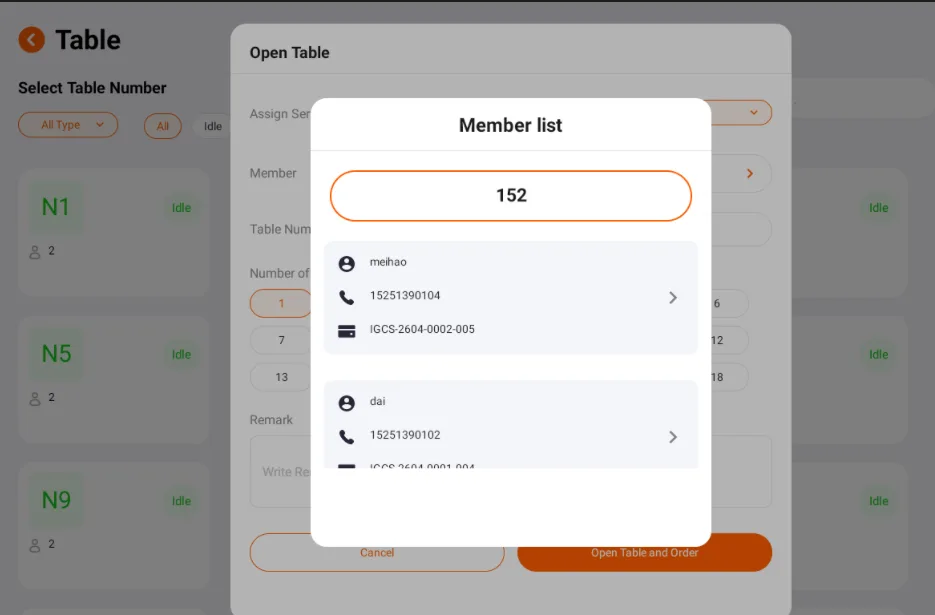
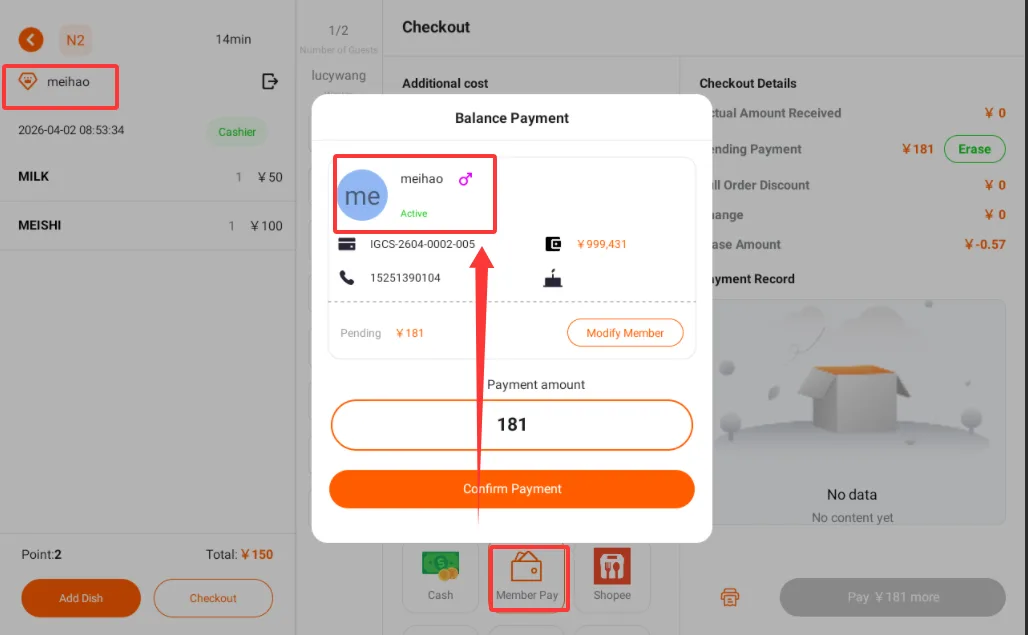
You can also select a member on the order placement page. Simply click the "Select Member" button and enter the member's mobile phone number, membership number, email, etc.
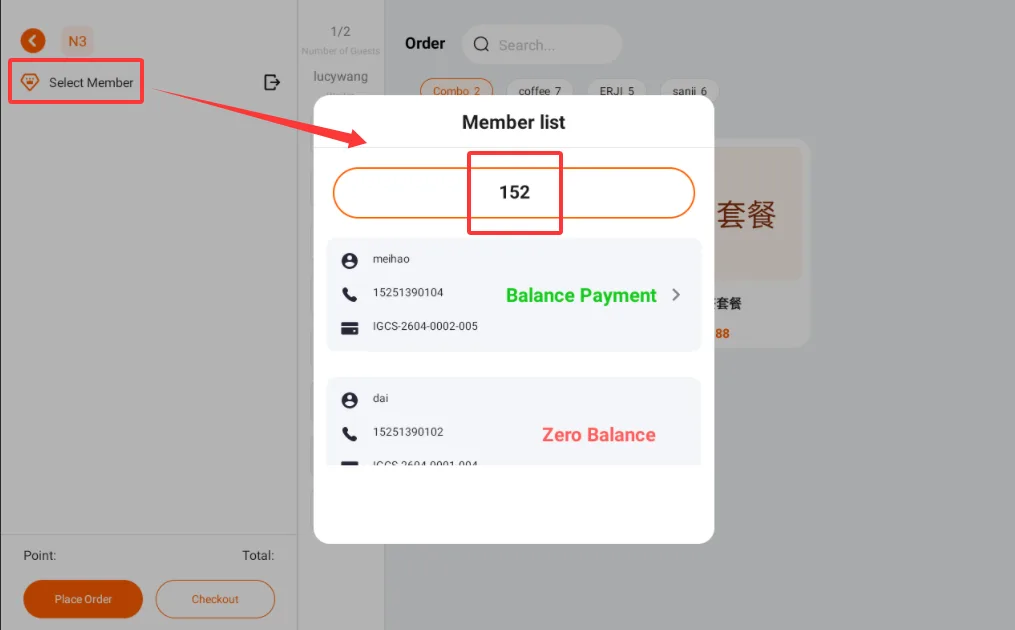
On the right side, select the guest to place an order, click the dish card, dishes are displayed according to system classification, and support searching by dish name;
Note
- Stores need to have basic information such as dishes in advance to be used. For details on the creation method, see "Instructions for Using the Store Management System"
- The pictures of dishes shown in this description are for testing purposes only, not actual restaurant products. The pictures are sourced from the internet. If there is any infringement, please contact us for deletion.
- If you need to order multiple servings of the same dish, simply click the dish card multiple times, or directly increase or decrease the quantity behind the corresponding dish in the ordered list on the left;
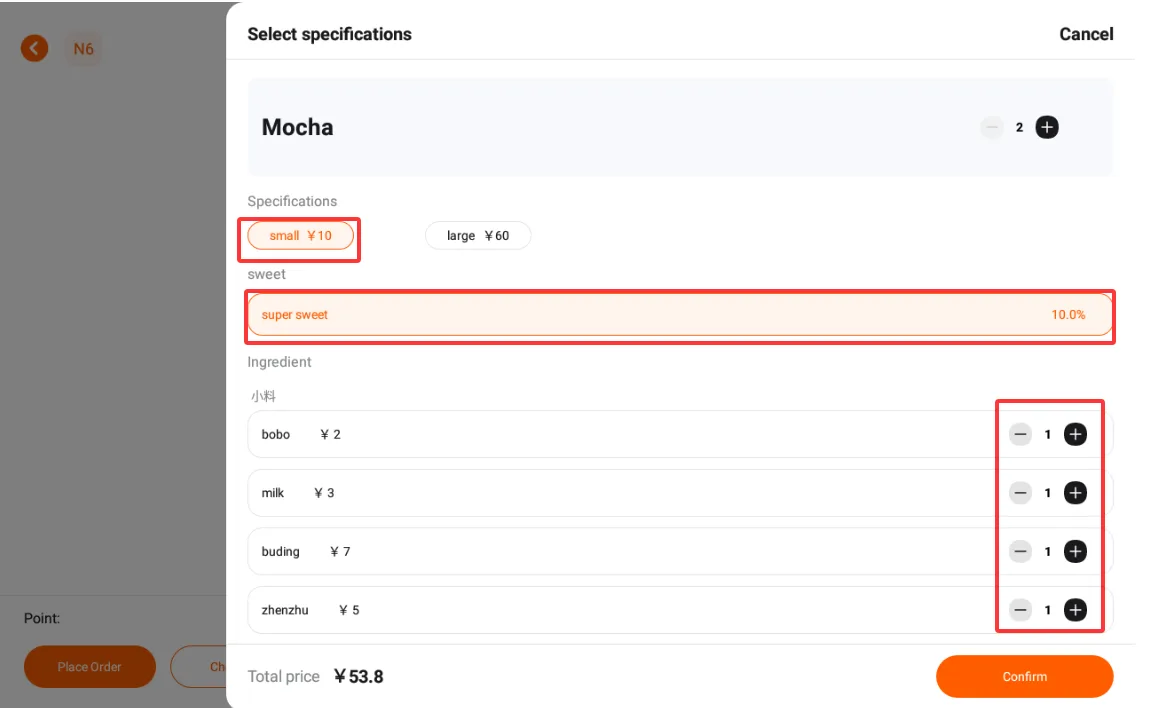
- For the dish, you can select the specification, cooking method, and additional ingredients. After making your selections, click Confirm.
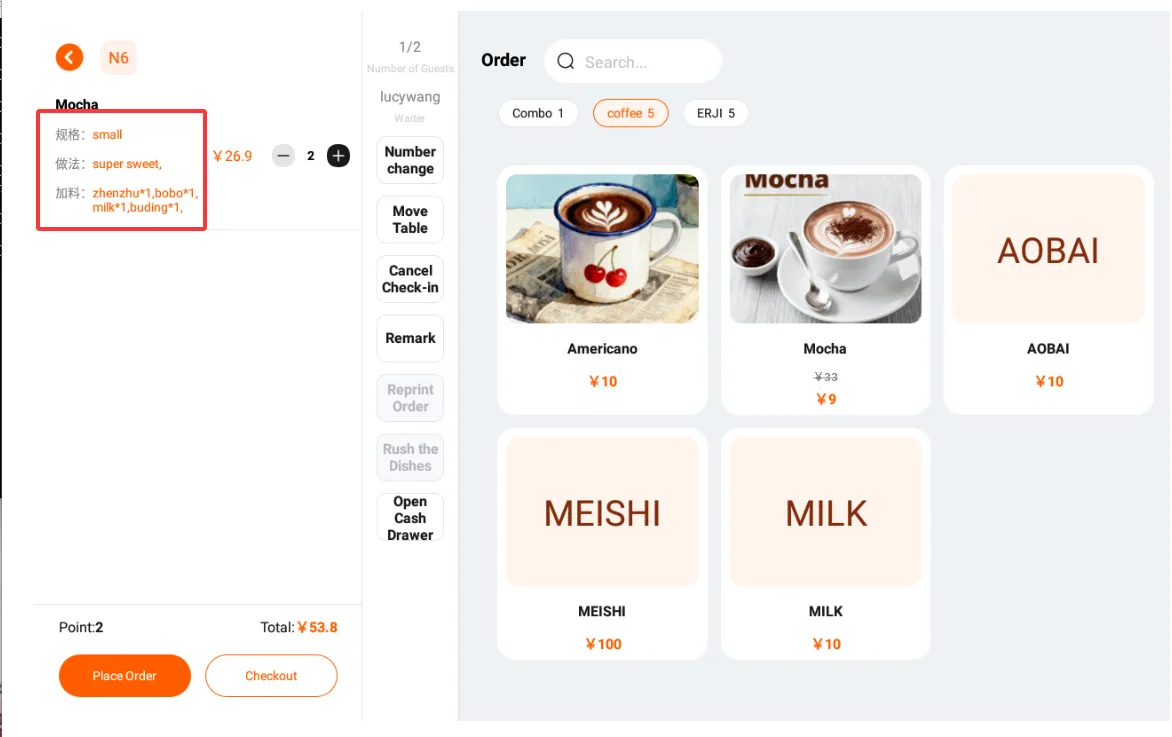
- After ordering, click the [Place Order] button in the lower left corner;
- After placing an order, the page will prompt that the order was successfully placed, and the list of ordered items on the left will change to the ordered state;
- If the device has printing paper installed, it will automatically print the order ticket;
- Dish order information will automatically arrive at the kitchen KDS system (the store needs to be equipped with the corresponding device).
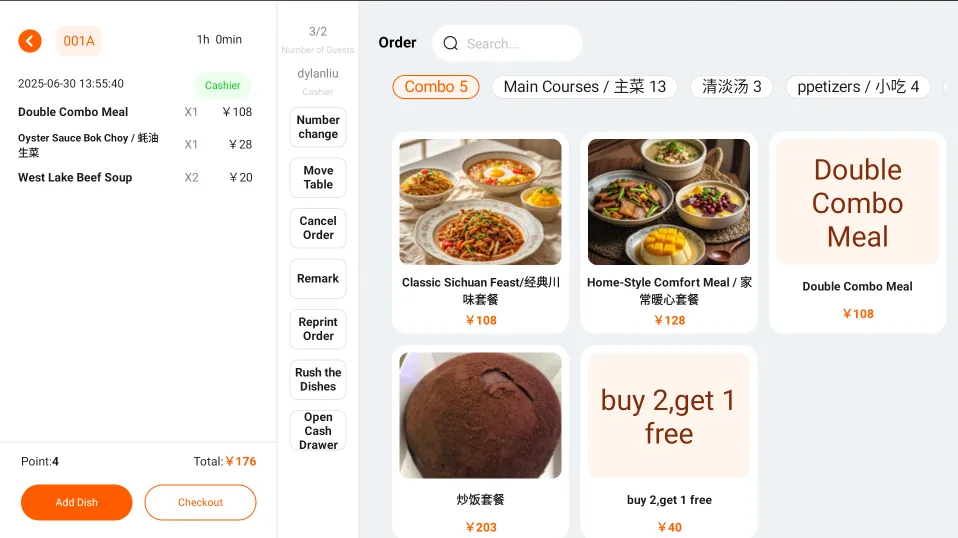
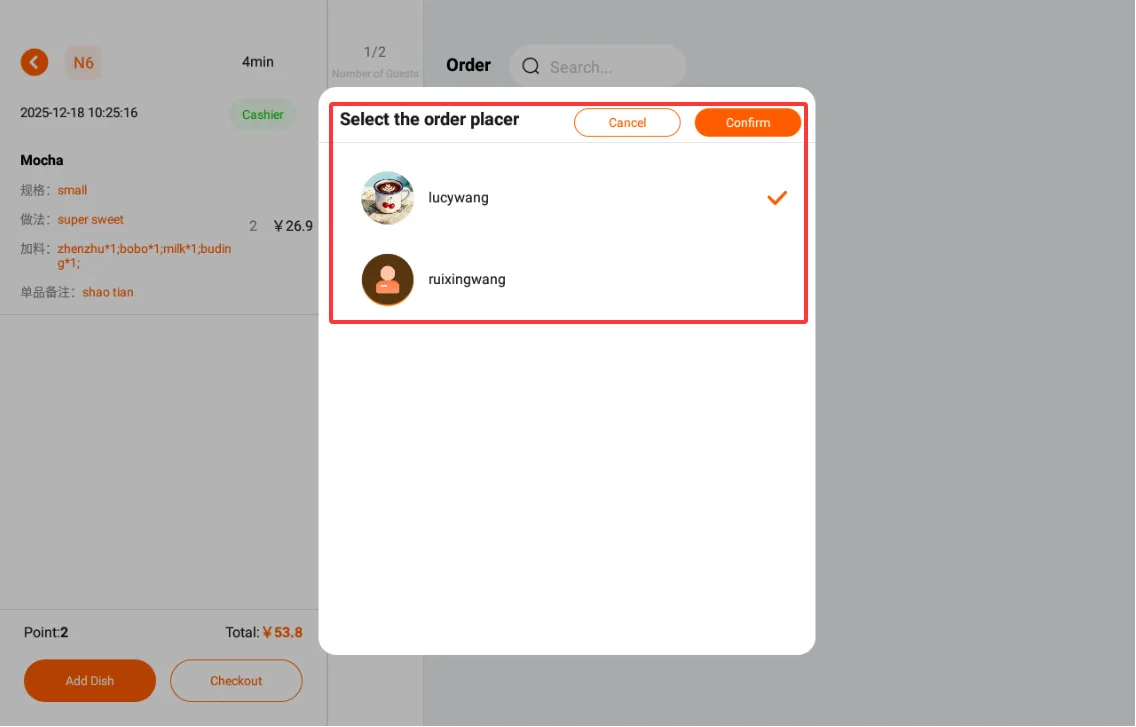
Assign Waiter
- You can choose a waiter when opening a table;
- You can also select a waiter on the ordering page.
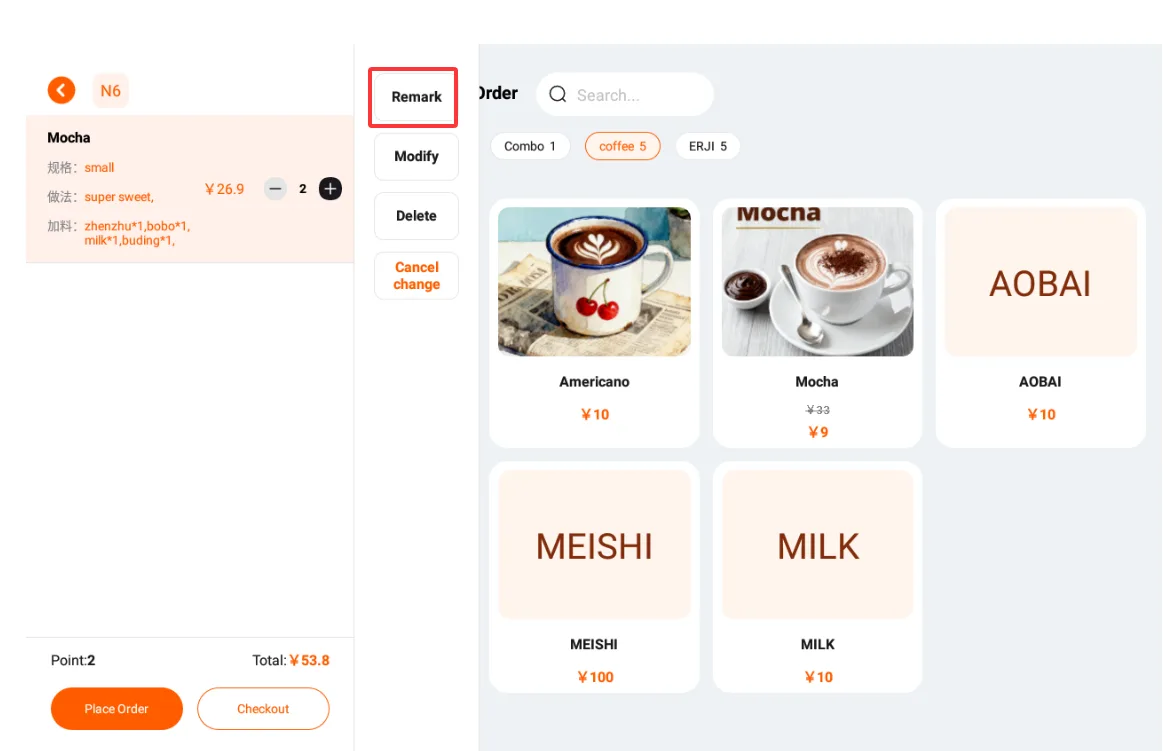
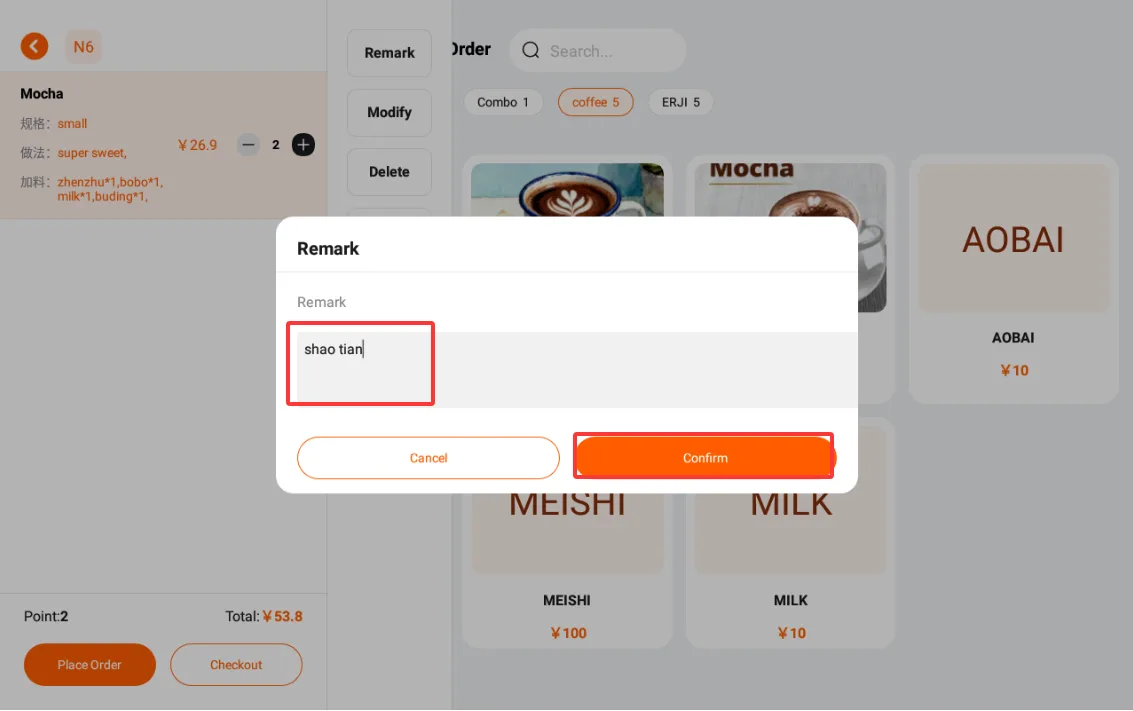
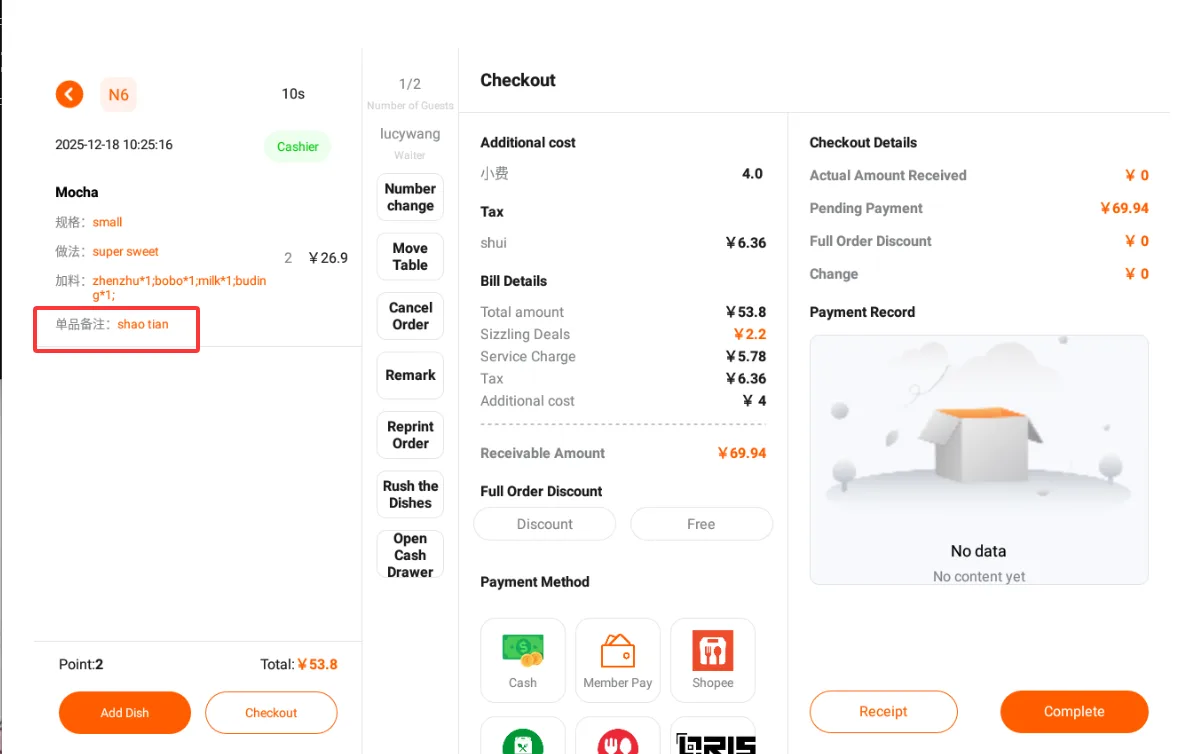
Add remarks to the dish
- When placing an order for a dish, simply select the remarks on the right and enter the remark information.
Guest cancelled table reservation
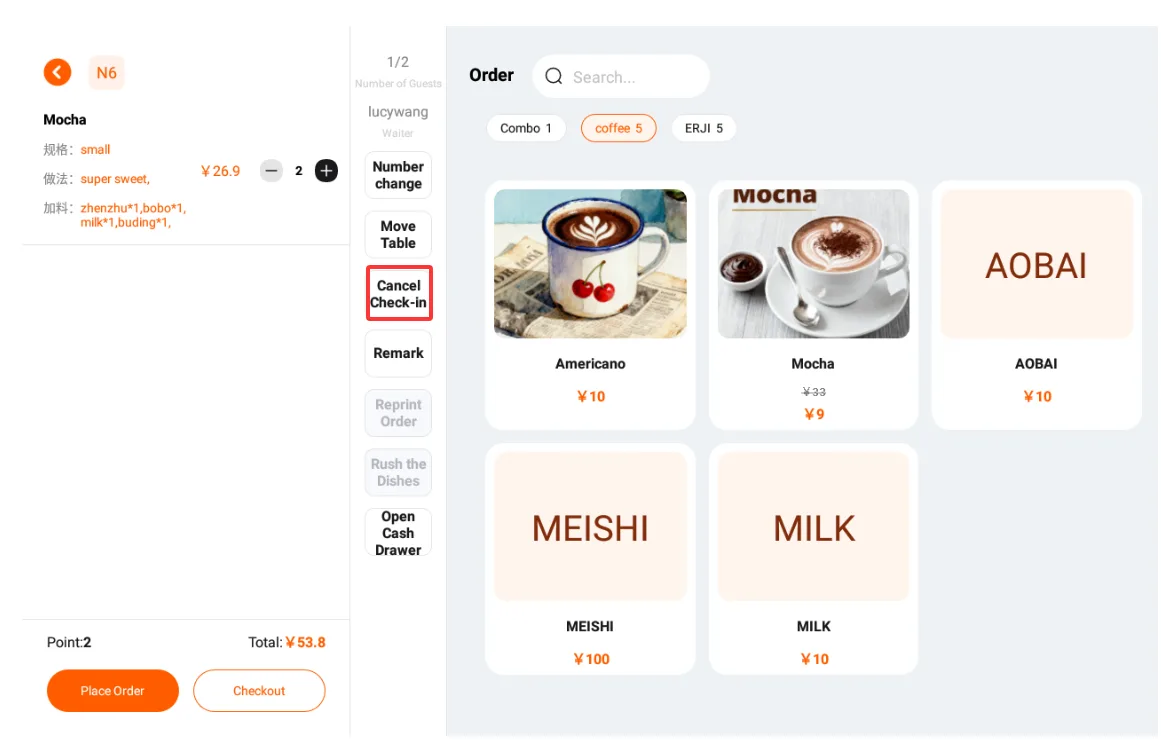
- During the ordering process, if the guest indicates they will not dine here, click 【Cancel Check-in】 in the middle of the page, and the table will be restored to the idle state.
Guests need to order additional dishes during the meal
Guests may need to order additional dishes while placing an order or dining;
Click the table number card corresponding to the guest;
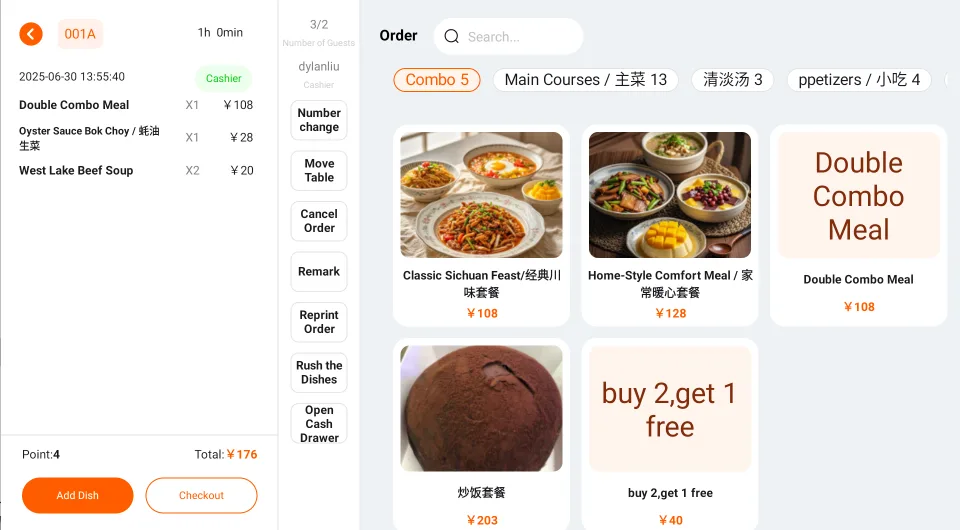
The left side will display the dishes that the guests have already ordered;
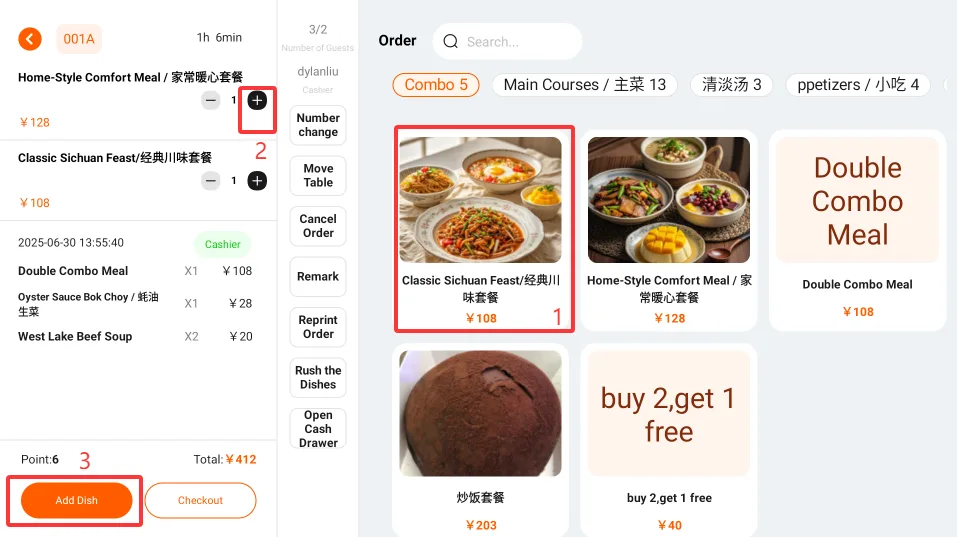
Click the dishes to be added on the right side, and the operation is the same as ordering dishes when opening a table;
After adding the dishes, click the [Add Dish] button in the lower left corner to complete the addition of dishes.
Guest is urging for the dishes
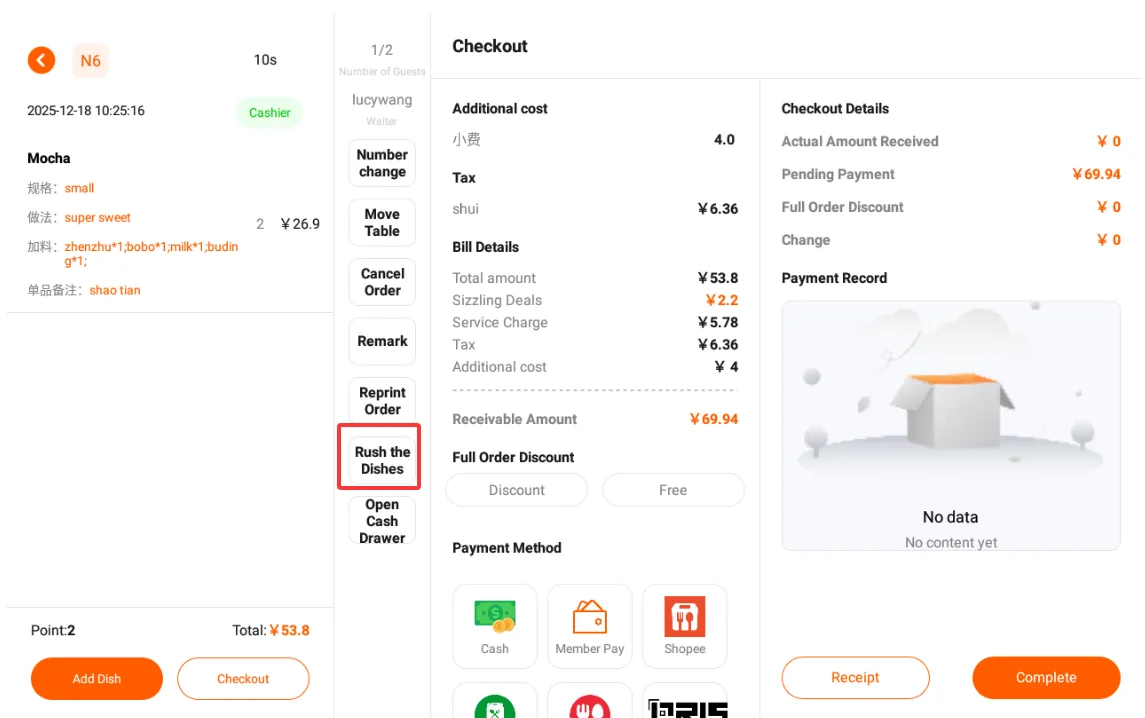
If a guest who has already placed an order is urging for their food, click the card corresponding to the guest's table number;
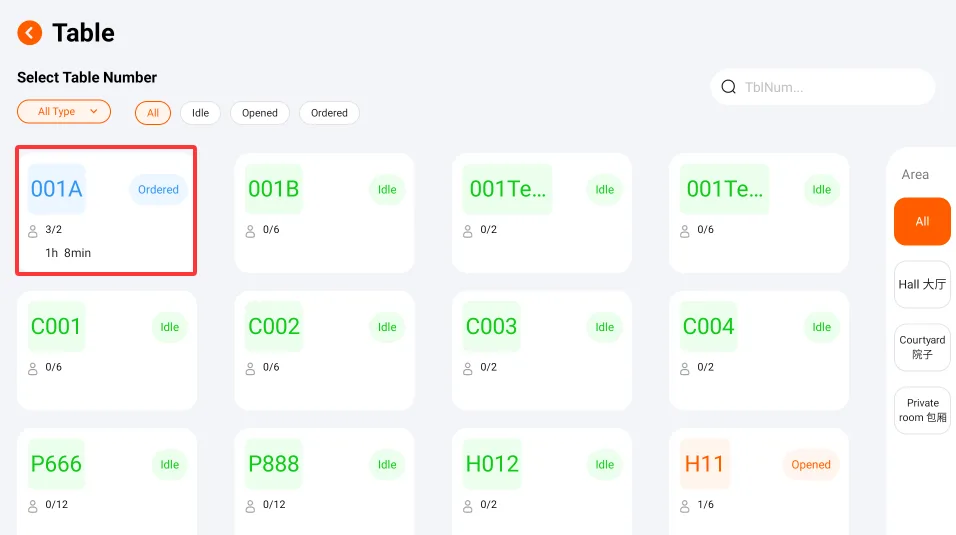
Click the middle 【Rush the Dishes】 button, and the rush dish information will be notified to the KDS in the kitchen (the store needs to be equipped with corresponding devices)
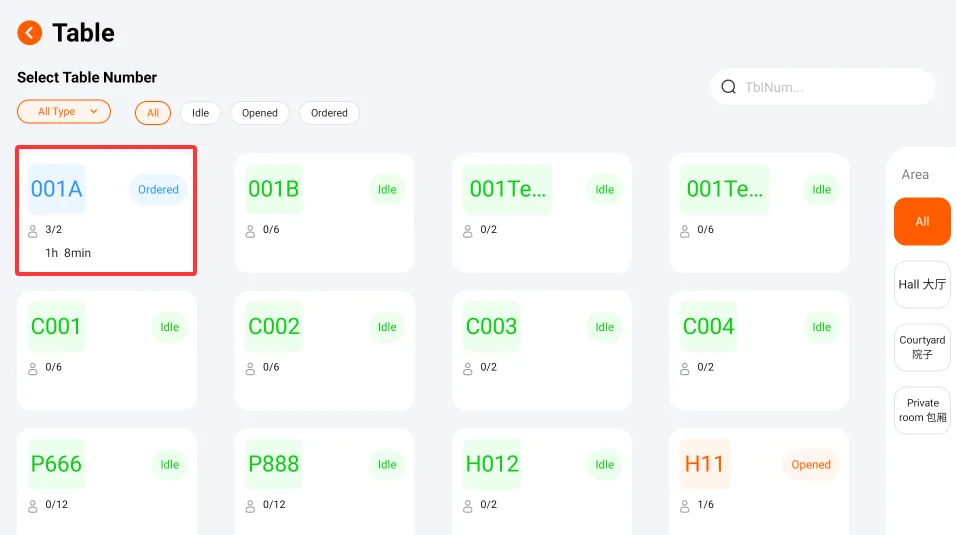
Guest cancelled the order
When a customer who has placed an order requests to cancel the order, the cashier should make a judgment based on the store's regulations and the actual situation on site. If the order can be cancelled for the customer, please click the customer's table number card;
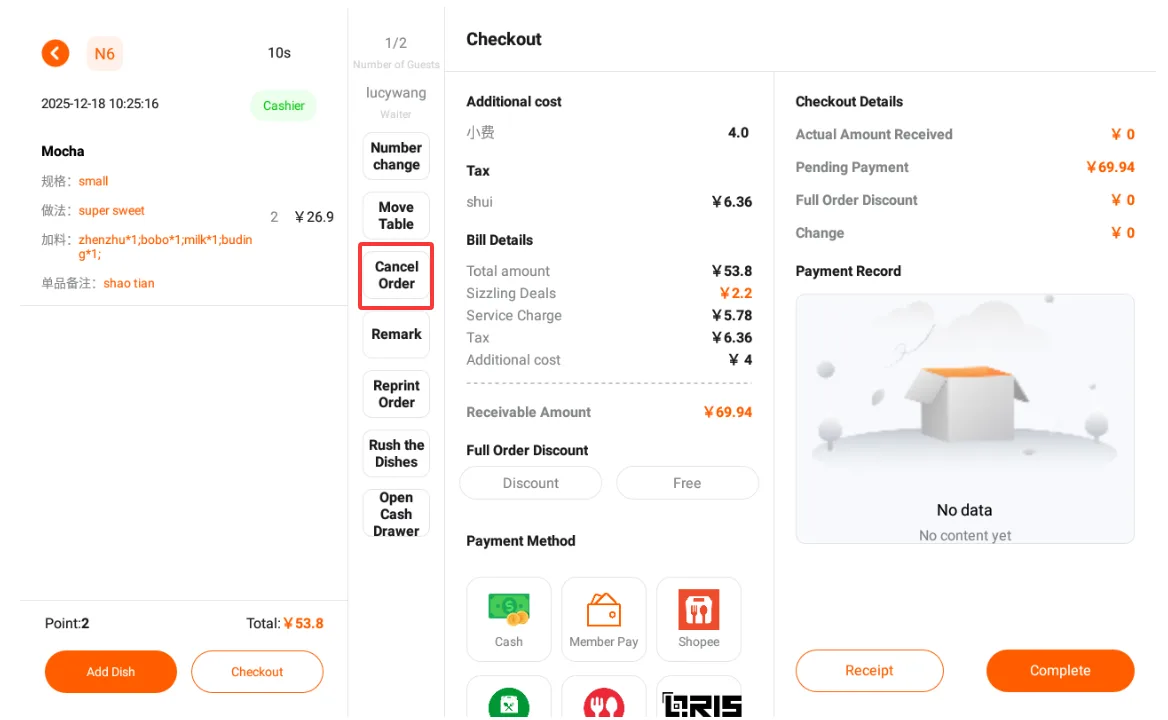
Click the [Cancel Order] button in the middle;
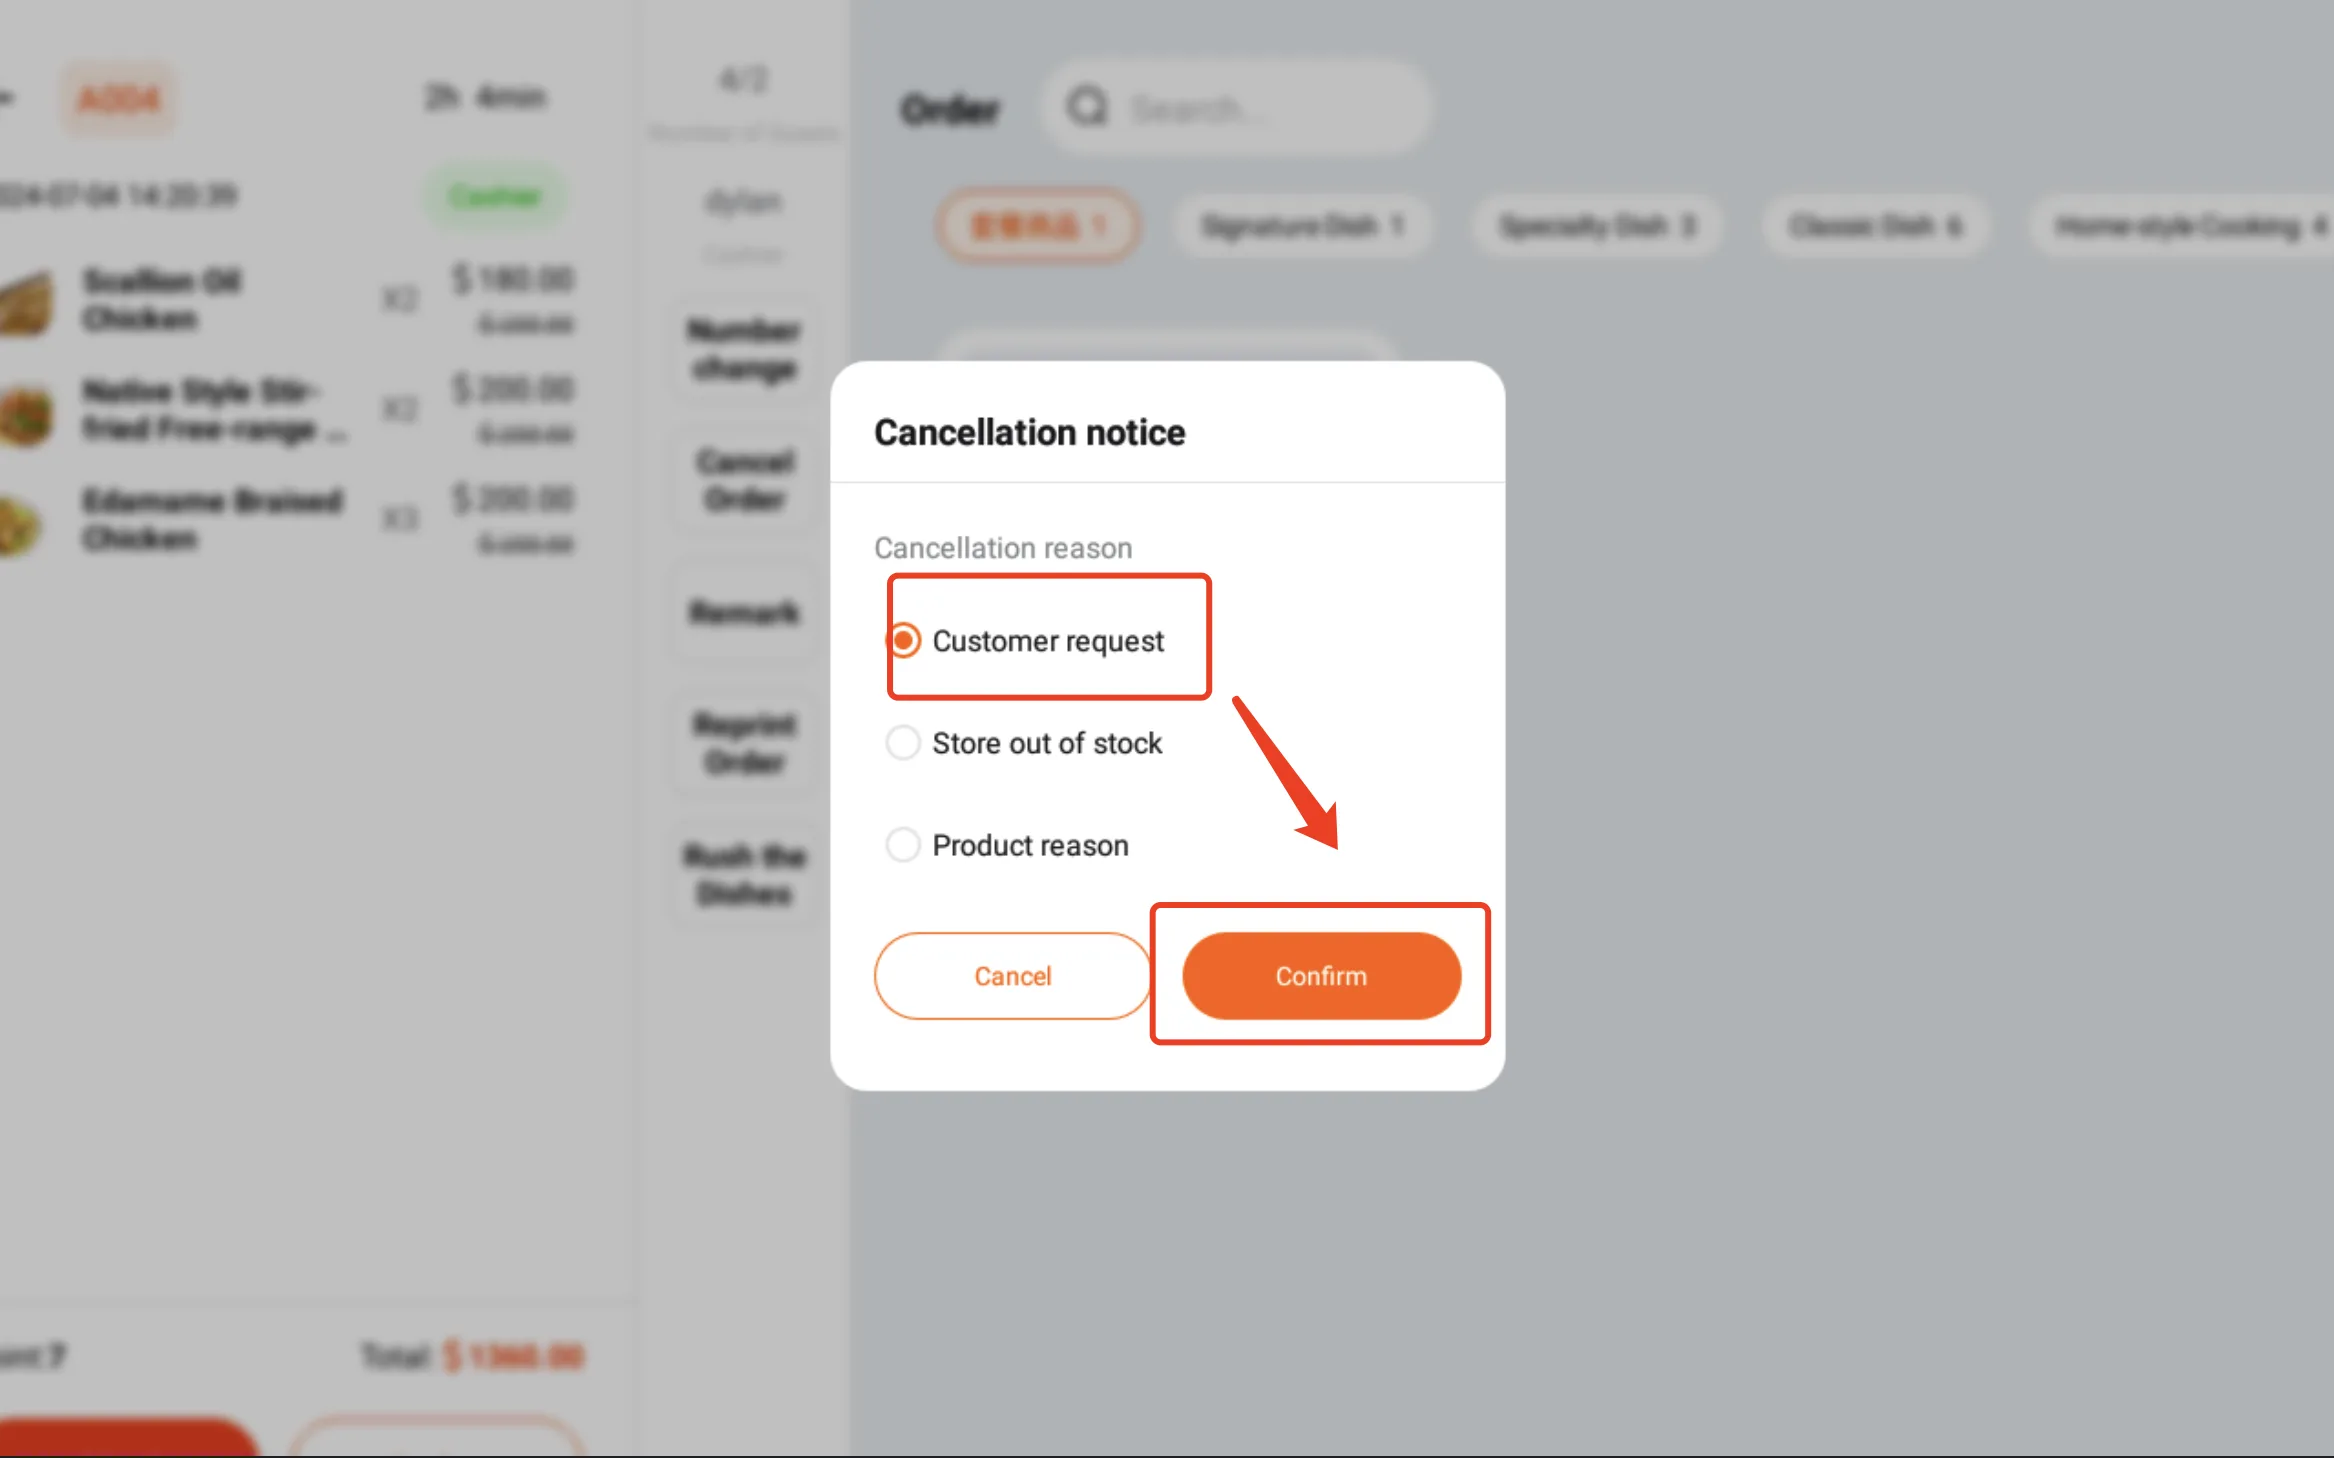
After selecting the reason for order cancellation in the pop-up window, click [Confirm], then the order cancellation is completed;
The order cancellation message will also notify the kitchen KDS system to alert the chef (the store needs to be equipped with the corresponding device).
Note
- Canceling an order will cancel all dishes. If you only need to return some dishes, please refer to the "Guest Dish Return" function description.
- If a guest has paid or partially paid for an order that needs to be cancelled, the system will require the store manager's password to verify permissions when performing the cancellation operation. The store manager's password is configured in the store management backend.
Guest returned the dish
When a guest who has placed an order requests to cancel a certain dish, the cashier should make a determination based on the store's regulations and the actual on-site situation. If the dish can be cancelled for the guest, please click the guest's table number card;
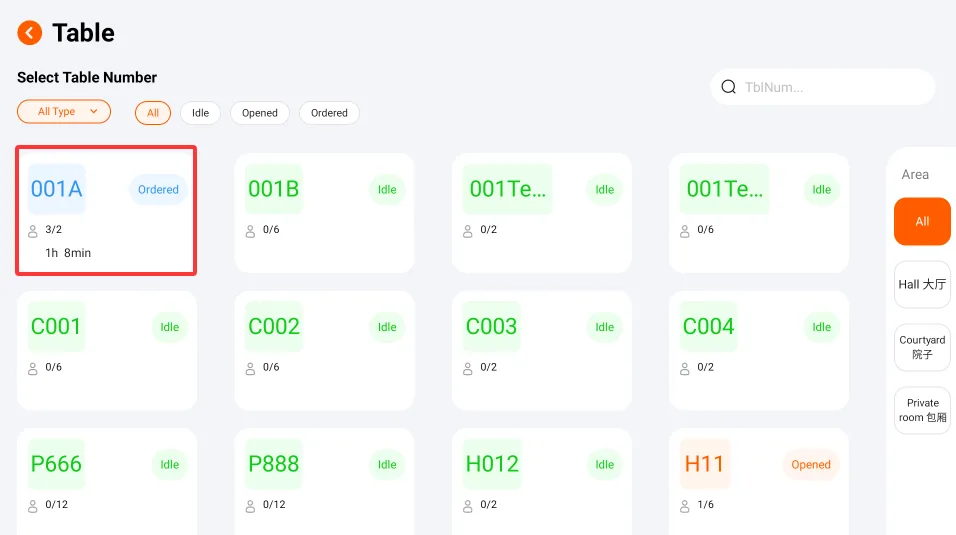
Click the dish to be refunded in the list of ordered dishes on the left;
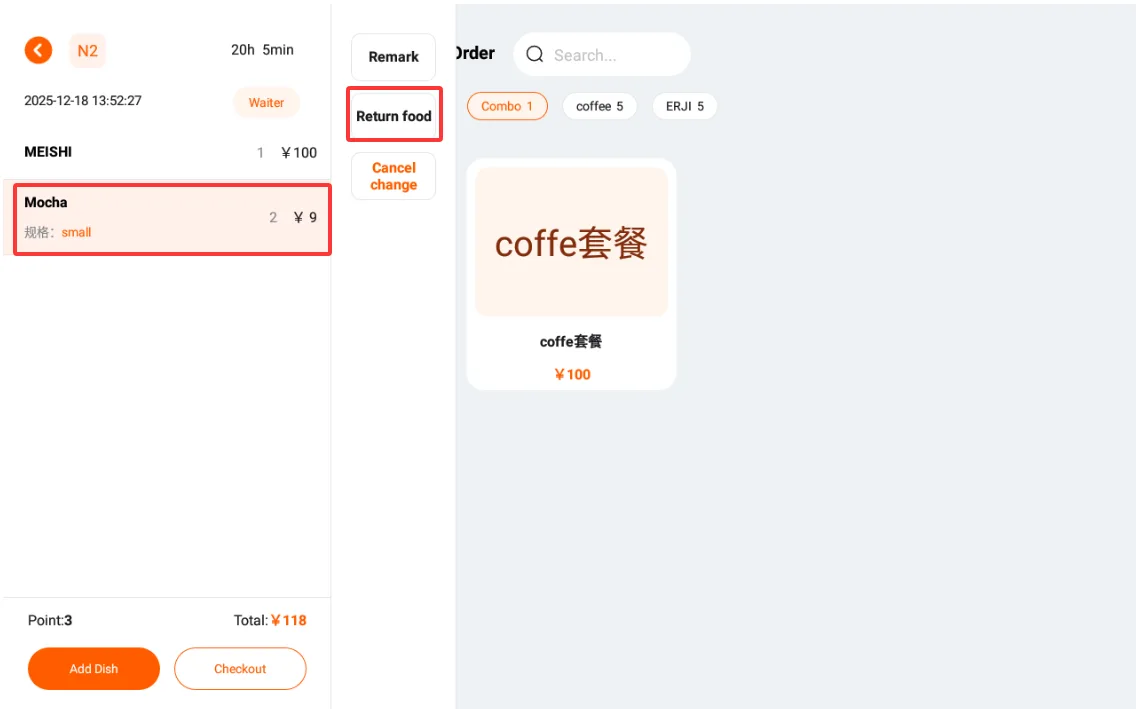
Confirm the item to be returned in the pop-up window, then click Return Dishes.
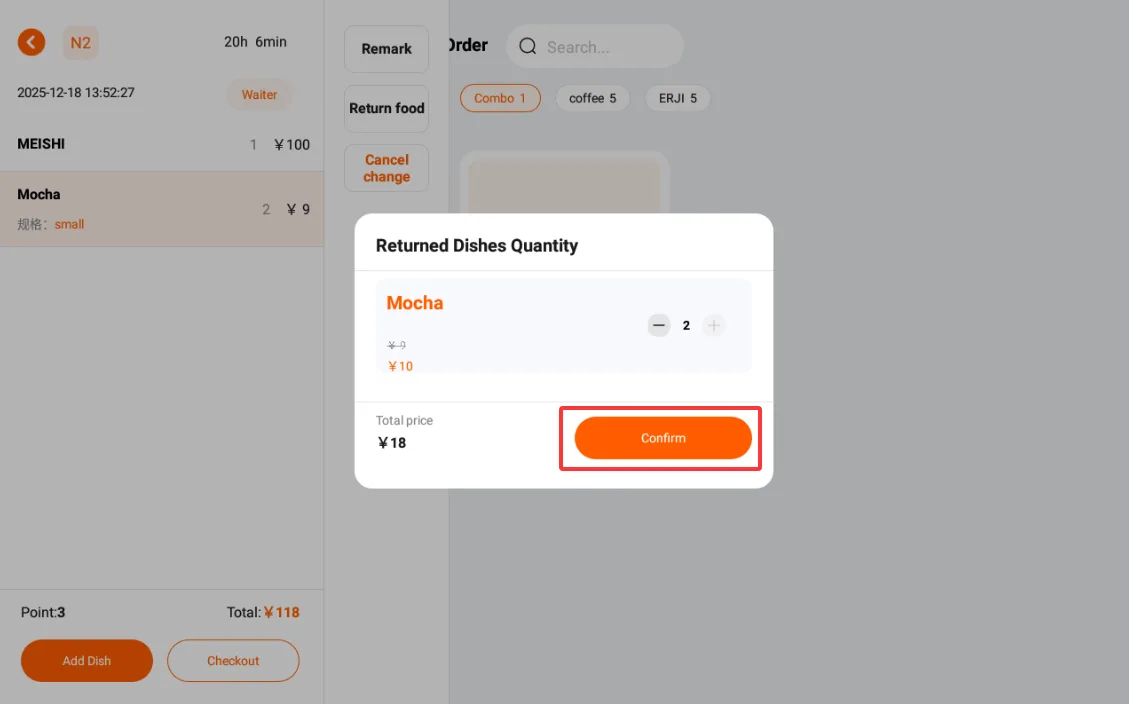
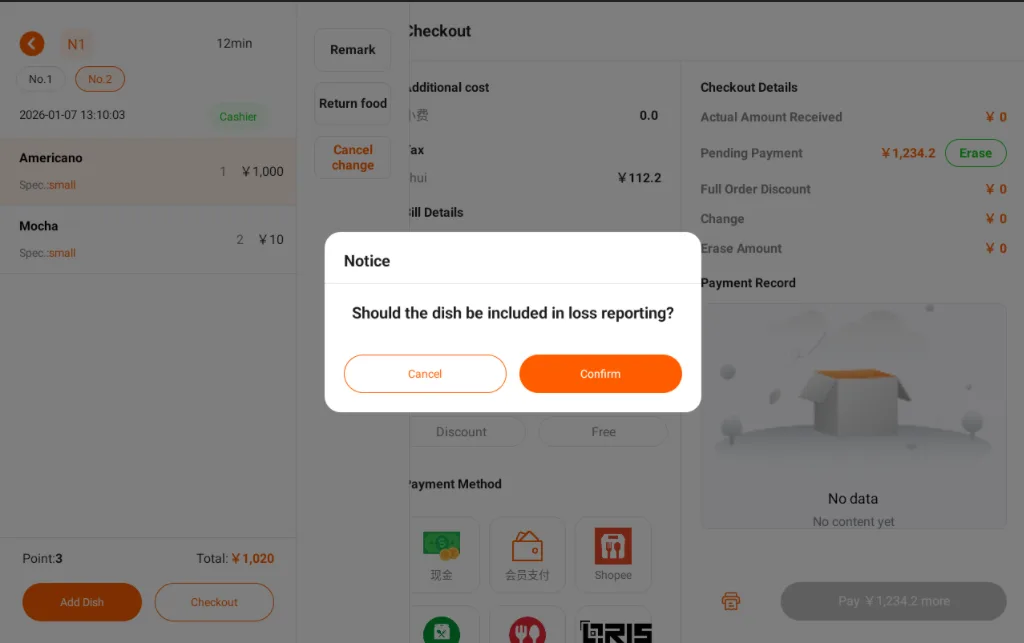
- In the new pop-up window, select the quantity of dishes to be returned, choose the reason for returning the dishes, and then click [Confirm/Confirm]. After confirmation, select whether the returned dishes should be counted as losses (if counted as losses, the corresponding inventory of the dishes will be deducted; if not counted as losses, the inventory of the dishes will be restored by the corresponding quantity of returned dishes), and finally complete the dish return.
- The dish cancellation message will also notify the kitchen KDS system to alert the chef (the store needs to be equipped with the corresponding device).
Guest Self-service Ordering - Order Receiving
- After guests use their mobile phones to scan the QR code on the dining table to place an order self-service, the cashier needs to confirm the order;
- New orders will trigger pop-up and sound alerts;
- The cashier confirms the dish information and table number information in the pop-up window. If there are no issues, click [Accept Order/Reject Order] to complete the order acceptance;
- If the device has printing paper installed, it will automatically print the order ticket;
- Dish order information will automatically arrive at the back-of-house KDS system (the store needs to be equipped with the corresponding device).
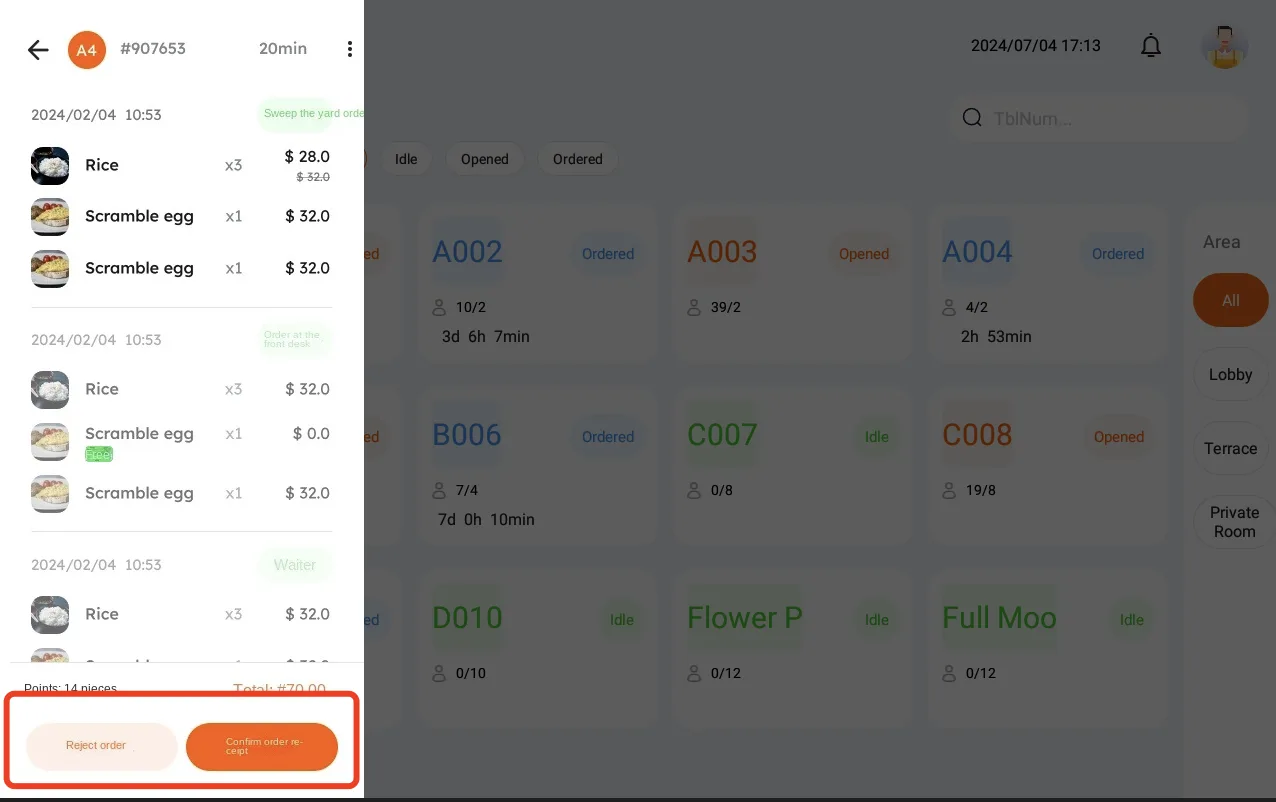
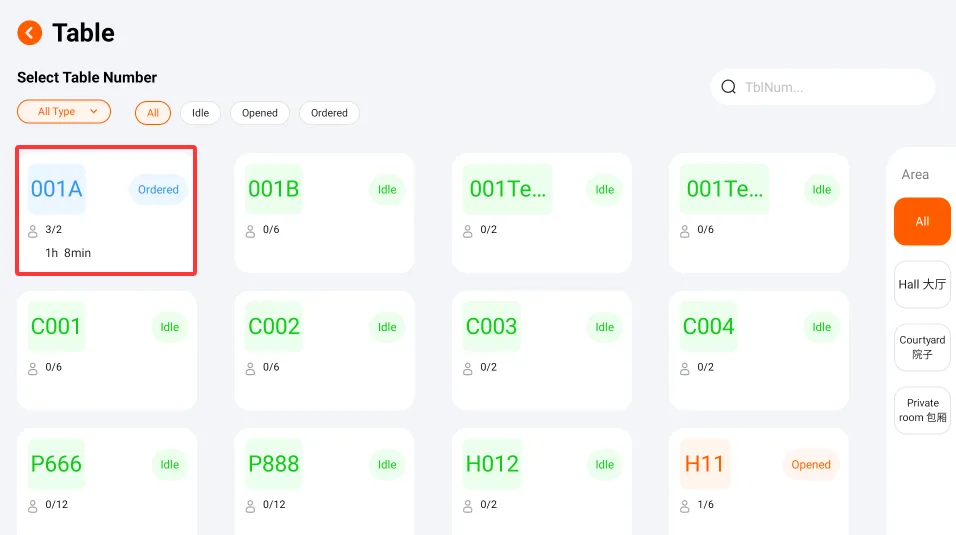
Guest Checkout
When a guest needs to settle the bill, click the guest's table number card;
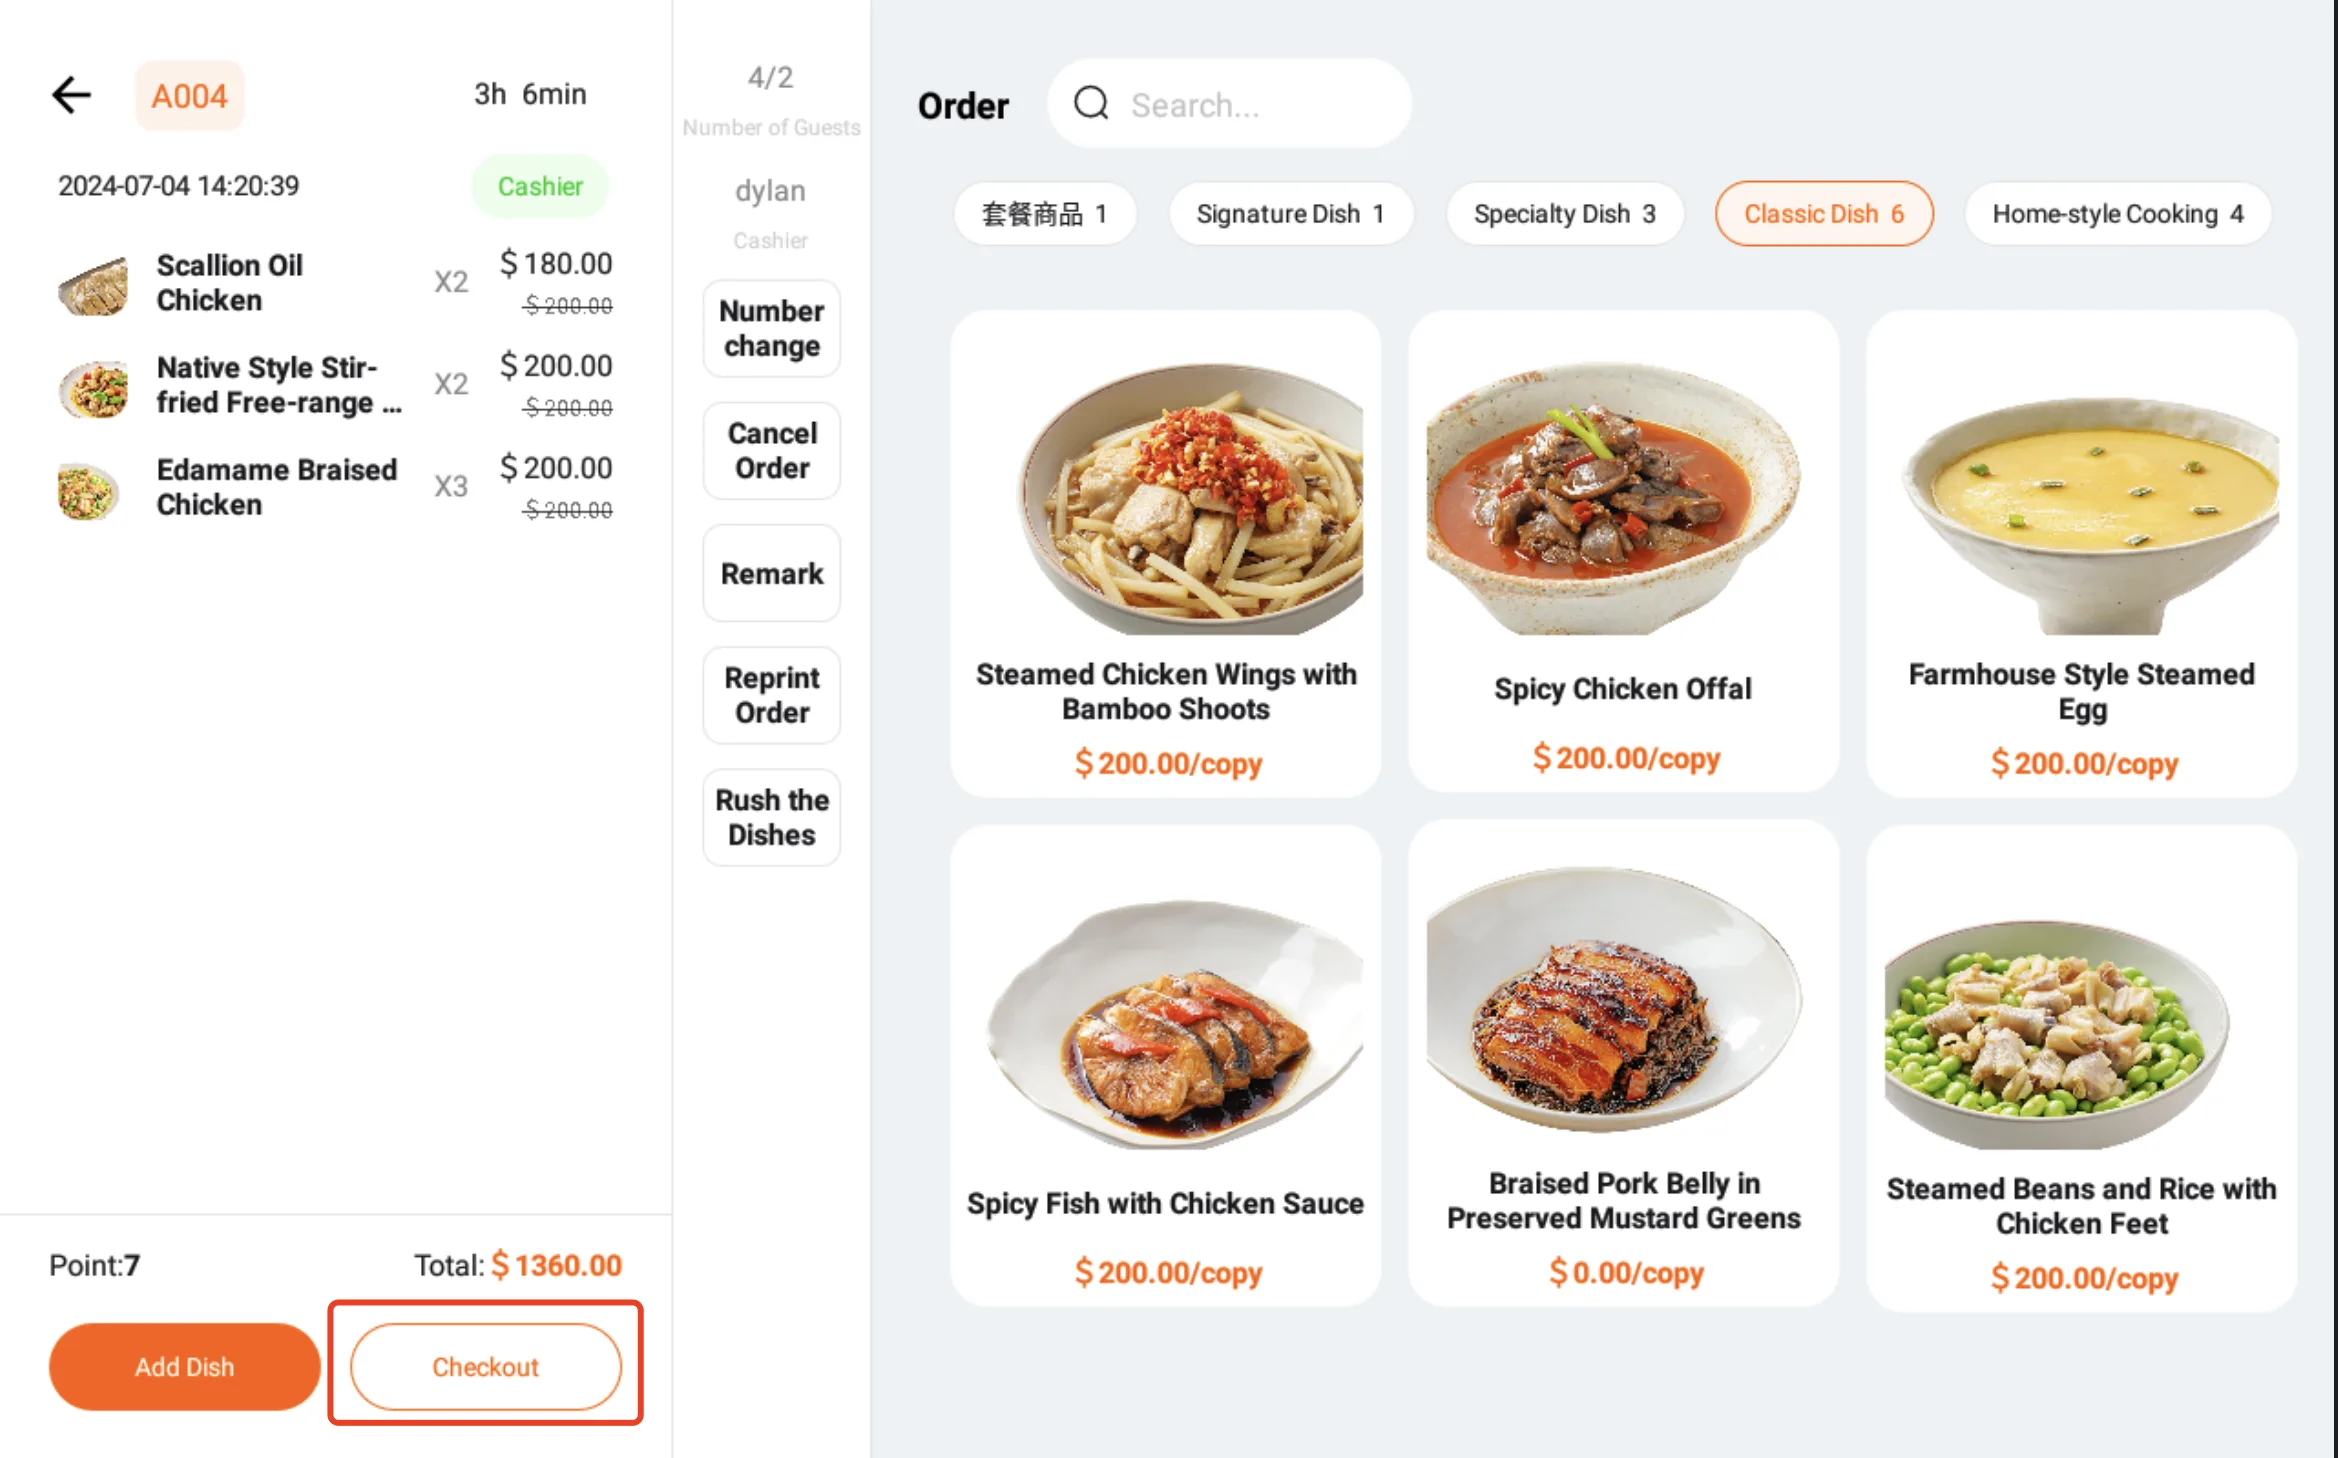
Click the [Checkout] button at the bottom left;
Check the amount, the amount the guest should pay will be displayed in the middle (above the payment method);
Note
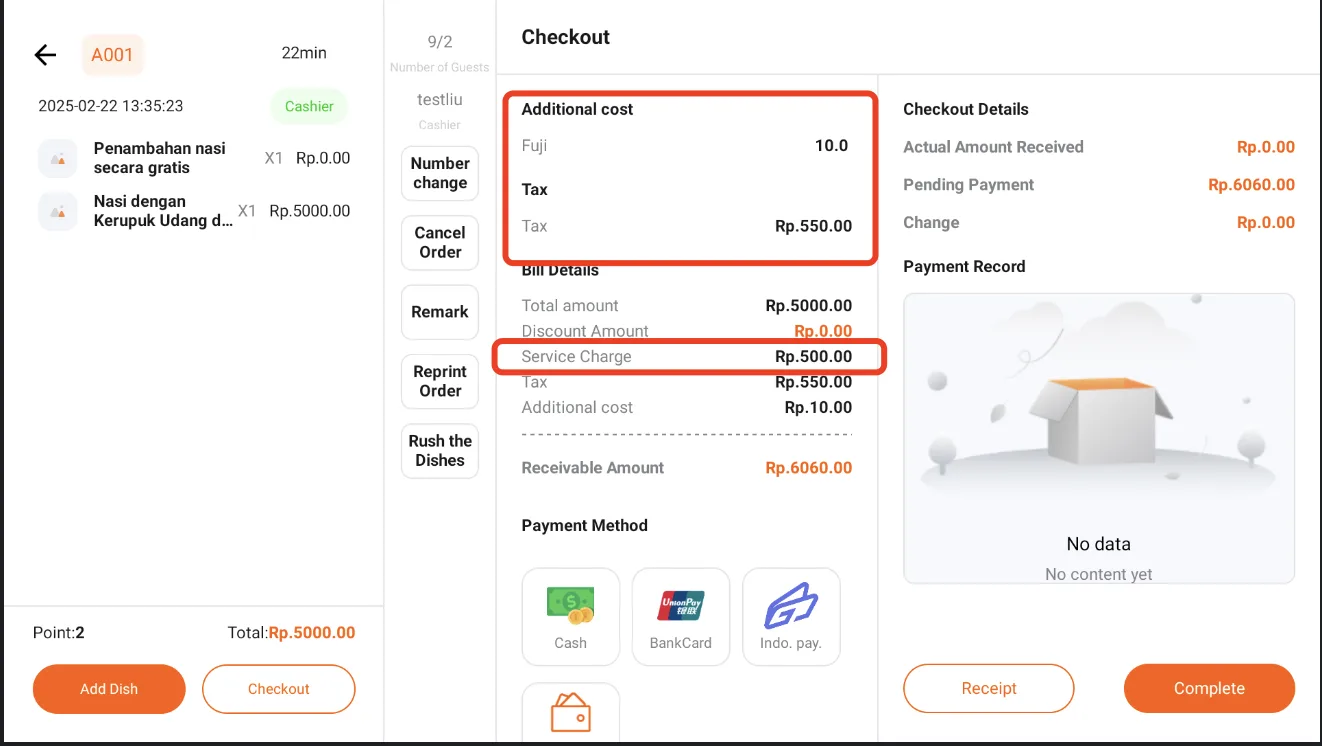
The surcharge is calculated based on the collection ratio set in the store management backend. For details, see "Instructions for Using the Store Management System"
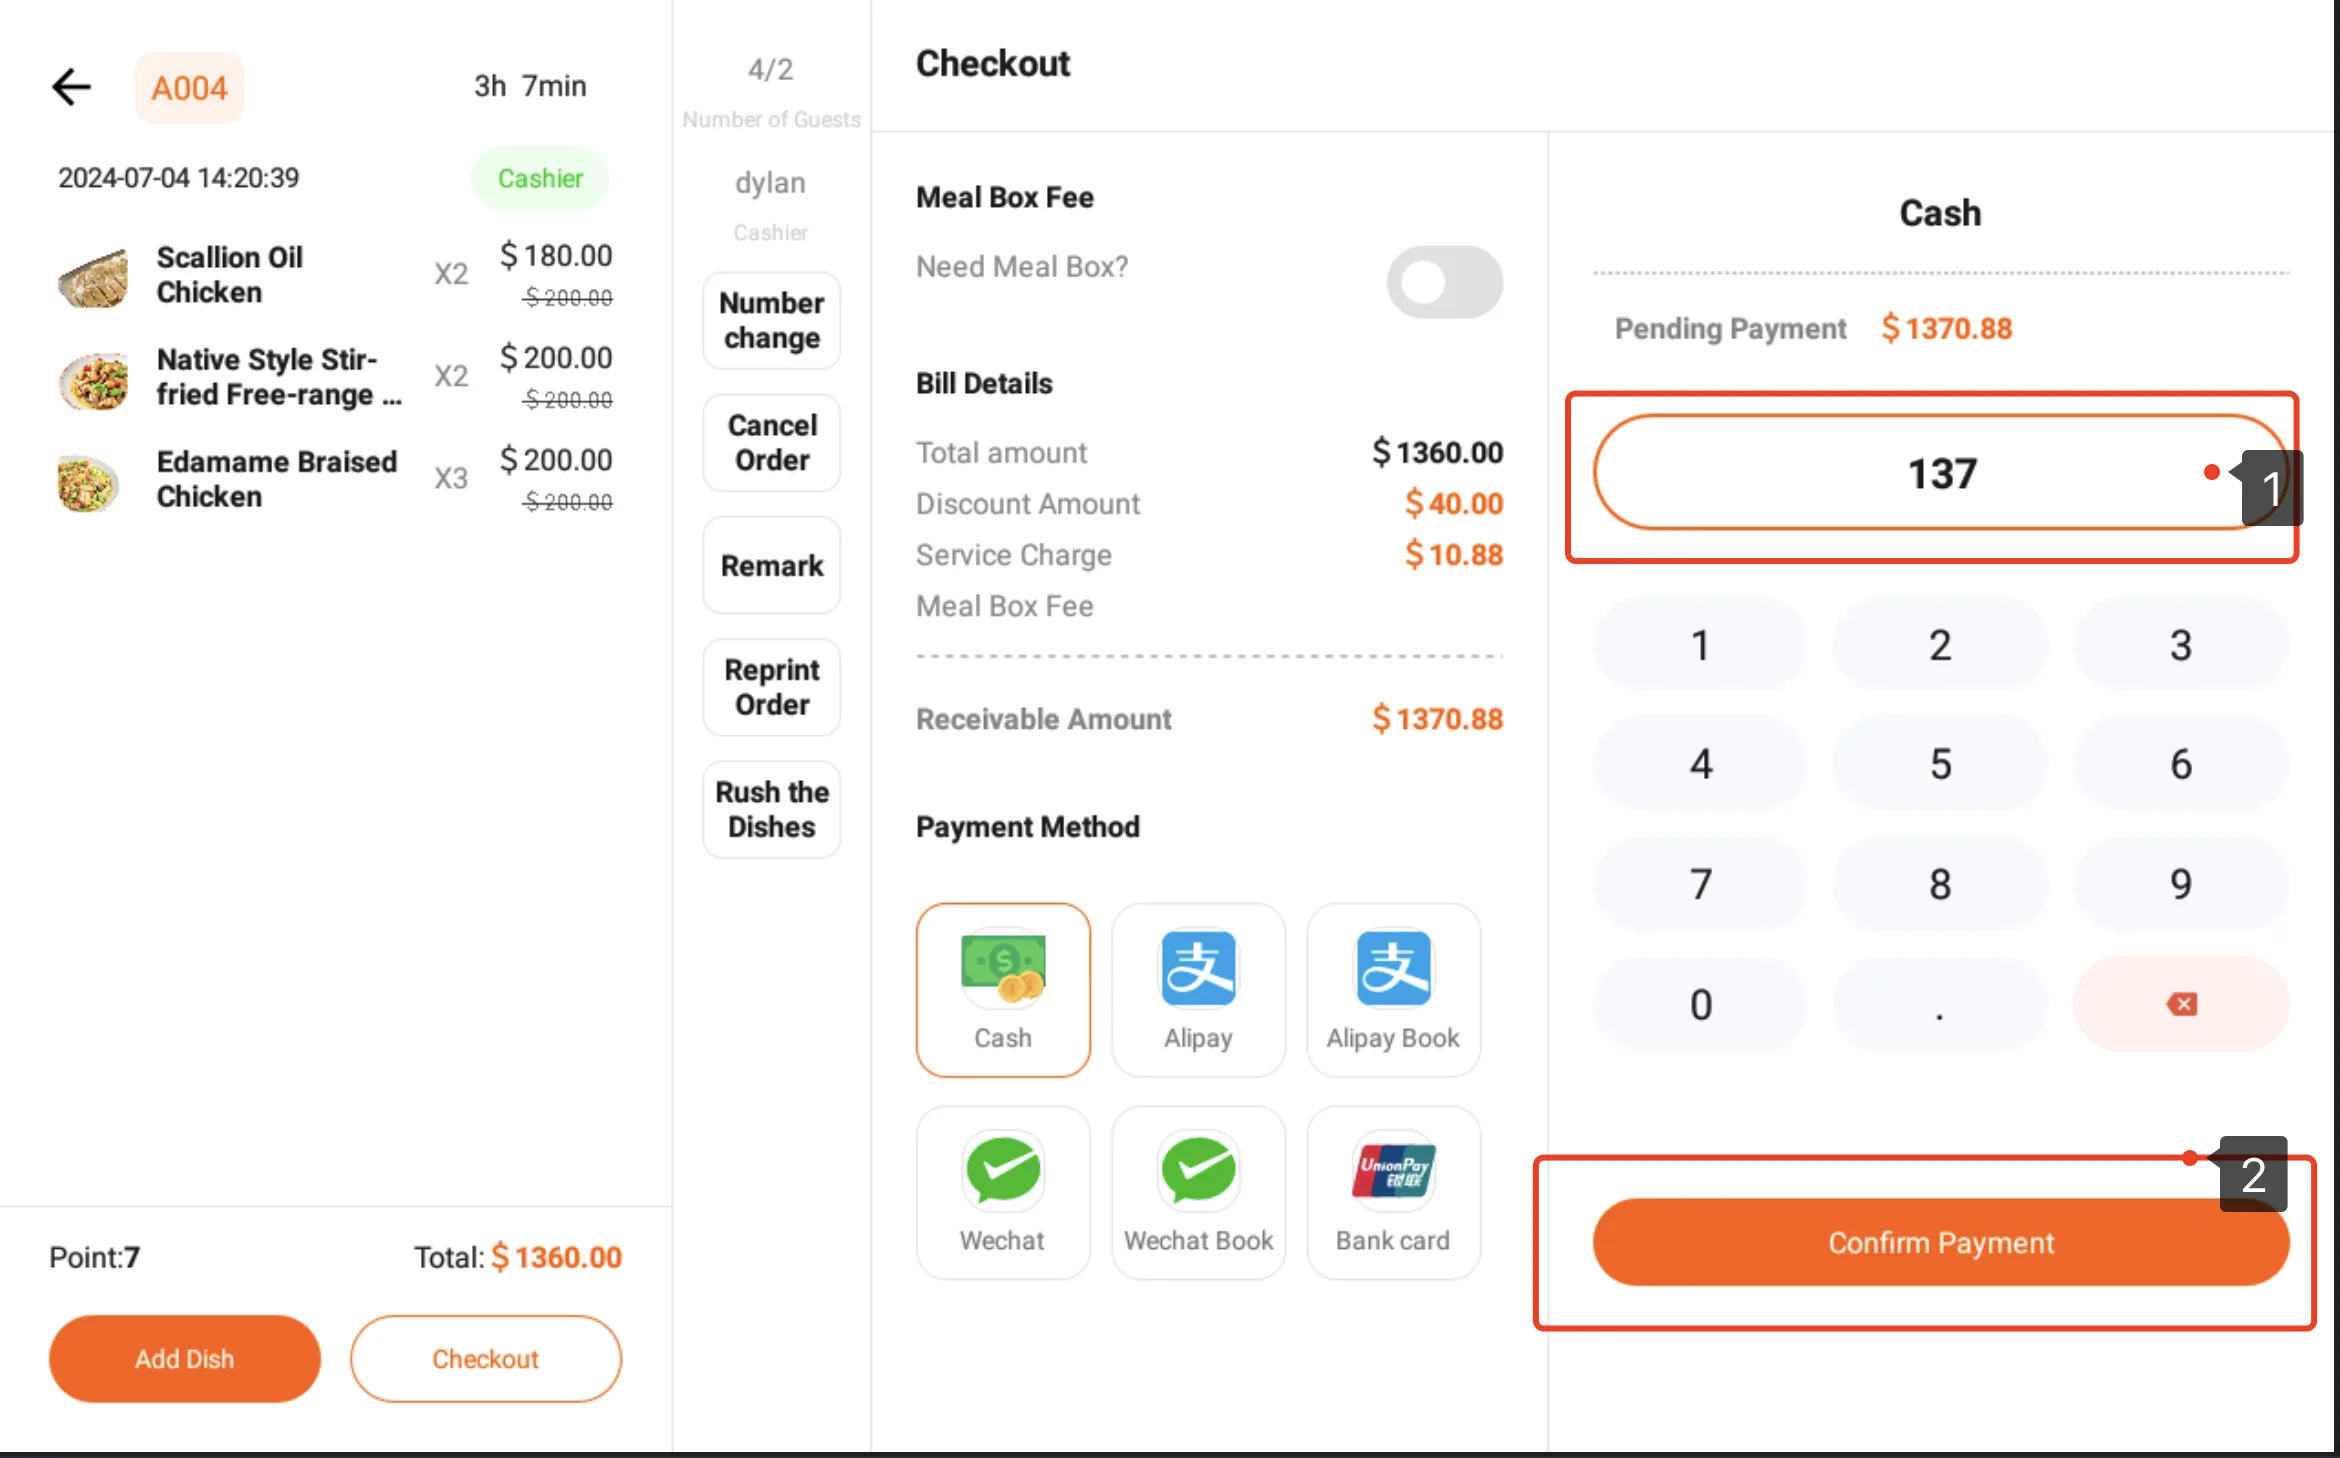
Select the guest's payment method, with 'cash' payment as an example below;
Click [Cash];
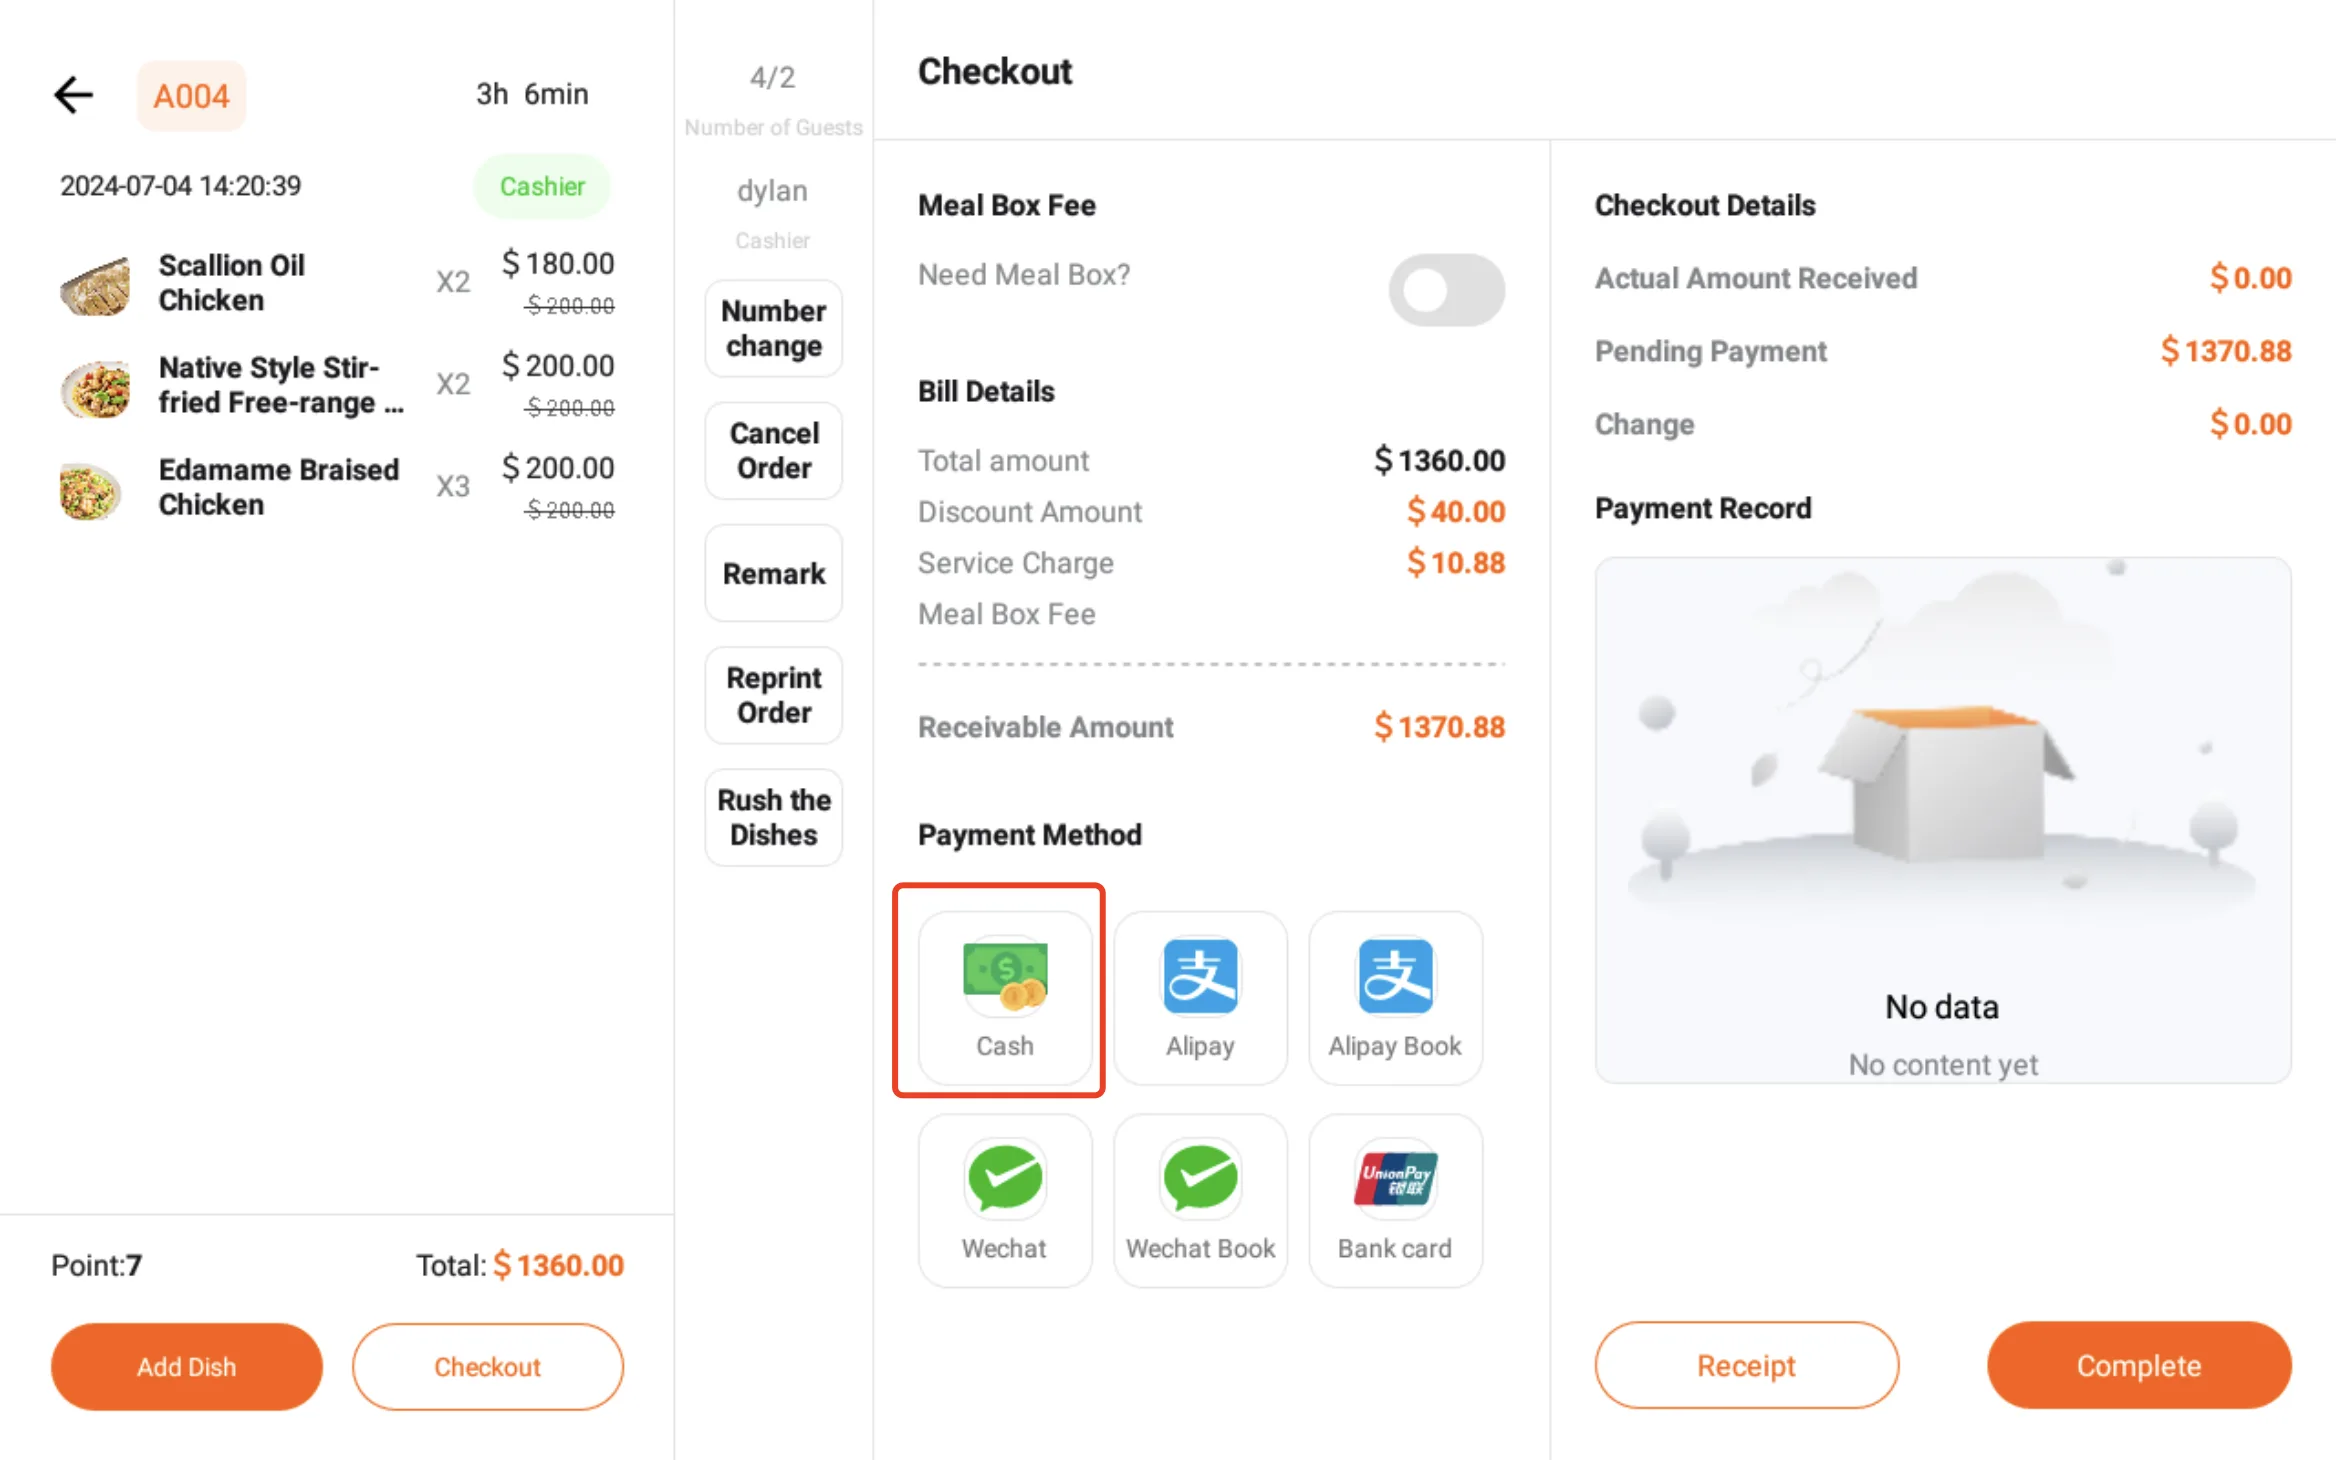
The amount in the right-side pop-up window defaults to displaying the amount the guest should pay and can be modified based on the actual amount paid by the guest;
Note
If a cash drawer is equipped, selecting cash payment will automatically pop it open
After confirming that everything is correct, click [Confirm Payment];
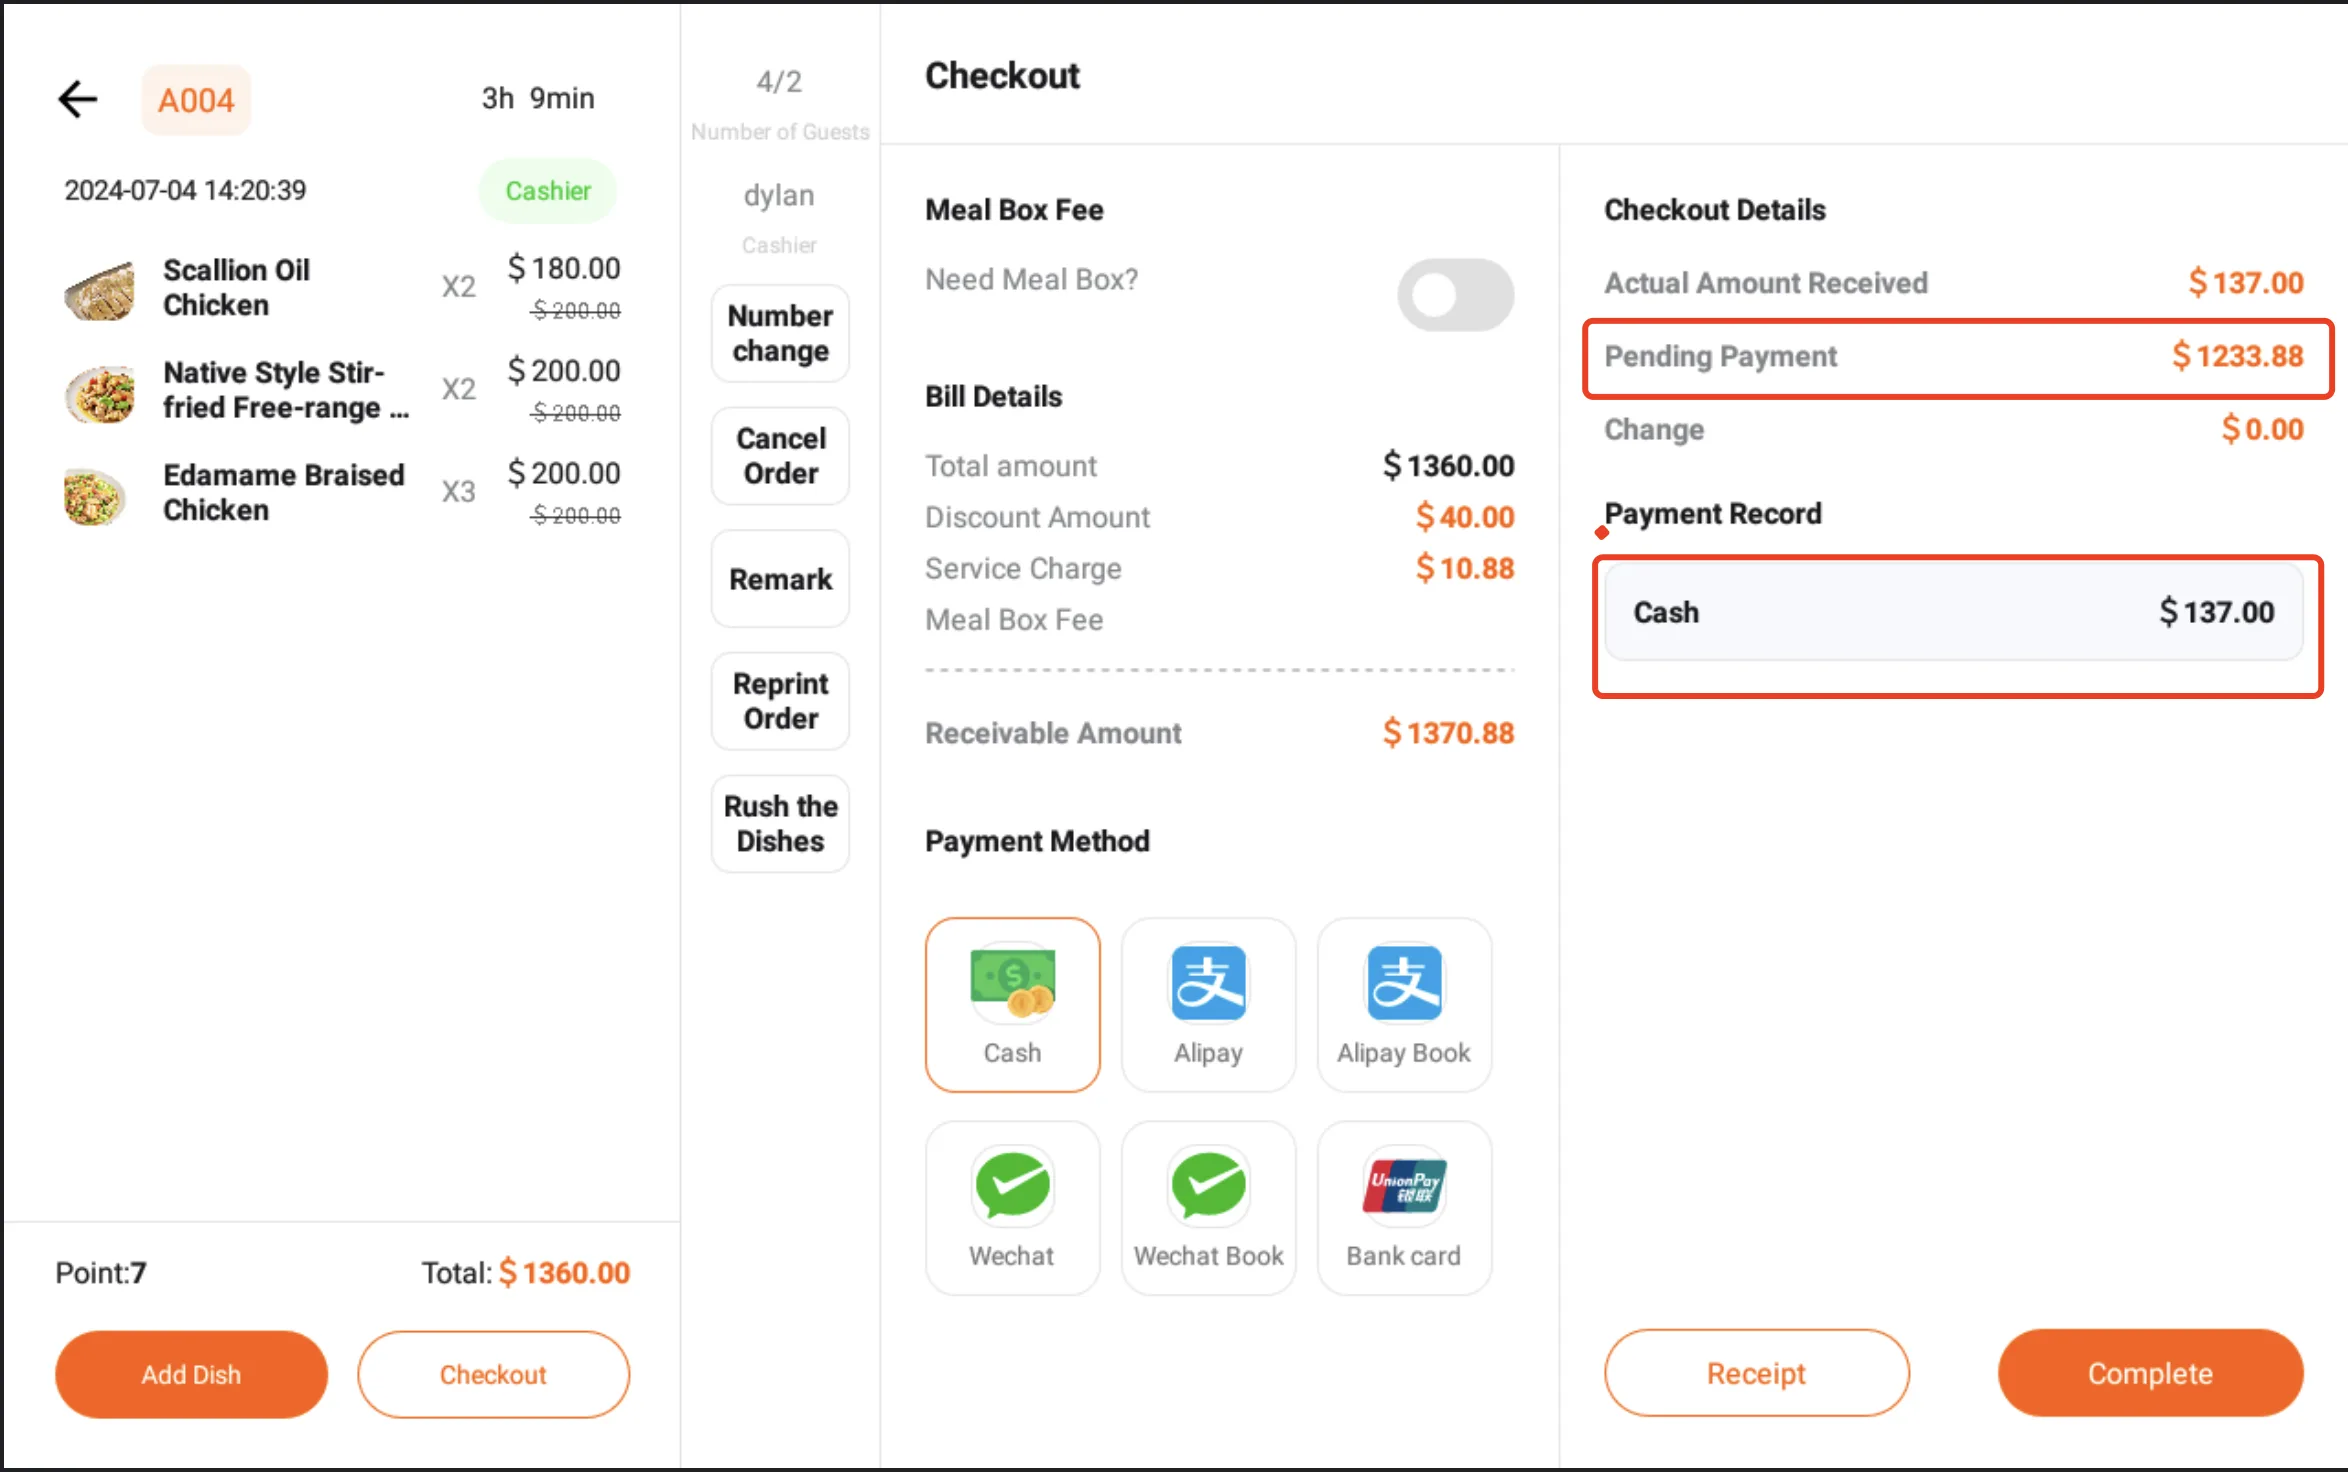
The upper right section will display the total amount paid and the remaining amount to be paid (if not fully paid in one lump sum);
The payment record will show the payment method and amount for each payment of this bill;
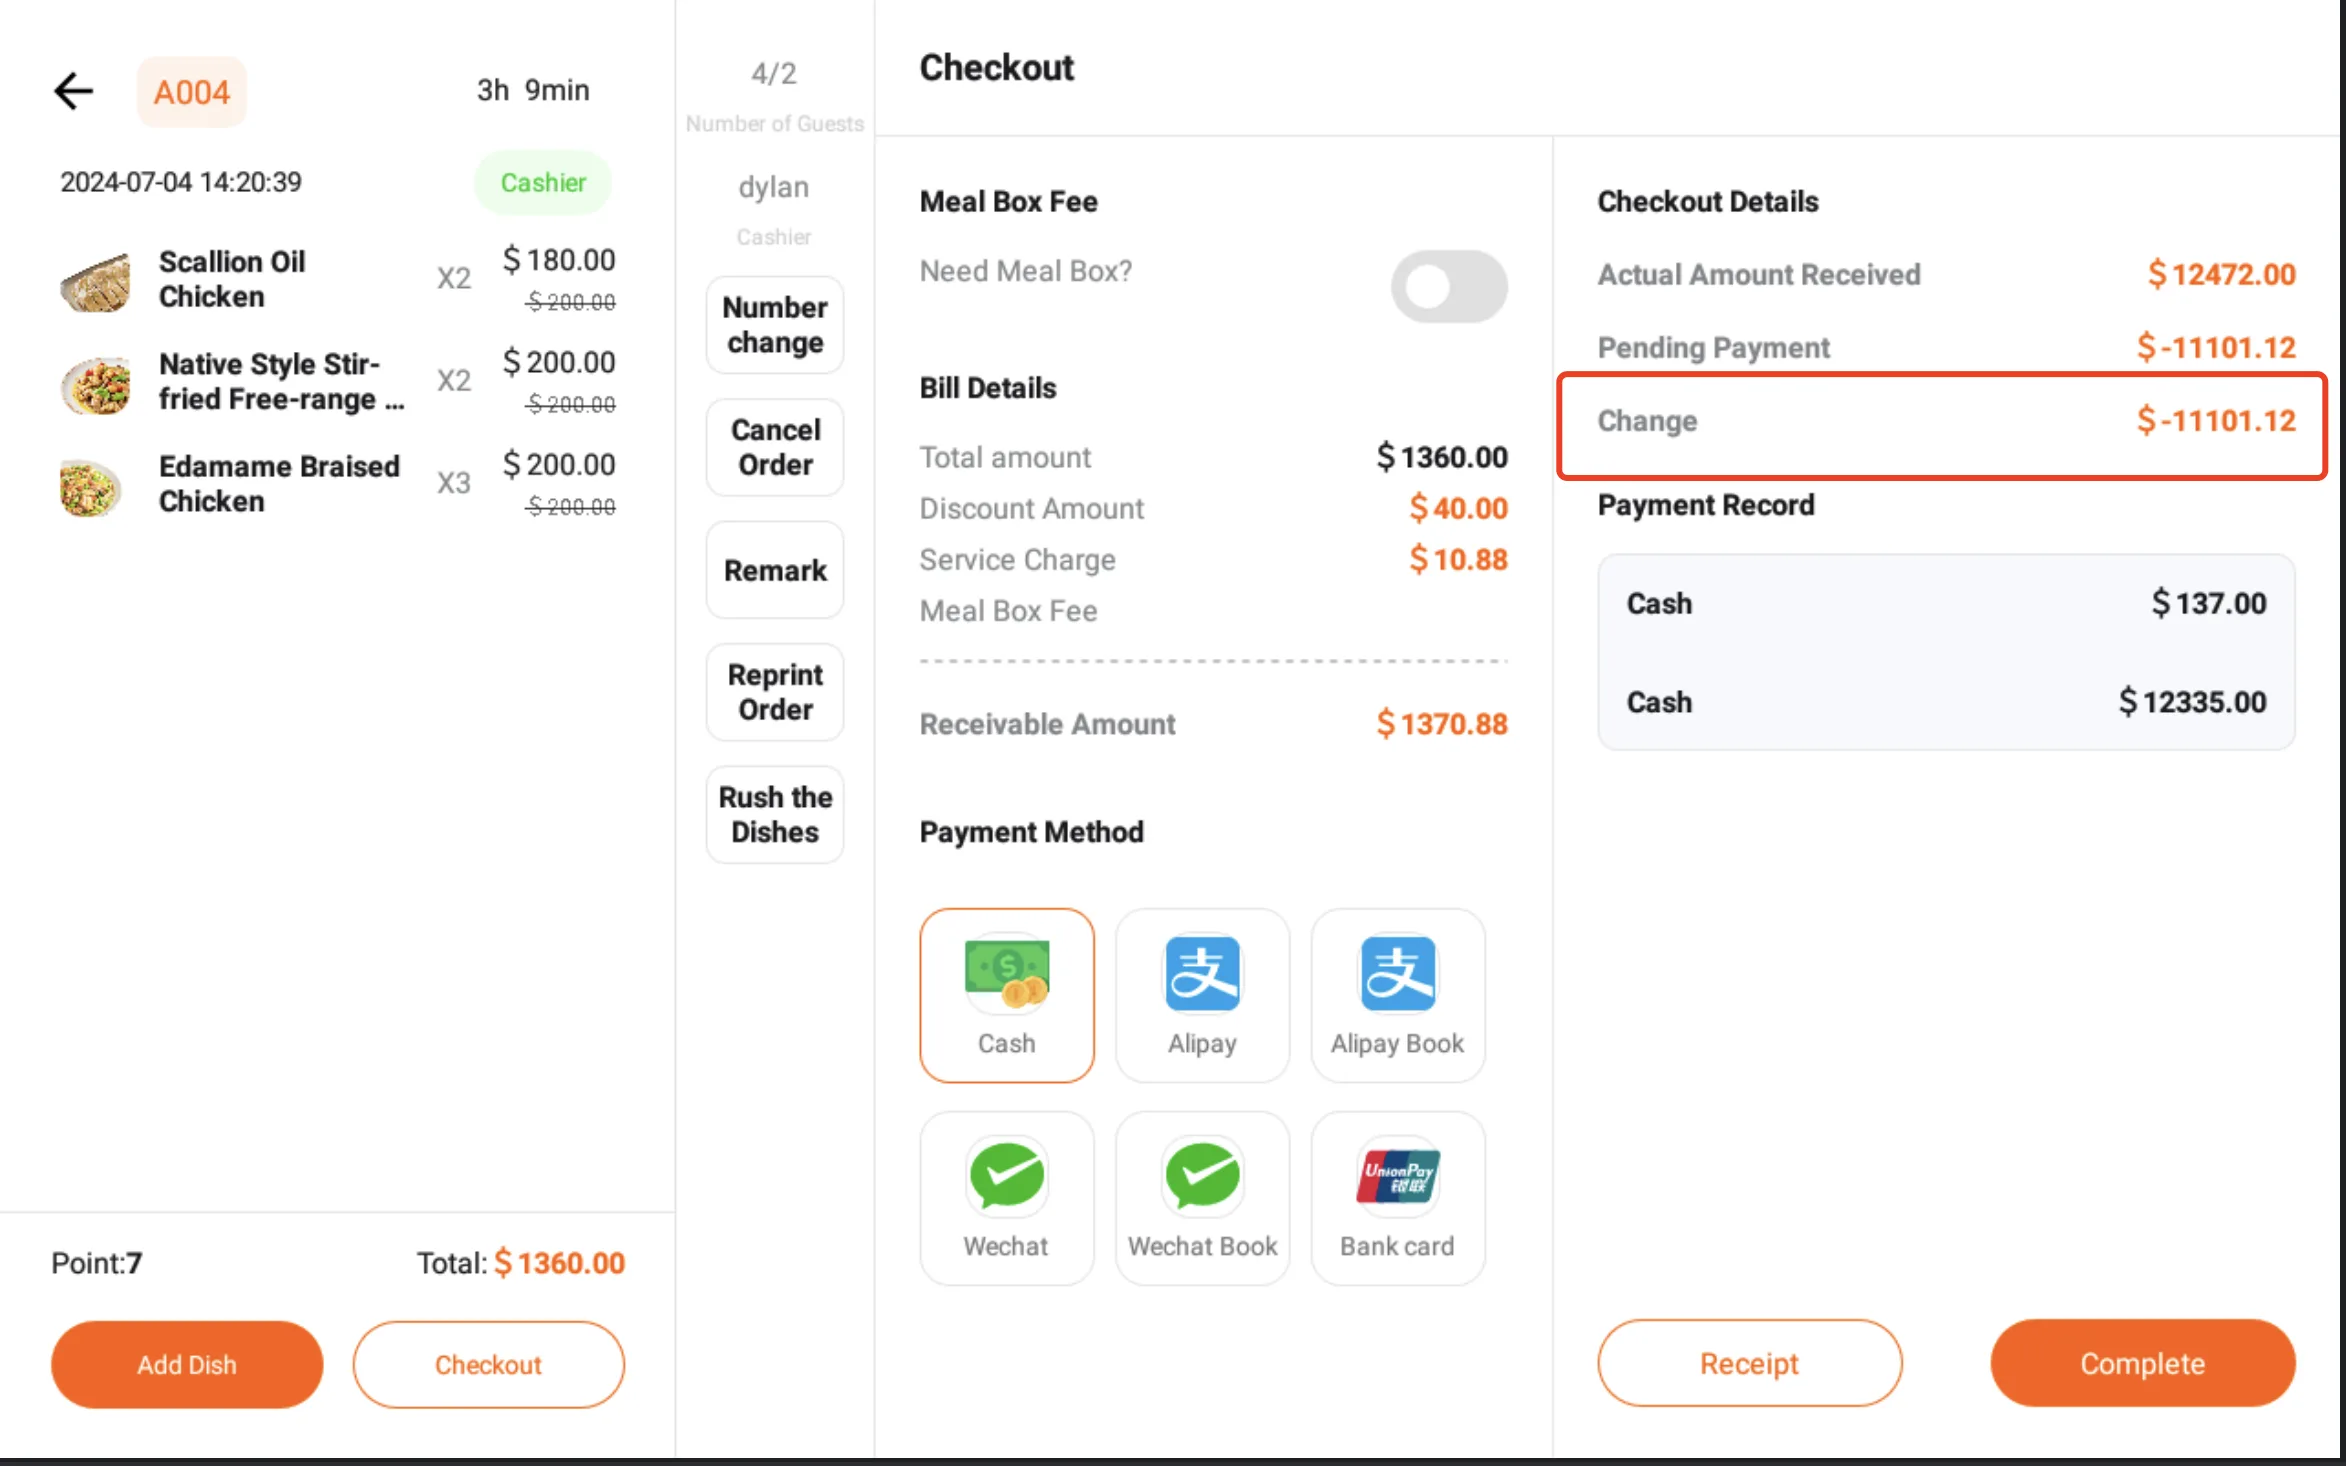
If the payment/collection amount is greater than the payable amount, i.e., when we need to give change to the guest, the amount of change to be given will be displayed;
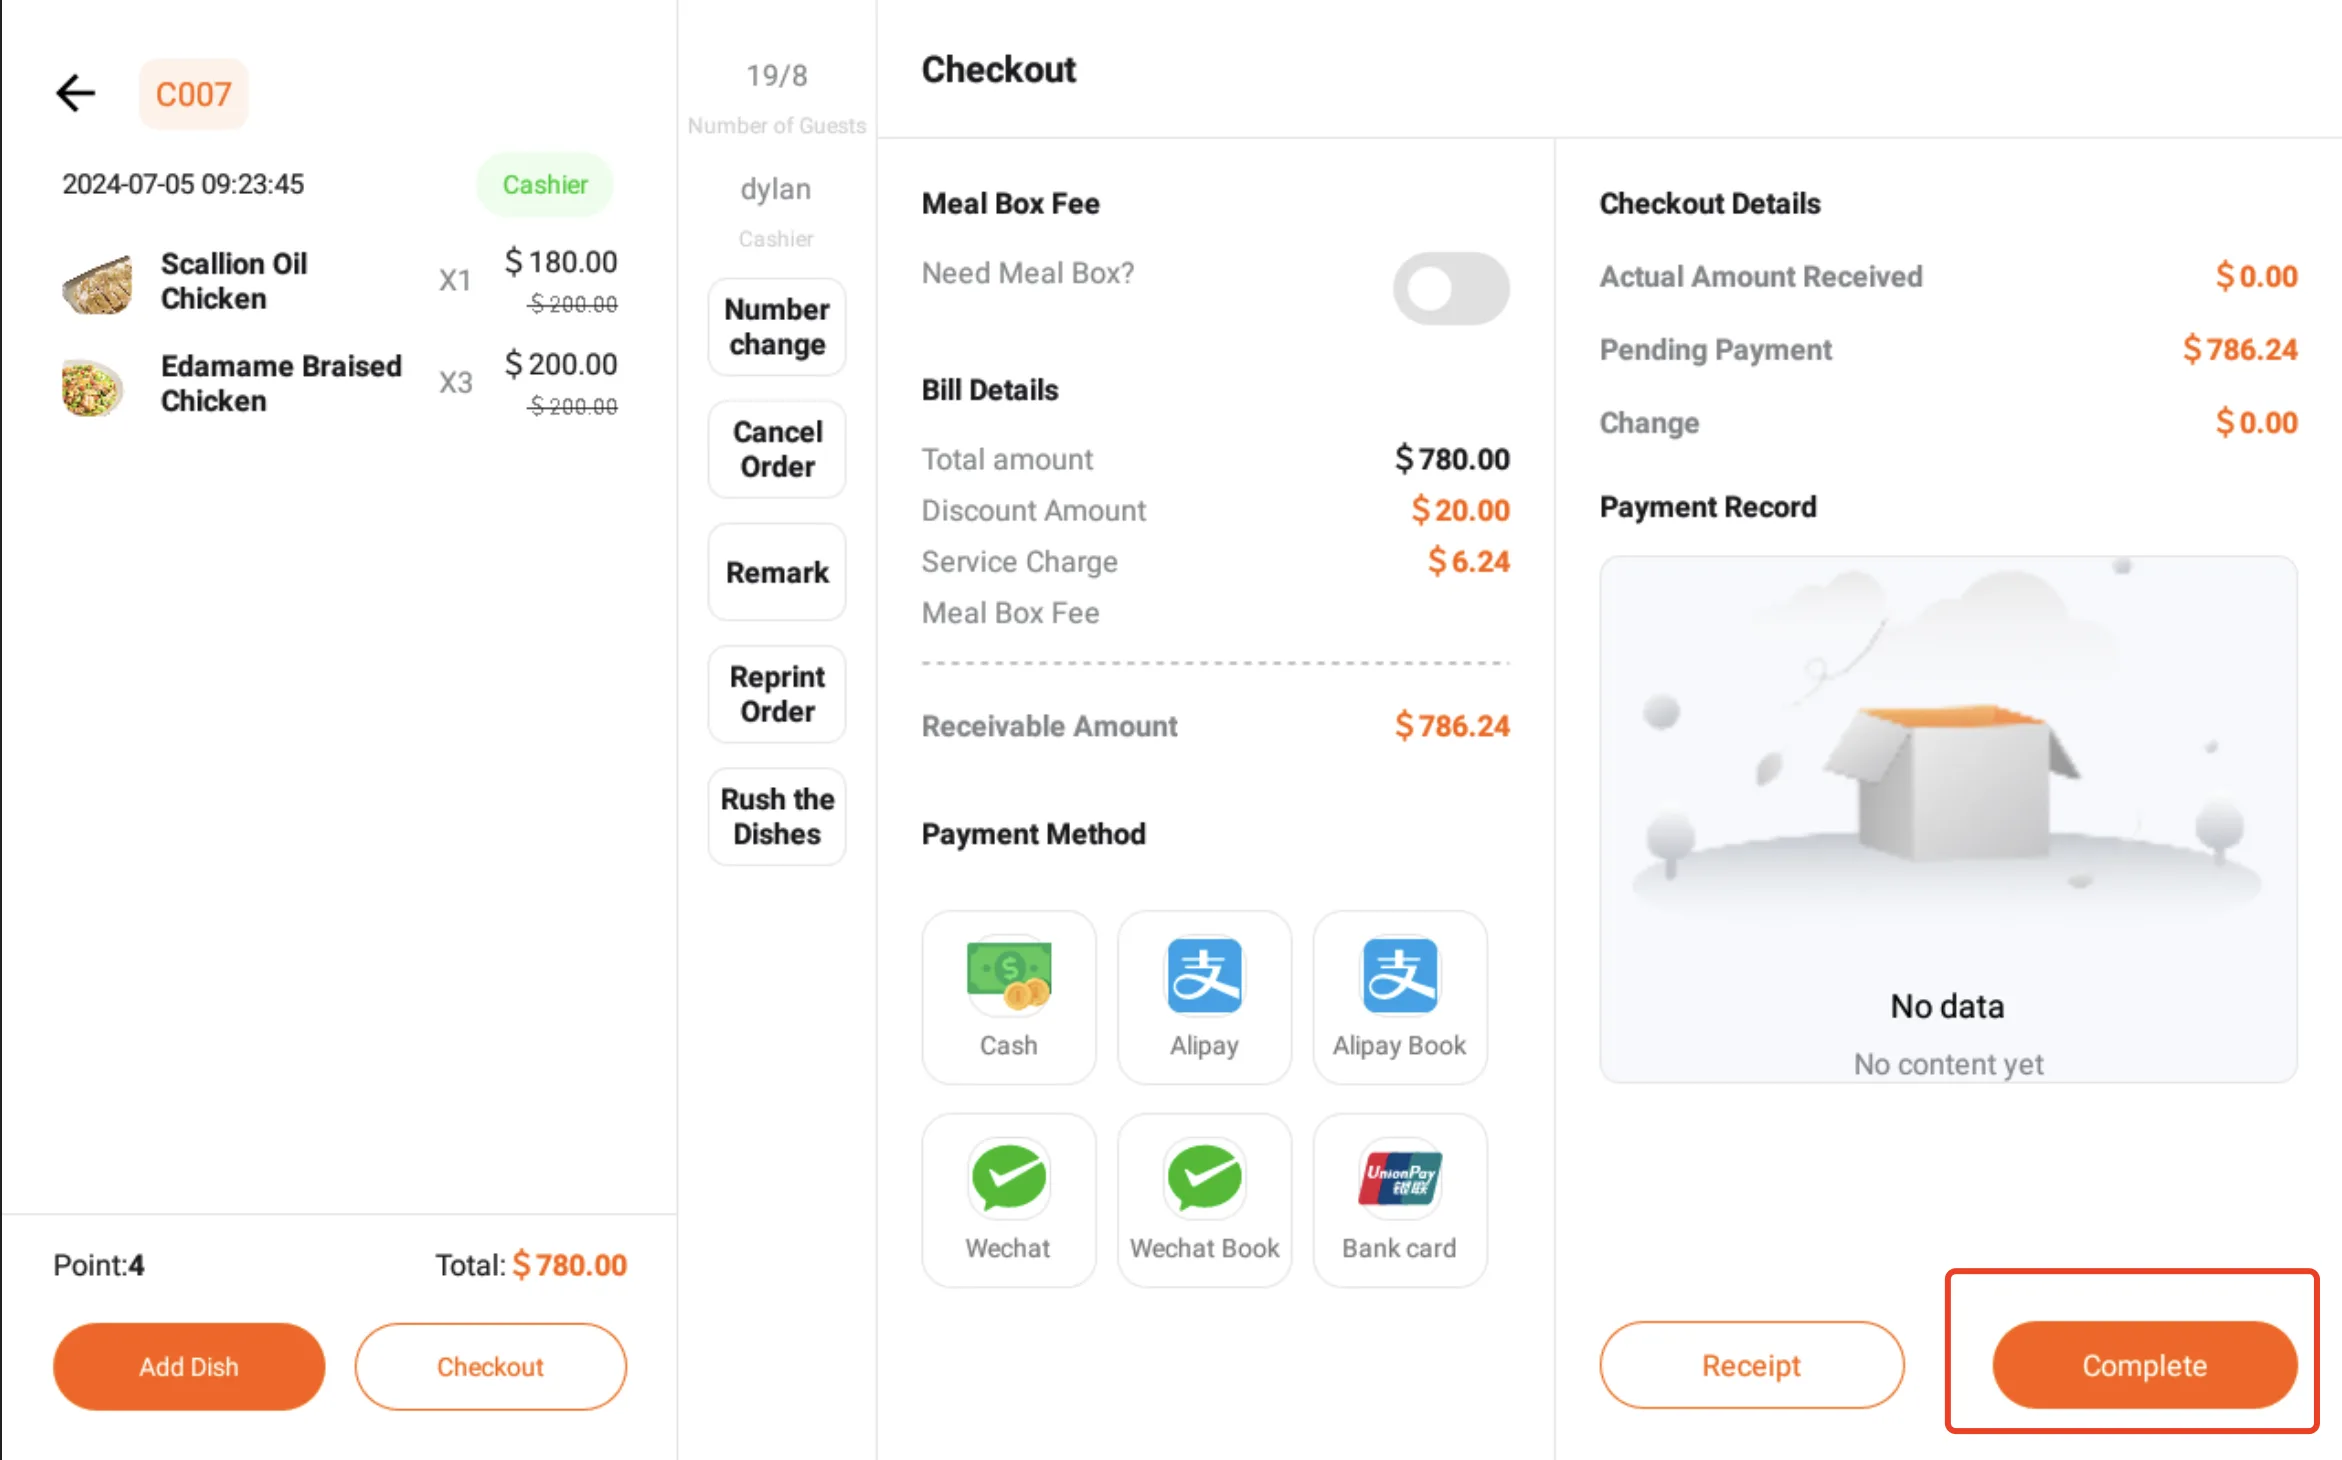
After the guest has finished dining and paid the full amount, click [Complete], and the bill will change to the completed status;
If printing paper is installed, the printer will automatically print receipts;
At this time, the dining table will be released and become idle.
Note
If it is a prepayment, i.e., the guest has paid the full amount before completing the meal, there is no need to click [Complete/Complete], so the table remains in use; Clicking on [Receipt] allows you to pre-print a receipt.
Other payment methods: Based on regional or store operational requirements and the actual support status of access, the system supports multiple electronic payment methods.
WeChat Pay, Alipay: When either of these two payment methods is selected, the payment QR code will be displayed on both the main screen and the customer screen (if a customer screen is configured). Customers only need to scan the QR code to complete the payment, without manually entering the payment amount during the process.
WeChat Payment, Alipay: These options allow customers to scan the fixed payment QR code provided by the store using the corresponding app on their mobile phones and manually complete the payment. Once the payment is successful, the cashier should click the corresponding "record payment" button on the cash register to confirm the transaction.
Bank card payment: The operation process of this payment method is similar to that of bookkeeping. First, the customer completes the bank card swiping operation through the card swiping device, and then the cashier needs to click "Bank card" on the cash register to confirm the transaction.
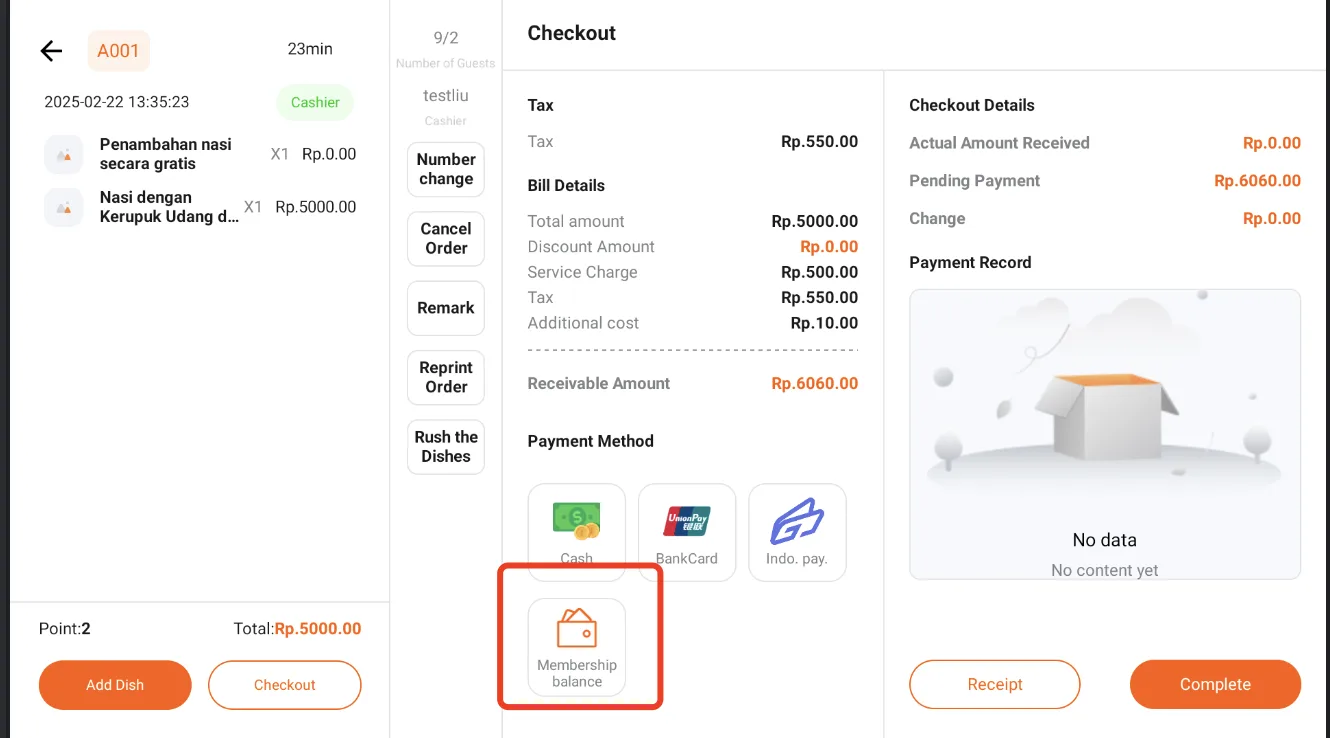
Member balance payment (for details of member functions, see the description below):
- When checking out, select "Member Balance". In the pop-up window, enter the guest's mobile phone number or membership number for retrieval, and select the correct member.
- Click "Confirm Payment" to complete the payment.
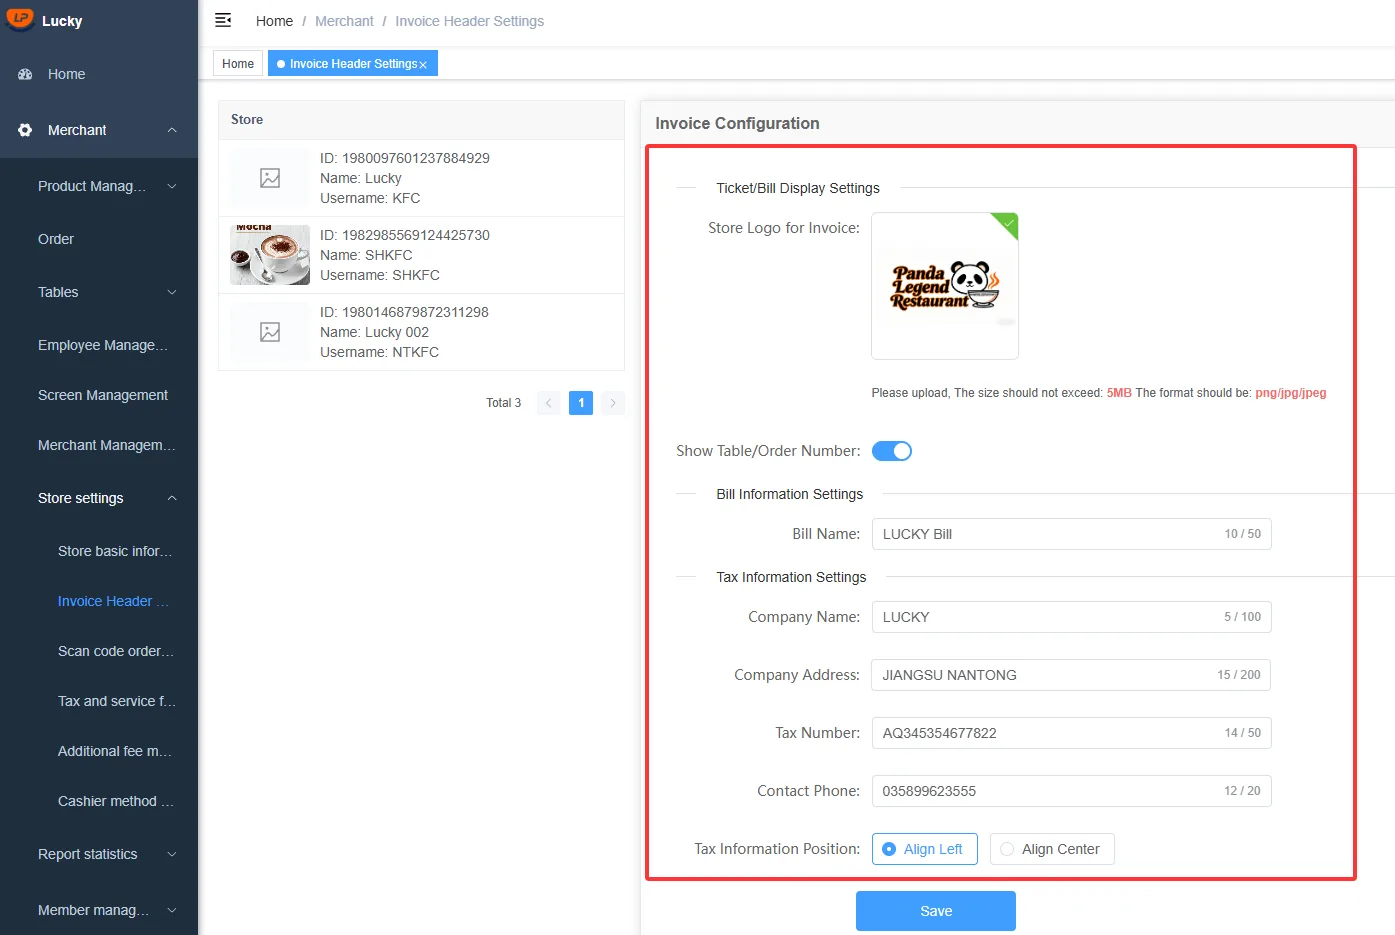
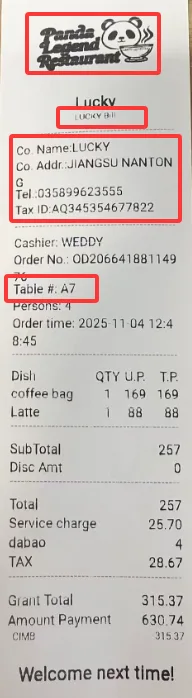
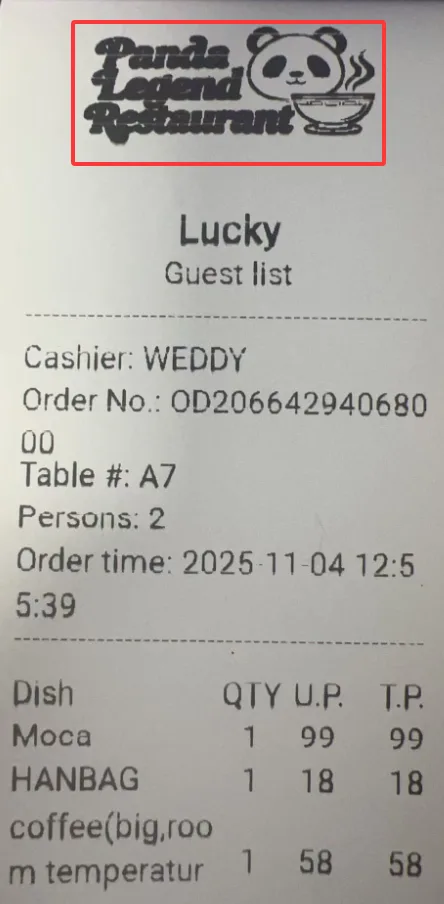
Bill Settlement/Guest Receipt Printing
- According to the settings of the billing header in the order management backend, the settlement bill and customer bill display the corresponding printed content.
Surcharges, service fees, taxes, etc.
- If guests incur other expenses in addition to the cost of dishes, they need to be configured in advance in the store management backend.
- During settlement, relevant fees will be automatically calculated and added to the amount payable.
Whole order discount and free order
Note
- Currently, the overall order discount and free order, as temporary customized features of the store, are only used to deduct expenses at checkout. Since the system does not currently provide relevant functions for overall order discounts, these discounts will not be displayed in the discount information on the bill, and the discount amount in the shift handover report will not include this part either.
- The system will add support for promotional information in subsequent updates and supplement relevant attributes to accurately reflect information on order-wide discounts and free orders. At that time, this document will be updated accordingly.
At checkout, the cashier can provide customers with a full order discount or a free order promotion based on the store's event arrangements and on-site operational conditions. This requires verifying the authority by entering the store manager's password.
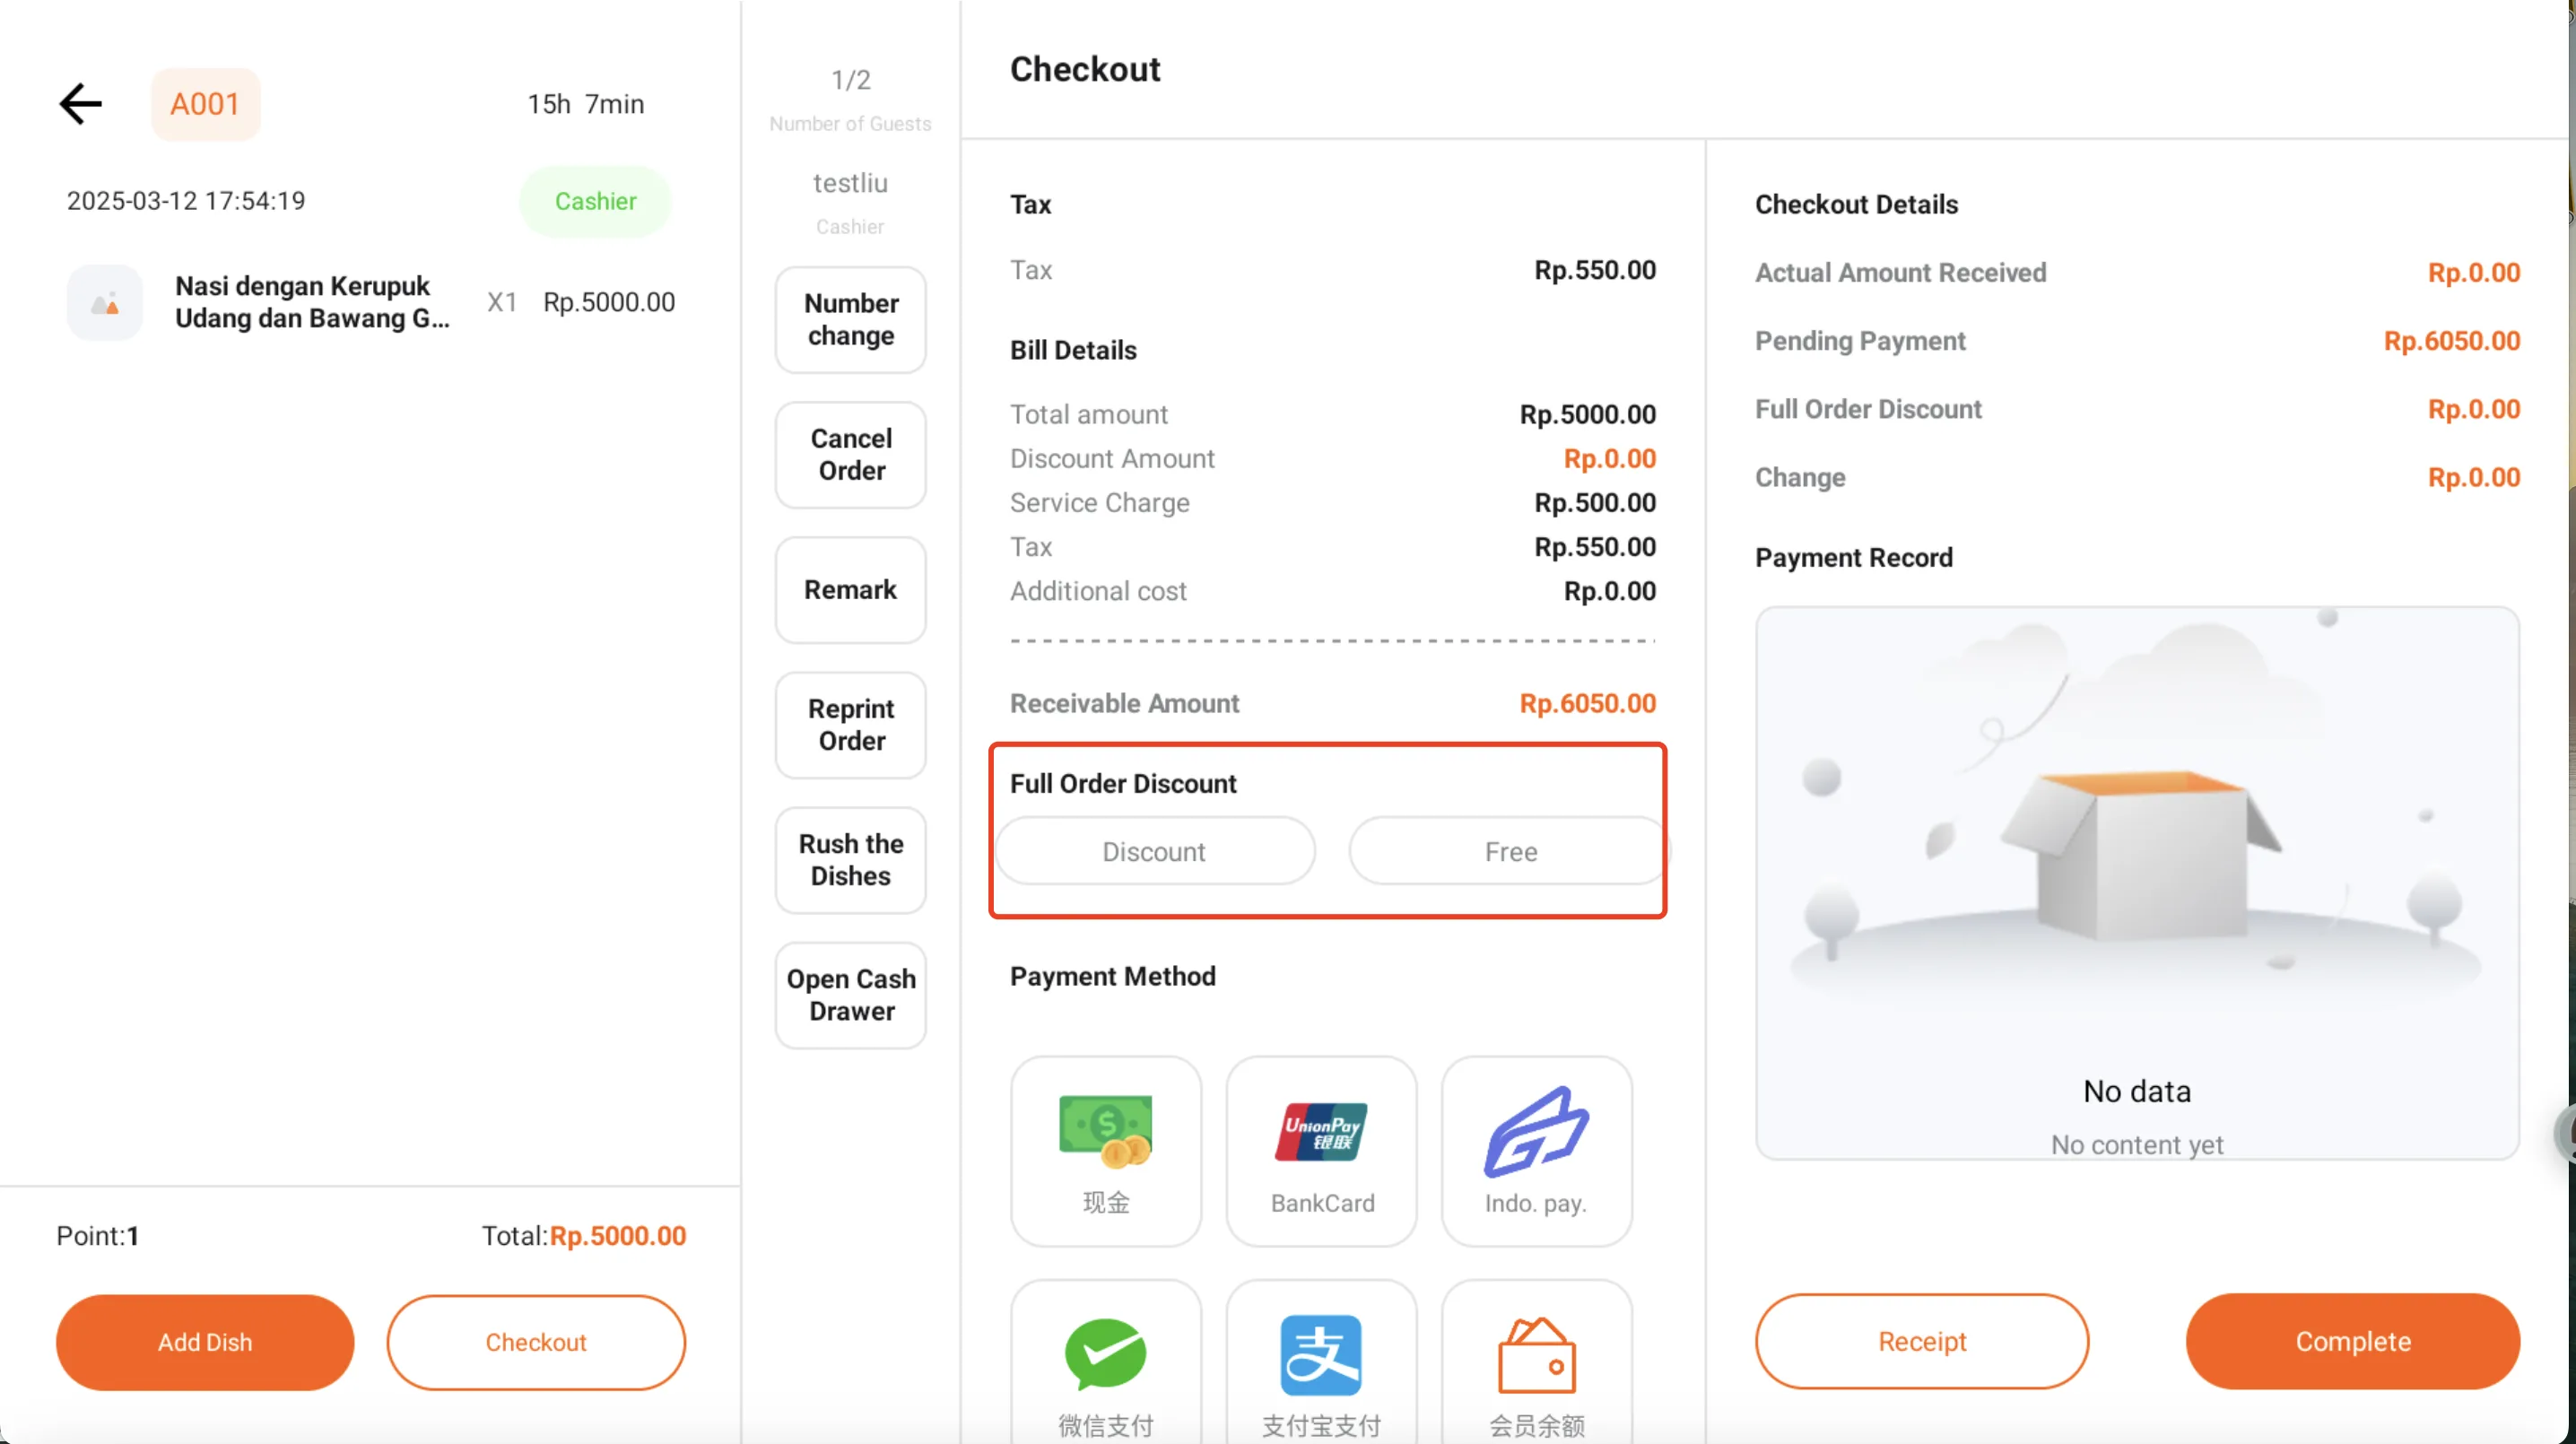
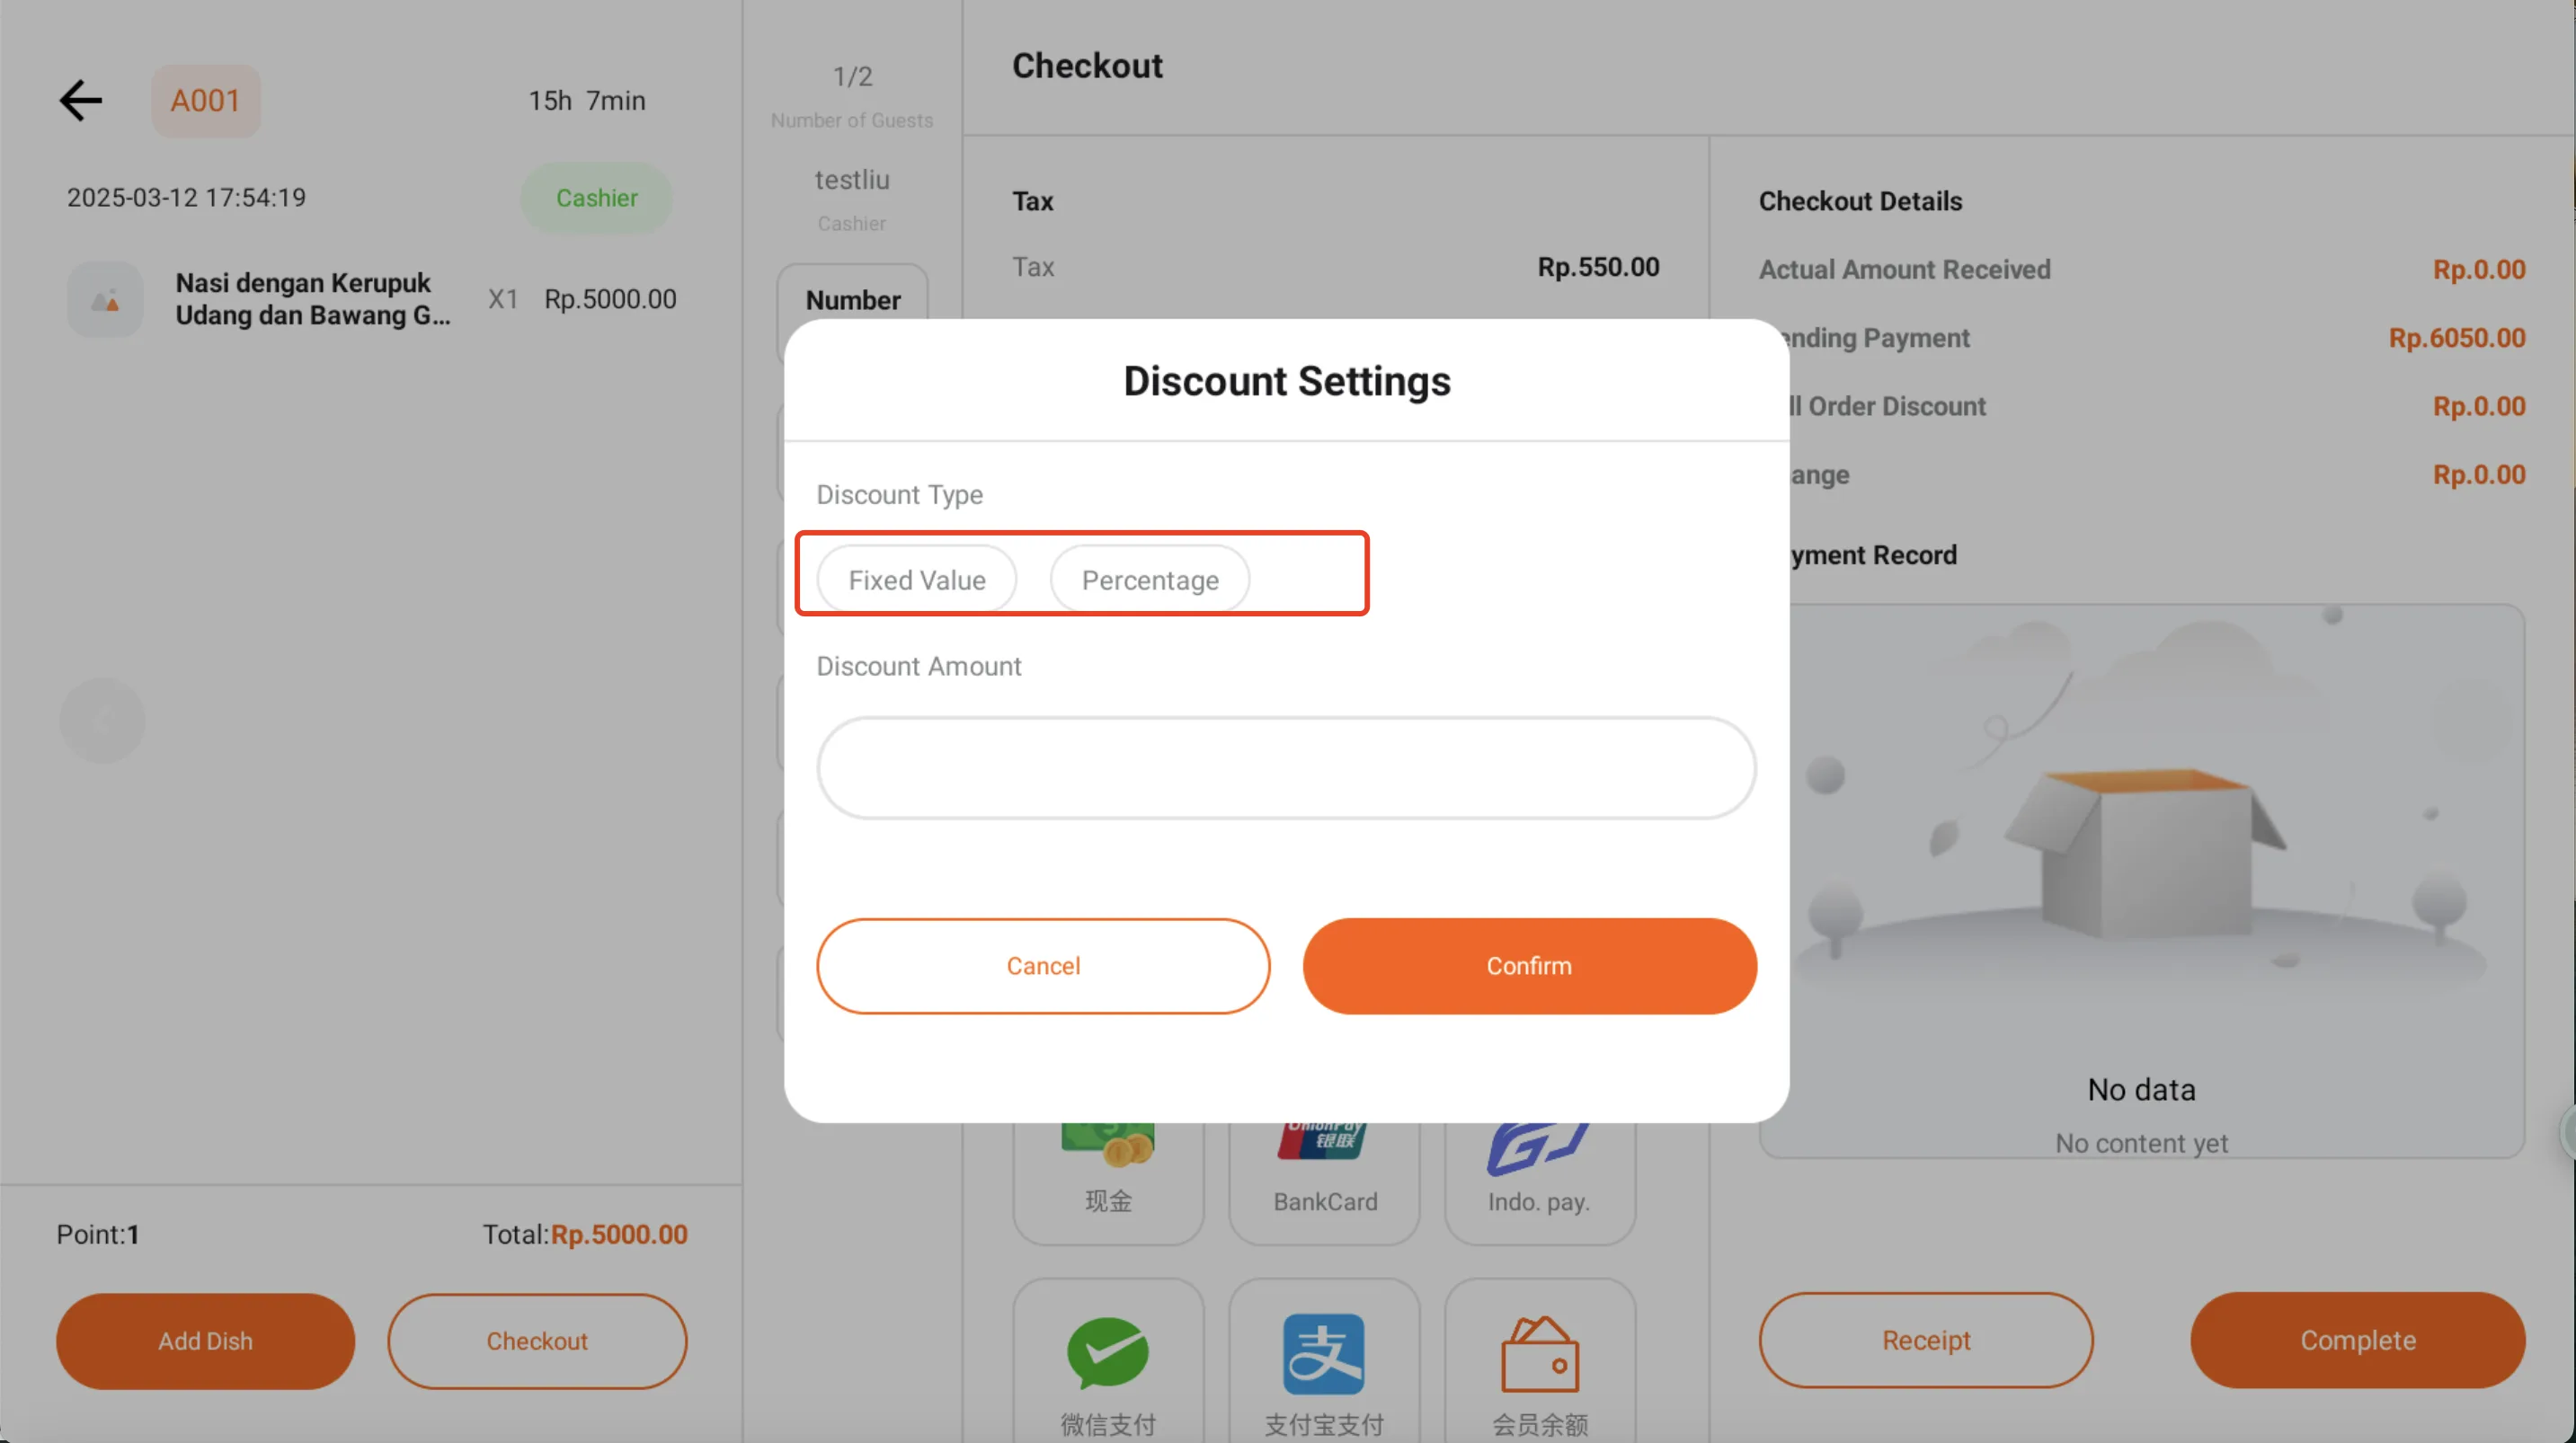
When selecting a discount or free order, the authority must be verified through the store manager's password. Discount methods include directly reducing a certain amount or reducing by a percentage of the total payable amount. When selecting a free order, the entire payable amount is directly waived.
After completing the checkout, the amount of the overall order discount given will be clearly displayed in the checkout details.
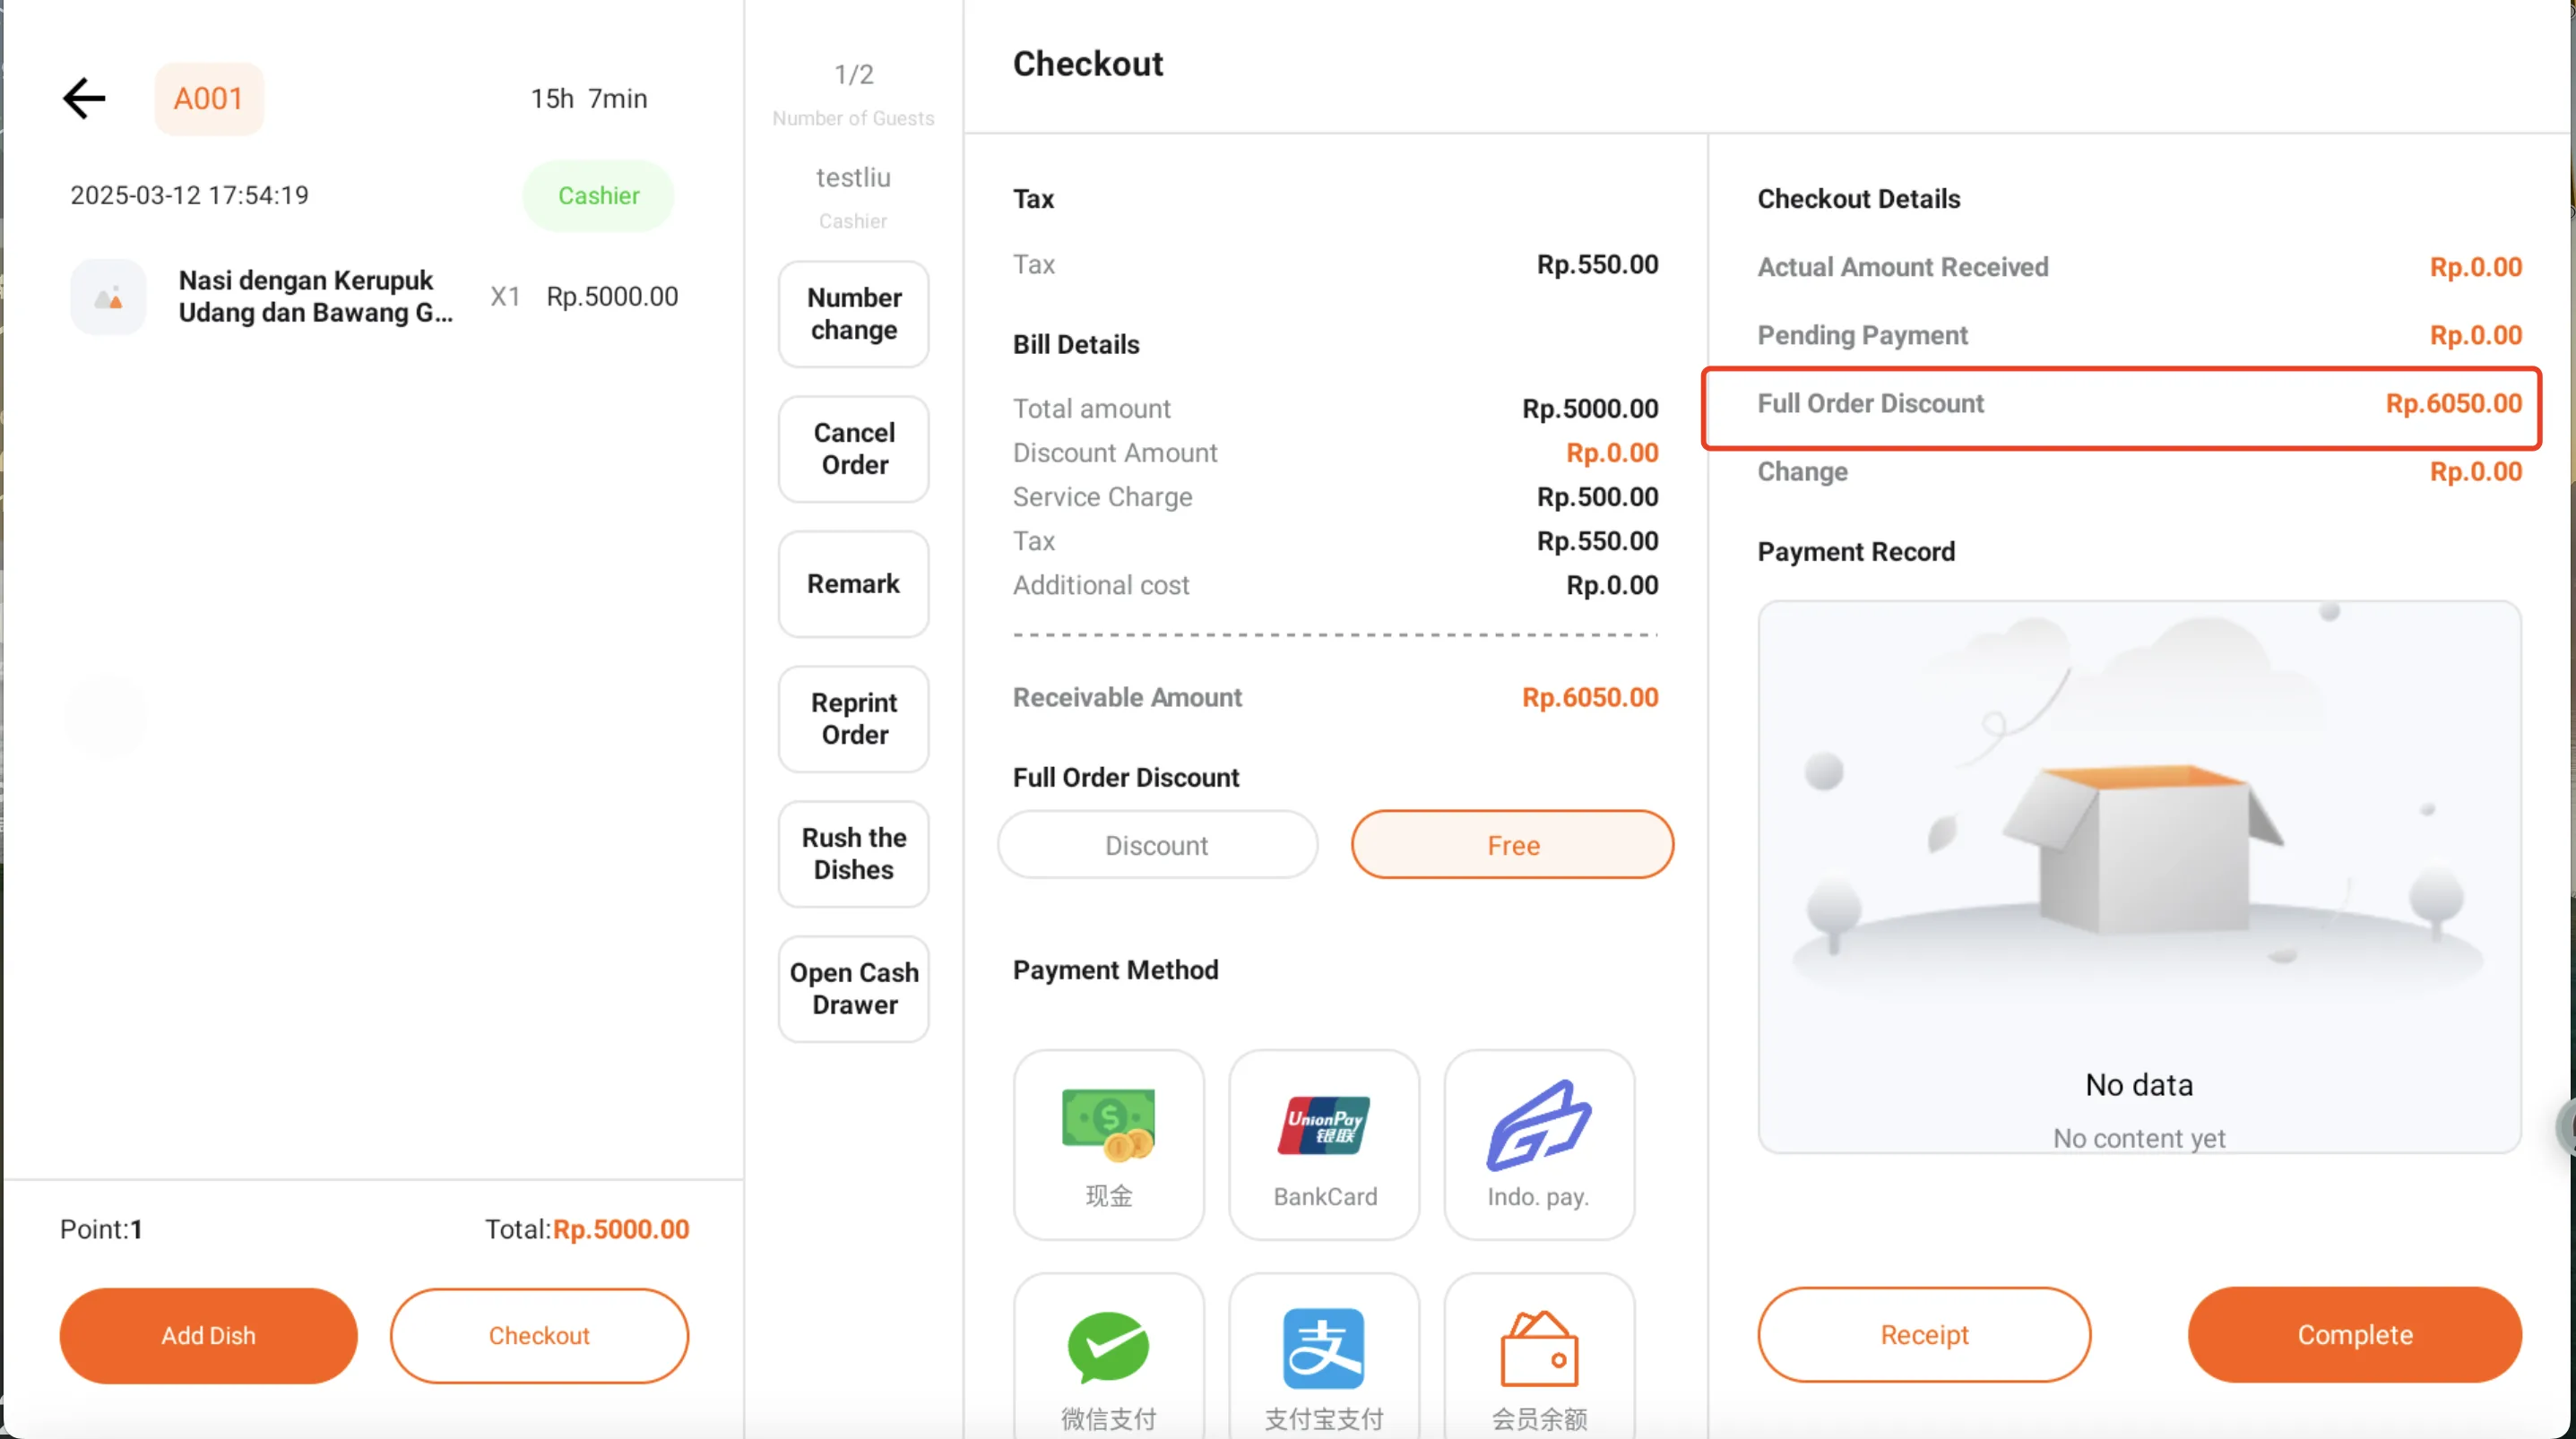
It should be noted that each order only supports applying a discount once. If the discount option is clicked again, it will be considered as canceling the previous discount setting. After cancellation, it is allowed to reset the discount
Move the table
- When a guest needs to move a table, they can click the "Move Table" button, select the table number to move to, and click "Confirm". Once the table move is completed, the previous table number will be in an idle state.
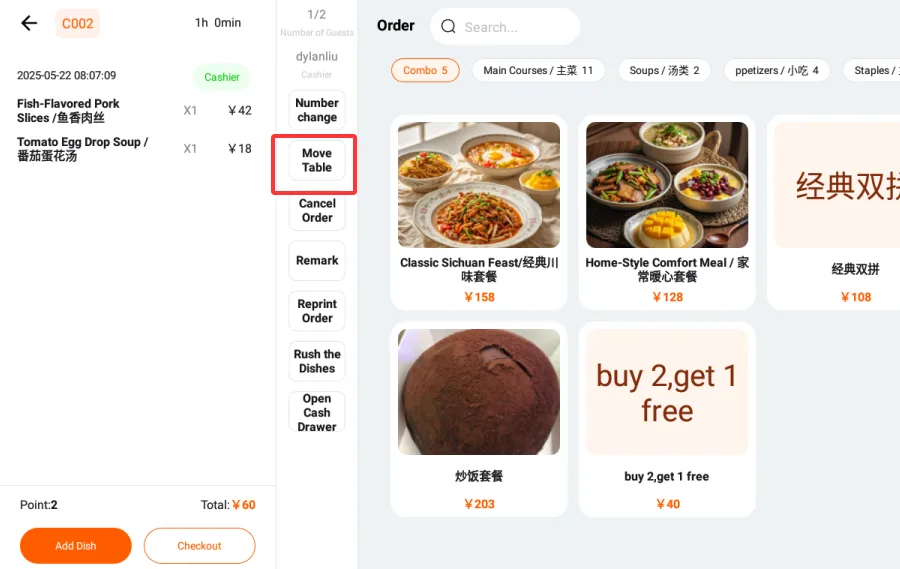
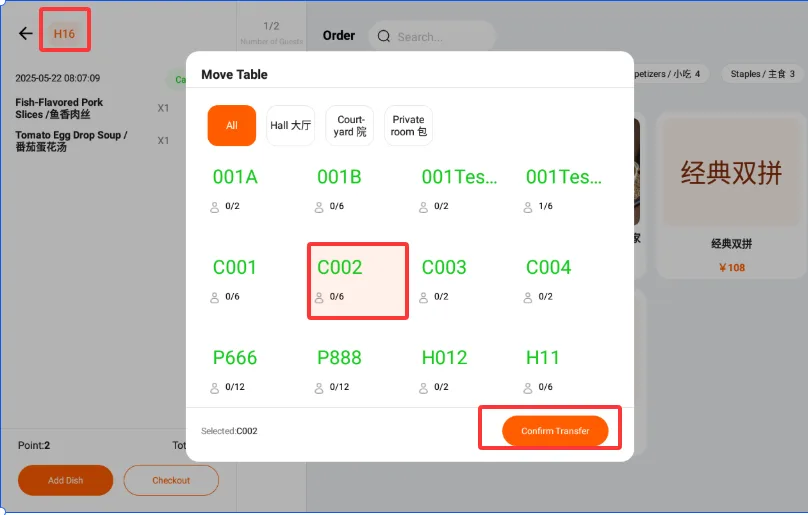
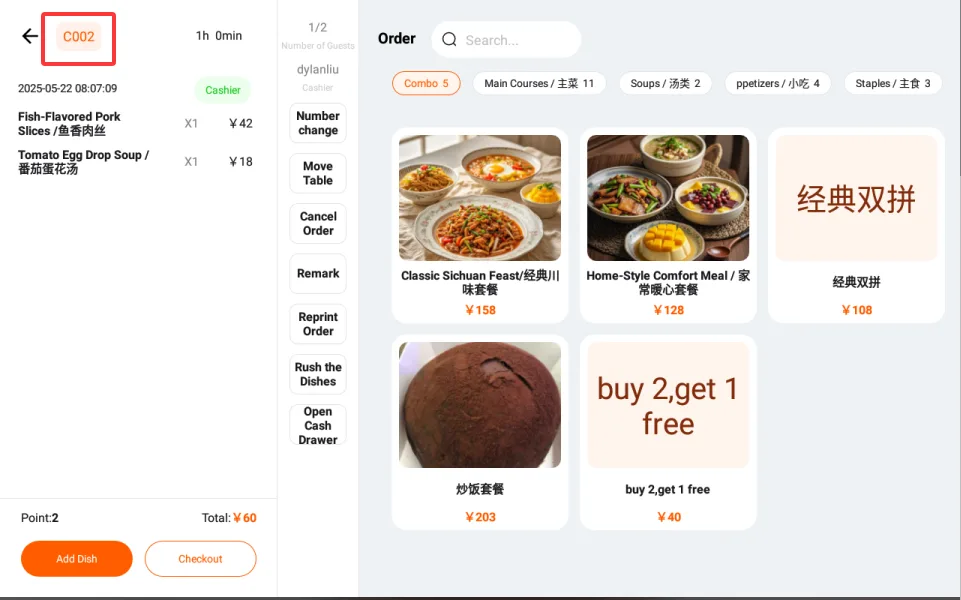
- After the table move is completed, the table number and dishes on the ordering page will be updated to the new table number, and the original table number will become available for further ordering.
- On the bill page, the table number on this order page will also change.
- The table number on the receipts printed by the POS machine for dishes and checkout will also change.
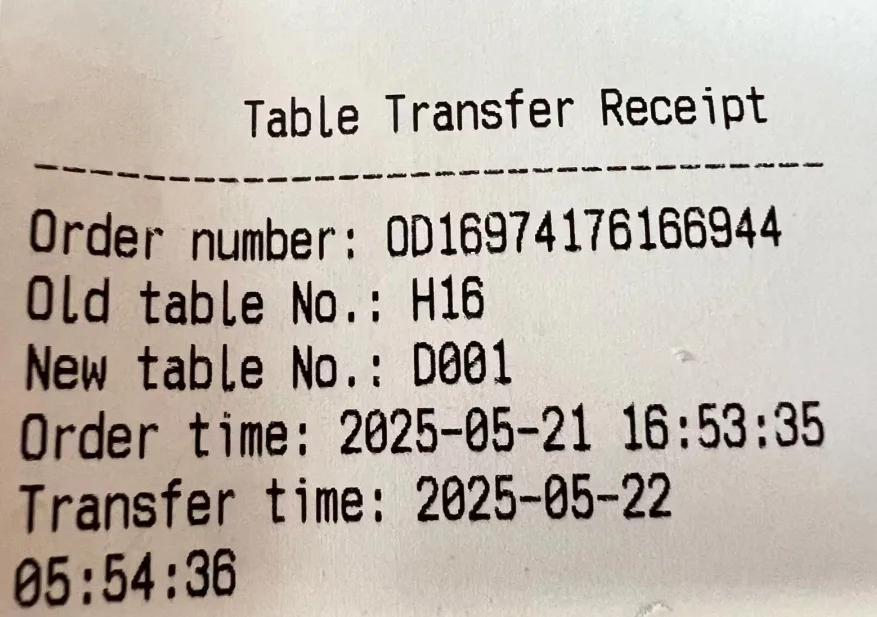
- The table number of the order on KDS will also change. After the table is moved, KDS will print a table transfer slip.
Order Disassembly
The order splitting function supports manual order splitting by product and settlement requirements, generates independent sub-orders, synchronizes information, adapts to multi-scenario service needs, and improves order processing efficiency and settlement accuracy. 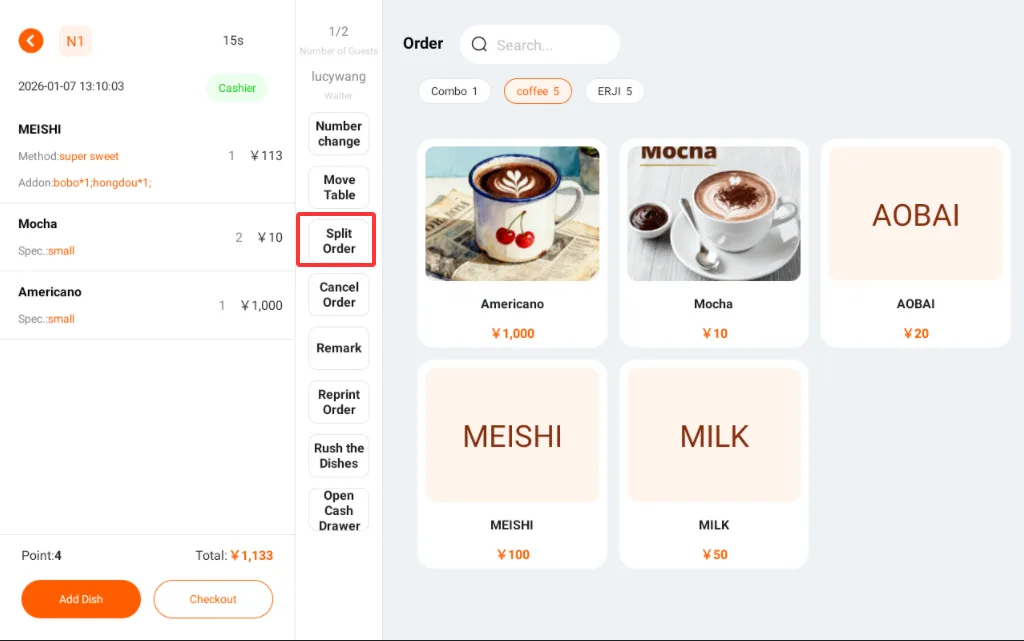
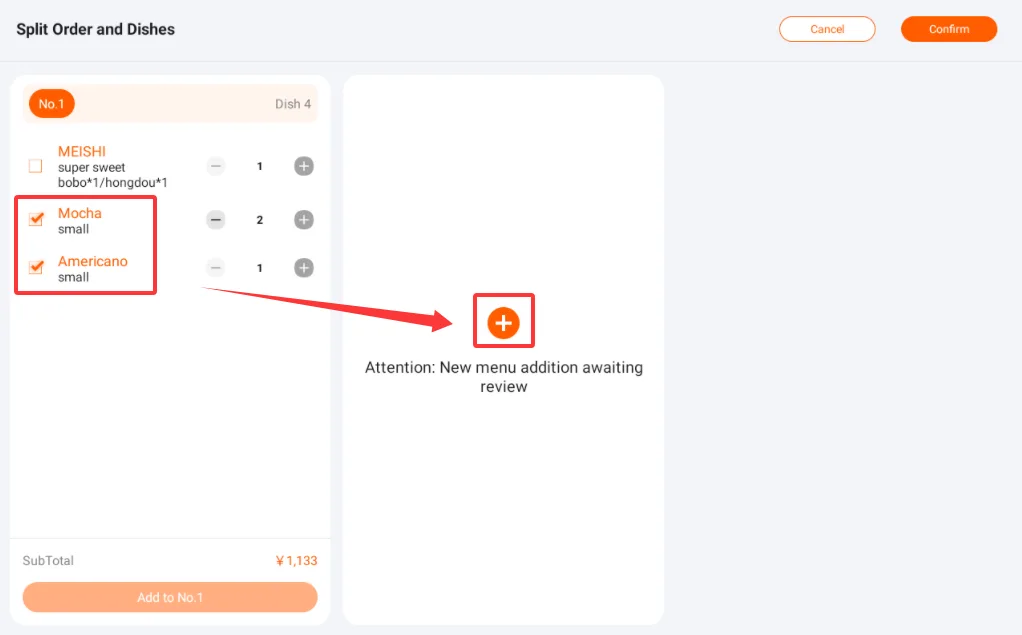
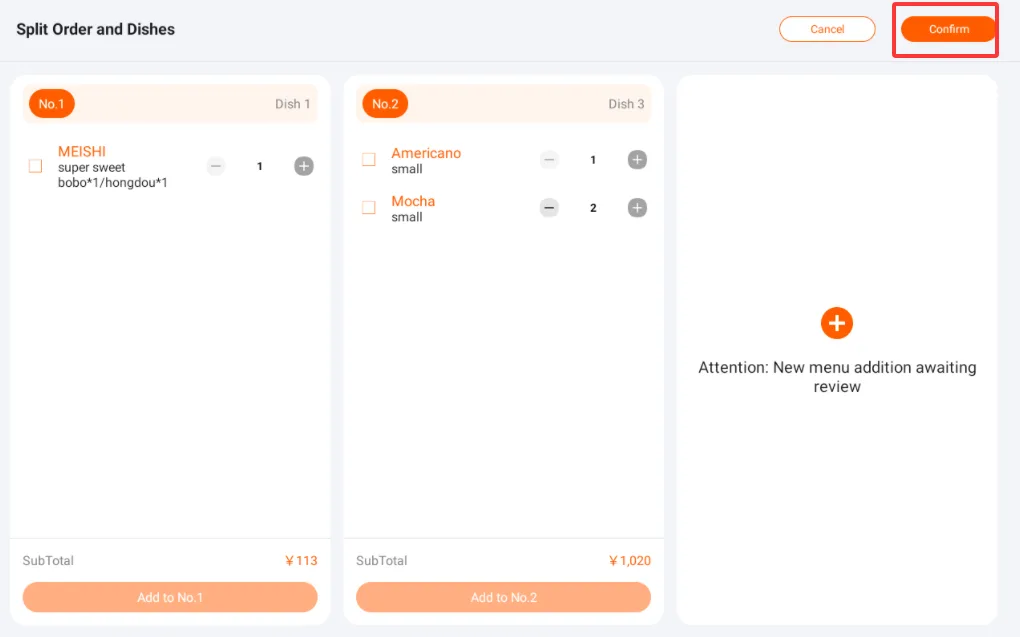
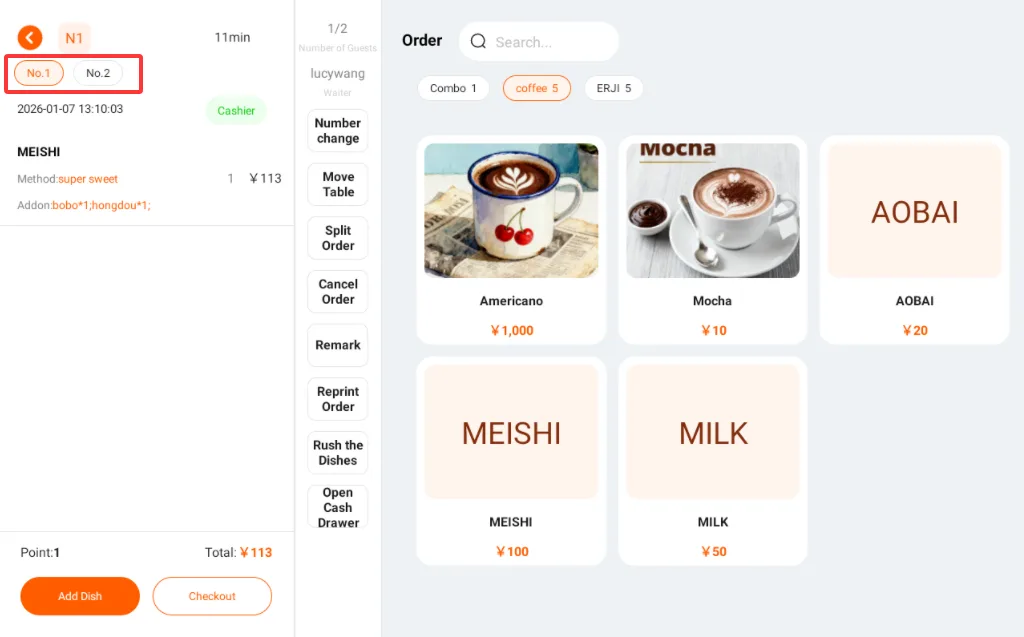
- Sub-orders can be settled separately.
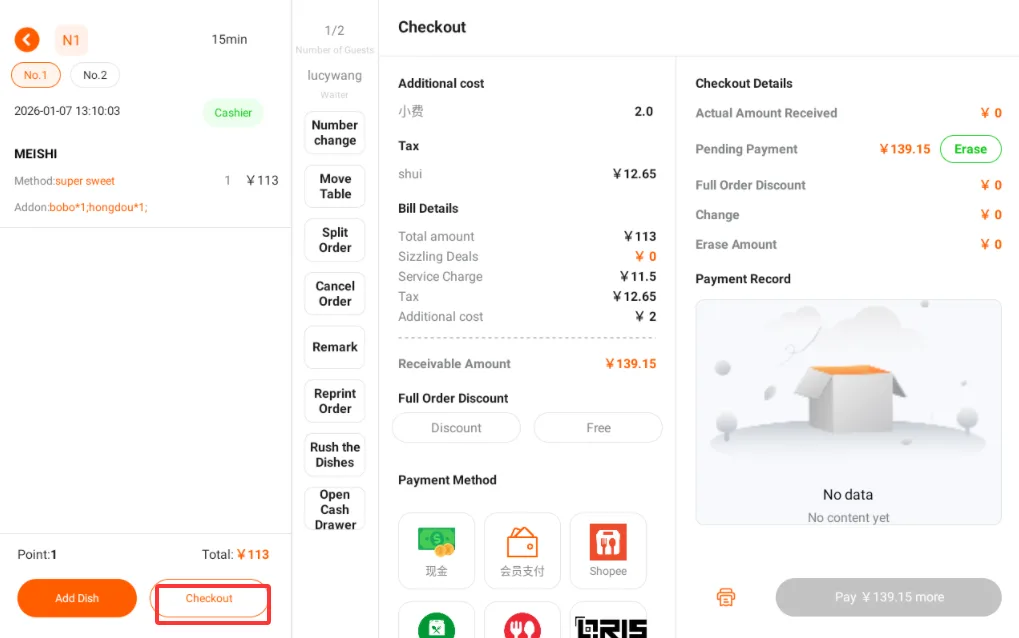
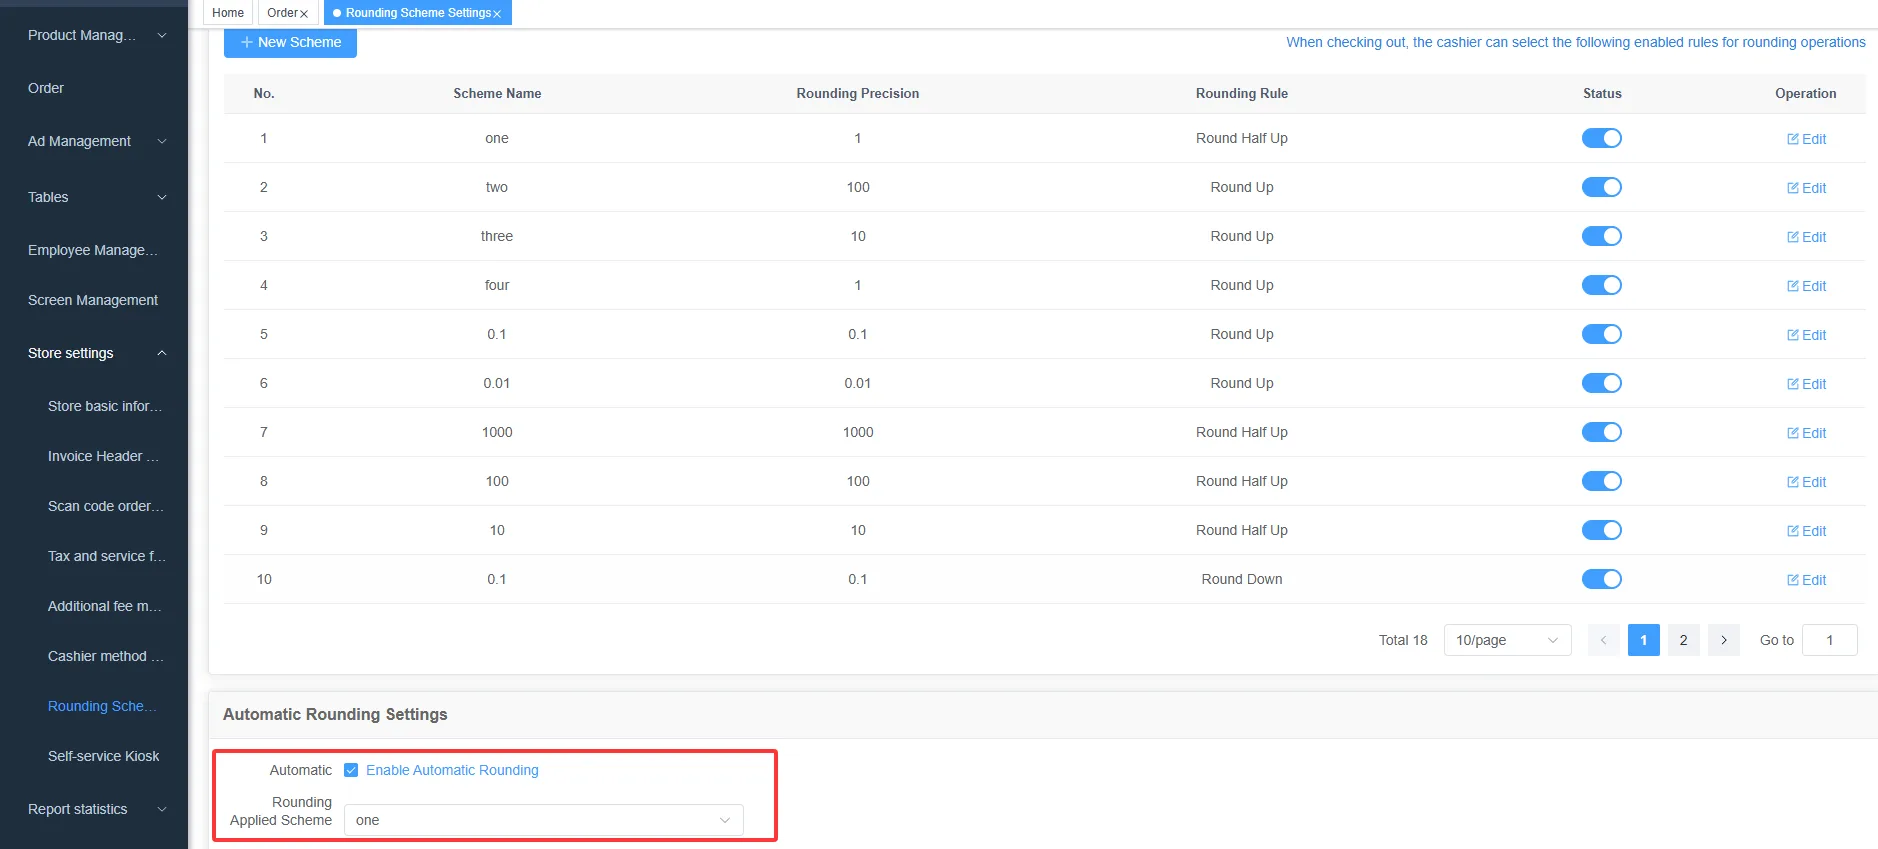
Round down to zero
- Manual Rounding: The rounding function of the ordering system supports automatically rounding according to rules (such as rounding, rounding down, rounding up) or manually entering an amount to remove the decimal part of the order, simplifying the settlement process, enhancing the payment experience, and improving the convenience of financial reconciliation.
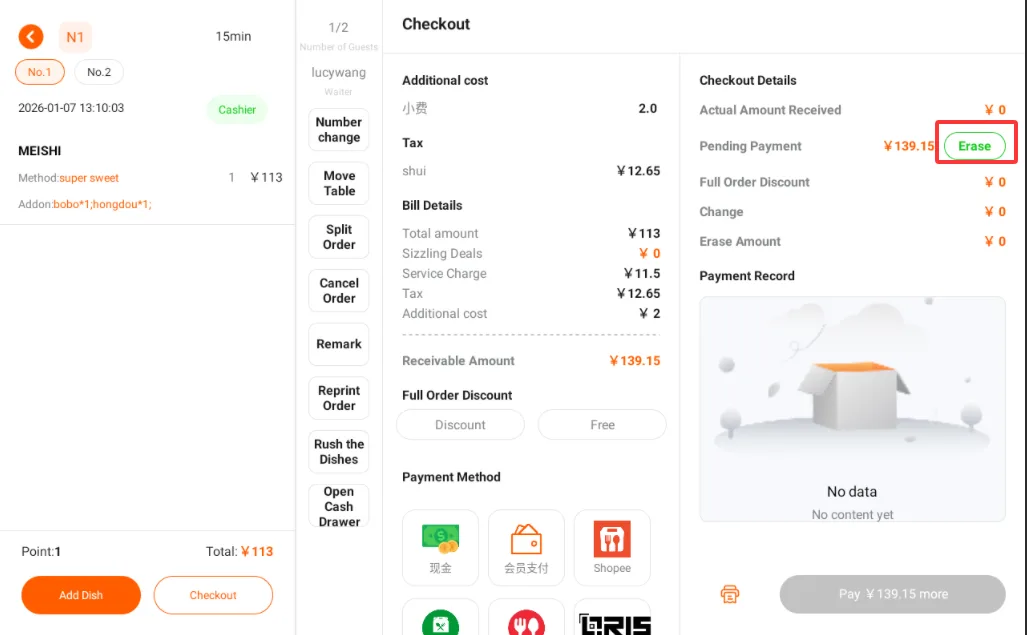
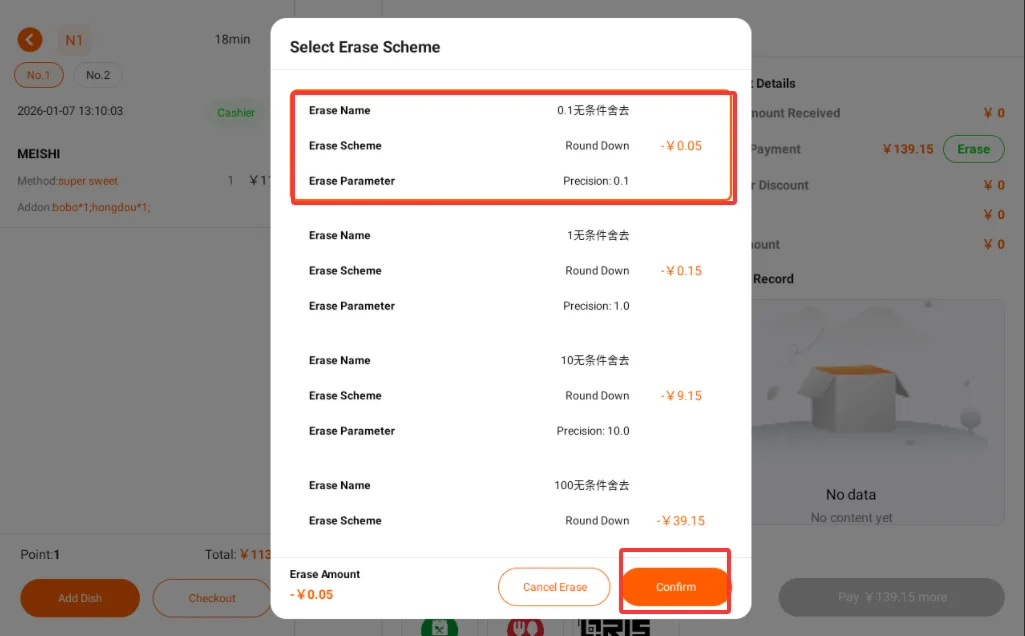
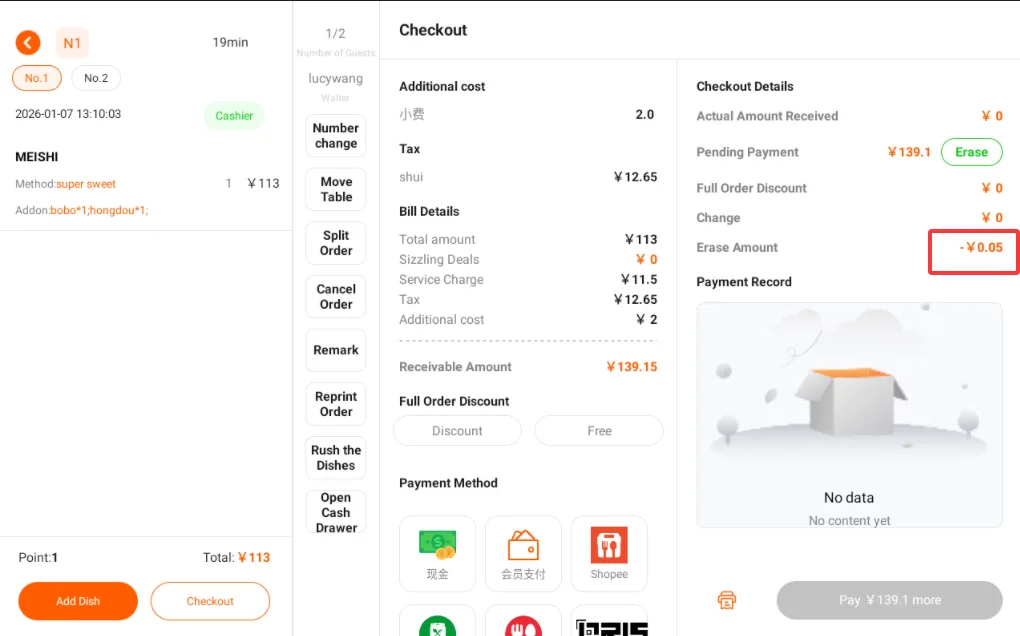
- Automatic rounding down: If the rounding down scheme is configured as automatic rounding down on the backend management platform, there is no need to click the rounding down button on the checkout page.
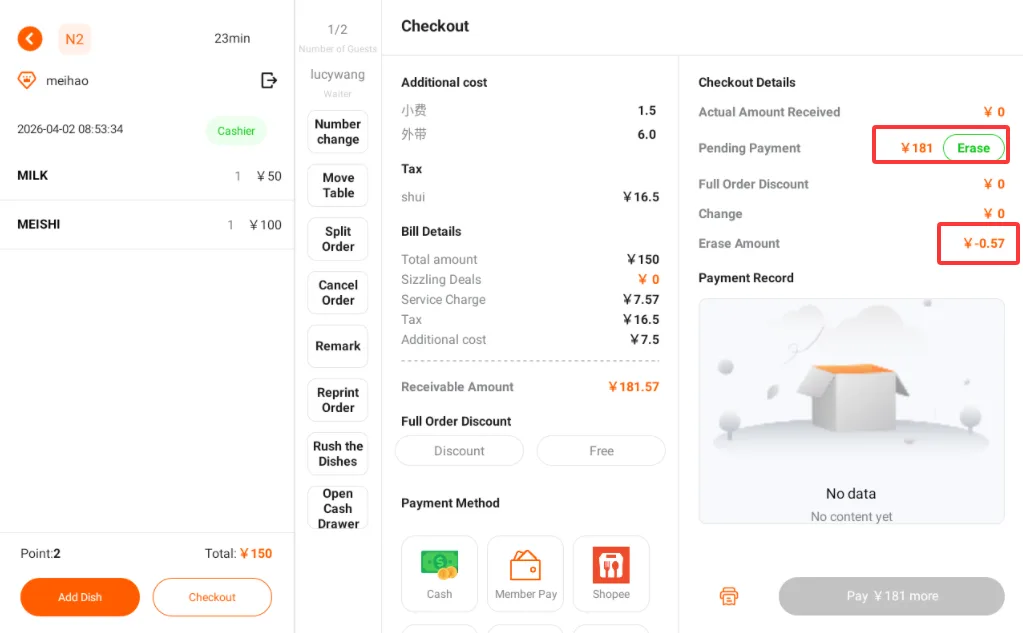
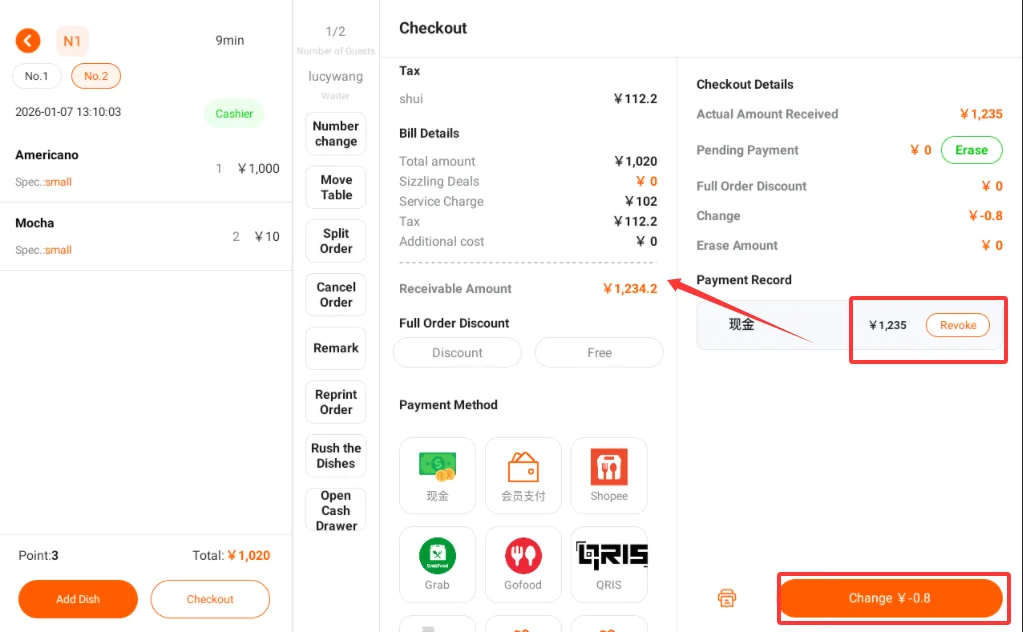
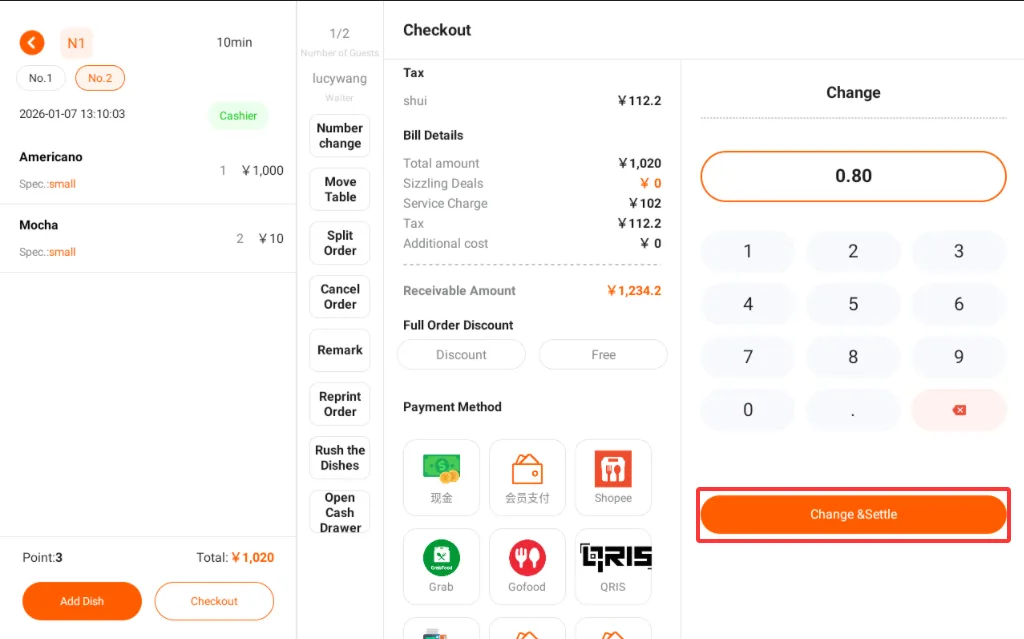
- Change When the actual payment is greater than the amount receivable, change settlement is required.
Takeout operation
- When guests choose takeout and order without selecting a table number, the cashier can click the navigation "Takeout/ Quick Ordering ";
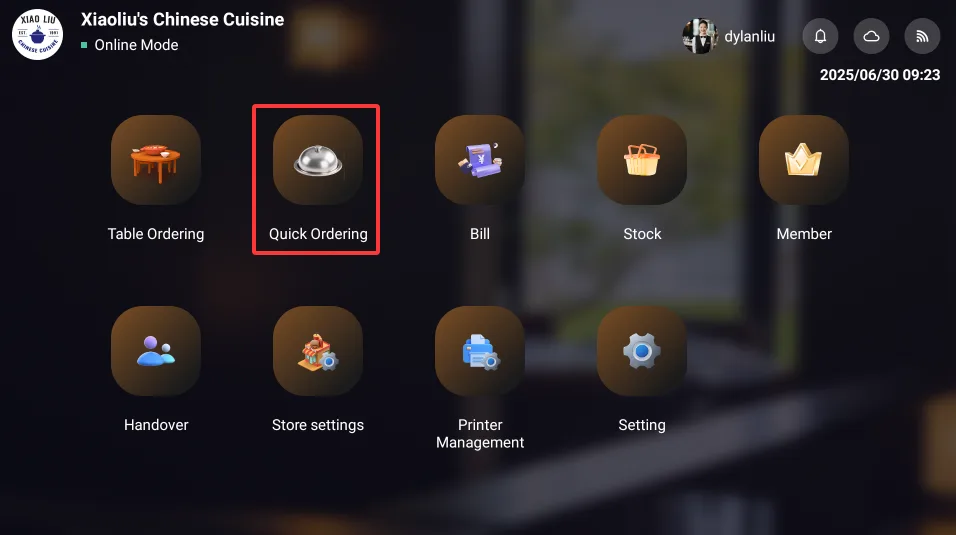
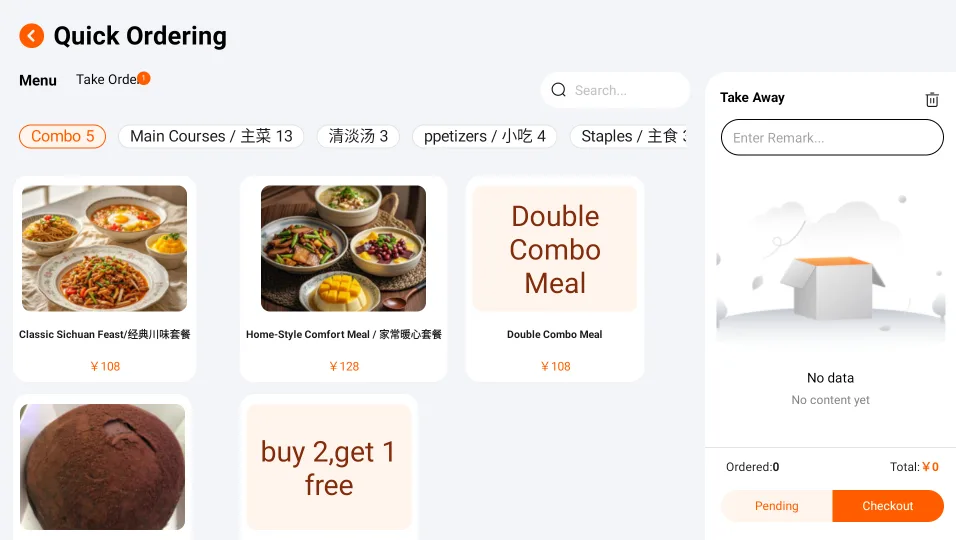
Quick Ordering
- Quick ordering includes both takeout and dine-in.
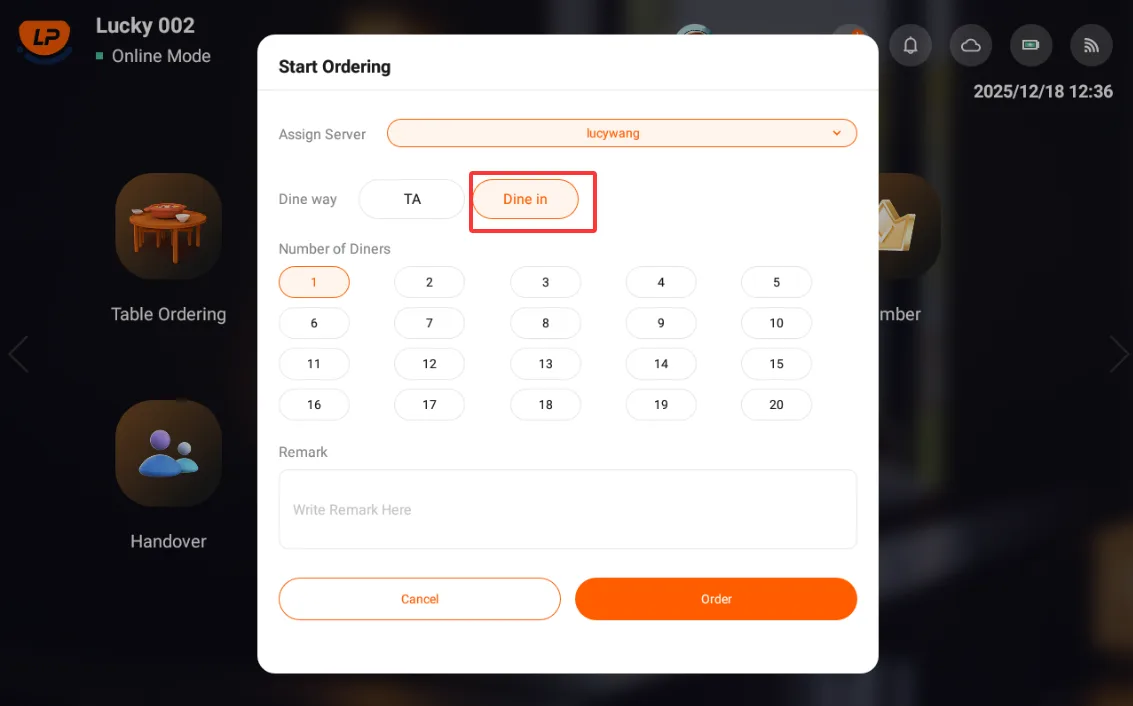
- Click Quick Order, you can select a waiter, choose takeout, select the number of diners, and fill in remarks (optional)clickOrder;
- For the same dish, if you need to add multiple servings, you can click the dish multiple times;
- After adding the dishes, click the Place Order and Checkout button below, and you can enter the checkout page.
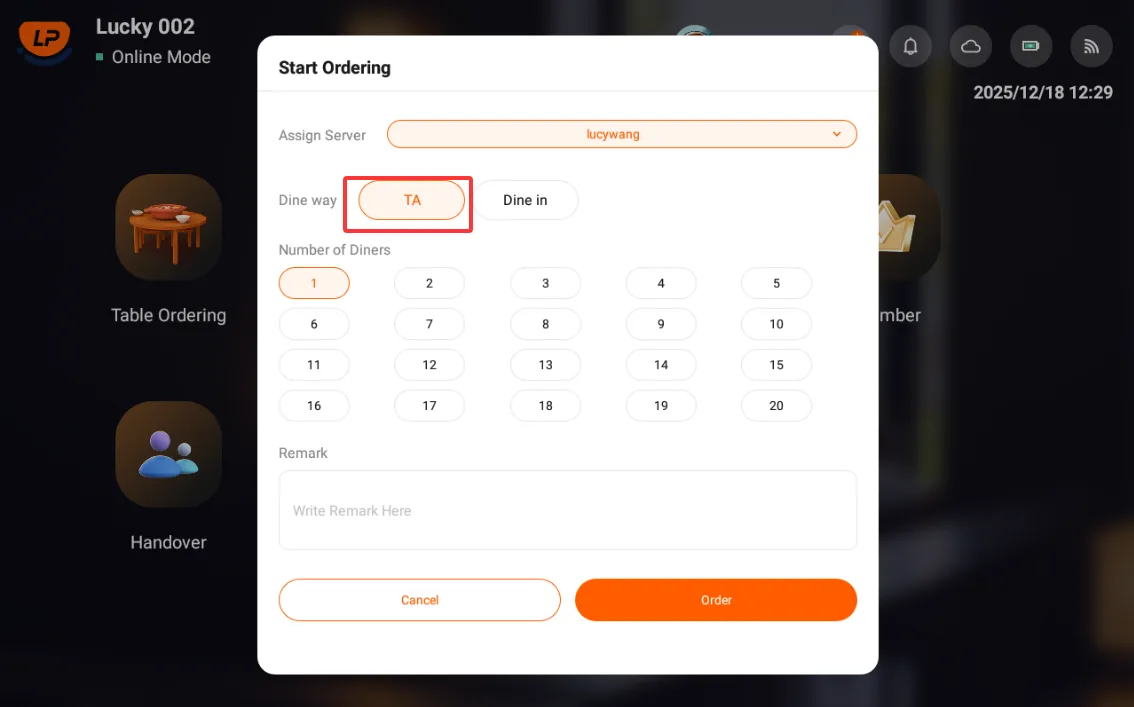
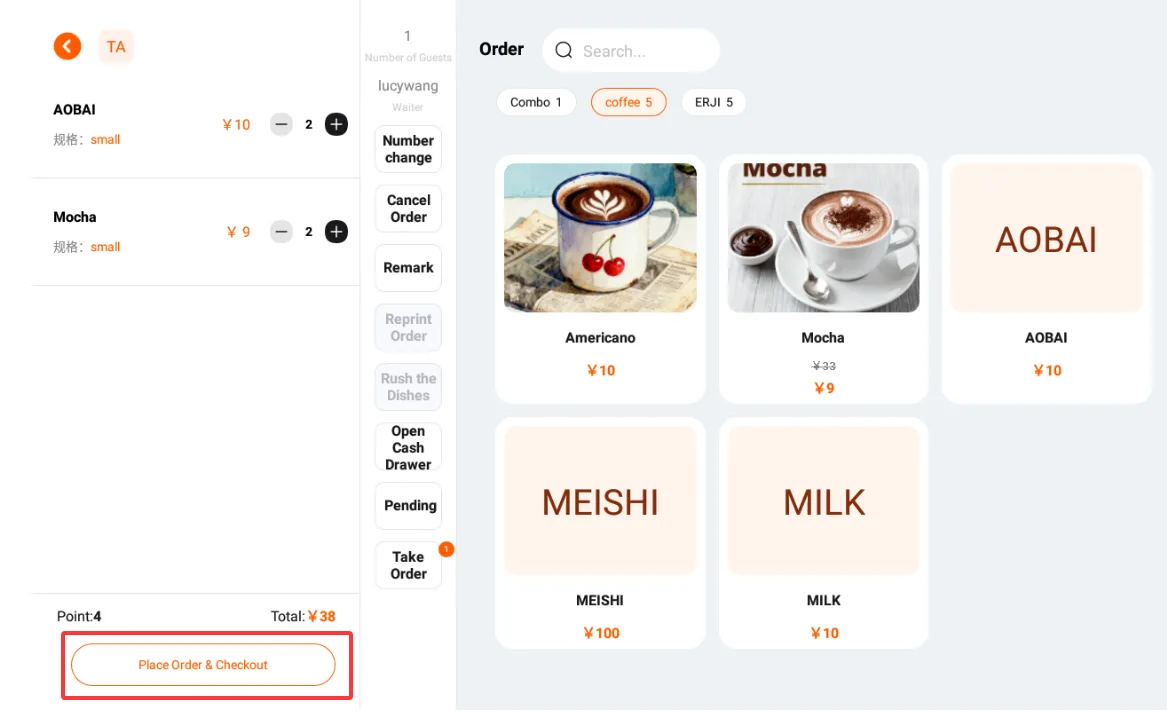
- Click Quick Order, select Dine-in, and enter the order page;
- Click the dish card on the right. For the same dish, if you need to add multiple servings, you can click the dish multiple times;
- After adding the dishes, click the "Place Order and Checkout" button below to enter the checkout page.
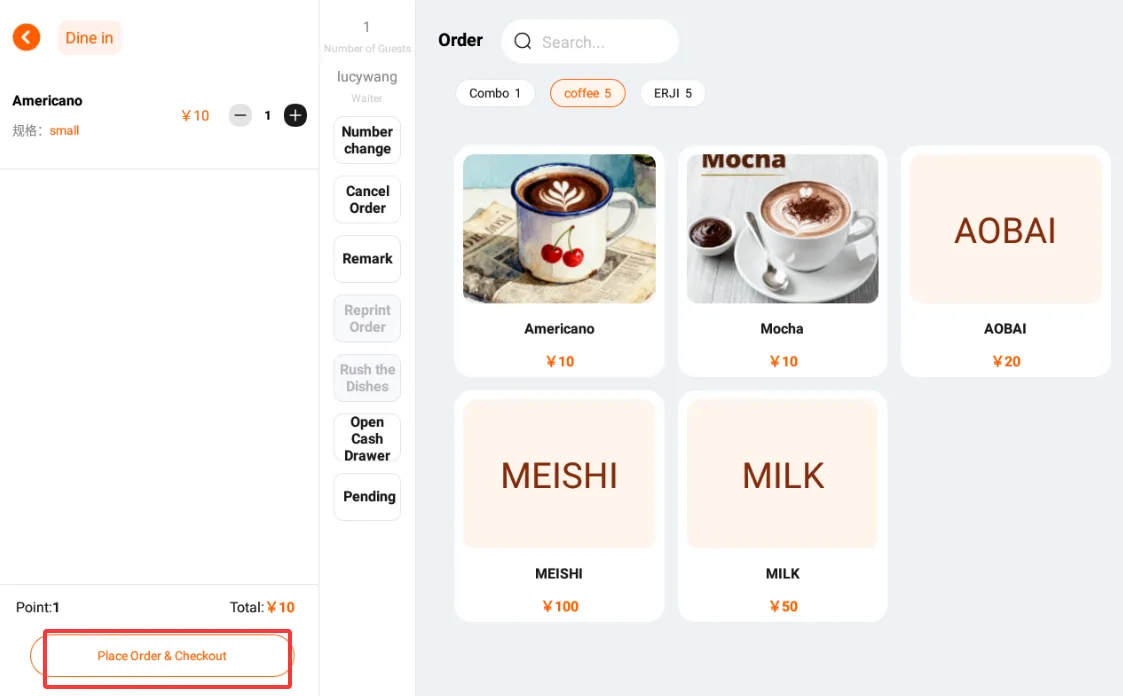
- The operations on the checkout page are the same as those for table checkout described above, so they will not be repeated here.
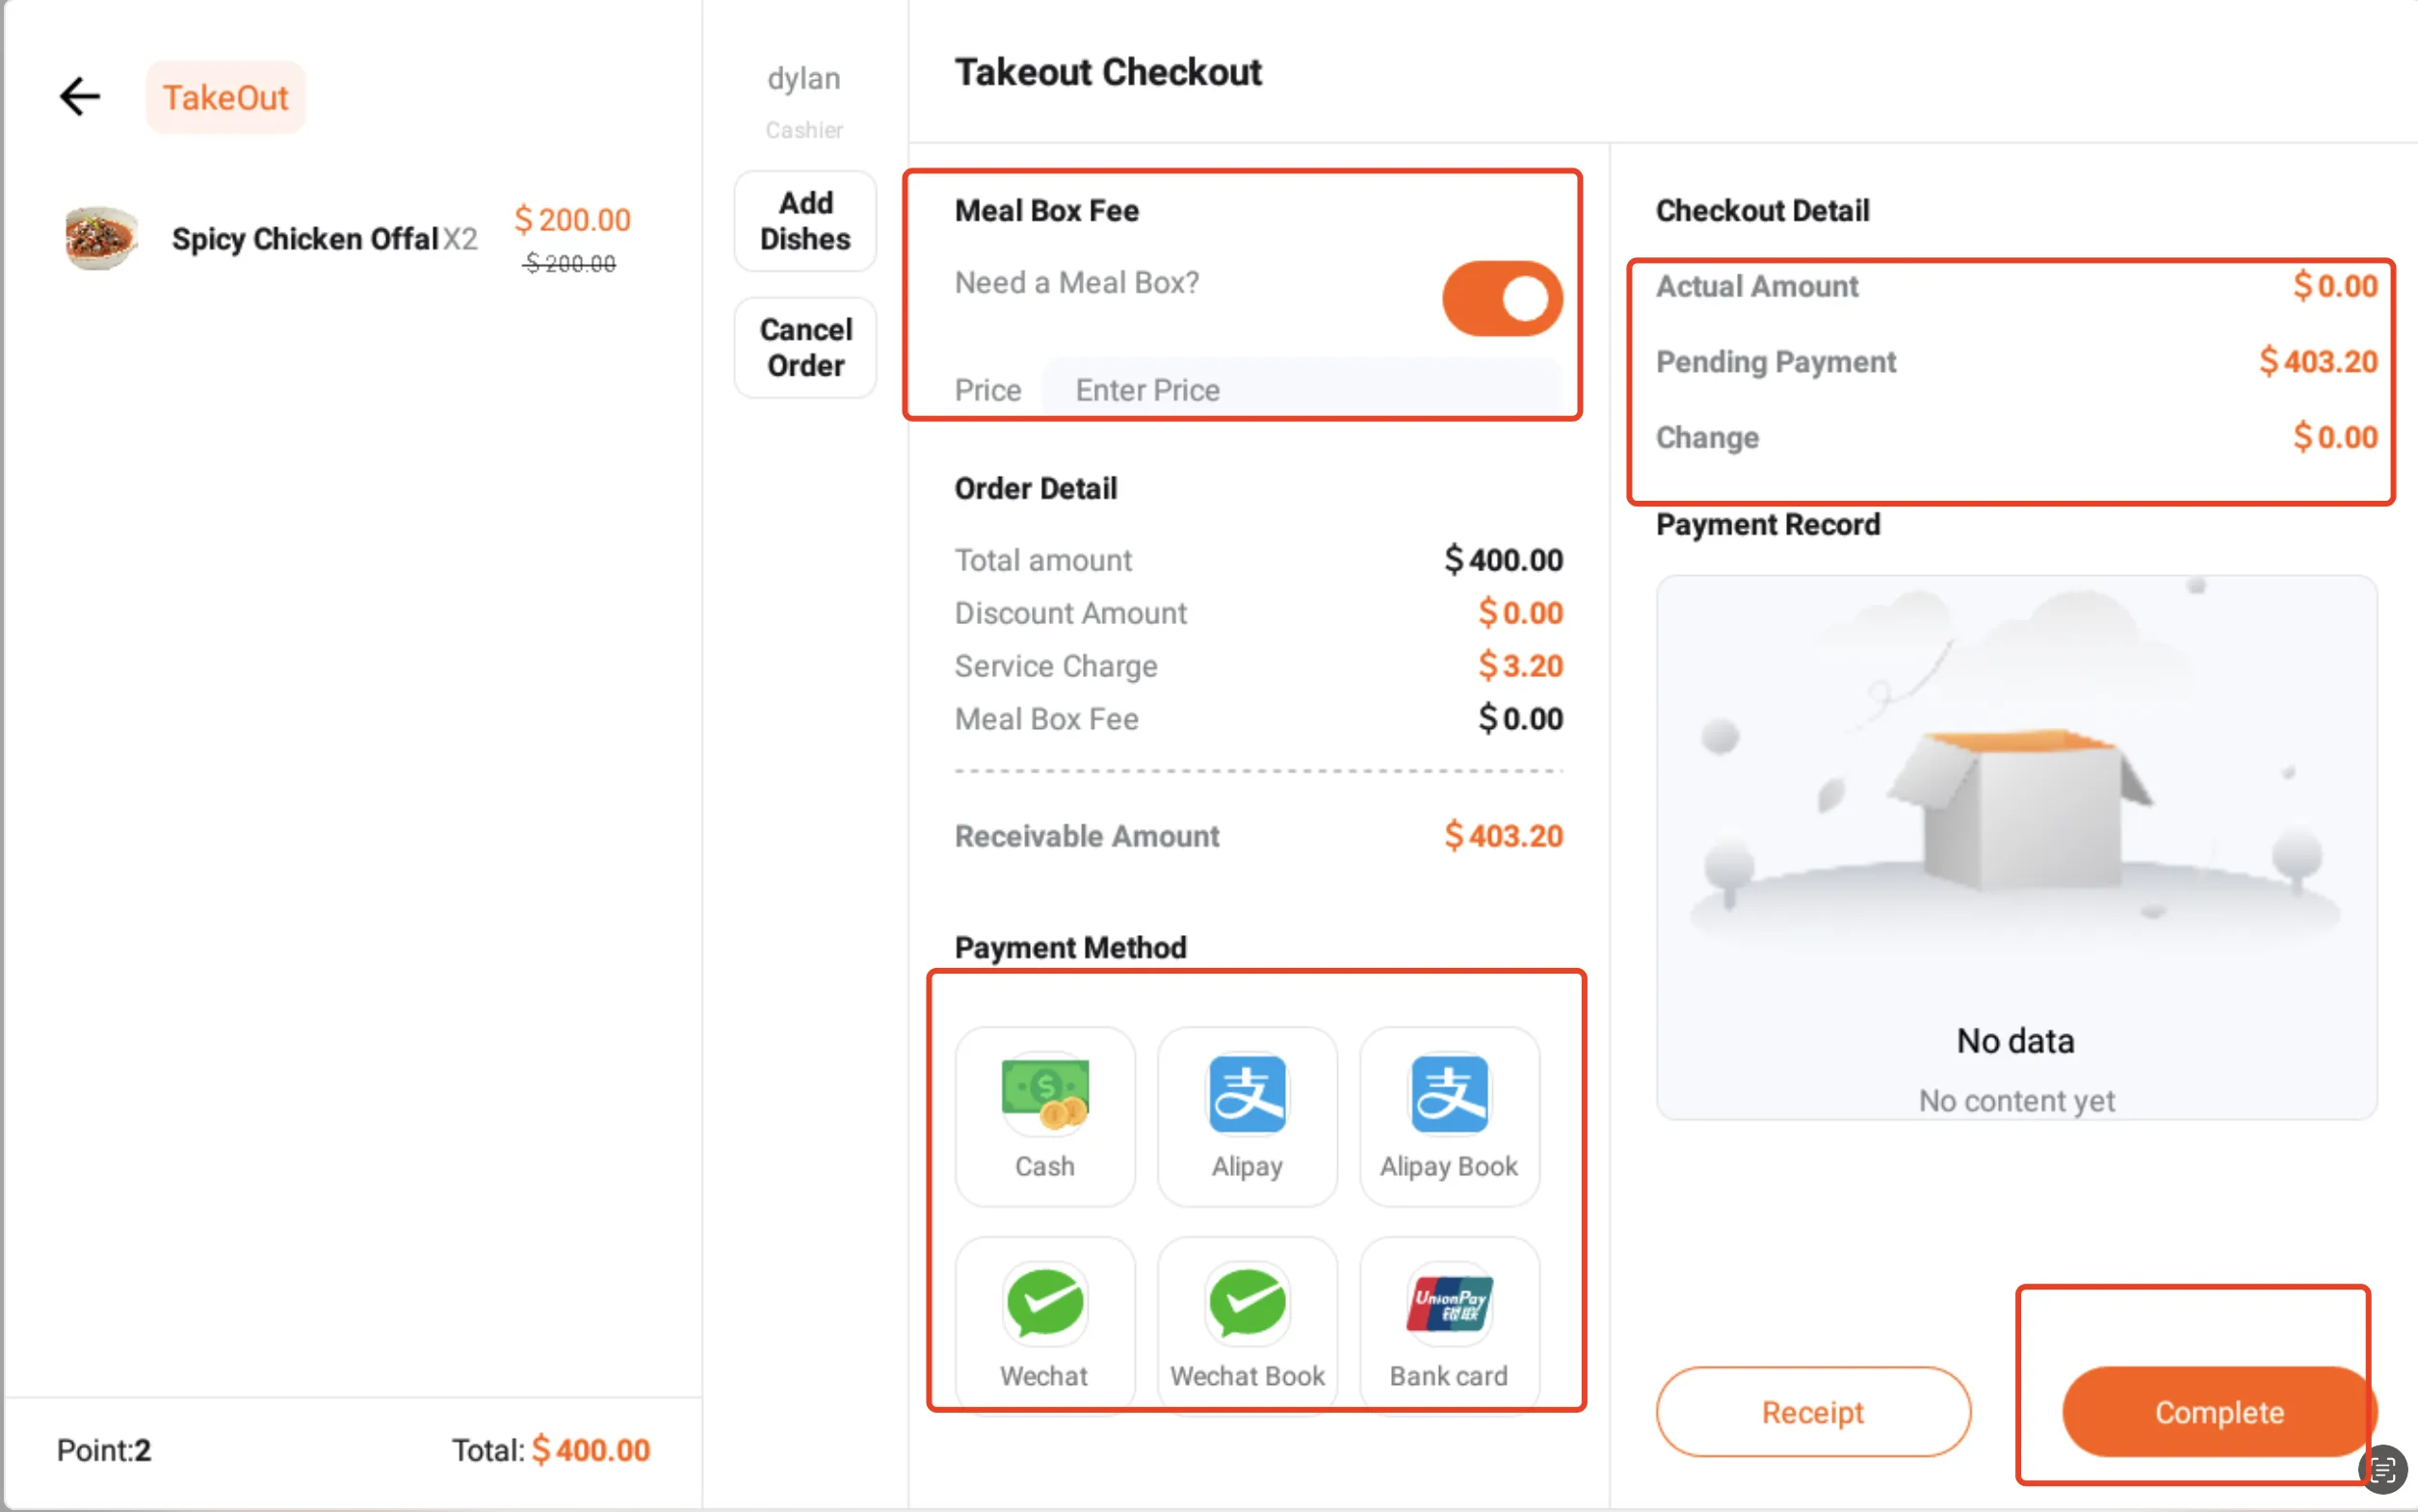
Order Placement and Retrieval
- The functions of placing and retrieving orders are designed to facilitate restaurants in handling orders more flexibly and efficiently.
- The hanging order function usually allows waiters to temporarily save incomplete or unpaid orders during the customer's ordering process. For example, when a customer is still thinking or continuing to order, or there are other urgent situations that require attending to other tables first, the hanging order function can be used. This helps avoid confusion and loss of order information while not affecting service to other customers.
- The single function retrieval allows for quickly and accurately retrieving previously suspended orders at a suitable time later and continuing operations, such as completing an order, modifying dishes, and settling the bill.
- The combination of these two functions can optimize the restaurant's service process, improve work efficiency, reduce the occurrence of errors, and enhance the dining experience of customers.
- The specific operations are as follows:
Order Placement
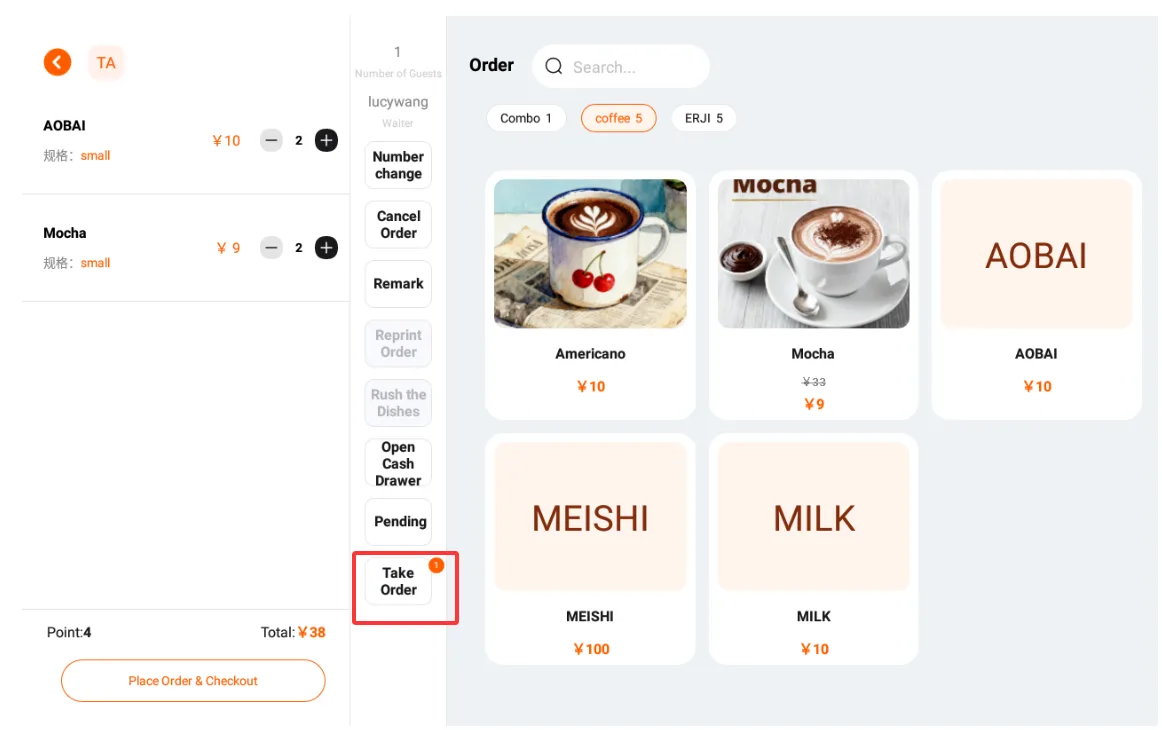
During the takeout order process, click "Pending" in the lower right corner to suspend the current order content;
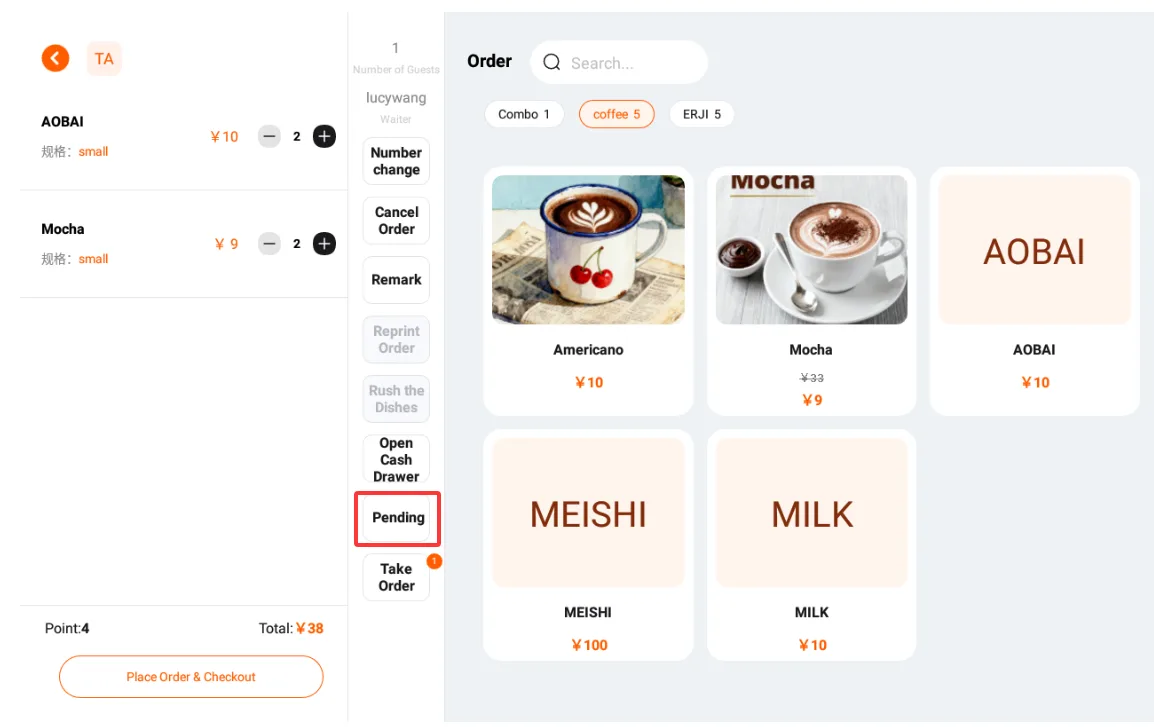
As shown in the figure, the right upper corner will display the pending order record, and its quantity is the marked quantity of pending orders;
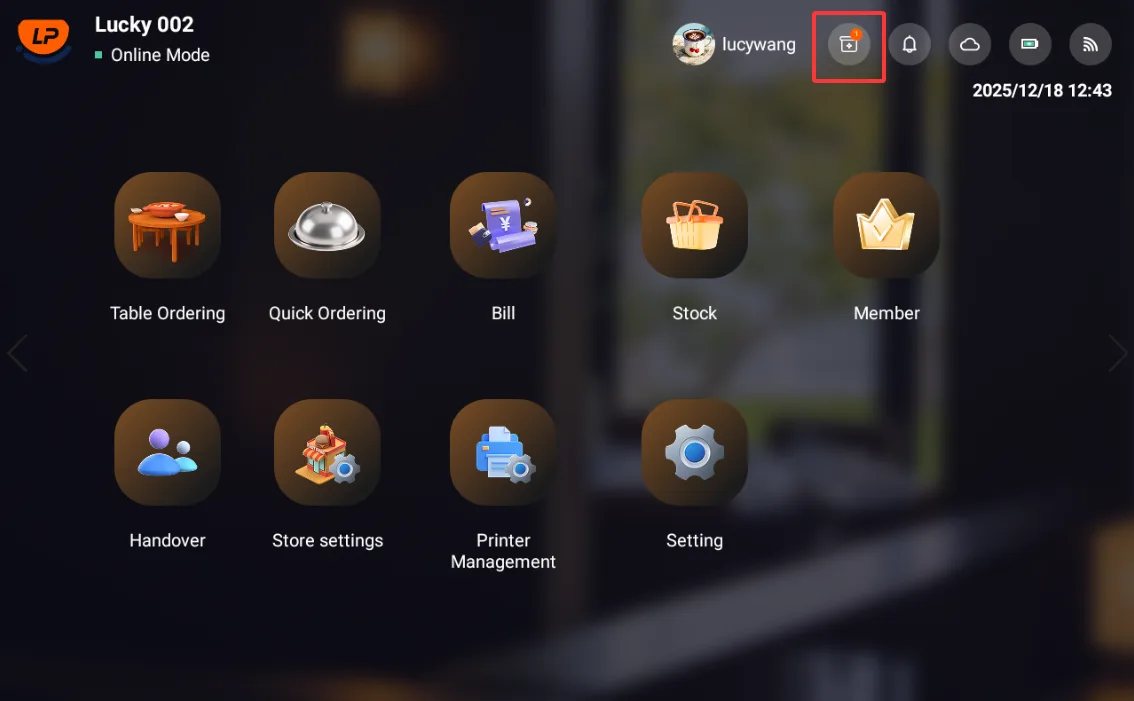
After placing an order, you can continue to take orders for other guests.
Take a single order
Click the order record;
The pop-up window will display all order records. Select the record you want to pick up and click [Take Order/TakeOrder];
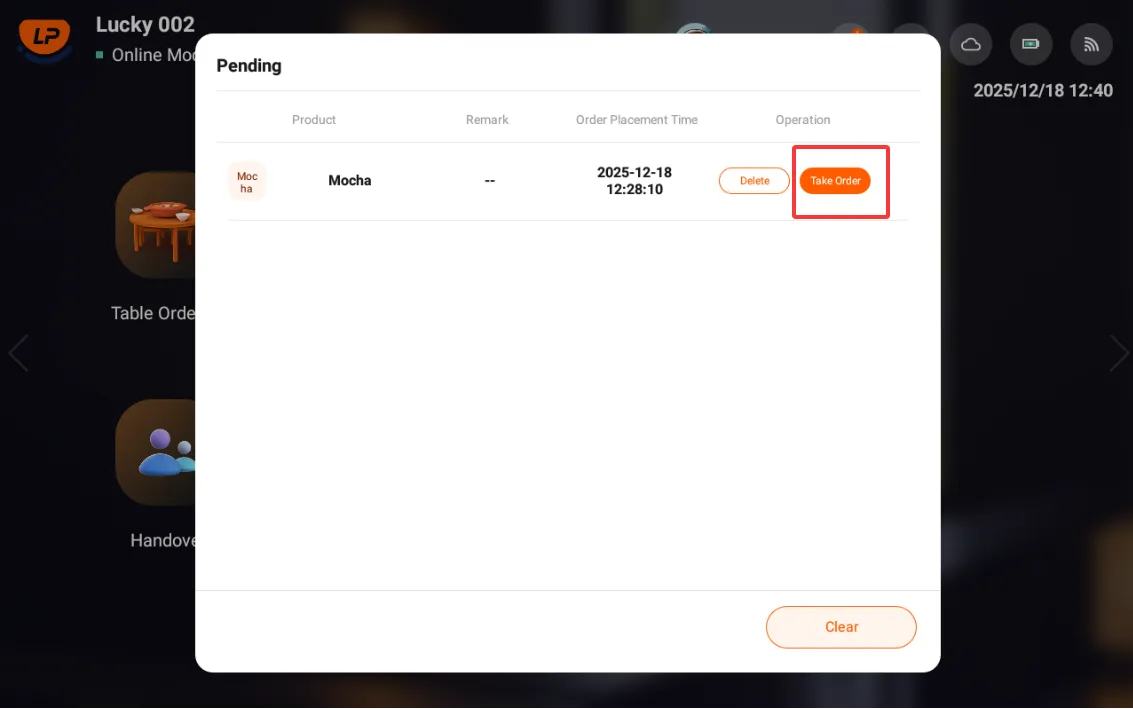
This record will be added back to the shopping cart for further adding dishes or checking out.
Bill Management
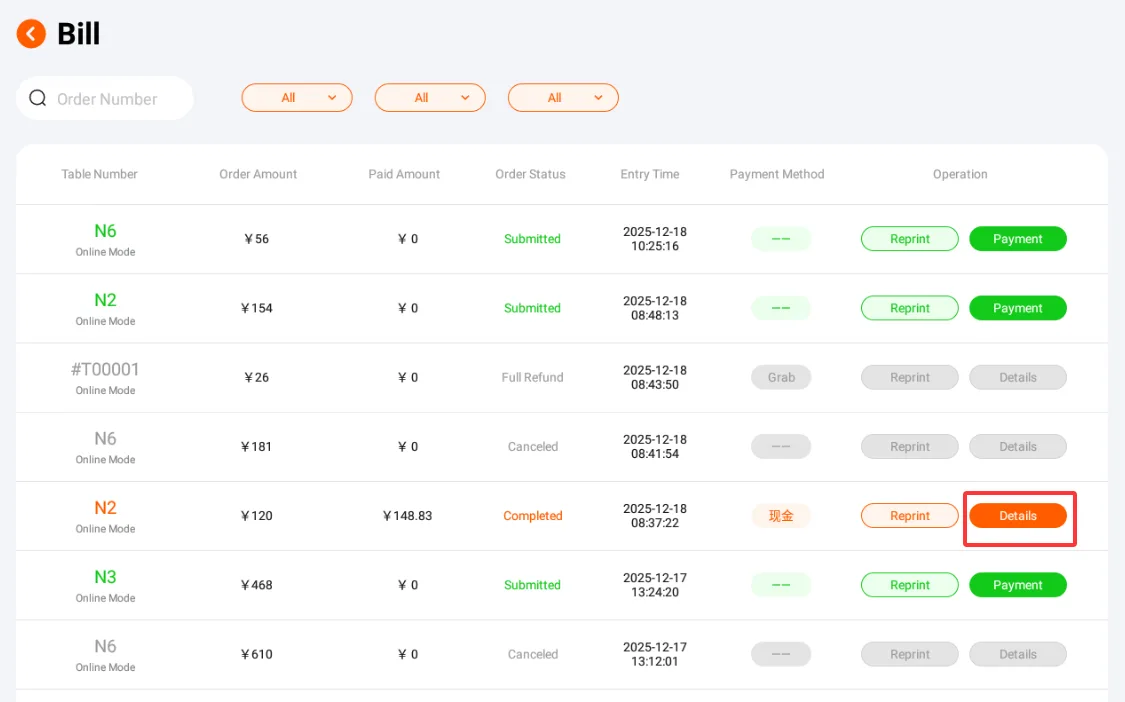
- Clicking on 【Bill Management/Bill】 in the navigation allows you to view bill information;
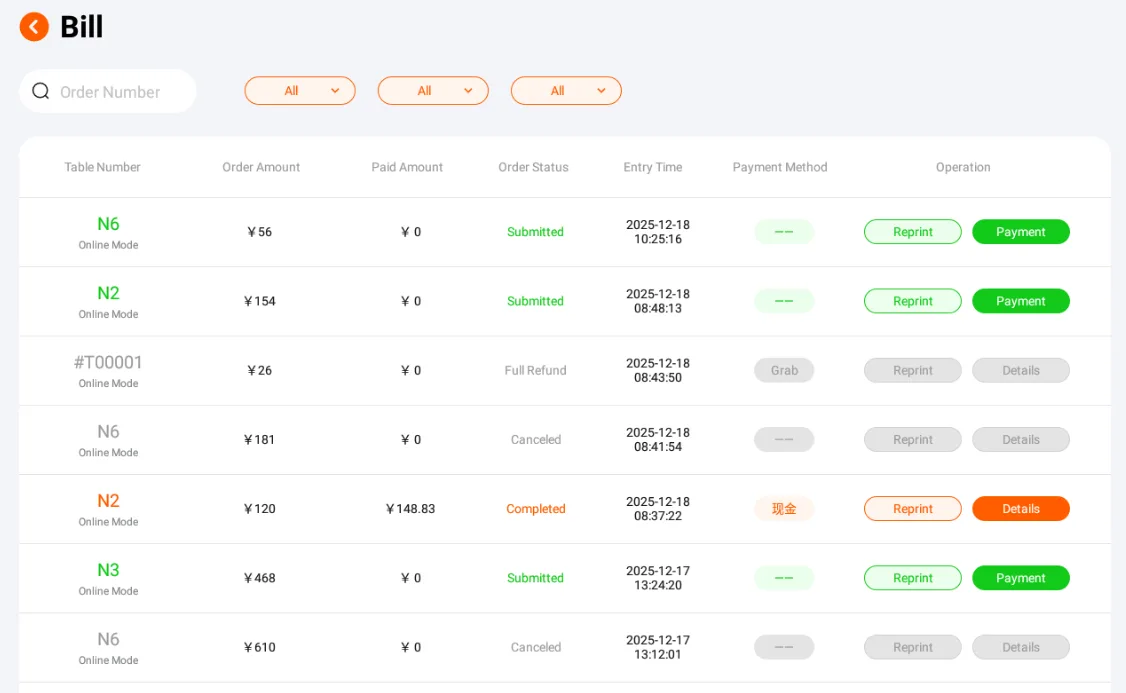
Bill List
- The list displays all settled bills, showing basic information such as table number, amount, payment method, source, etc.;
- Click the [Details] after a bill
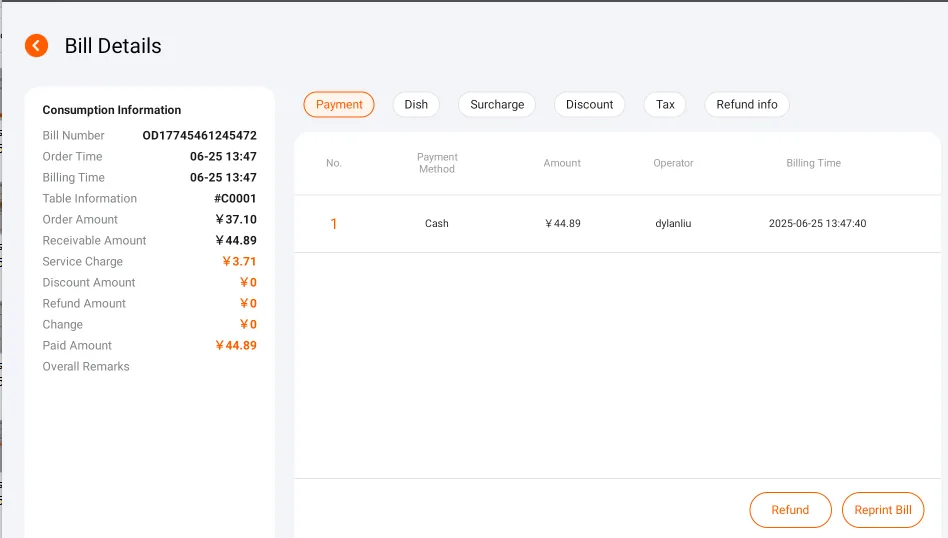
Bill Details
Bill details display all detailed information of the bill;
Payment information shows the payment method and corresponding amount of the bill;
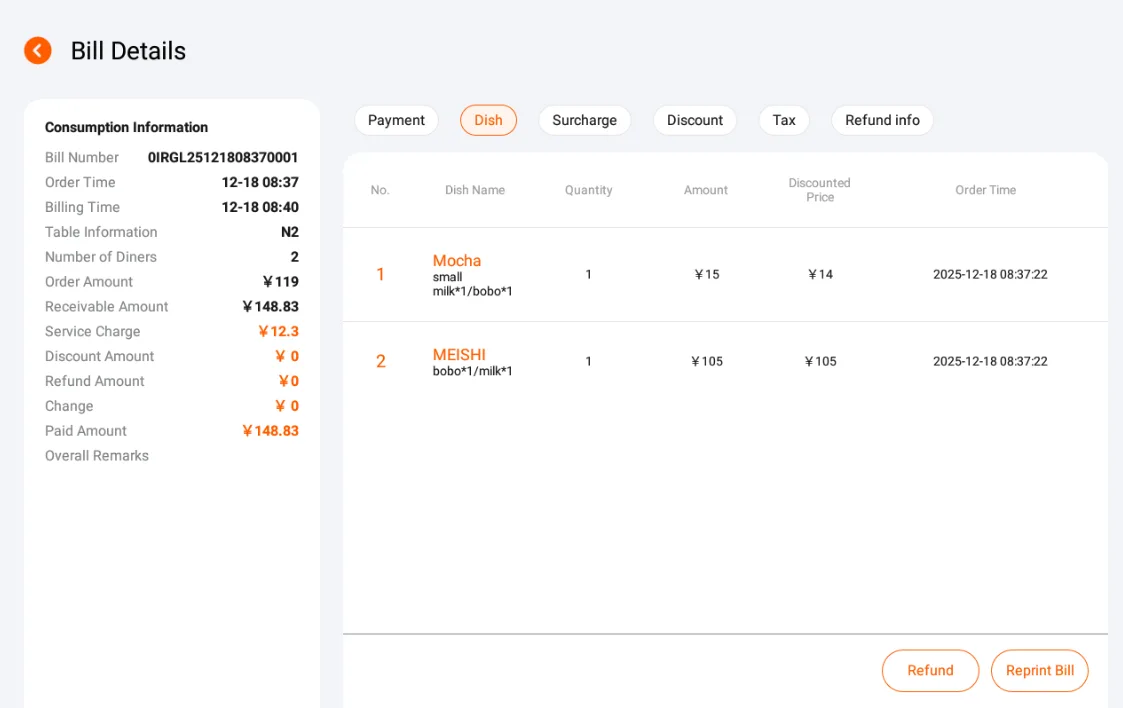
The dishes display all the dish information under this bill, including name, price, quantity, order time, etc.;
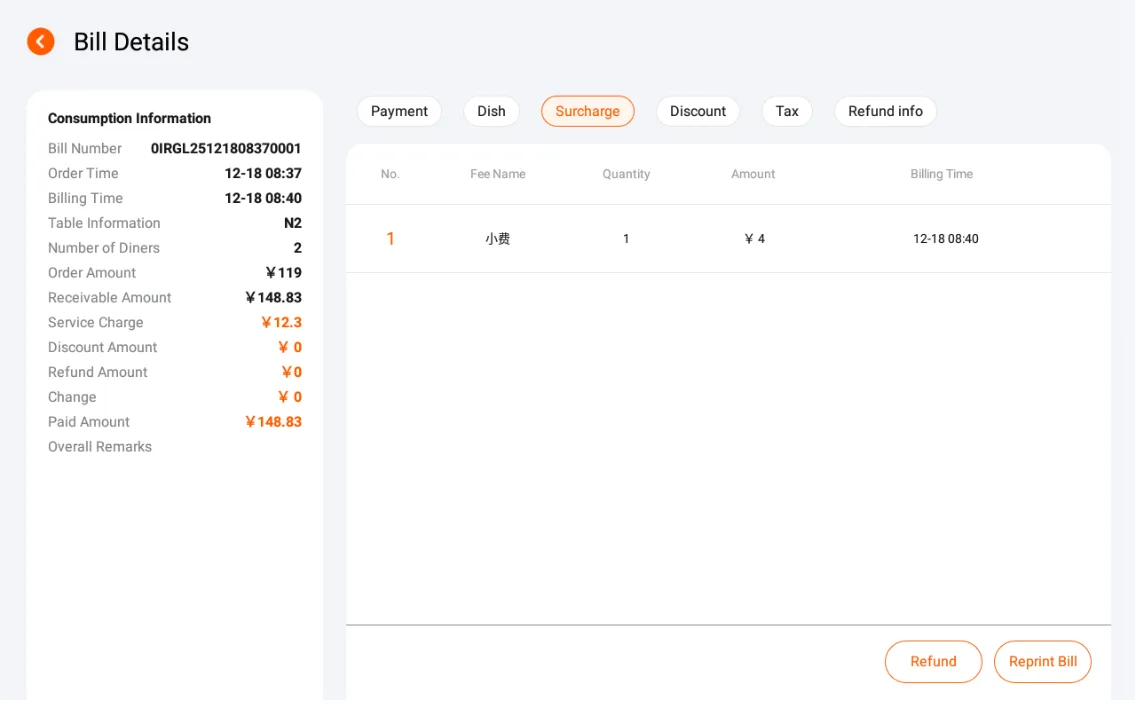
Other expenses will display relevant information such as service fees, packing fees, change, etc.;
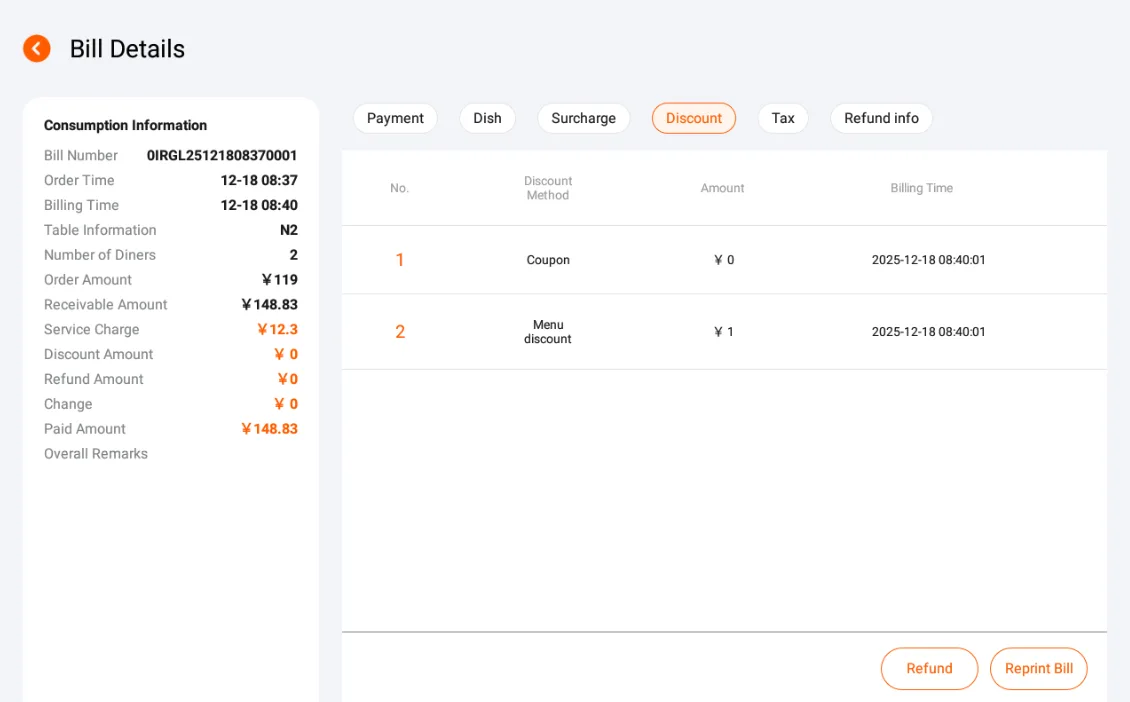
The discount information shows the discount details of the bill.
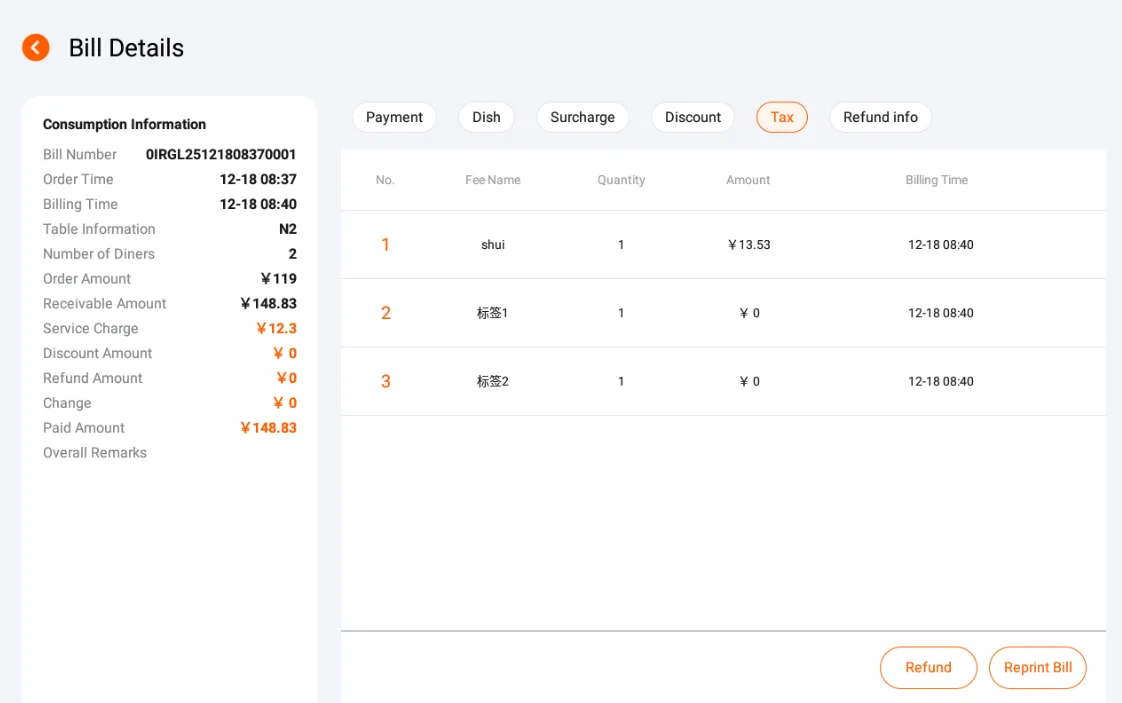
Order tax information.
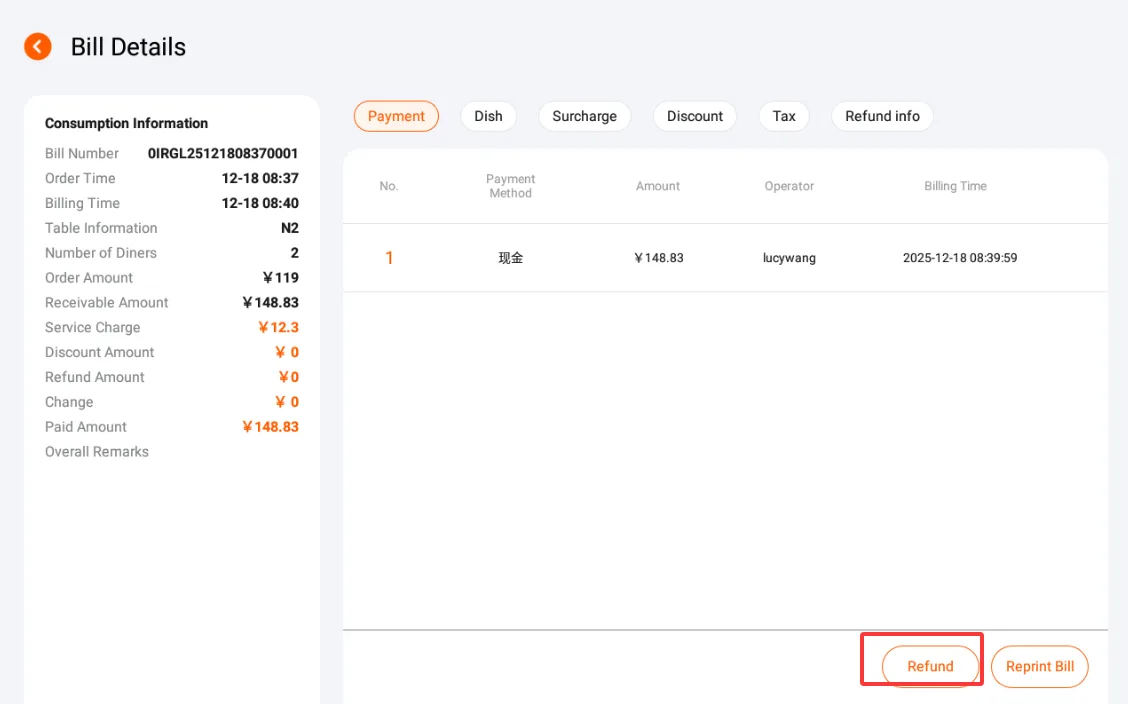
Guest requests a refund
When a checked-out guest requests a refund, the cashier should make a determination based on the store's regulations and the actual on-site situation. If a refund can be issued to the guest, click [Refund] in the bill details;
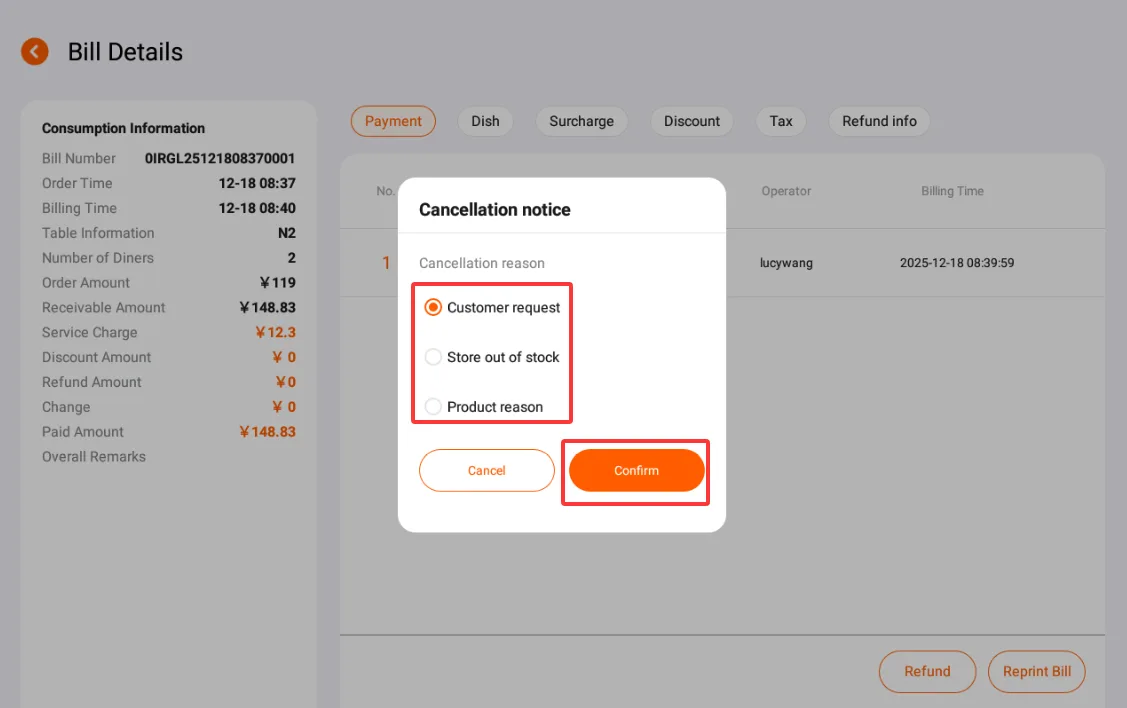
Select the refund reason in the pop-up window;
Click [Confirm];
Note
Cash refunds need to be manually processed from the cash drawer (if available); For other electronic payments not made through this system, cashiers need to manually complete the refund in accordance with the store's specified method; Electronic payments made through this system have a refund deadline, which is specifically related to the locally connected payment methods, and this content will be updated and explained later.
Product Management
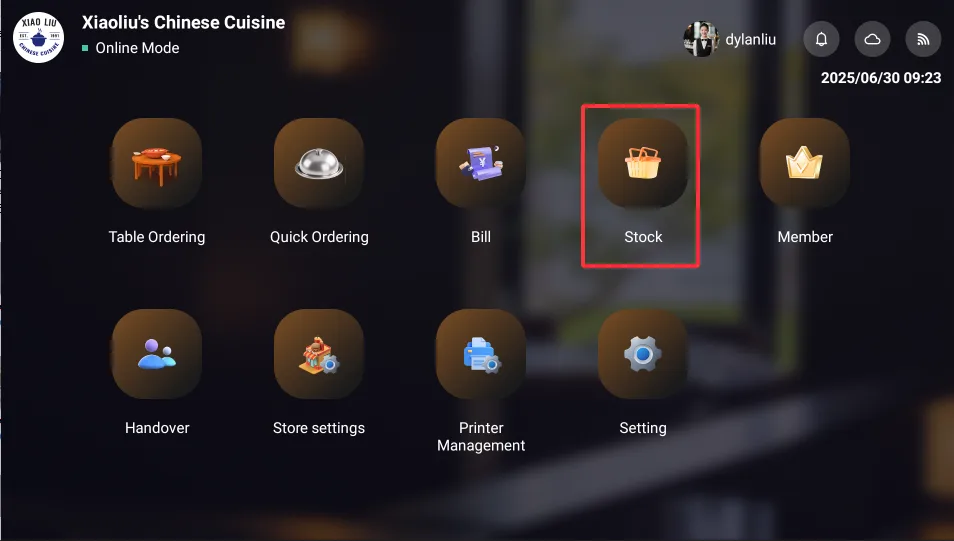
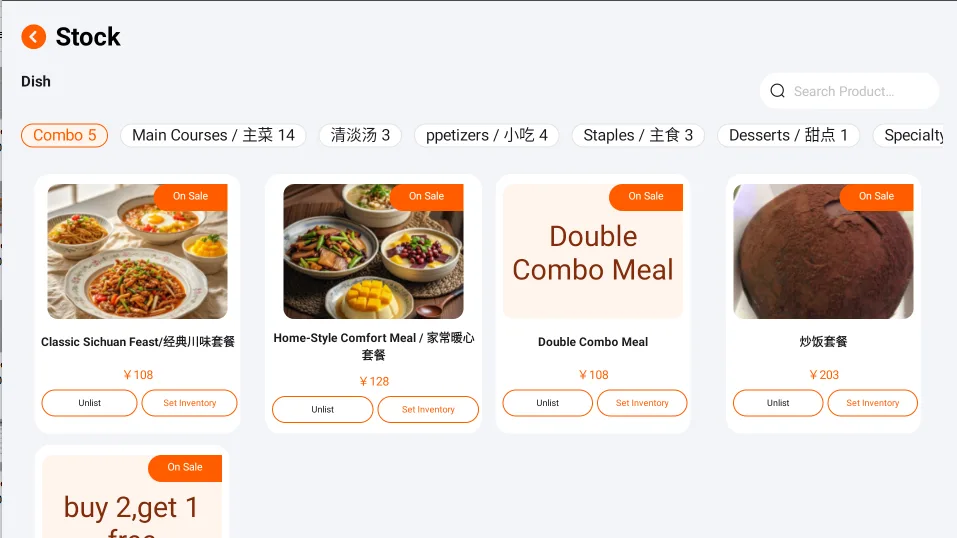
- In the product management, information such as the names, pictures, prices, and on-sale status of all dishes is displayed;
Dish Sold Out
- Dish sold out refers to a situation where a particular dish has been sold out or is about to be sold out, with inventory at zero or reaching an alarm state, making it impossible to provide sufficient quantity to customers. This is usually an operation of taking the on-sale product off the shelves or adjusting the inventory based on situations such as raw material shortages reported by the kitchen.
Dish taken off the menu
Select the dish to be delisted and click the [Delist/Unlist] button below the dish;
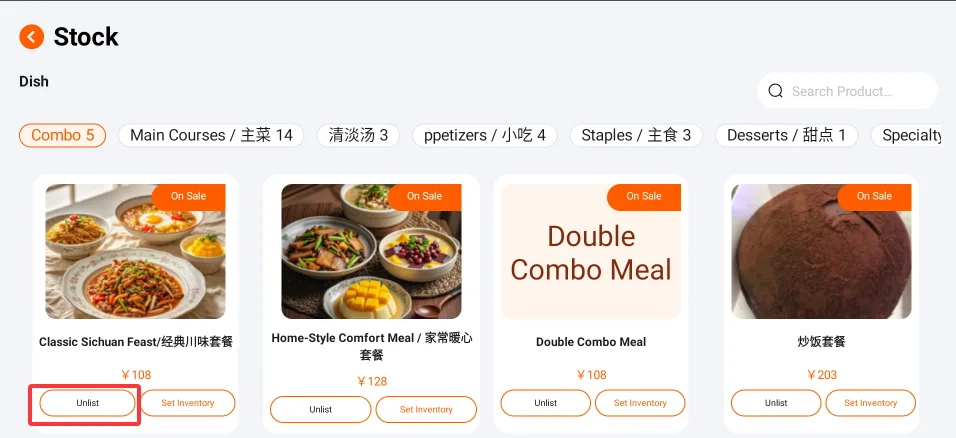
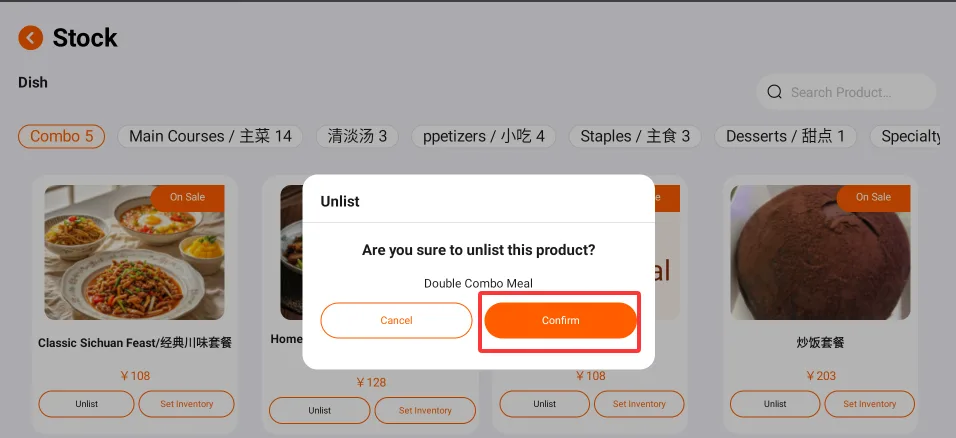
Click [Confirm/confirm] in the pop-up window to complete the delisting;
After being taken off the shelves, this dish can no longer be ordered on the cashier terminal, the service staff's tablet ordering terminal, or the user's mobile phone scan code ordering terminal.
Inventory Adjustment
Select the dish to adjust and click the 【Set Inventory】 button below the dish;
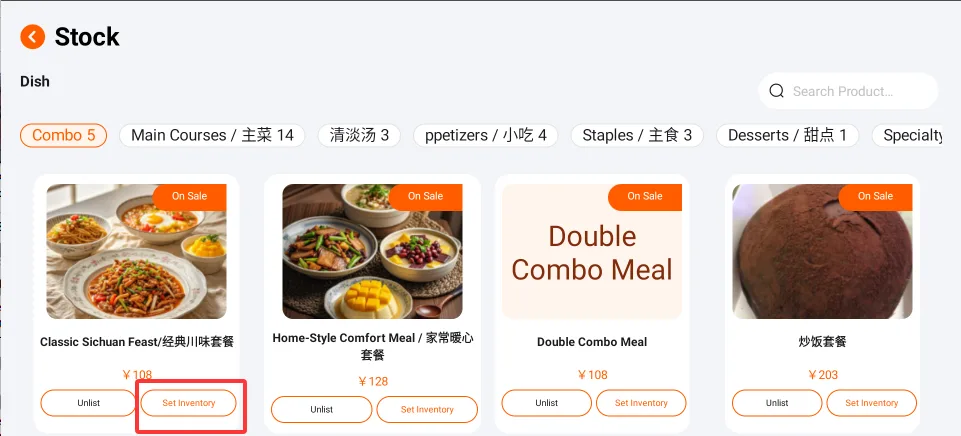
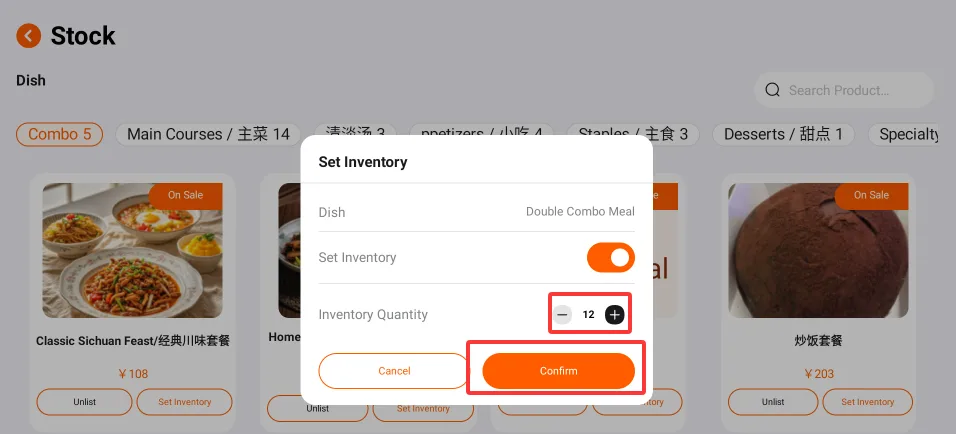
After setting the inventory quantity in the pop-up window, click [Confirm/confirm] to complete the setting;
When the sales of this dish reach the remaining inventory, the system will automatically take the dish off the shelves.
Member
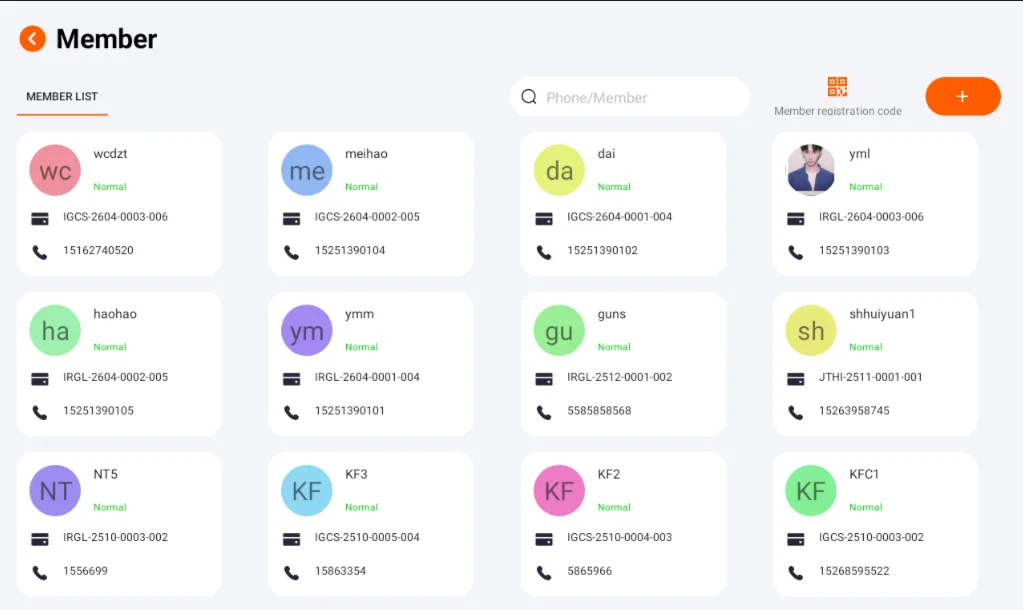
Member List
- The home page will display member information in the form of cards, with each card corresponding to a member. The card shows the member's initials, full name, membership status, membership number, and contact phone number.
- If the store is a chain store, both the headquarters and branches can view all member information. The headquarters can see the members of itself and its branches, while the branches can see the members of themselves, other branches, and the headquarters.
Registered Member
Supports mobile phone scanning of QR codes to self-register for a store membership account. 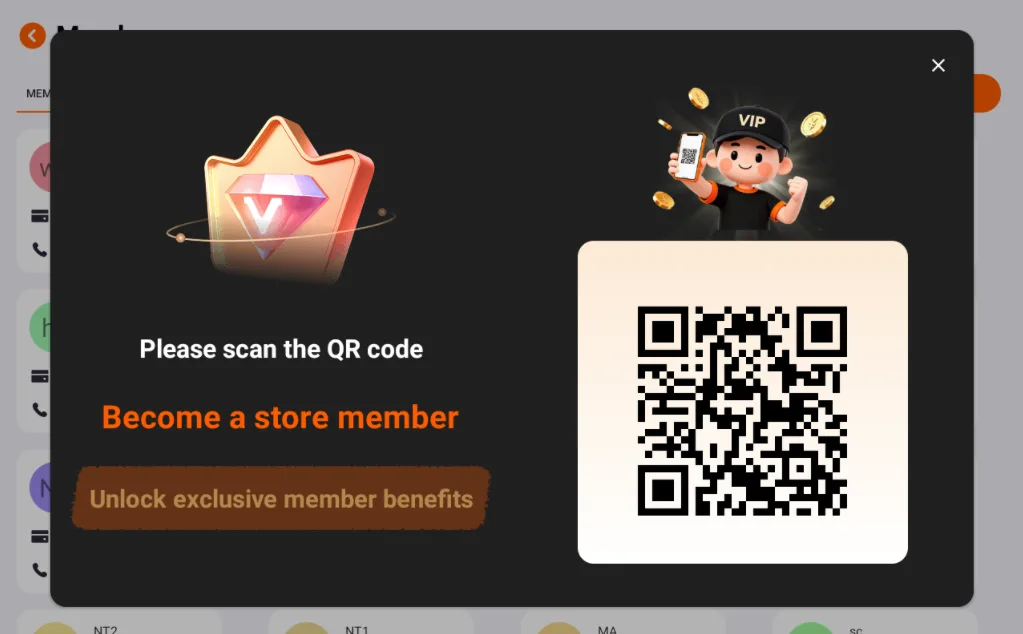
Add New Member
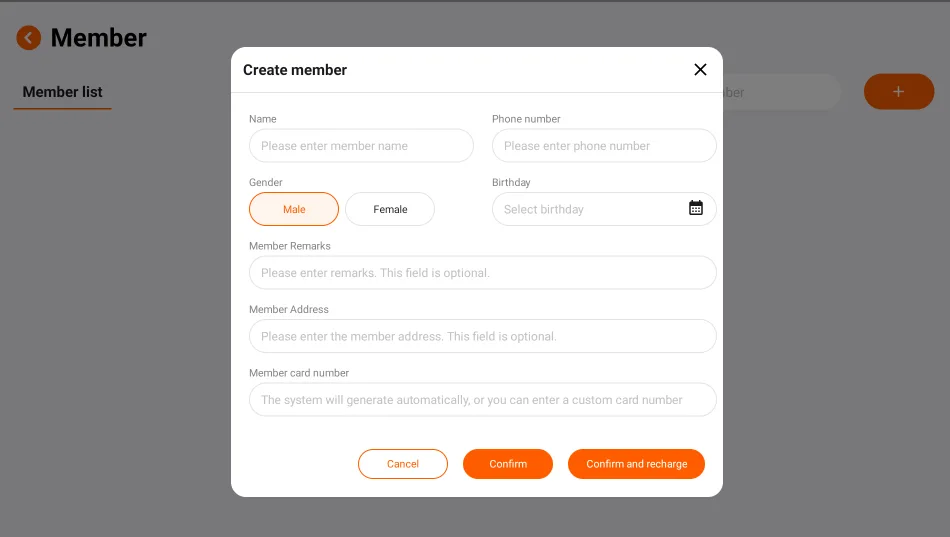
- On the home page of the membership function, click the orange plus button in the upper right corner, and the "Create Member" pop-up window will appear.
- Information Completion
- Name: Enter the member's name in the corresponding text box.
- Phone Number: Fill in the member's contact phone number.
- Gender: Click to select "Male" or "Female".
- Birthday: Click the text box, and after the calendar icon appears, click the icon to select the member's birthday.
- Membership Card Number: The system will automatically generate a card number, or you can manually enter the desired card number yourself.
- Member Remarks: Enter remark information.
- Member Address: Enter the member's residential address.
- Email: Set up an email address for logging in to the mobile membership system.
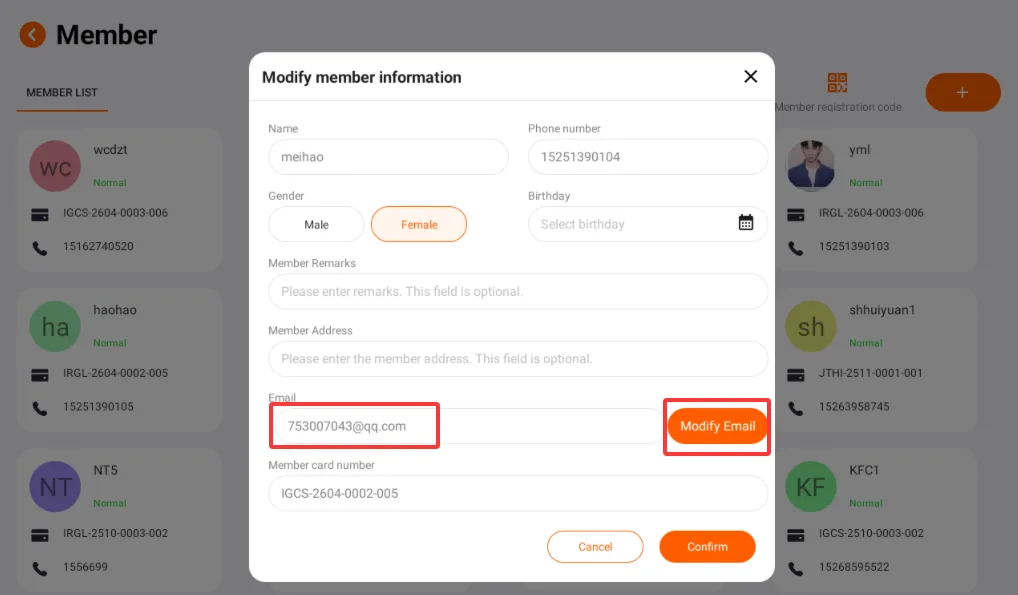
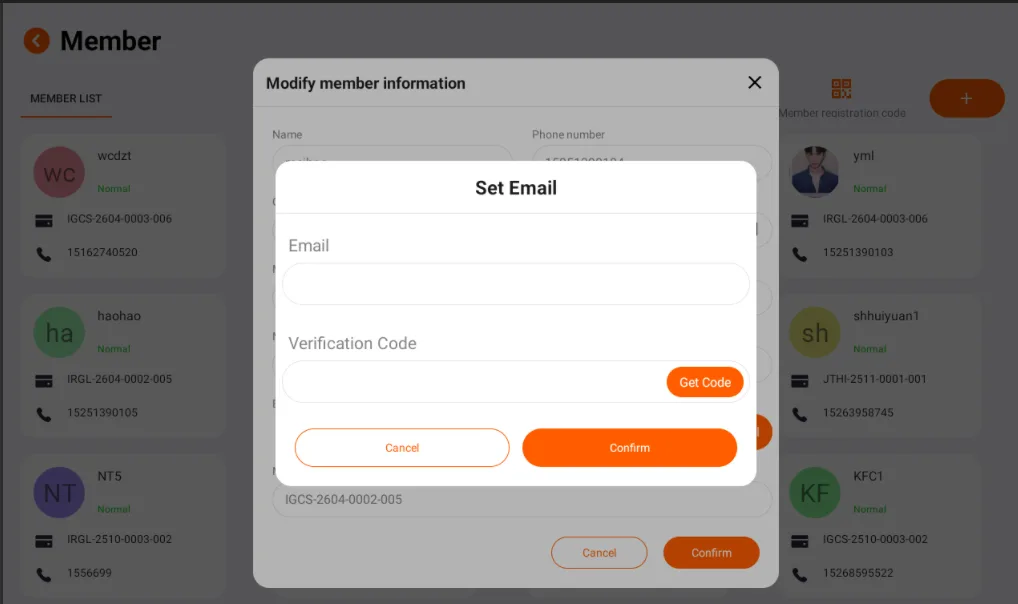
- Function Button
- Cancel: Click this button to close the pop-up window, and the entered member information will not be saved.
- Confirm: Click this button to save member information, close the pop-up window, and return to the home page of the member function.
- Confirm and Recharge: Click this button to save member information while entering the member recharge page to perform the recharge operation.
Member Details
- Access Path: On the home page of the member function, click a member's card, and the "Member Information" pop-up window will appear.
- Information Presentation
- Basic Information: Displays member initials, name, gender marker, member status (active or disabled), member number, contact phone number, and birthday
- Account Balance: Below "Balance", the current balance of the member's account will be displayed,
- Function Button
- Modify Information: Click this button to enter the interface for modifying member information, where you can adjust details such as name, phone number, etc.
- Disable: Click this button to set the member account to a disabled state, preventing it from enjoying member benefits.
- Recharge: Click this button to enter the member recharge page and top up your member account.
Member Balance Recharge
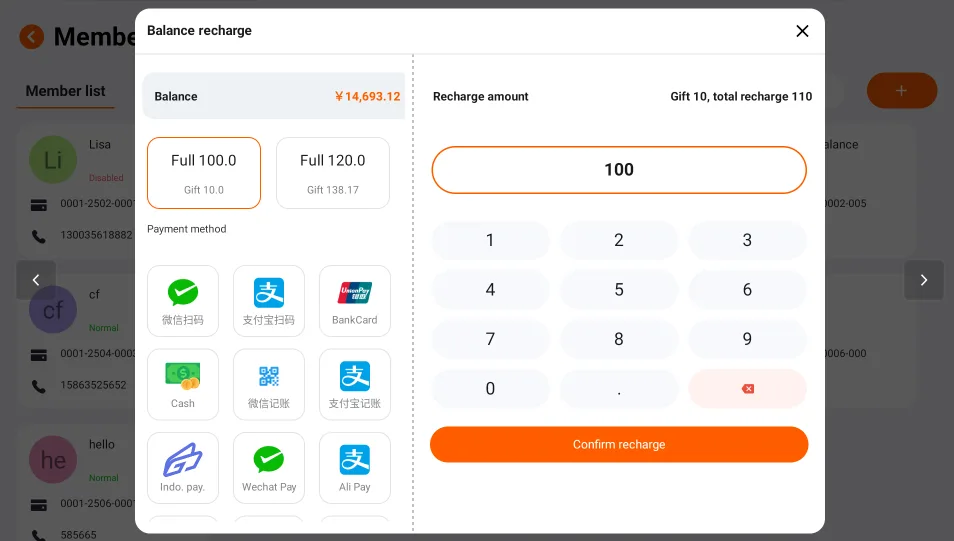
- Access Method: Click the "Recharge" button on the member details page, or click "Confirm and Recharge" when creating a new member, and you can access this page.
- Information Presentation
- Current Balance: The current account balance of the member will be displayed after "Balance" in the upper left corner of the page.
- Recharge Promotion Selection: On the left, there are recharge promotion selections, such as "10% bonus by proportion" and "1000 bonus for every 5000 recharge". On the right, information related to this recharge is displayed, for example, "10000 bonus, total recharge 110000".
- Operation Process
- Enter the recharge amount: In the input box above the numeric keypad on the right, enter the amount you want to recharge, such as 100000 in the figure.
- Select Payment Method: In the "Payment Method" area on the left, you can choose "Cash", "Bank Card", "Electronic Payment", or "Event Gift" (directly given according to store promotions).
- Confirm Recharge: After entering the amount and selecting the payment method, click the orange "Confirm Recharge" button at the bottom of the page to complete the recharge operation.
Shift handover -- Account logout
- When a cashier gets off work or is replaced by another cashier, they need to complete the shift handover operation in this module and then log out of the account;
- The shift handover page will clearly record key data such as the on-duty employee's working hours, sales performance, and payment collection status;
- The amount receivable only reflects the total amount receivable for the settled portion. In the unsettled state, the total amount receivable will change accordingly due to possible additions or deletions of dishes, as well as adjustments to taxes and surcharges. Therefore, the amount receivable only calculates the portion that has been settled and will not change.
- The actual received amount and refund amount are calculated based on all actual collections and refunds that occurred during this shift;
- Currently, the calculation of the discount amount only covers discounts on dishes.
- Standby funds for handover, etc., need to be confirmed.
- The detailed shift handover report generated by the system provides a basis for managers to supervise and analyze, which helps to identify problems, optimize processes, and evaluate employee performance.
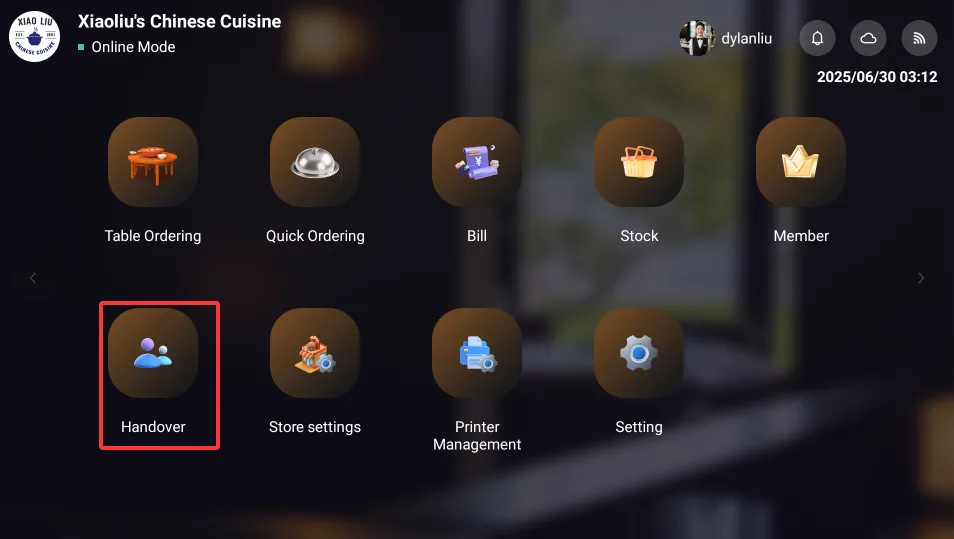
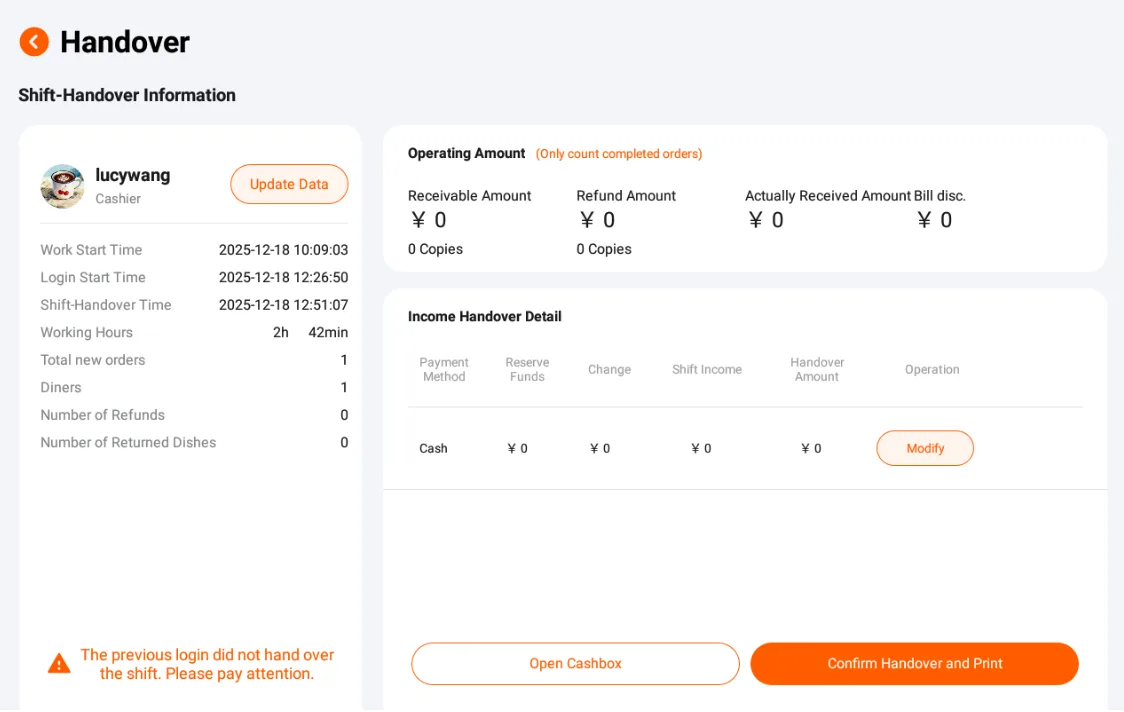
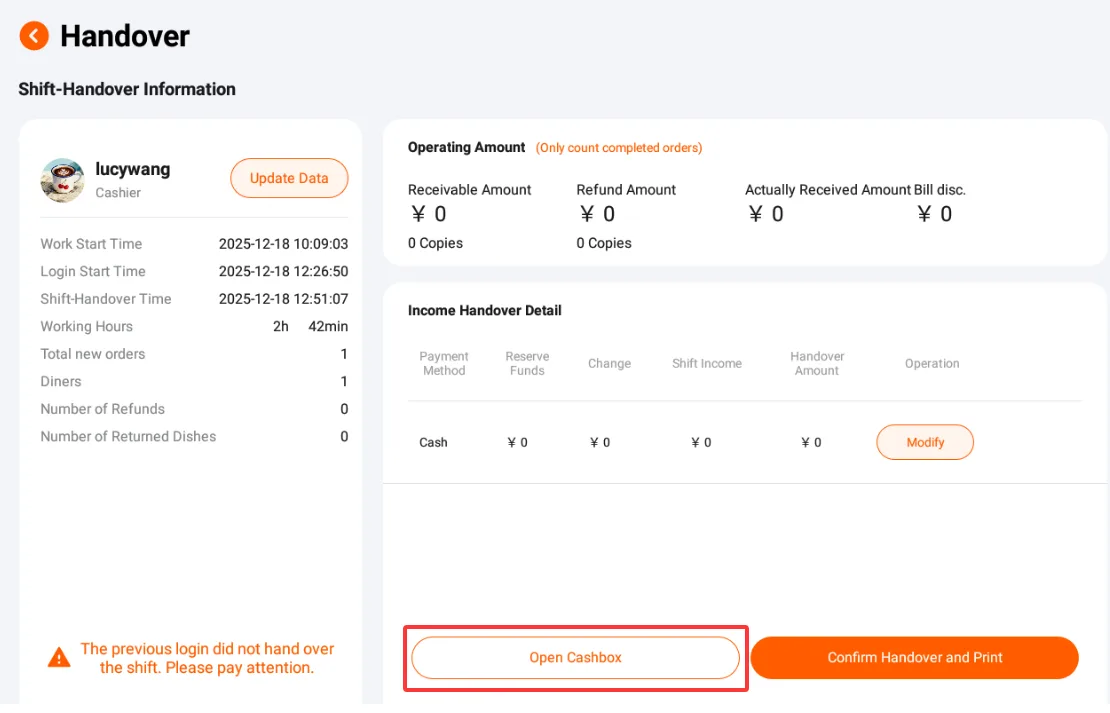
Click [Open Cashbox], and the system will open the cashbox device, allowing the shift handover staff to count the cash being handed over in the cashbox;
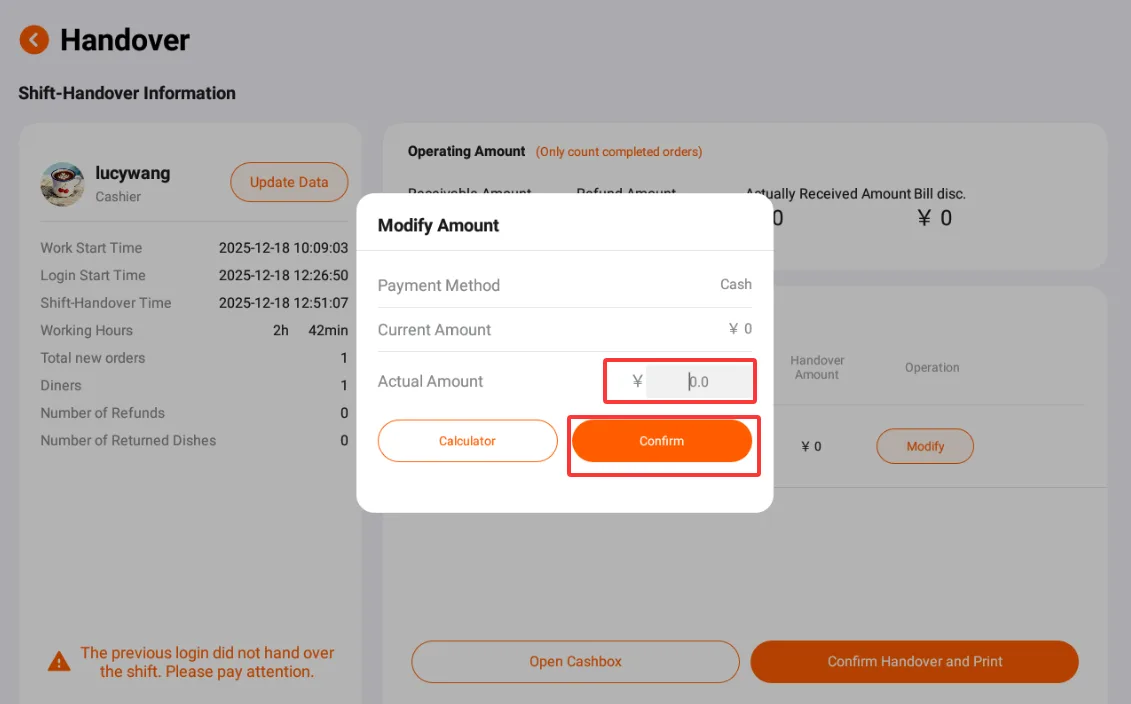
If the counted amount differs from the system-calculated amount, click the circled 【Modify】 as shown in the figure;
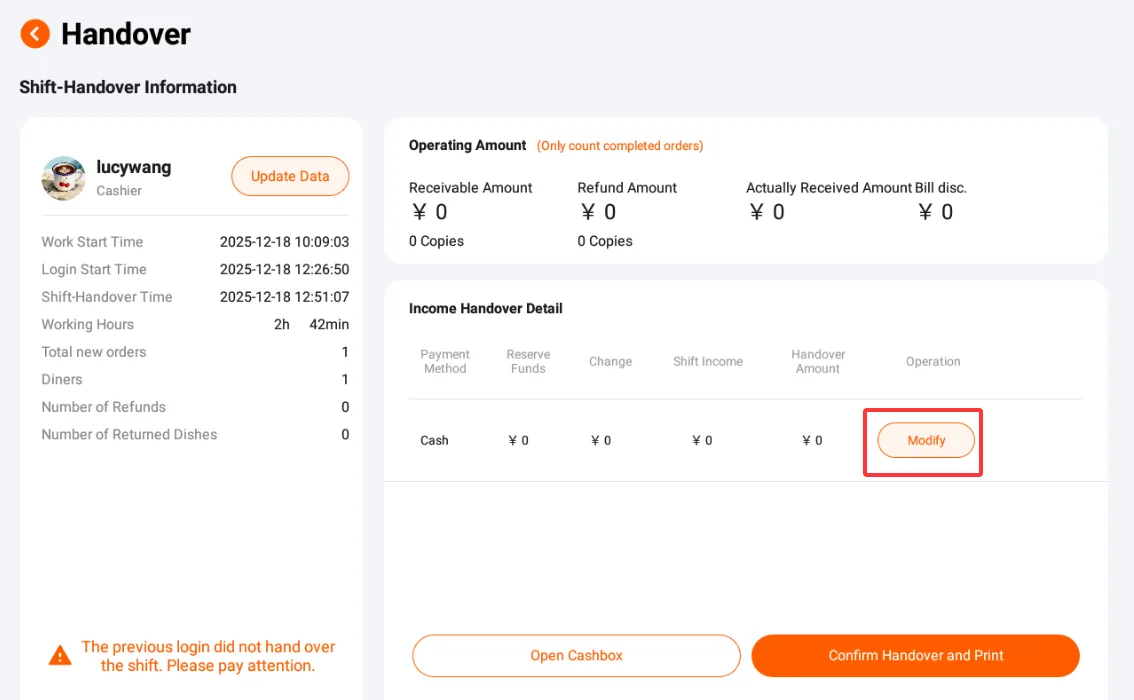
After entering the actual counted amount in the pop-up window, click [Confirm] to complete the modification;
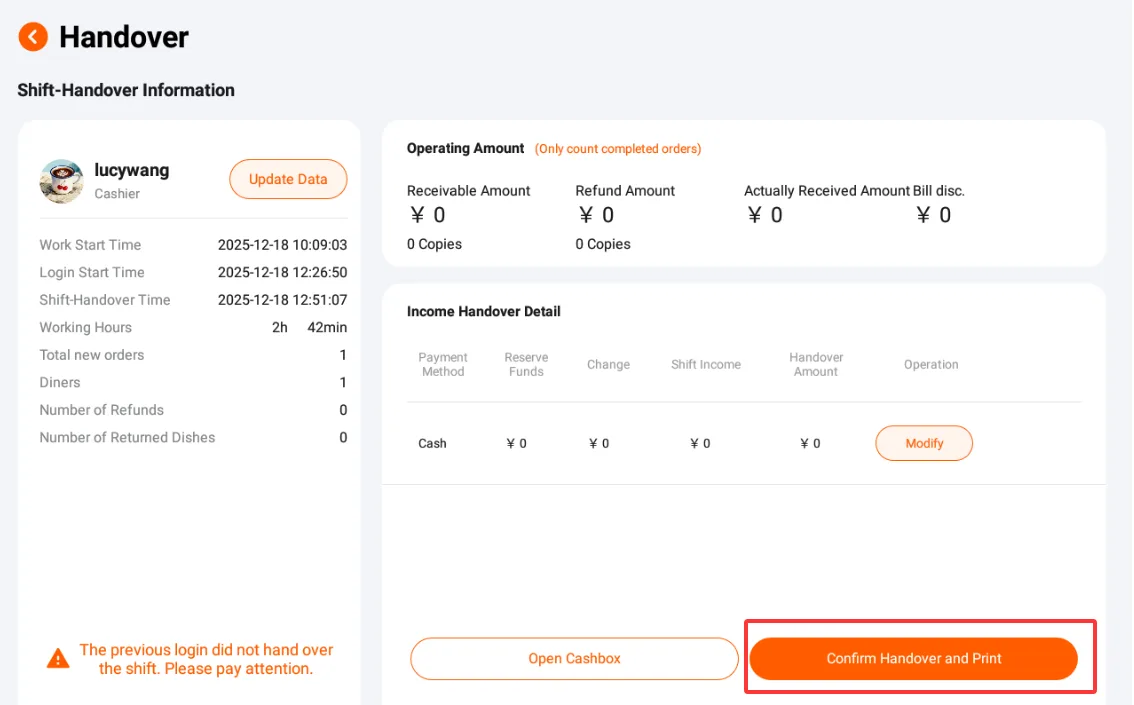
After confirming that the handover information is correct, click [Confirm Handover and Print/Comfirm Handover and Print];
The system will print the handover voucher and automatically log out of the current account.
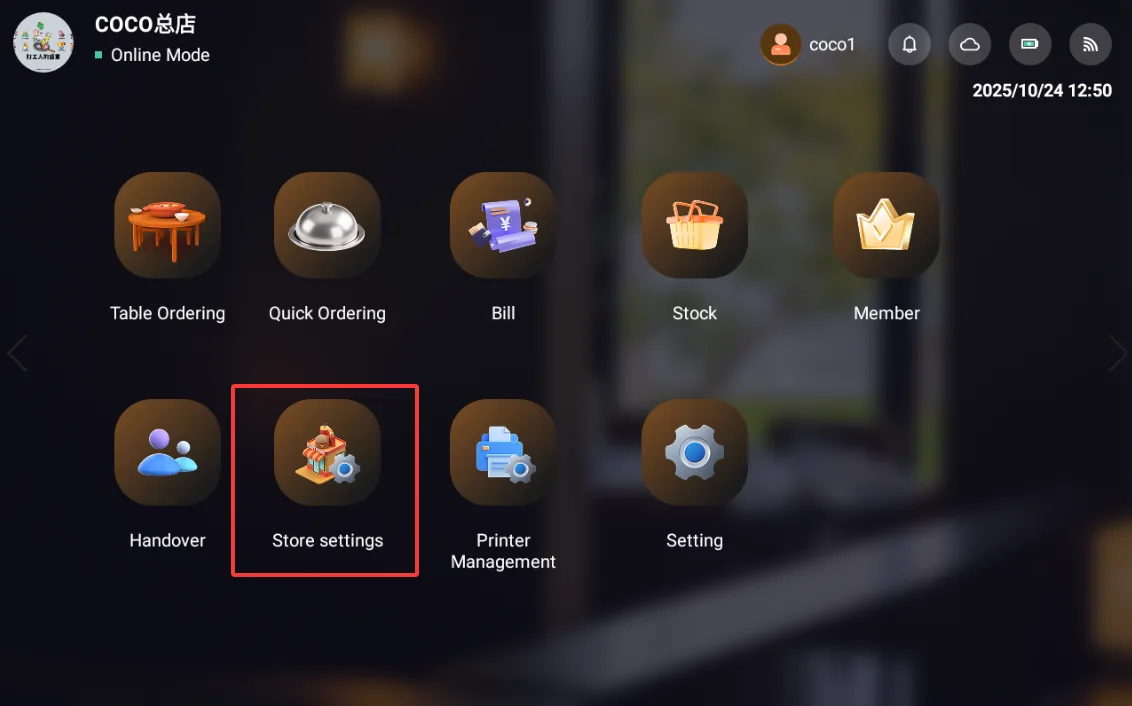
Store Settings
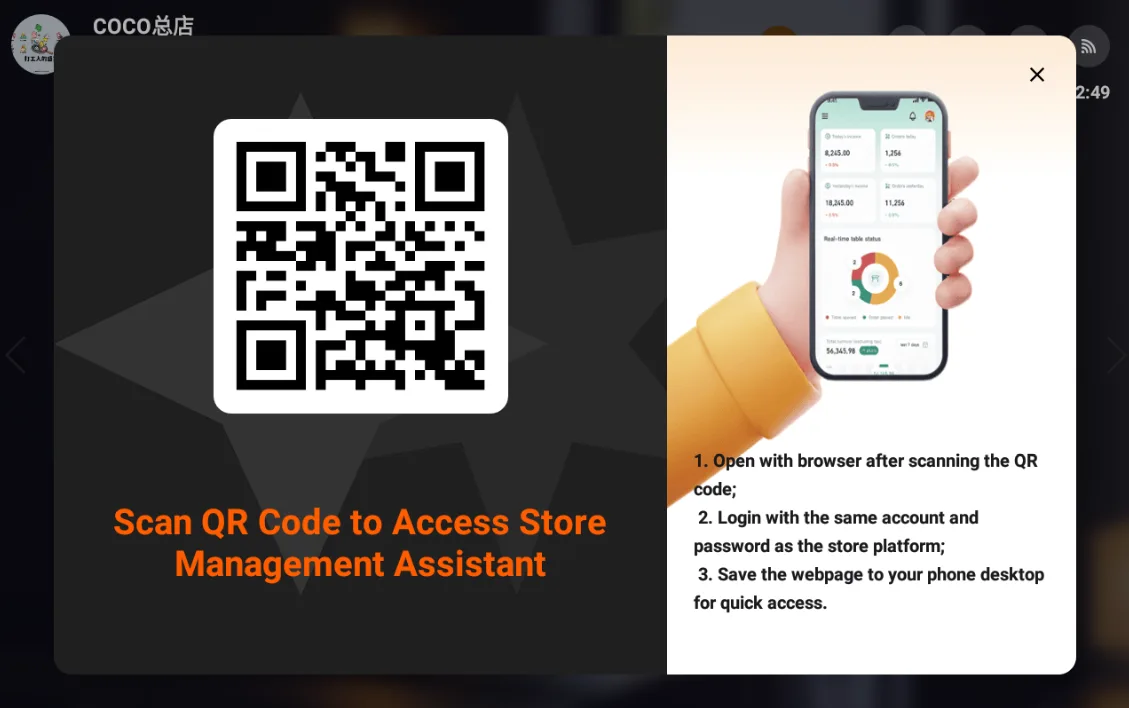
- Mobile platform entry, scan the QR code on the mobile QR code scanning page, enter your account and password to access the system management platform.
System Settings
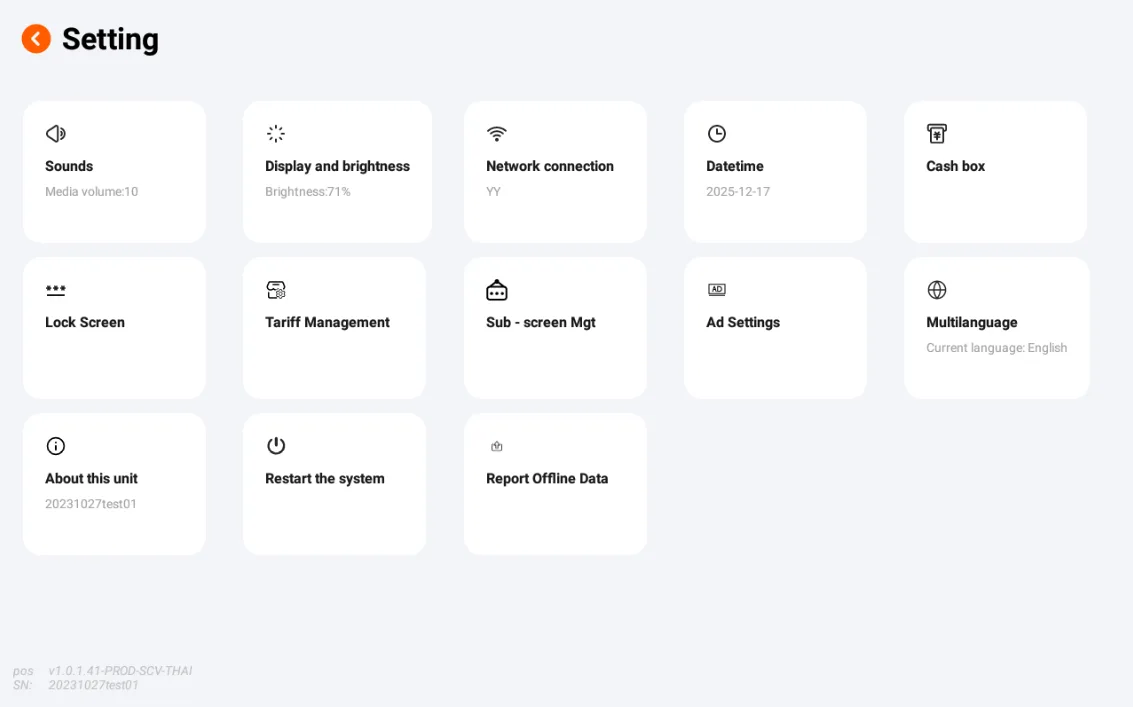
- This module serves as the main entry point for basic system settings, such as sound, brightness, network, time, language, etc.;
- Clicking on the corresponding card enables setting up the corresponding function;
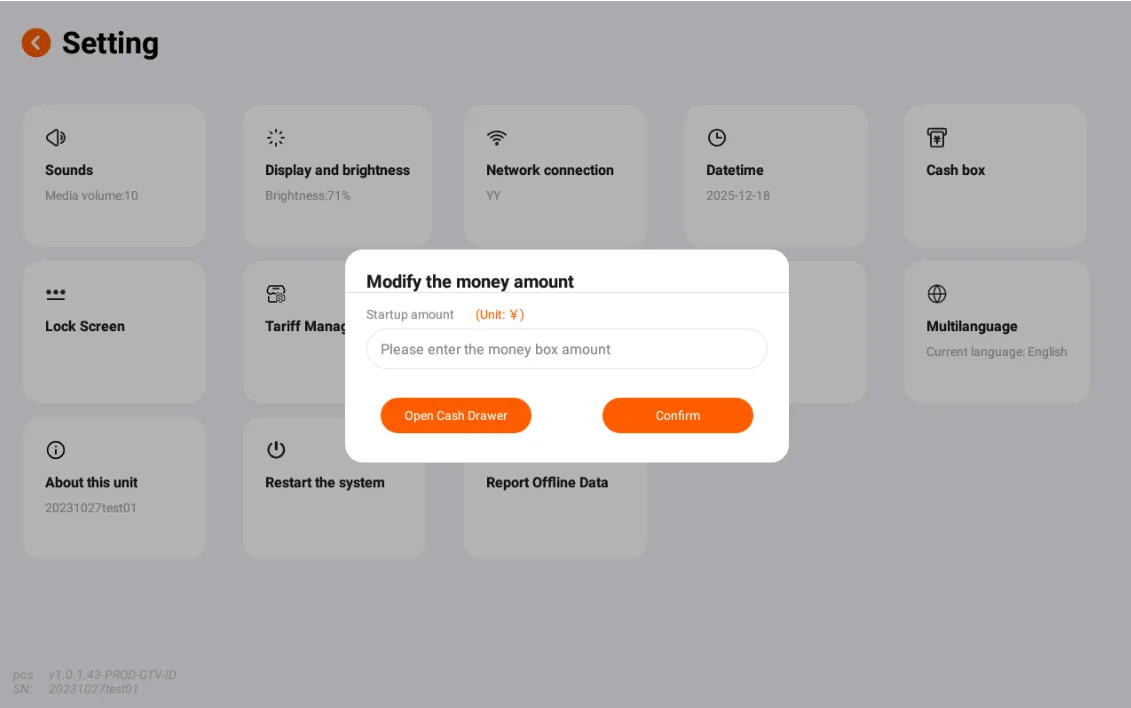
Cash Box
Among them, the cash drawer can be modified using the "Modify Cash Drawer Amount" (only modifies the amount recorded in the system), which is generally used when adding petty cash to the cash drawer during work
"About This Device" displays information about the system and device;
The system restart function can be used to restart the device. After restarting, you need to log in to your account again. It is recommended to use it with caution during business hours.
Lock Screen
Description
- Locking the screen refers to locking the device's screen to put it in an inoperable state. In a point-of-sale cash register, the purpose of locking the screen is to enhance security and prevent unauthorized use.
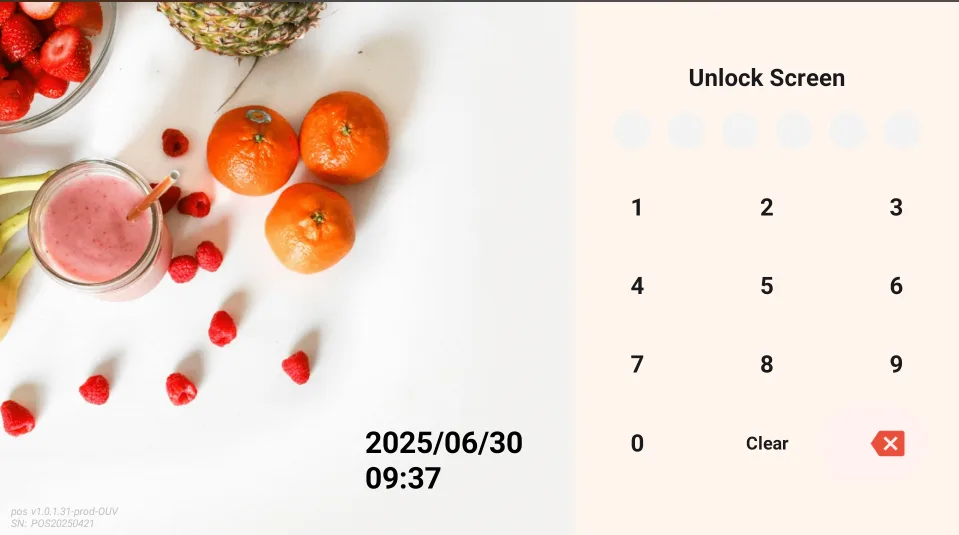
- The operating method is as follows: When you click the power button of the device, the screen will enter the locked state. At this time, the screen will display an interface requiring password input to prevent others from operating it at will.
- When you need to use the cash register again, you need to enter the pre-set correct password in the password input area. Only by entering the correct password can you unlock the screen, restore normal operating permissions, and perform related operations such as ordering and cashiering.
- Initial Password: 250308
Objective
Locking the screen of the ordering cash register and setting an unlock password has the following functions:
- Prevent misoperations: Avoid order errors, data changes, or system settings being disrupted due to accidental touches or inadvertent operations by other personnel during busy business operations.
- Ensure transaction security: Prevent unauthorized personnel from accessing and operating the cash register, and prevent malicious tampering with transaction records, theft of customer payment information, or illegal operations.
Password Setup/Modification Method
Go to Settings and select "Lock Screen":
- Open the device's Settings app and tap the "Lock Screen" card to start the process of setting or modifying the password.
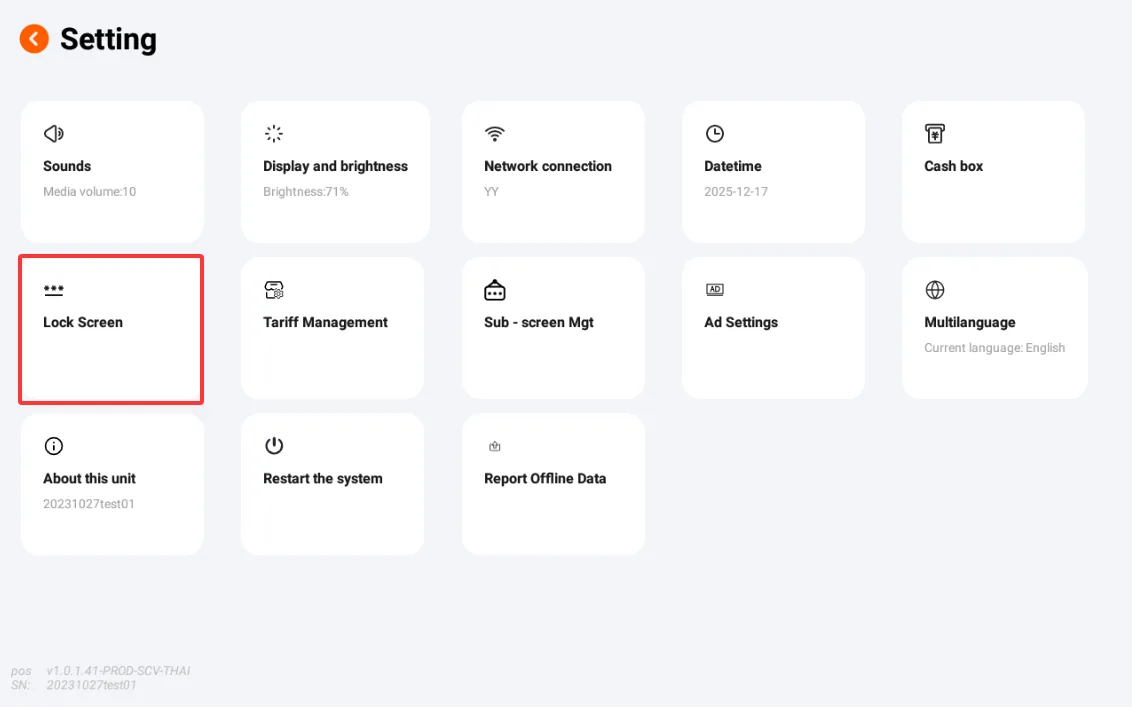
- Open the device's Settings app and tap the "Lock Screen" card to start the process of setting or modifying the password.
Enter old password:
- The system will prompt you to enter your old password. If you have not set a password before, please enter the initial password
250308.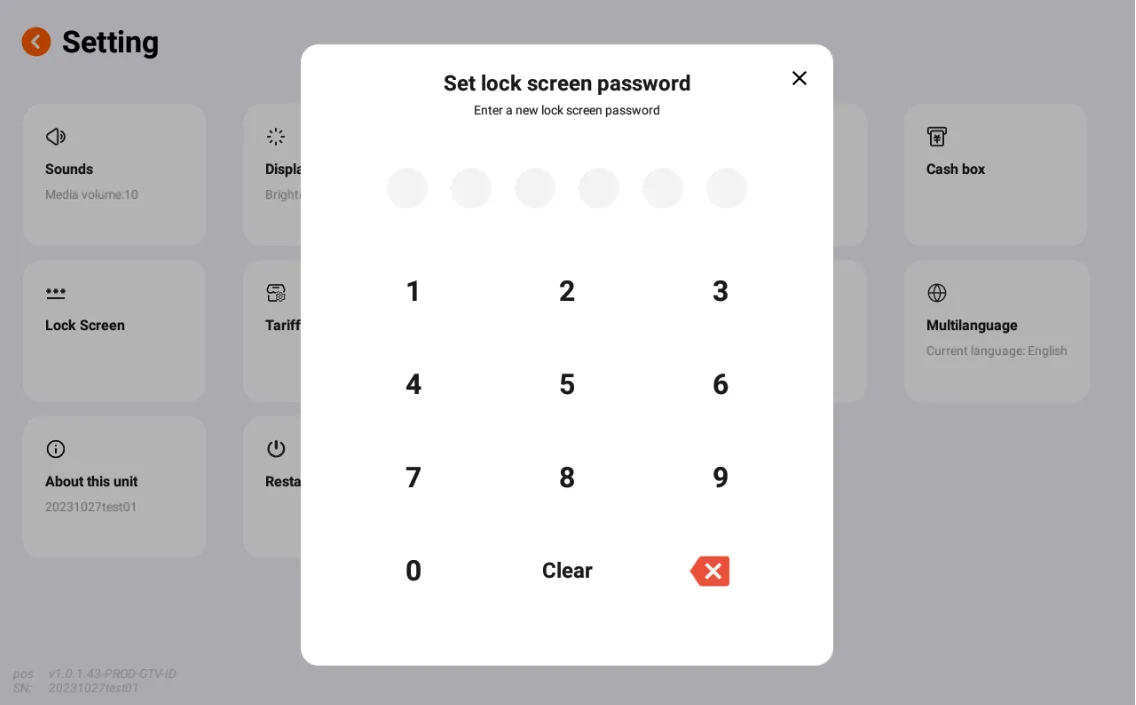
- The system will prompt you to enter your old password. If you have not set a password before, please enter the initial password
Verify the old password and set a new password:
- After successfully verifying the old password, follow the prompts to enter the new password twice to confirm it. This ensures that the new password is correctly set.
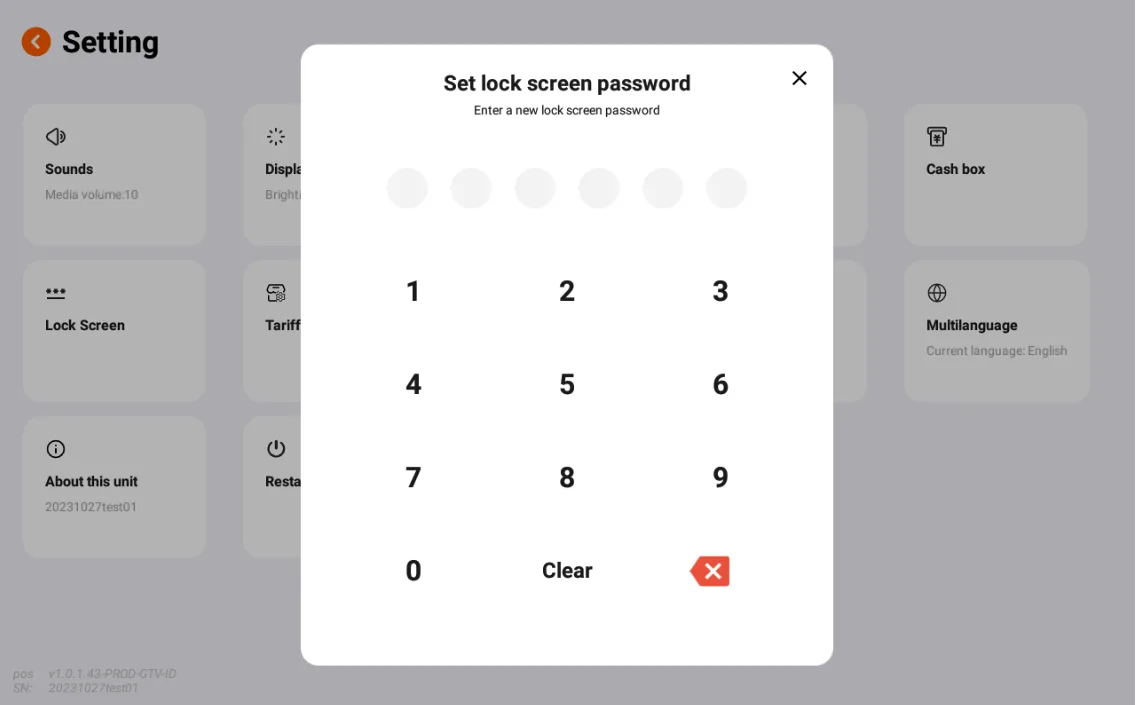
- After successfully verifying the old password, follow the prompts to enter the new password twice to confirm it. This ensures that the new password is correctly set.
Handling the situation of incorrect old password:
- If an error occurs while entering the old password, please continue to try clicking [Change Password] to enter the correct old password for verification.
- If you forget your old password, you can click the "Forgot Password" option, which will reset the password to the initial password.
Tariff Management
To ensure that the device can obtain the latest information such as payment rules, surcharge and tax settings, and payment methods, after these information are modified in the store backend, it is usually necessary to log out and log back in to the device for the changes to take effect. Additionally, you can also manually refresh the latest information by accessing the Store Settings page in the settings and clicking the [Update Configuration] button.
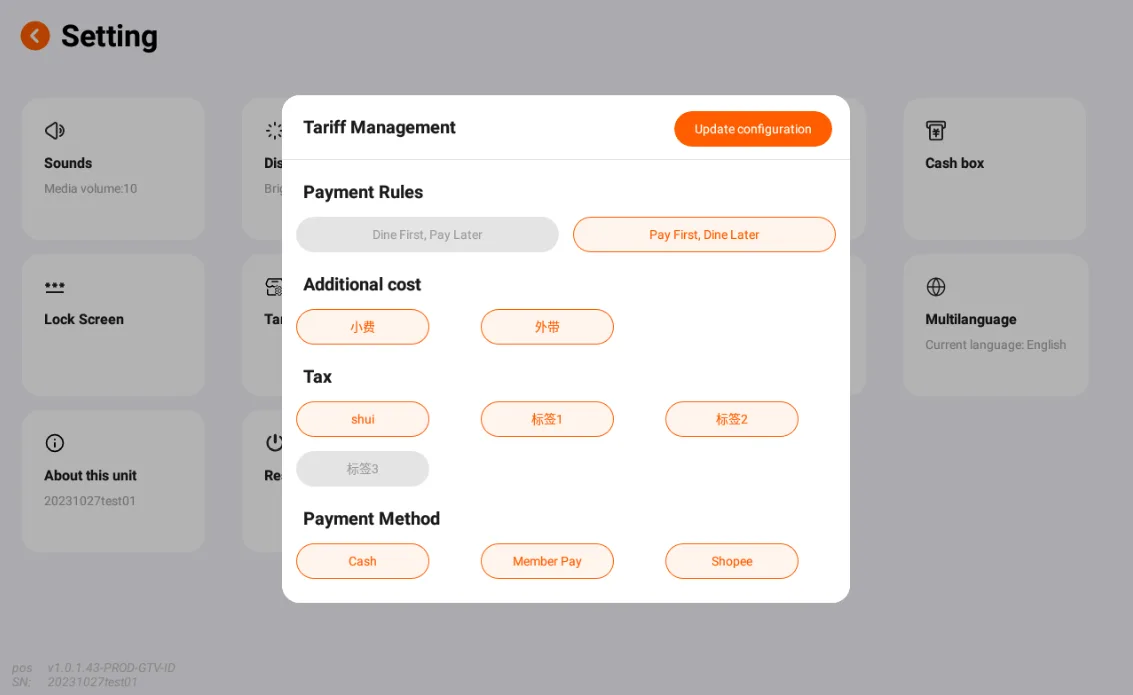
We recommend avoiding modifications to payment-related information during peak business hours or business operations as much as possible to prevent unnecessary confusion or service disruptions. Best practice is to make such adjustments during non-business hours to ensure that all changes can be smoothly transitioned without affecting the customer experience. This not only ensures operational efficiency but also provides customers with more stable and reliable services.
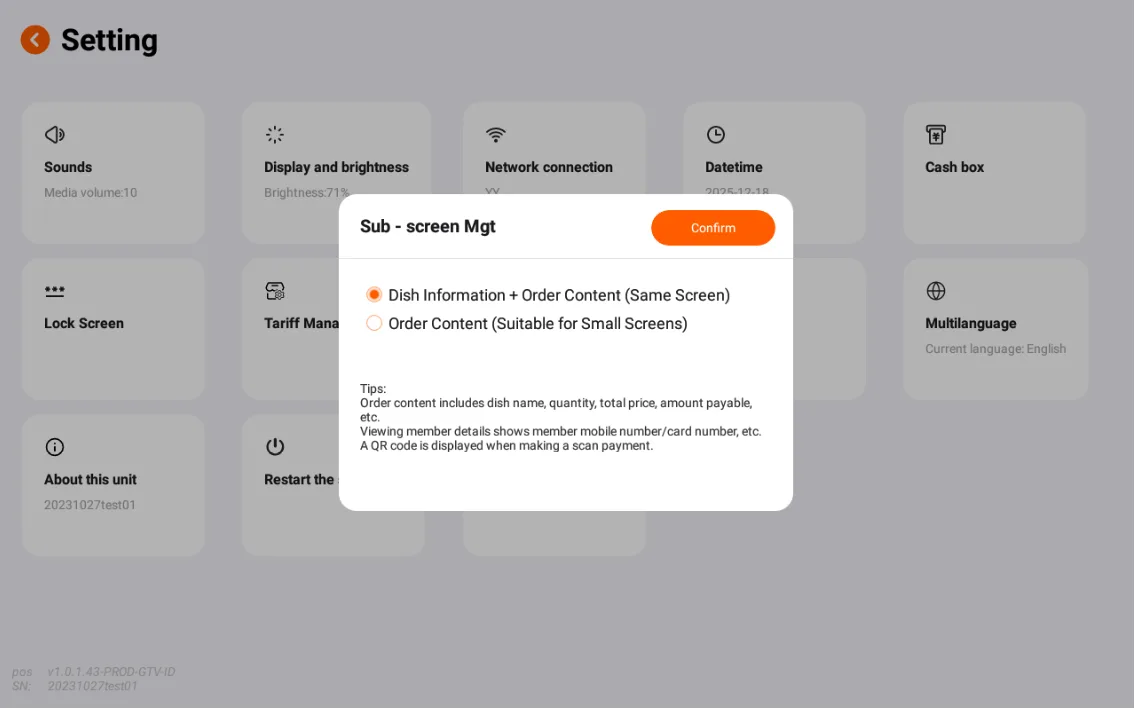
Sub-screen Management
- There are two ways to display the specific content of the secondary screen on a dual-screen cash register: 1. Dish information + Order content; 2. Order content. If you choose Option 1, customers can see the specific dish information, their own order content, and the specific information of members; if you choose Option 2, they can only see the content of the dishes they have ordered.