
Appearance
Detailed Guide
Account Login
Scan the QR code with WeChat to access the website;
Click in the upper right corner to select the appropriate language;
Enter your account, password, verification code, and click Login.
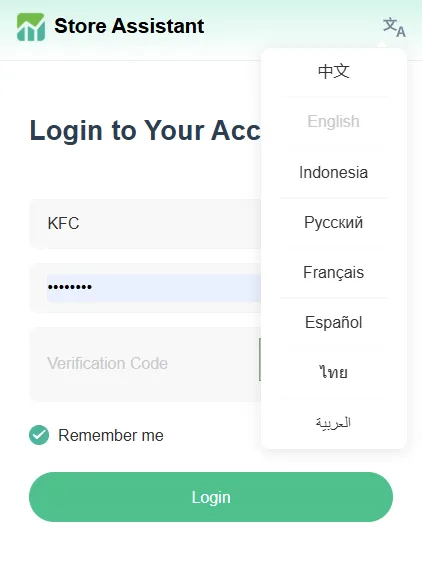
After passing the verification, open the system home page
Home Page
Function Overview
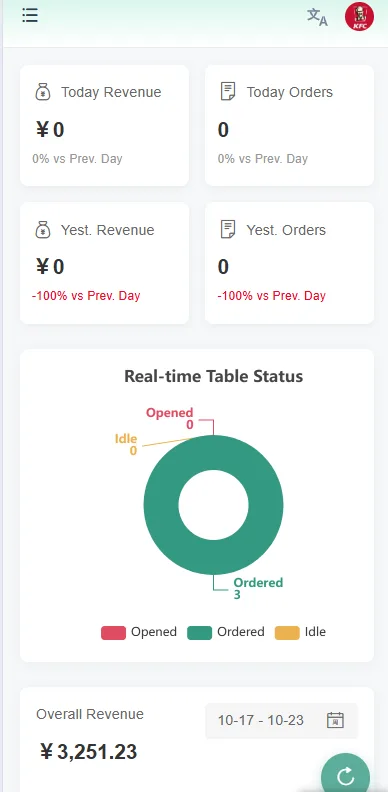
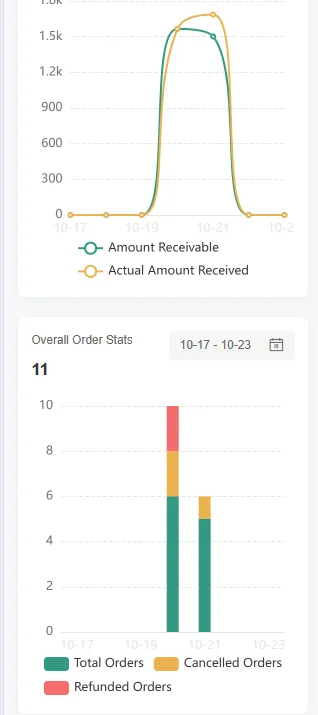
- Display today's and yesterday's turnover, actual received amount, total number of orders, table opening status, turnover and actual received amount for the last 7 days, total number of orders, number of cancelled orders, number of refunded orders, presented using bar charts and line charts. Statistically analyze the top 10 sales of dishes and set meals.
Store Basic Information Settings
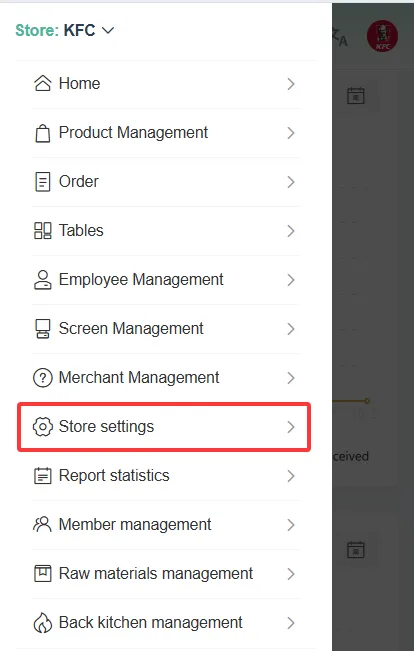
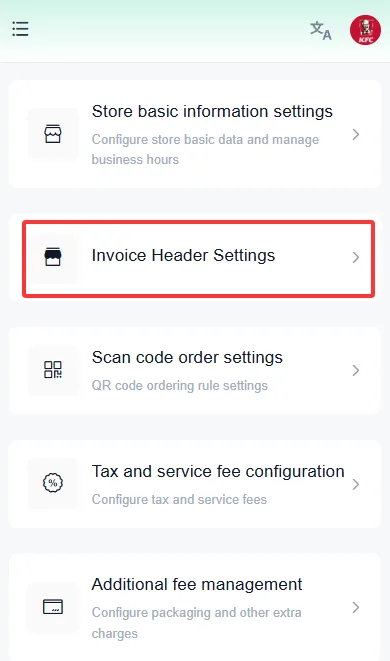
- Click the navigation bar in the upper left corner and select Store Settings;
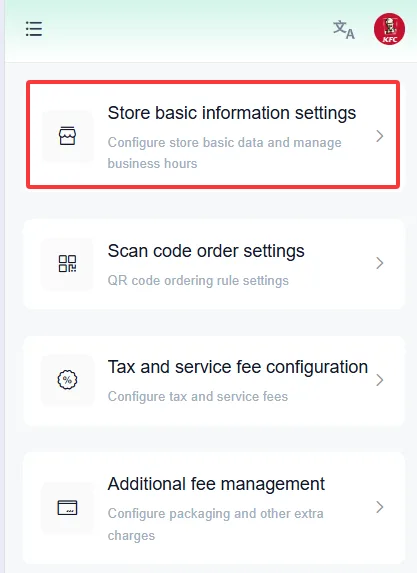
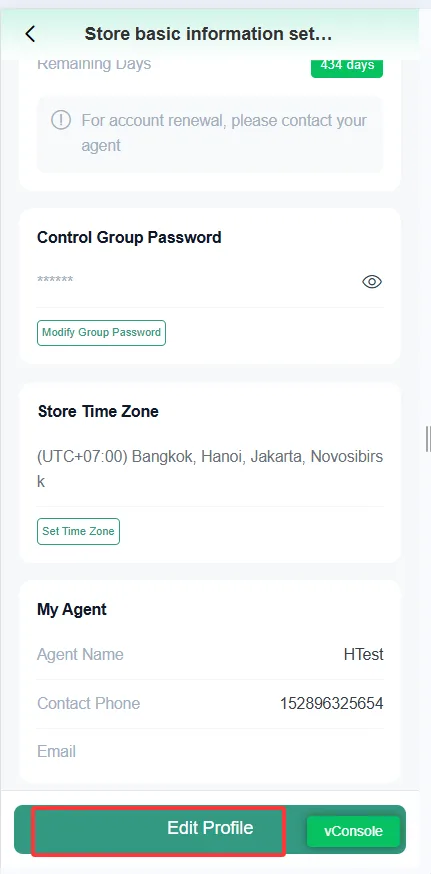
- Set the daily opening and closing times of the store. If the business hours are divided into multiple periods in a day, such as morning and afternoon, you can click the plus sign to add and set multiple time periods;
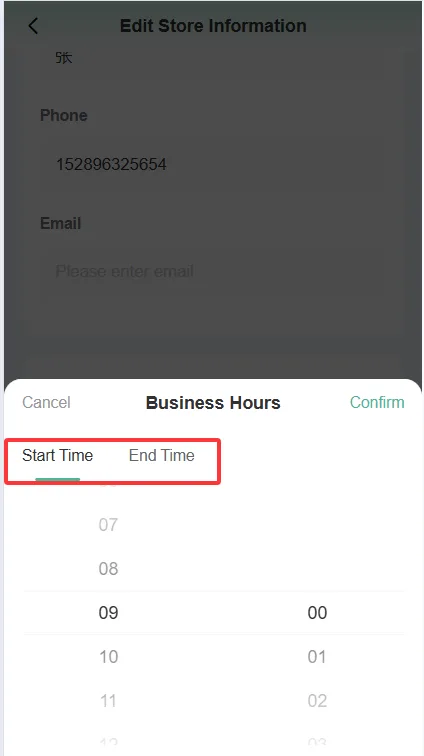
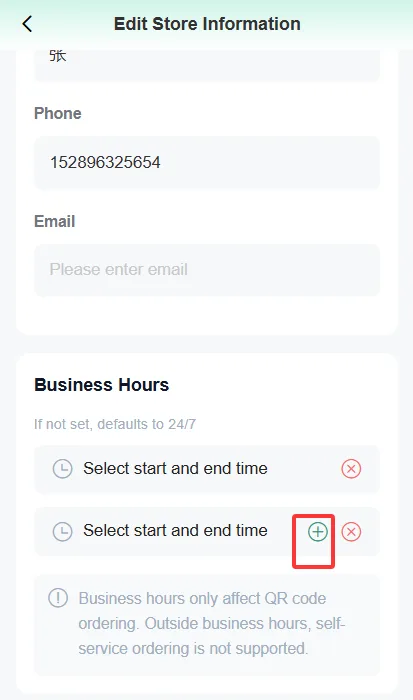
- During non-business hours, mobile QR code scanning for ordering is not supported to avoid the generation of invalid orders during this period;
- After completing the above information settings, click the bottom [Save] button to save the information.
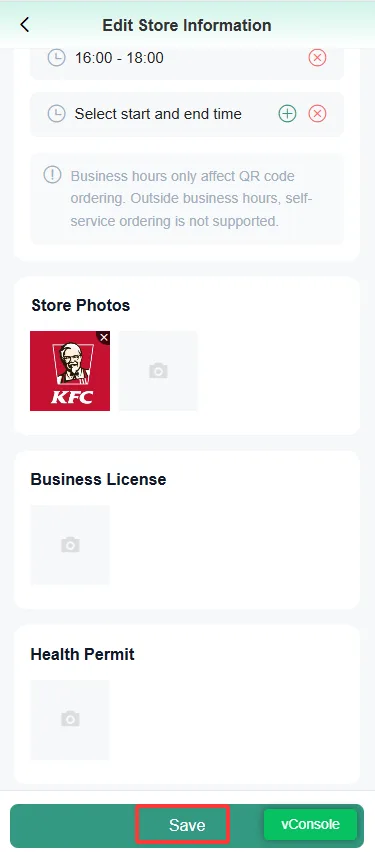
Store Settings
- Configure payment methods, taxes, service fees, and other additional charges, etc.
Bill Header Settings
- Ticket/Statement Bill Information Settings. Includes:
- Bill Store Logo
- Whether to display table number/takeaway order number
- Bill Name
- Company Name
- Company Address
- Tax ID
- Contact Phone Number
- Tax Information Location
- Enter the above information and save it.
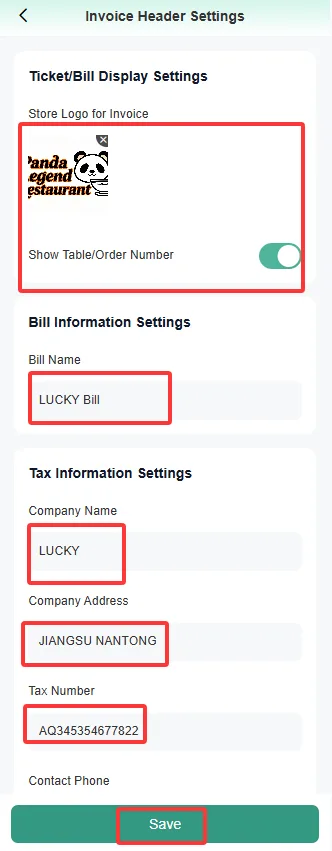
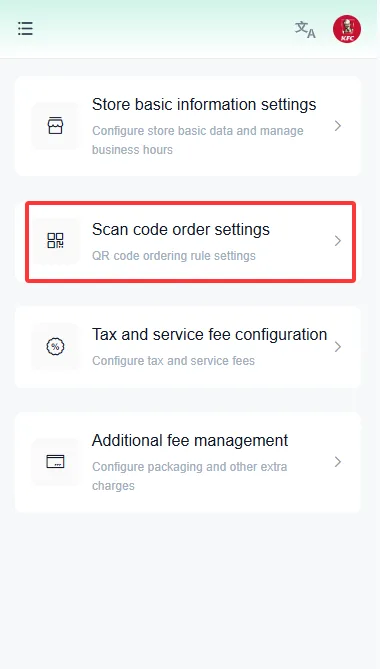
QR Code Ordering Setup
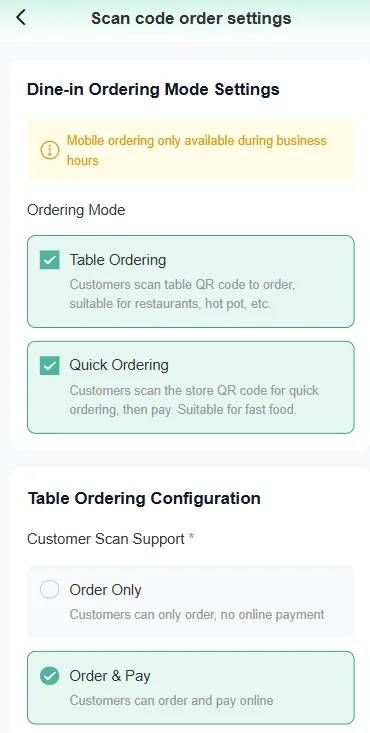
- Business Hours Restriction: Scan-to-order is only supported within the business hours you have set and cannot be used outside of these hours.
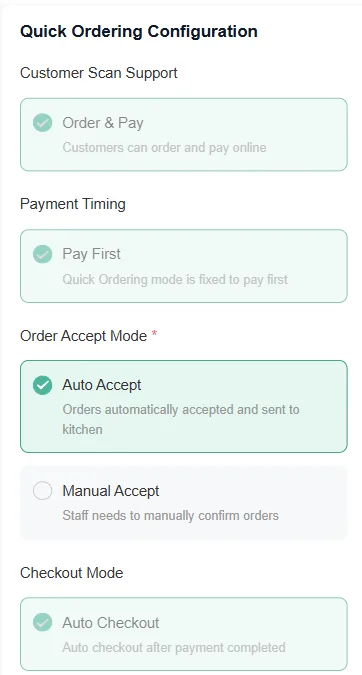
- Multi-mode support Supports the selection of "Table Ordering (One Code per Table)" and "Call Number for Pickup (One Code per Store)", which can be selected simultaneously, and the corresponding configuration content is displayed below respectively
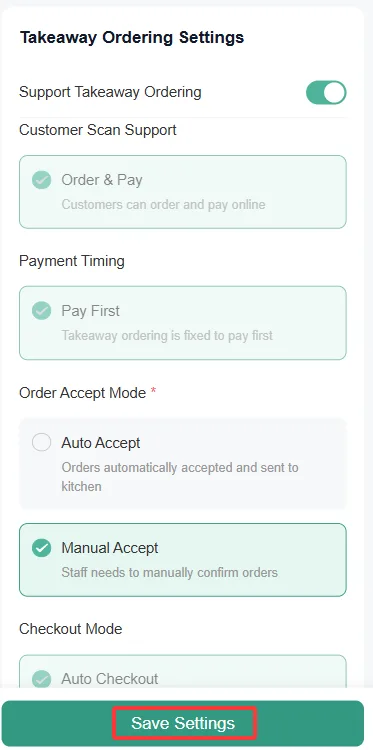
- Takeout Ordering
- can independently enable "Takeout Ordering"
- If "Call Number for Pickup" has been enabled, takeout orders will reuse the Call Number for Pickup configuration
- If the call - number meal pick - up function is not enabled, take - away ordering can be configured separately
- QR Code Placement Method:
- Tabletop Ordering: Select this option, where each table is equipped with an independent ordering QR code, and customers scan the corresponding table QR code to place orders.
- Customer support after scanning the QR code:
- Order Only: After customers scan the QR code, they can only place orders, and subsequent payment needs to be made through other means.
- Ordering + Payment: Customers can make payment operations on their mobile devices. Payment methods: Mobile devices support QRIS, membership payment, and paying at the cashier counter.
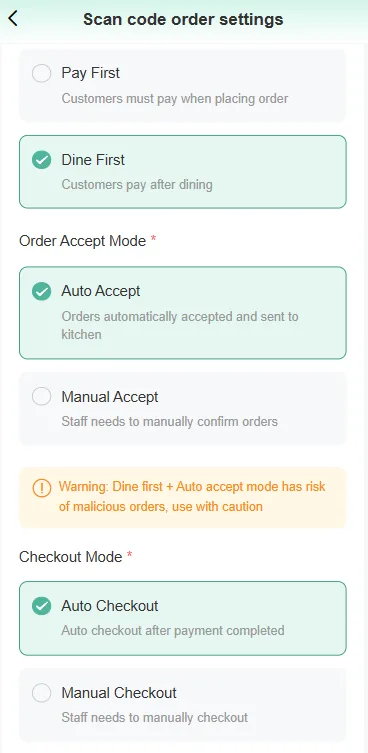
- Customer payment time:
- Pay first, then dine: After customers place an order, they can settle the bill independently on their mobile phones. Payment methods: Mobile phones support QRIS, membership payment, and paying at the cashier counter. Only after completing the payment can they proceed with the subsequent dining process.
- Pay after dining: Customers can place an order and dine first, then make payment after the meal. Payment methods: QRIS, member payment, and paying at the cashier counter are supported on mobile devices.
- Dining Method:
- Dine-in: Customers dine inside the store.
- Takeout: After customers place an order and make payment via their mobile phones, they can pick up their food by number. Food is available for takeout.
- Automatic Order Receiving and Related Settings:
- Enable Automatic Order Acceptance: Supports automatic order acceptance. After a customer places an order via mobile phone, there is no need for service staff to manually accept the order on the point-of-sale terminal.
- Automatic order acceptance for additional dishes, does not support independent switch settings.
- Automatic Order Acceptance Period: The automatic order acceptance period is based on the store's business hours and does not support custom settings.
- When both "Table Ordering" and "Call Number for Pickup" are enabled:
- Configurable default dine-in mode for the member center
- Tabletop Ordering: Scan the QR code (tabletop code) required
- Call number for meal pickup: No need to scan QR code
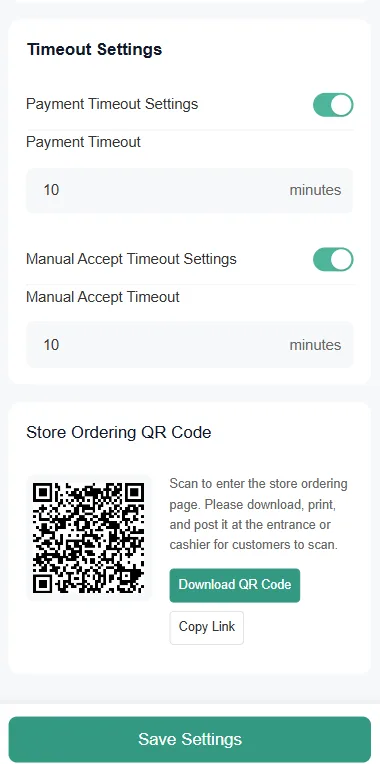
- Payment timeout
- In the prepayment mode, if payment is not made within the set time (default 30 minutes), it will be automatically cancelled.
- Order acceptance timeout
- In the manual order acceptance scenario, if the order is not accepted within the set time (default 120 minutes), it will be automatically cancelled.
Note
- Note that after enabling manual order acceptance, the payment method is pay first, dine later, and payment only supports QRIS and membership payment.
Download and print the store ordering QR code, which can be posted at the storeentrance or cashier counter for customers to scan easily. After completing the settings, please click the "Save" button at the bottom of the page to save your QR code scanning ordering settings.
Self-service ordering machine
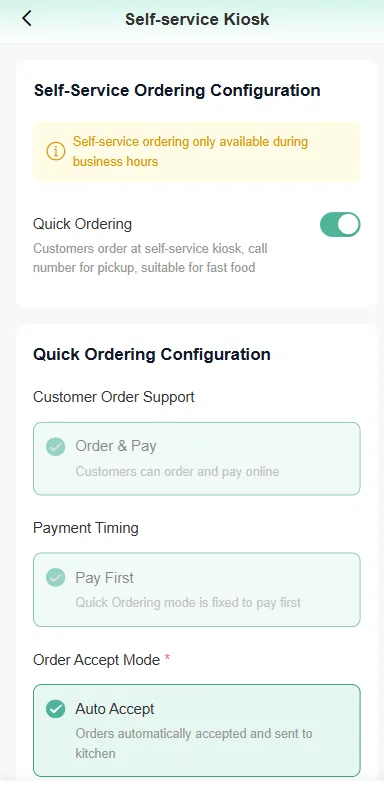
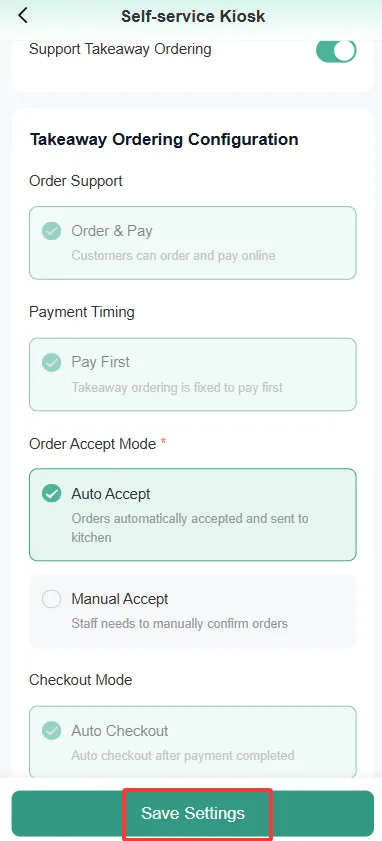
For the configuration of self-service ordering machines, whether for dine-in or takeaway, payment is made before dining, with three payment methods available: QRIS, member payment, and cashier payment. Order receiving methods: manual order receiving, automatic order receiving.
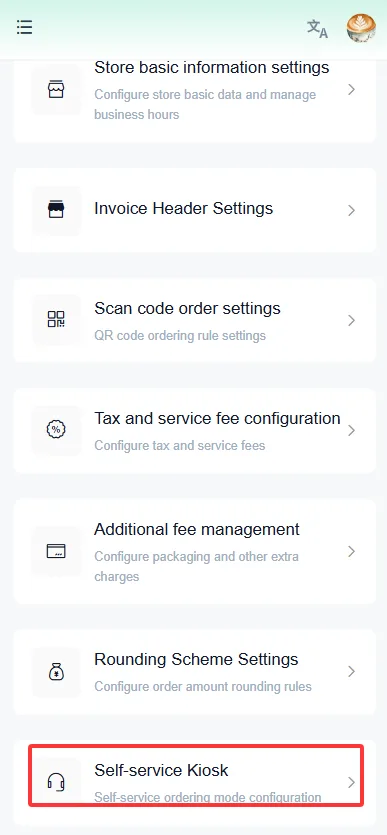
Tax and Service Fee Configuration
Enter the Tax and Service Fee Configuration Page
- In the store management system, click "Store Settings" in the left sidebar menu.
- Enter the tax configuration page.
Whether the commodity price includes tax
- At the top of the page, you will see the option "Is the product price already tax-included?"
- If "Yes" is selected, tax calculation will no longer be performed during checkout.
- Note: If the product price already includes tax, creating a tax item will not be supported here to avoid calculation errors.
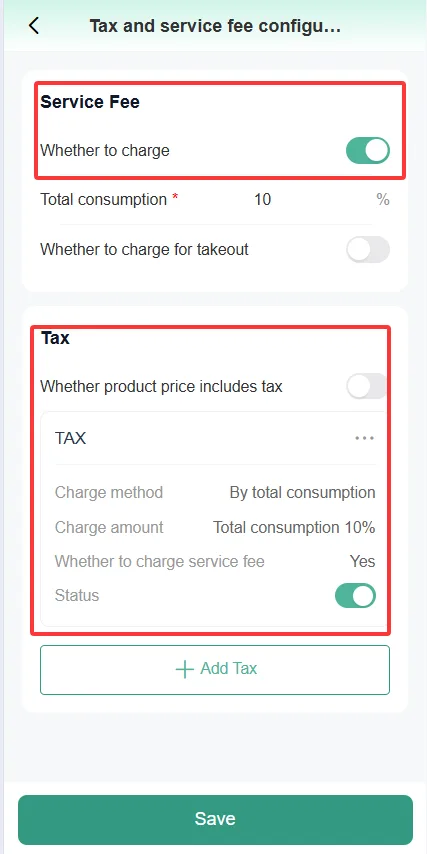
Tax Configuration
- In the tax configuration area, you can view existing tax information, including:
- Serial Number: The number of the tax and fee.
- Tax Name: The name of the tax (e.g., "Consumption Tax").
- Charging Method: The calculation method for taxes and fees, such as "based on total consumption" or "by product label".
- When "By Product Label" is selected, the corresponding product label needs to be selected in "Select Label", and taxes will be calculated based on the products with the selected label.
- Charge Amount: Specific charging standard (e.g., "total consumption * 11%").
- Whether service fees are subject to tax: Indicates whether service fees are subject to tax.
- Status: The status of the current tax and fee (e.g., "enabled" or "disabled").
- Creation Time: Records the time when the tax fee was created.
- Operations: Operations that can be performed, such as editing or deleting.
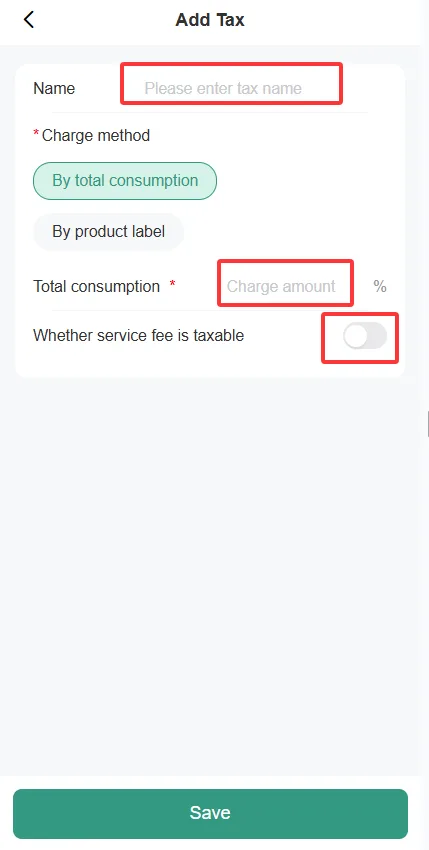
New Tax and Fee Settings
- Tax Name: Enter the name of the tax.
- Charging Method:
- According to the total consumption amount: Taxes and fees will be calculated based on the total consumption amount.
- By Product Label: Tax will be calculated based on the product label. When "By Product Label" is selected, the corresponding product label needs to be selected in "Select Label", and tax will be calculated based on the products with the selected label.
- Charge Amount:
- Enter the specific charging standard for taxes and fees, which can be set as a percentage of the total consumption.
- Is the service fee subject to tax?
- Select "Yes" or "No" to determine whether the service fee is subject to tax.
- Operation:
- Save: Save the newly added tax settings.
- Return: Abandon this operation without saving the settings.
Operation Instructions
- Ensure that when setting taxes and service fees, each configuration is carefully checked to ensure compliance with the store's business strategy.
- After the modification is completed, please be sure to save the changes to ensure that the settings take effect.
Additional Fee Management
Enter Additional Fee Management
- In the store management system, click "Store Settings" in the left sidebar.
- Select "Additional Fee Management" from the dropdown menu to enter the relevant configuration page.
- Additional charges such as packaging fees, tissue fees, tableware fees, etc. can be configured.
Additional Charges List
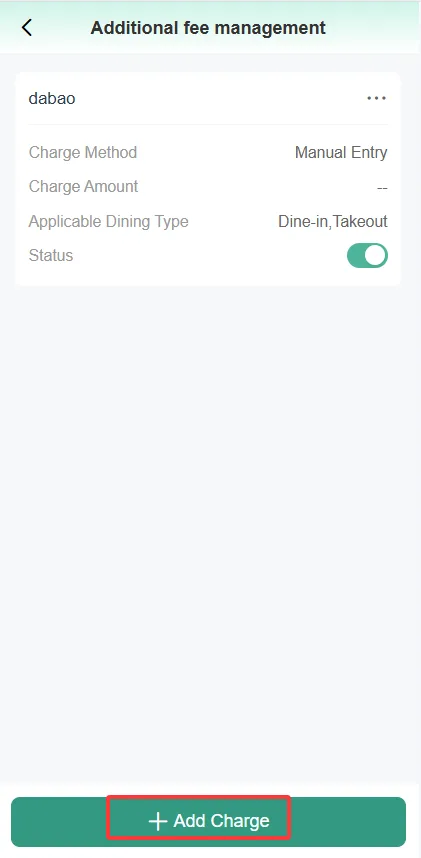
- On this page, you can view the information of the configured additional fees, including:
- Sequence Number: Number of Additional Charges
- Fee Name: Name of Additional Fee
- Charging Method: The calculation method for additional fees, such as "charged at a fixed amount"
- Value: Specific amount of additional fees
- Applicable Type: The scenarios to which the additional fee applies, such as "dine-in"
- Status: Activation status of additional charges
- Creation Time: Creation time of additional charges
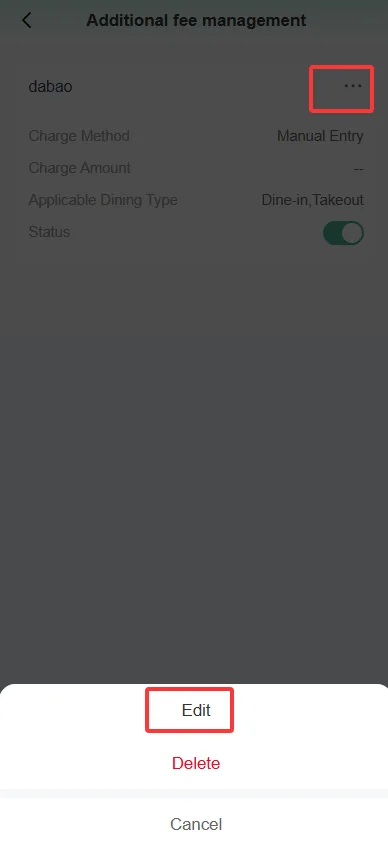
- Operation: Additional fees can be edited or deleted
New Additional Fees
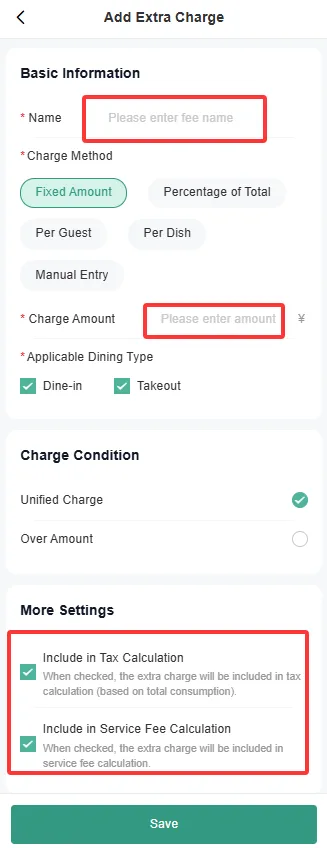
- On the additional fee management page, click the "New" button in the upper right corner to enter the new addition page.
- Fill in the following information:
- Fee Name: Enter the name of the new additional fee.
- Fee Calculation Method: Select the calculation method for additional fees, including "Charge by Fixed Amount" and "Charge by Consumption Percentage".
- Charge by a fixed amount: This option allows you to set a fixed fee amount, and regardless of how much the user spends, the fee will be charged according to this fixed amount.
- Charge based on consumption ratio: This option allows you to set a consumption ratio, such as 0.00%, so that the user's consumption amount multiplied by this ratio is the final charge amount.
- Charge by the number of seats: This option allows you to charge based on the number of seats, for example, charging a certain amount per seat.
- Charge by the number of dishes: This option allows you to charge based on the number of dishes ordered by the user, such as charging a certain amount for each dish.
- Manual entry: This option allows you to manually enter a charge amount as the final charge amount.
- Value: If you select "Charge by fixed amount", please enter the specific fee amount (and so on for others).
- Applicable Type: Select the scenarios to which the additional fee applies, including "Dine-in" and "Takeaway".
- Other options for setting additional fees: (subject to the actual page seen)
- Charge Cap: Set whether to cap additional fees. If a cap is set, please enter the specific amount. (This feature is currently unavailable)
- Charging Conditions: Select "Unified Charge" or "No Charge When Consumption Reaches the Specified Amount". (This feature is currently unavailable)
- Surcharge Settings: You can check options such as "Calculate Consumption Tax", "Calculate Service Charge", and "Participate in Discount (Currently no such function) " and set them according to your needs.
- After filling out, click the "Save" button at the bottom of the page to complete the new addition operation.
Edit Additional Fees
- In the additional fee list, find the fee that needs to be edited, and click the "Edit" button in the "Action" column.
- On the edit page, modify the corresponding information.
- Click the "Save" button to complete the editing operation.
Remove additional charges
- In the additional fee list, find the fee to be deleted, and click the "Delete" button in the "Operation" column.
- In the pop-up confirmation box, click "OK" to complete the deletion operation.
Zero Rounding Scheme Settings
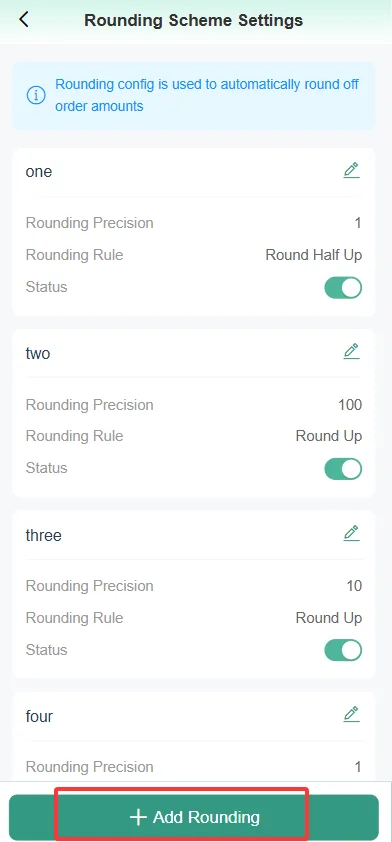
The order system's rounding adjustment feature supports automatically rounding off the decimal part of an order according to rules (such as rounding, rounding down, rounding up) or manually entering an amount, simplifying the settlement process, enhancing the payment experience, and improving the convenience of financial reconciliation.
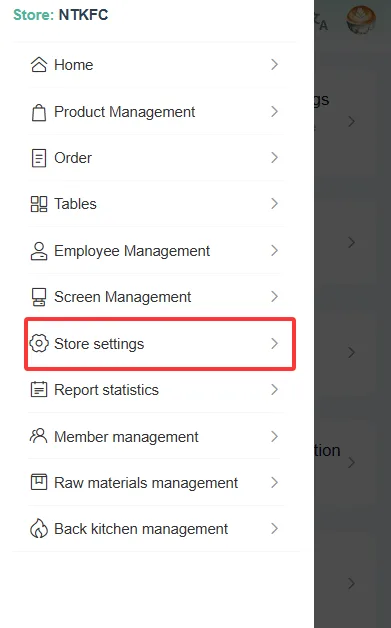
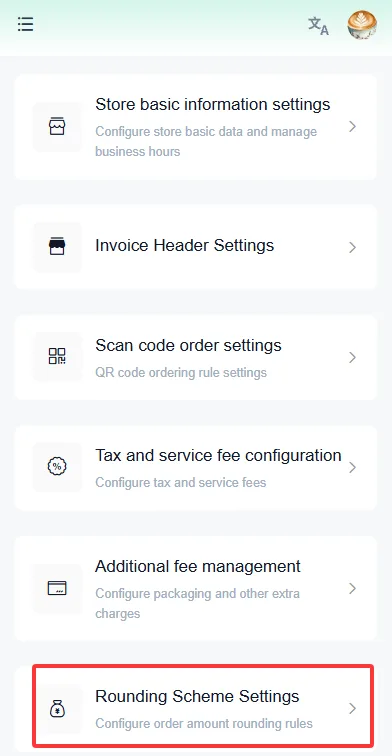
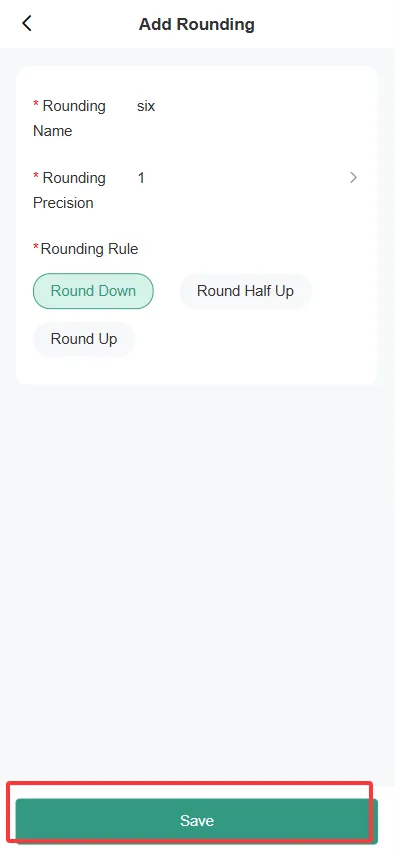
- Set the rounding rules required by the store according to the rounding rules and precision respectively.
- Click the "New" button, enter the rule name, select the precision and rule, then click "Save" to create multiple rounding rules.
Create Dishes
- When creating a product for the first time, you need to configure basic information such as product specifications, product units, and product categories first;
Create Dish Category
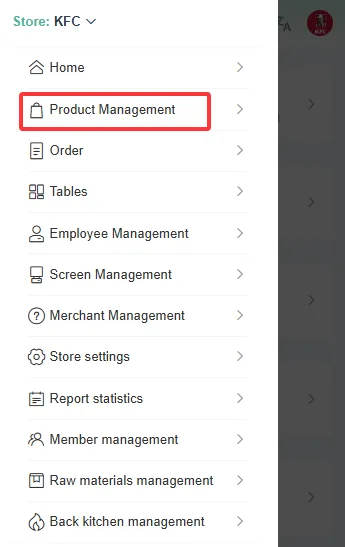
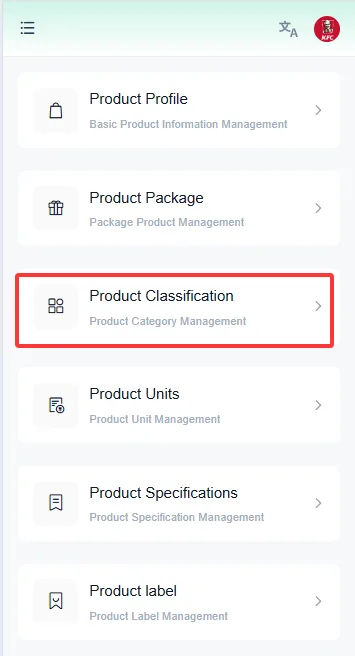
- Click the "Product Category" menu to enter the product category management page;
- Click the "+" button below the classification page;
- After entering the category name in the pop-up window, click [Save], and the category will be created successfully;
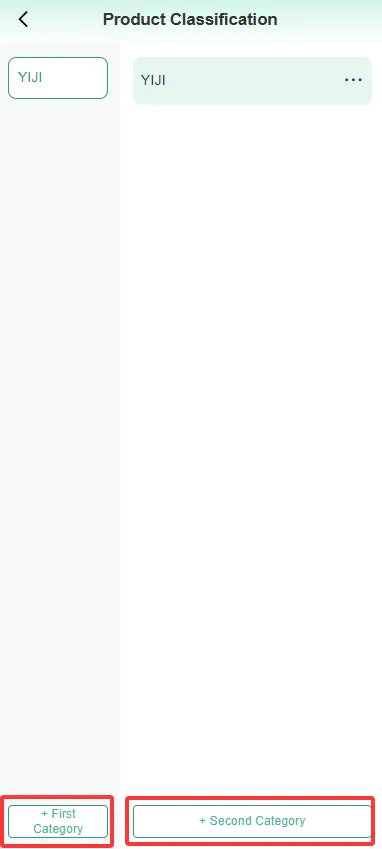
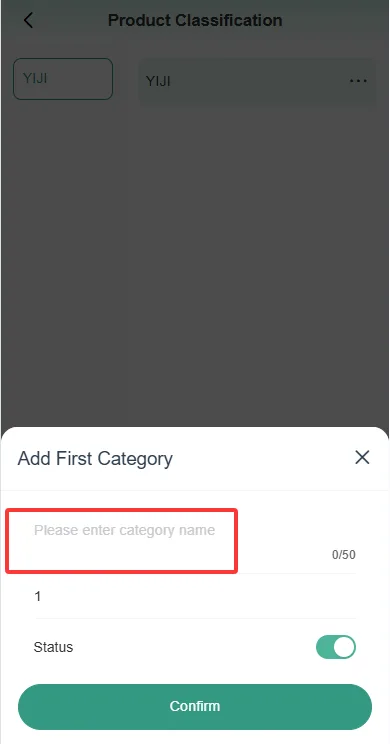
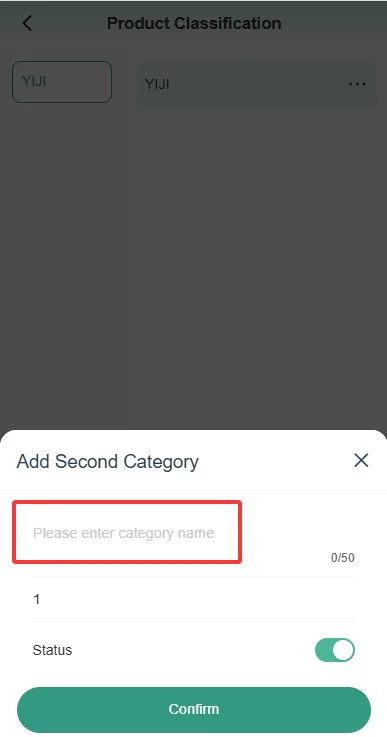
- Create all categories according to the above classification;
Create Dish Unit
- Click "Dish Unit" to enter the dish measurement unit management page;
- Click 【New Unit】 at the bottom of the page;
- Enter the unit of the dish, such as bowl, plate, serving, cup, etc., and click [Confirm].
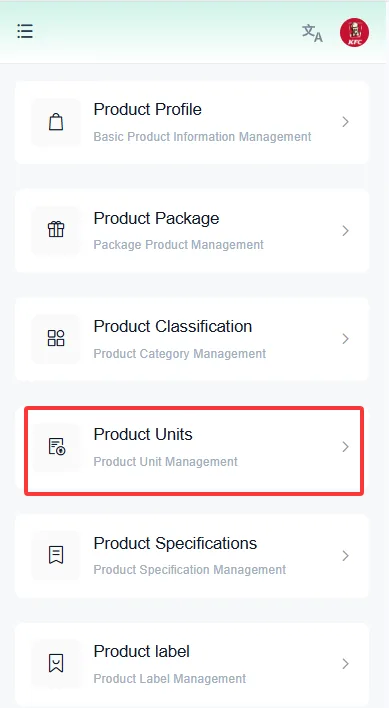
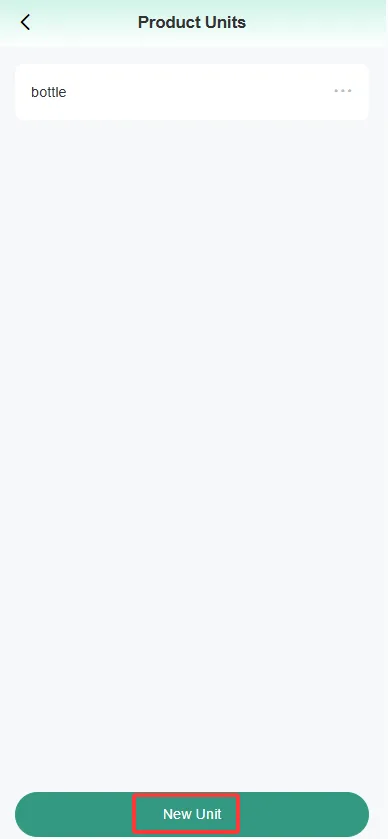
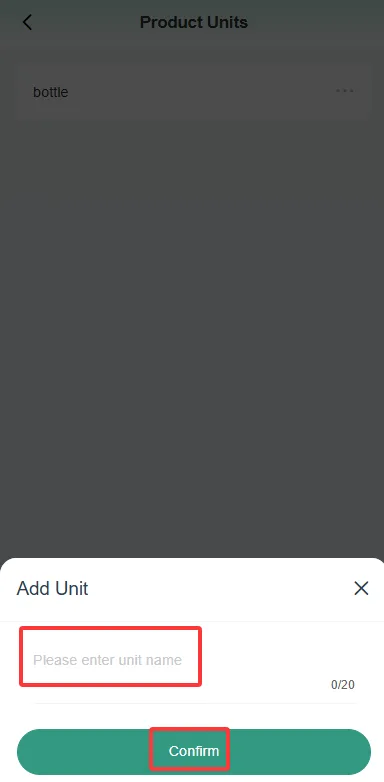
- Create all required units of measurement according to the above classification.
Create Dish Specification
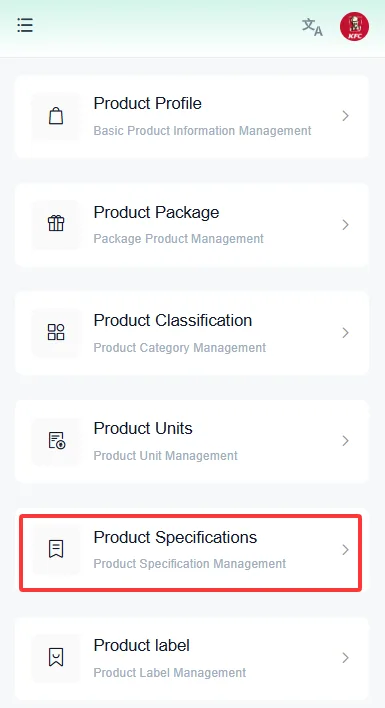
- Click the "Dish Specification" menu to enter the specification management page.
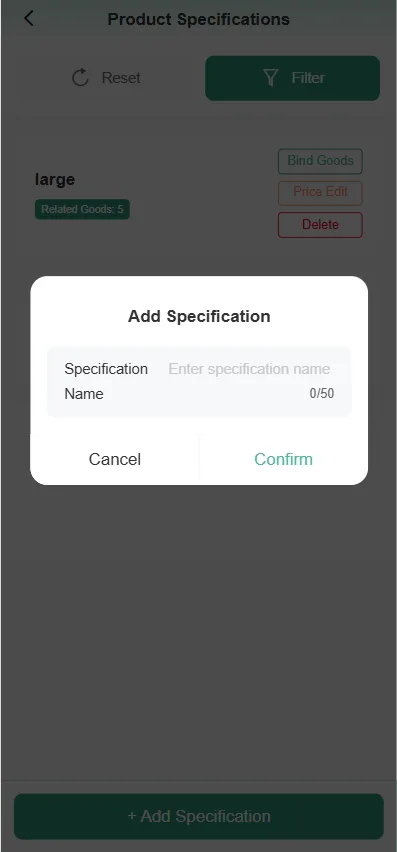
- Click the Add button below to add the corresponding specification. Enter the specification name, such as: Small Cup, Large Cup, then press Enter on the keyboard to complete the addition;
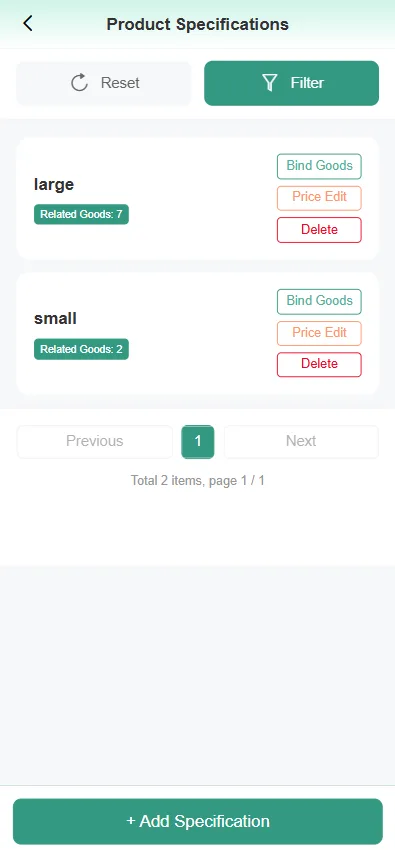
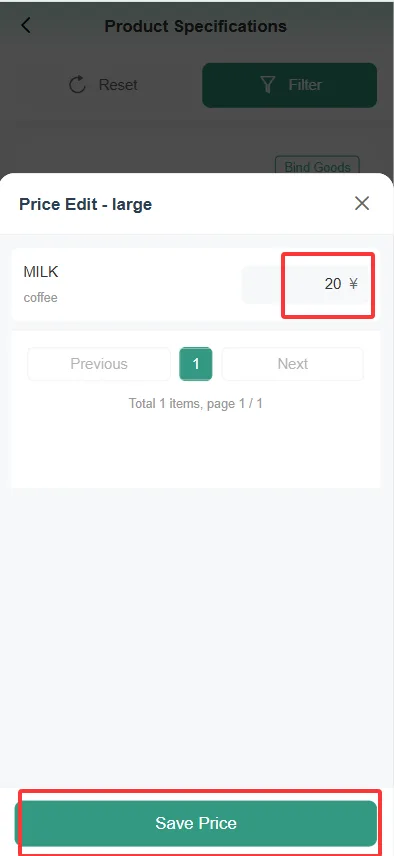
- Associate dishes, click the "Associate Dishes" button. The left side shows unassociated dishes. Click "Associate". After completion, enter the price of the specification, click "Save", and the specification binding is successful.
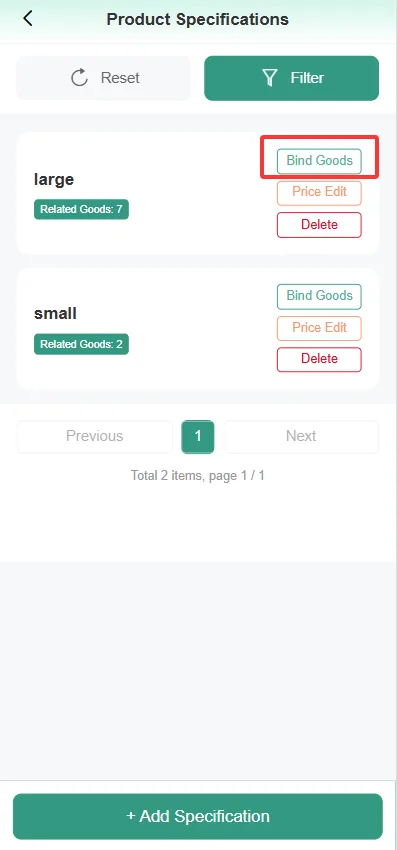
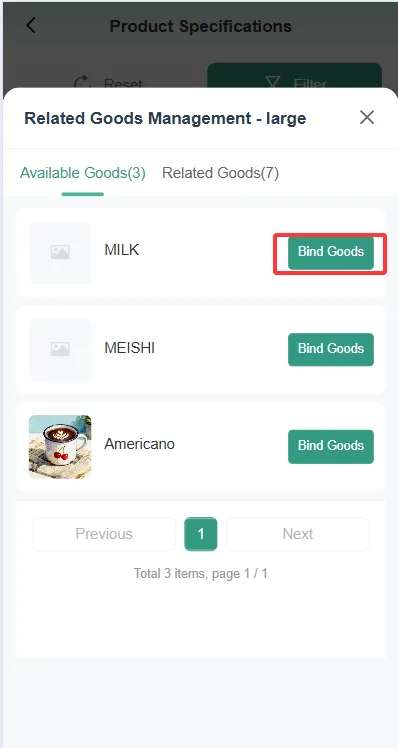
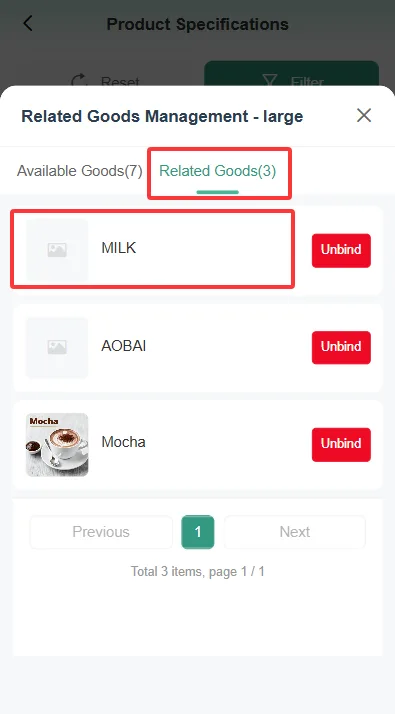
- Unbind the dish, click the Unbind button, click OK, and the unbinding is successful.
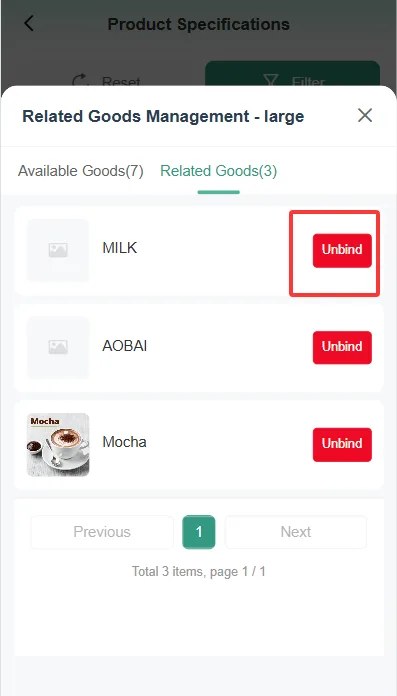
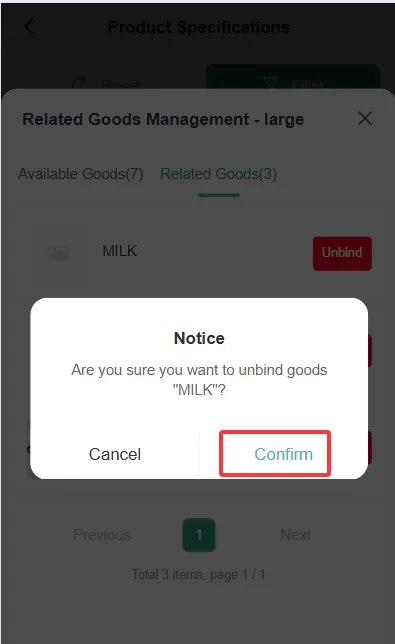
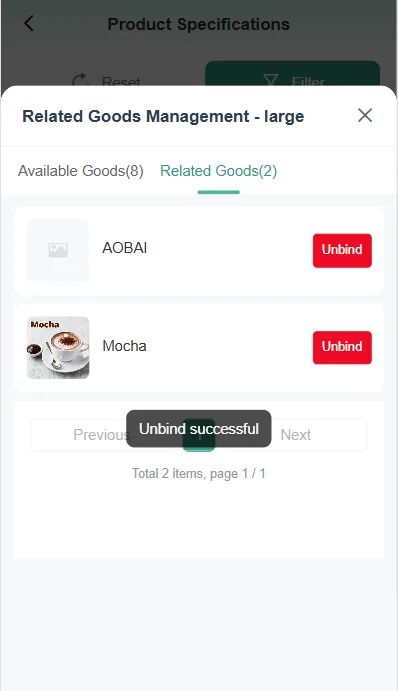
- To modify the price of the specification, click the price modification button, modify the price, and click Save.
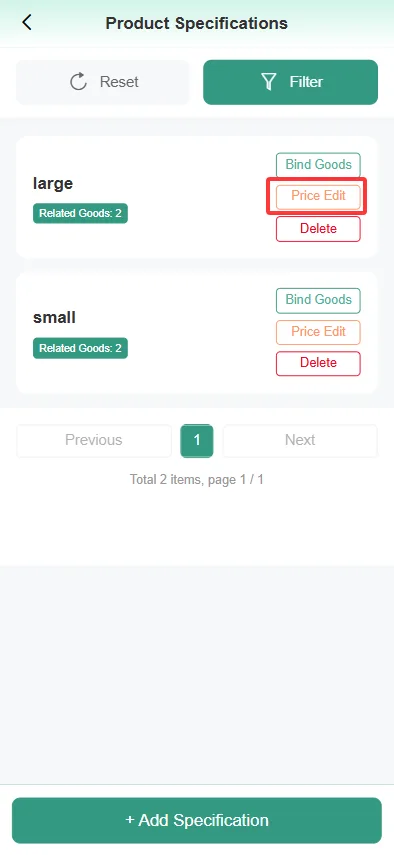
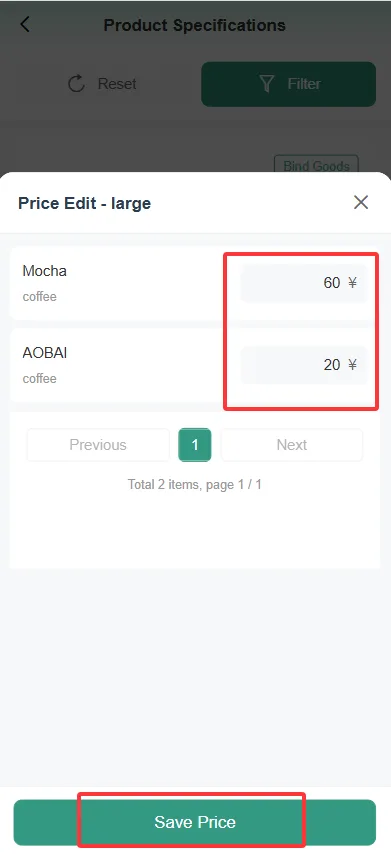
- Create all specifications according to the above method;
Creation Method
- Enter the [Product Practice] module
- Click [Add New Category] to create a practice category (such as sweetness level, spiciness level, etc.)
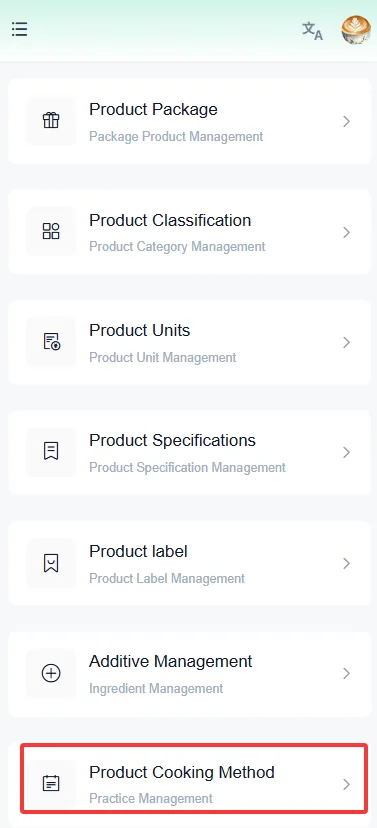
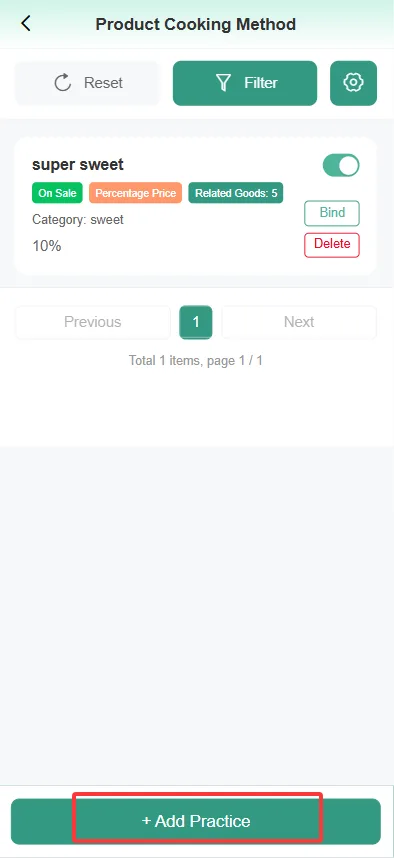
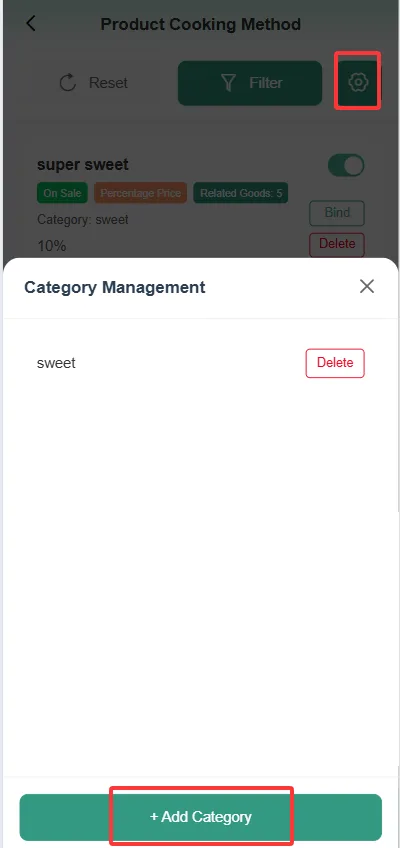
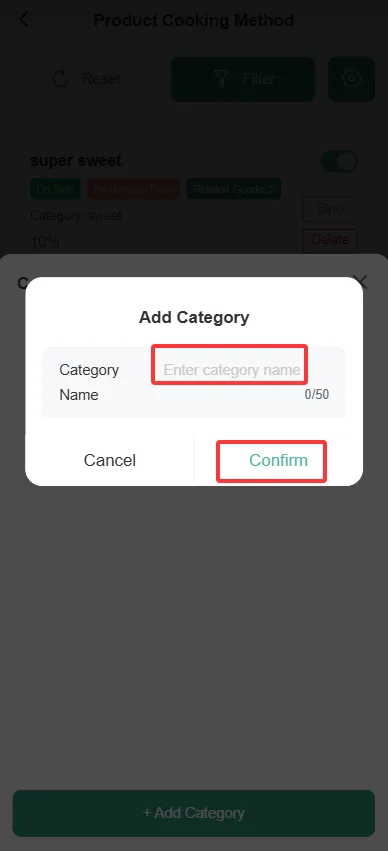
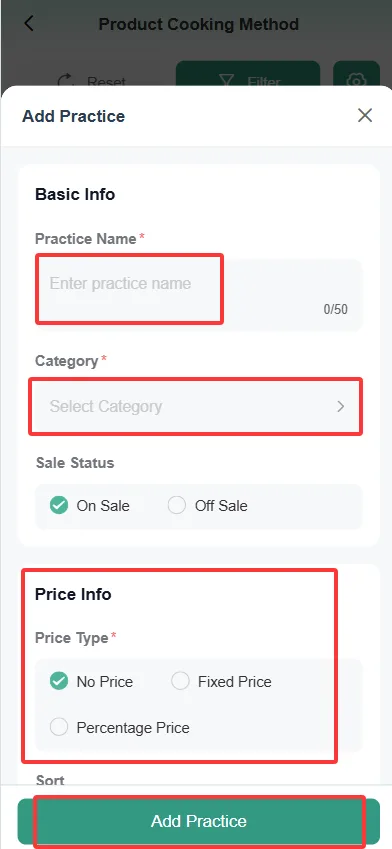
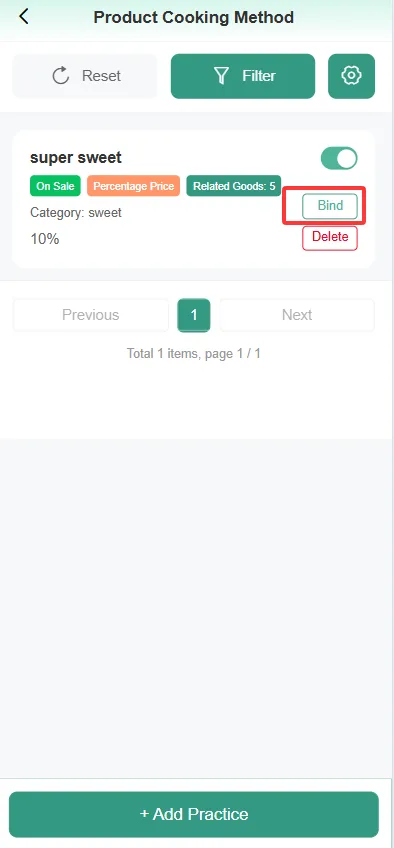
To create a practice, click the Add Practice button, enter the practice name, select the category, choose the on-sale status and price, click Add, and the addition is successful.
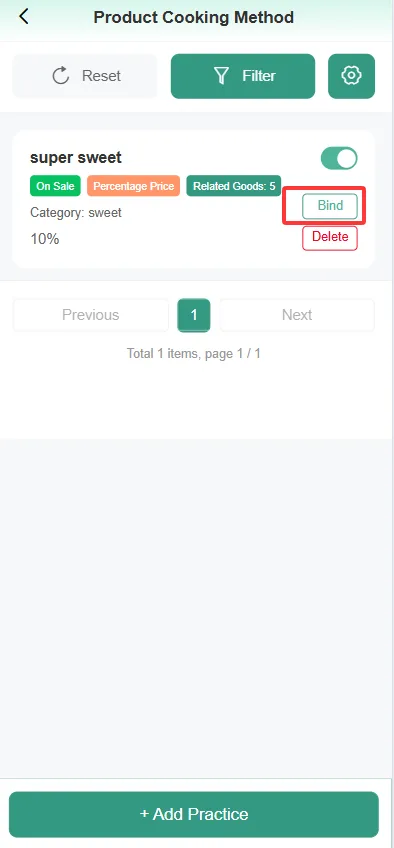
After saving, click the [Associated Product] button after the method item
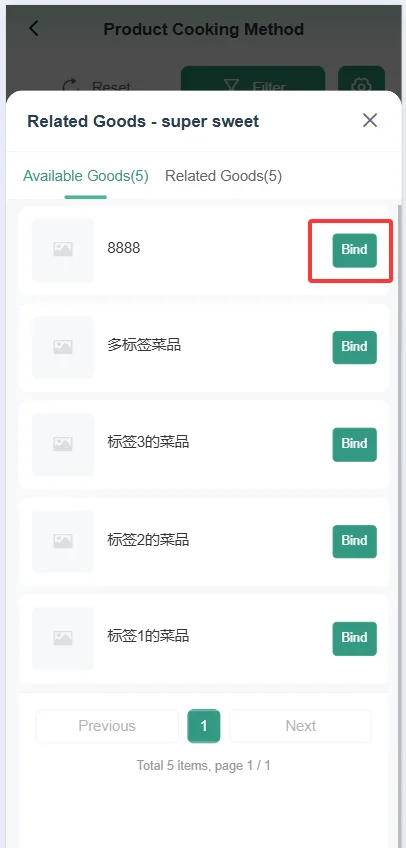
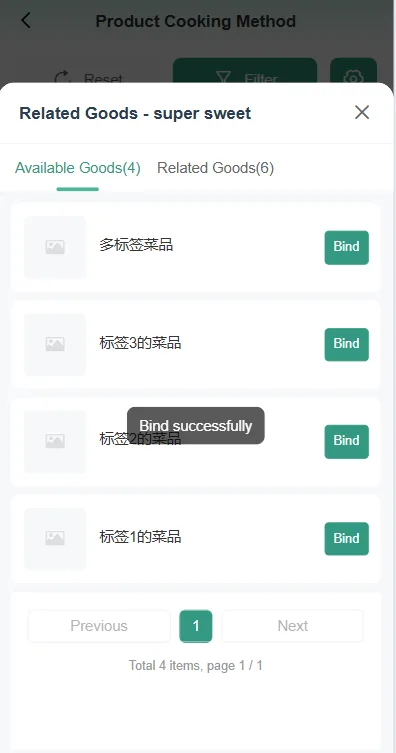
- Select a product and click [Associate]
- Click [Complete] after finishing
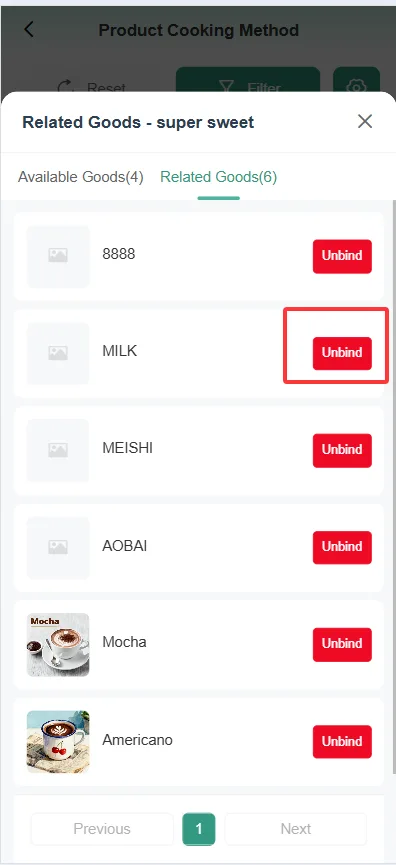
- Unbind Product Practice
Create Feeding
- Enter the [Feeding Management] module
- Click [Add New Category] to create a feeding category
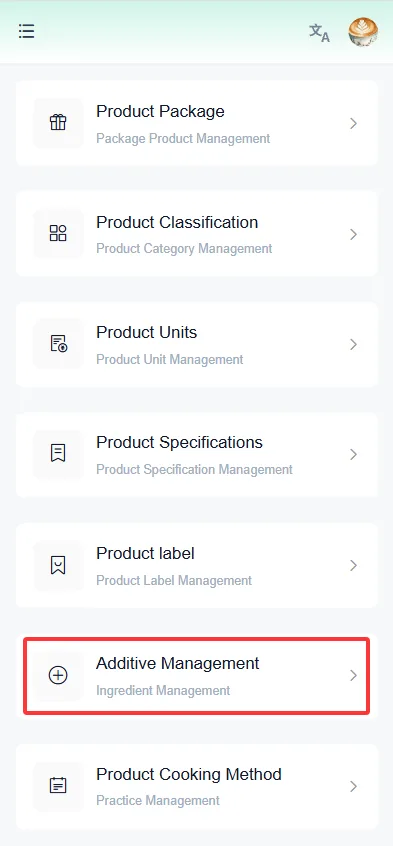
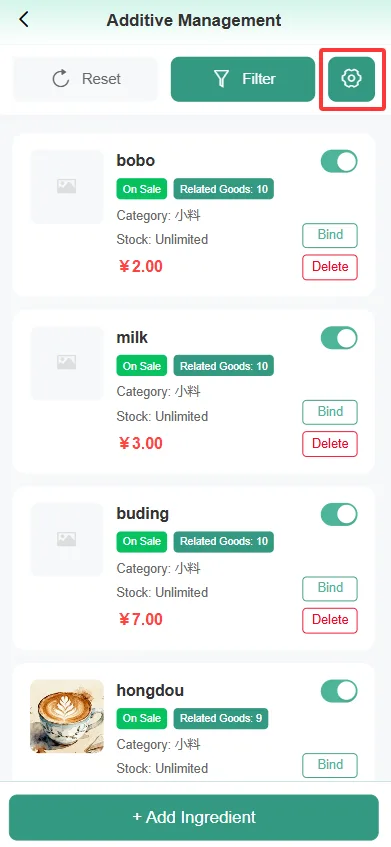
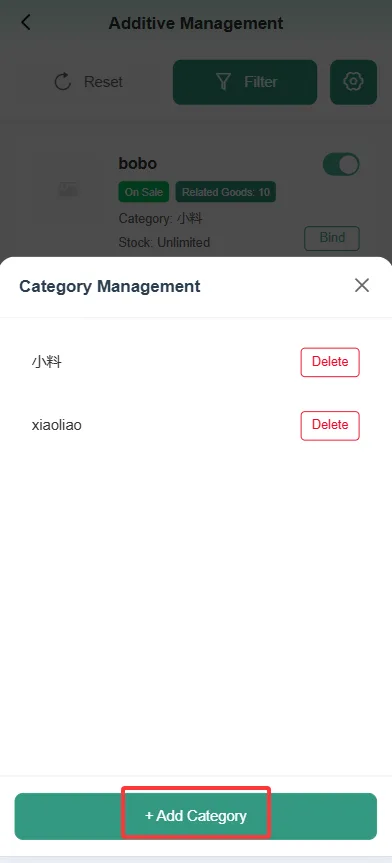
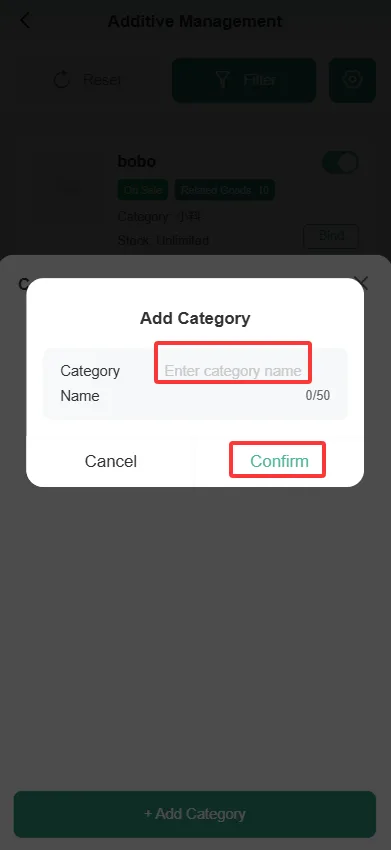
- Click [New Additive] under Classification Fill in the content:
- Feeding Name
- Topping Price
- Other related settings
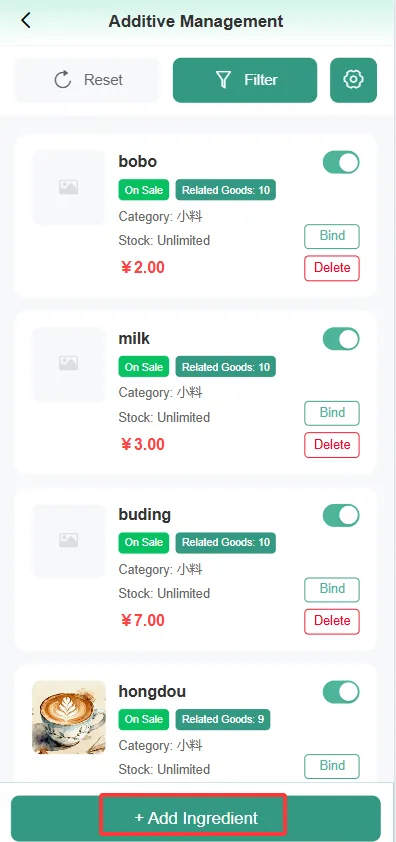
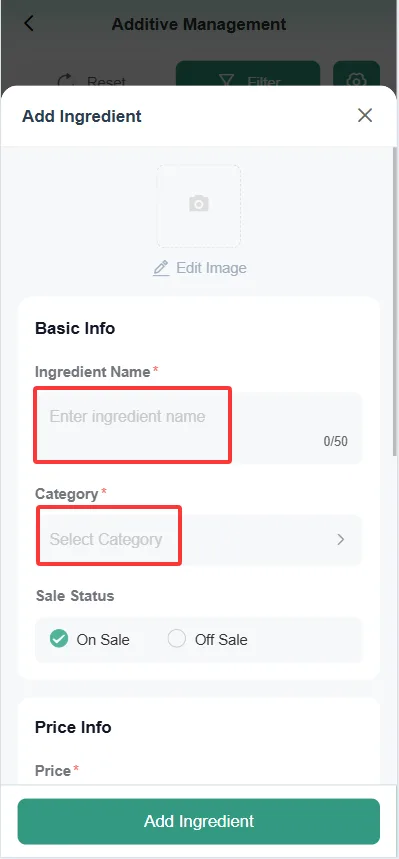
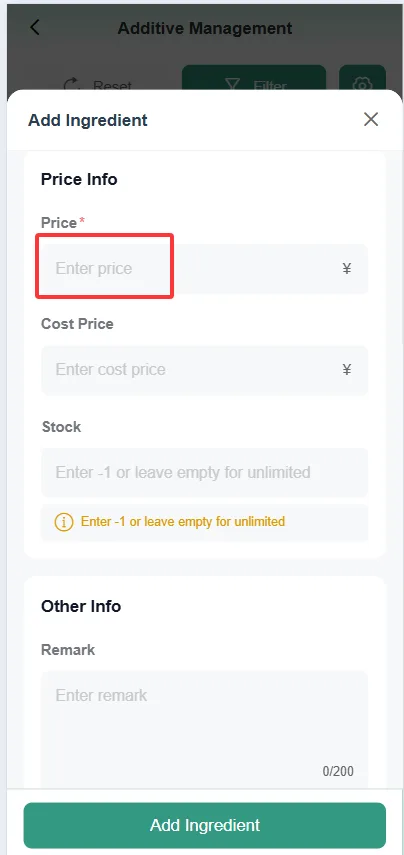
- After saving, click the [Associated Product] after the feeding item
- Select products and complete the association
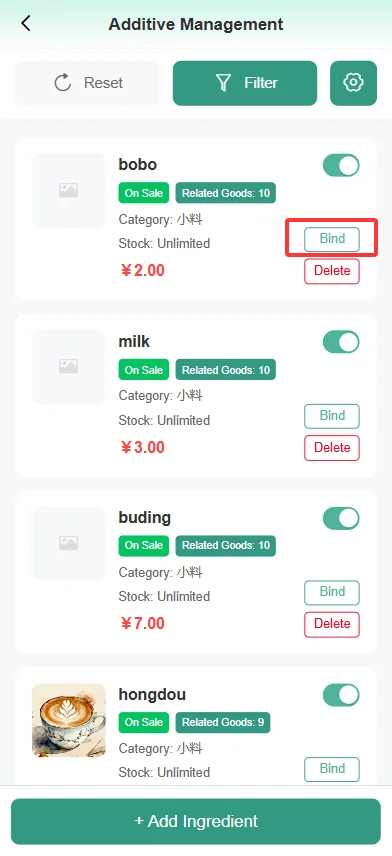
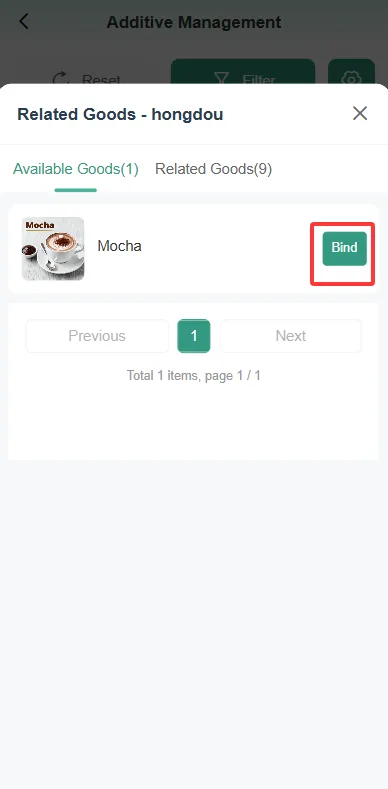
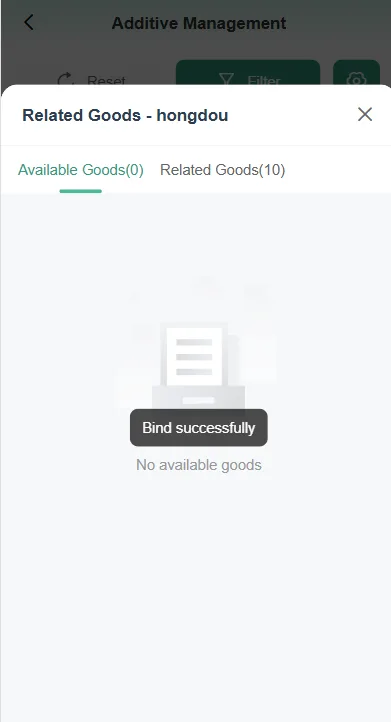
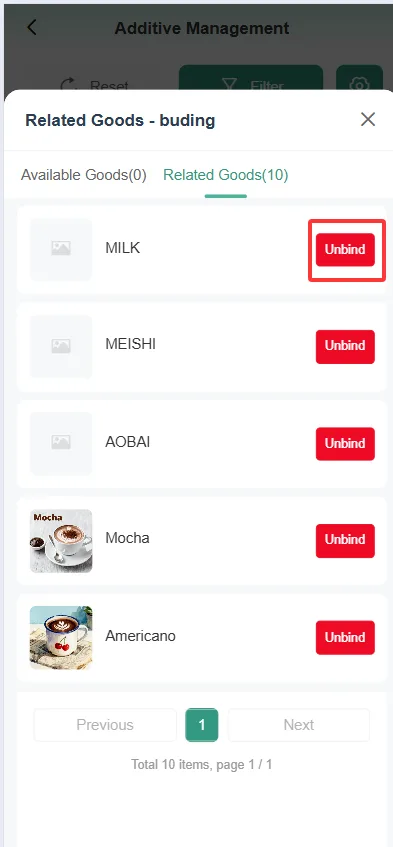
- Unbind the product, click the Unbind button, and the unbinding is successful.
Add Dishes
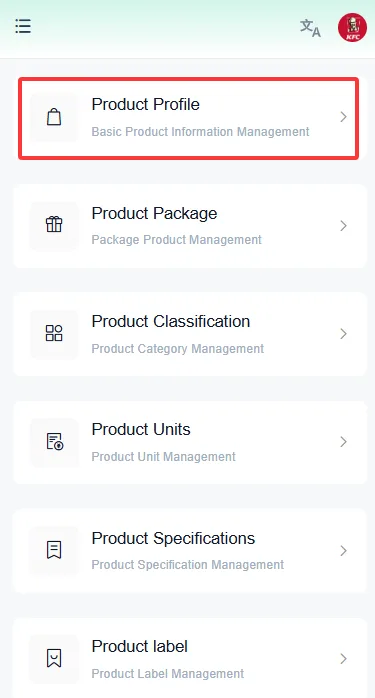
- Click the "Dish Archive" menu to enter the dish management page.
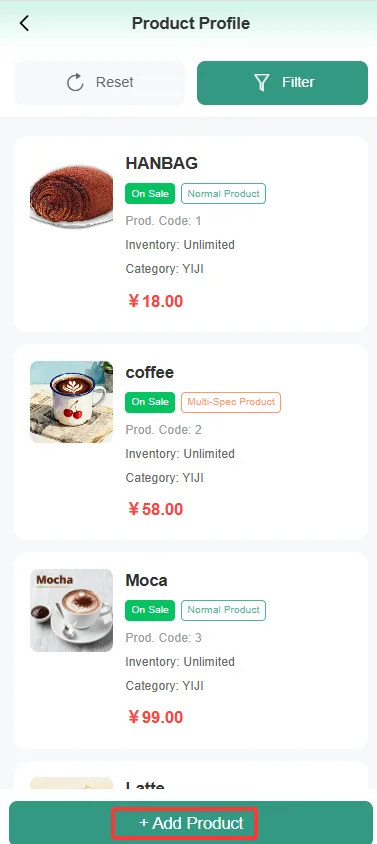
- Click 【Add new product】 below the dish list;
- Enter relevant information such as the name, category, price, unit, stall, specification, additional ingredients, cooking method, and picture of the dish in sequence on the new page, then click [Save] at the bottom to complete the addition of the dish;
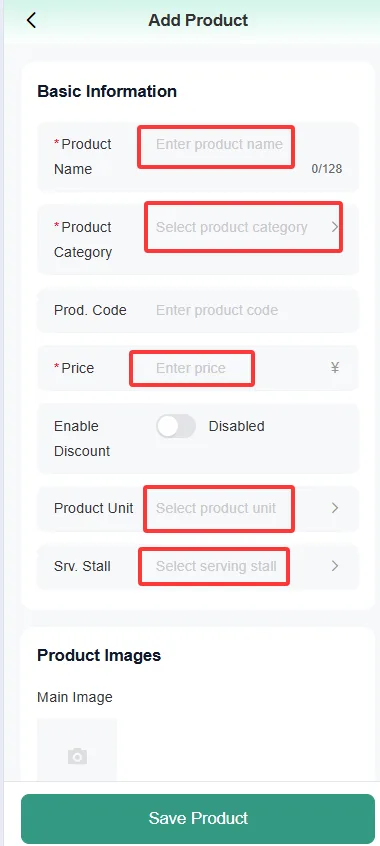
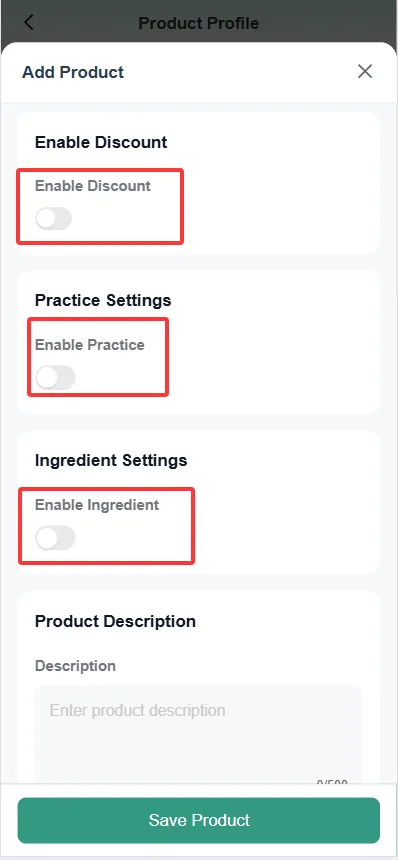
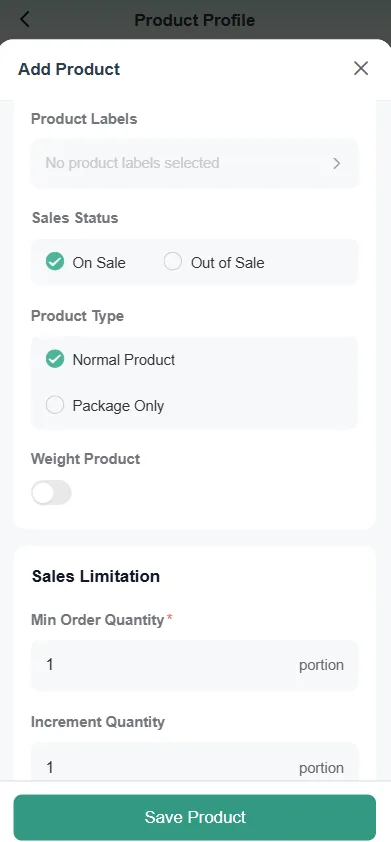
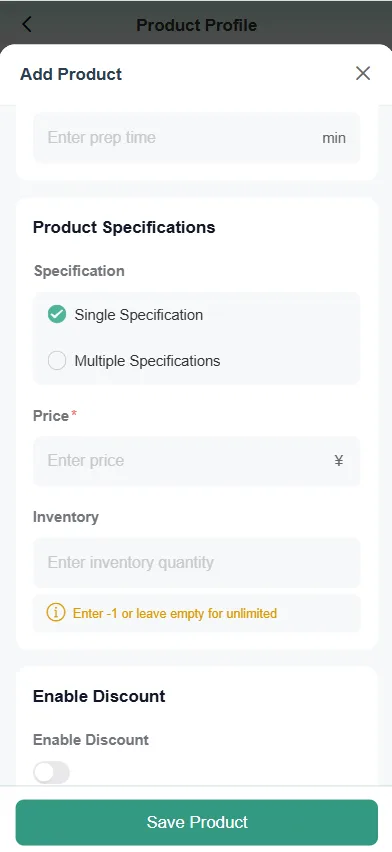
- Add multiple specifications, select multiple specifications, check the required specifications and prices on the new page, and click Save.
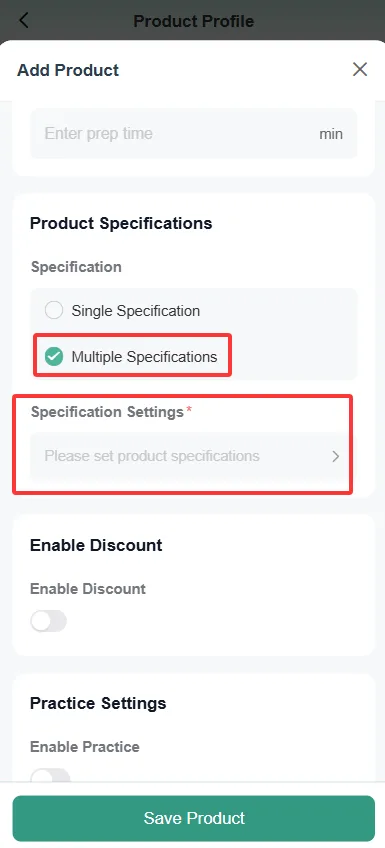
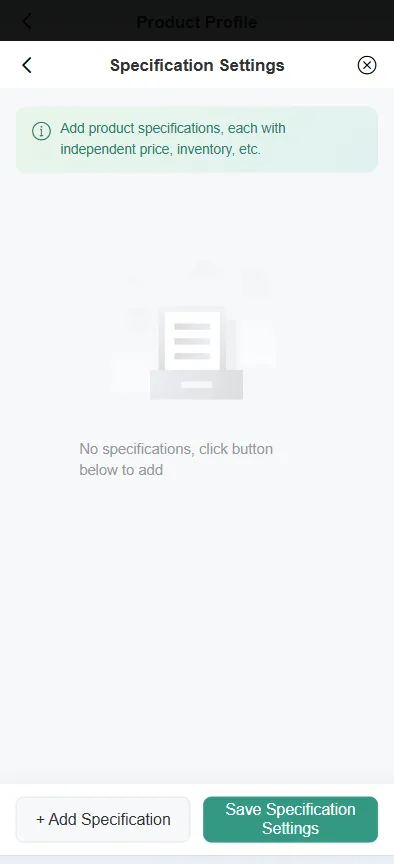
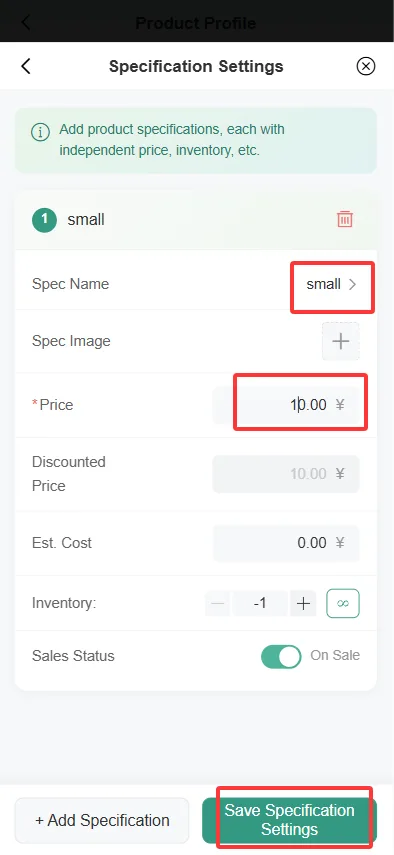
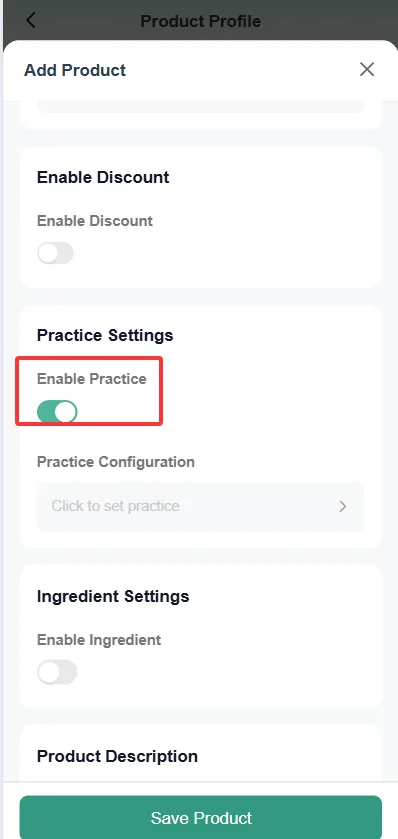
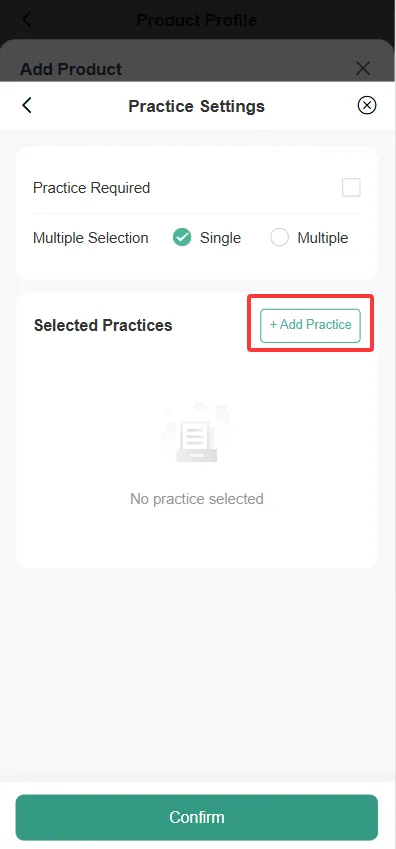
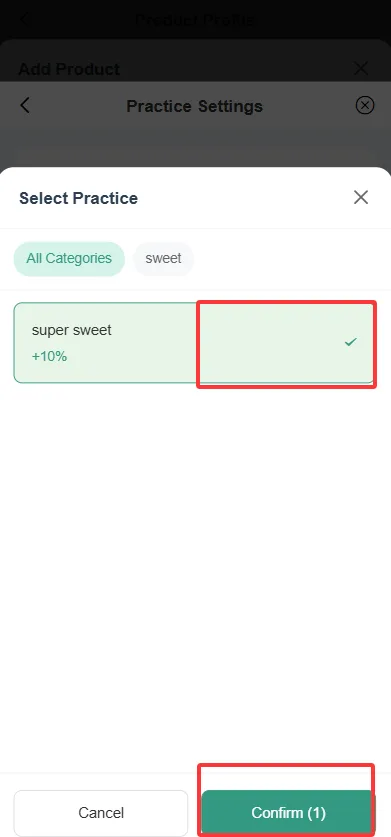
- Practice selection, switch to turn on the practice;
- Select the Add Method button,
Note
- For multi-specification products, if the total inventory is set, placing an order will be restricted by the total inventory.
- The inventory setting for each specification will limit the quantity that can be ordered or added to the shopping cart for that specification.
Dish Discount
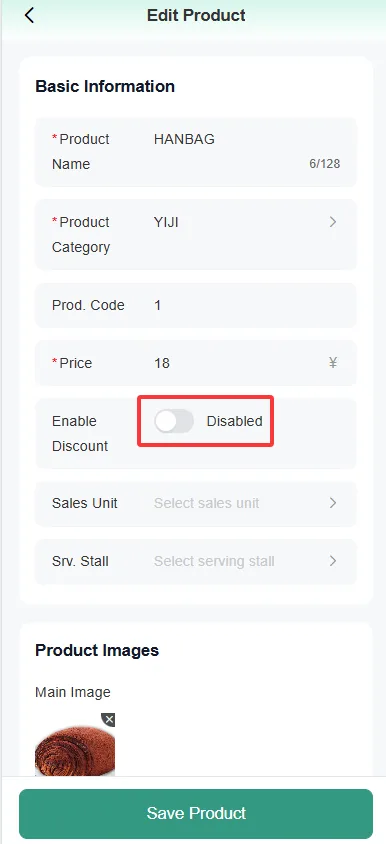
- To launch a discount promotion for a specific dish, select the "Discount Information" field of that dish in the list and click "Activate";
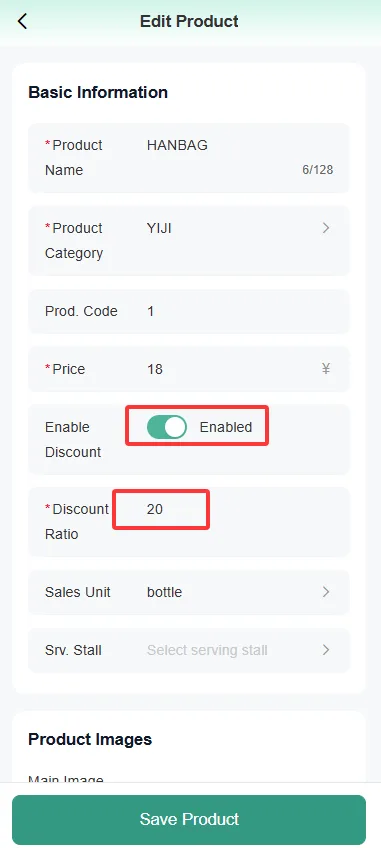
- On the dish editing page, enable the discount button and enter the discount percentage;
Note
- If the original price of a dish is 200 and the input discount rate is 0.8, then the dish will be sold at a price of 160 thereafter.
Dish Label
Function Overview
- Commodity / Dish Label Management is mainly used for operations such as adding, deleting, modifying, and querying commodity labels. Through this page, you can conveniently create, edit, delete, and view commodity labels to better classify and manage commodities. At the same time, labels can also be used for tax management of specific commodities, such as adding additional taxes to certain commodities.
Page Function Description
Tag List
- Label Name: Displays the name of the created label.
- Operation: Provide "Edit" and "Delete" buttons, supporting modification or removal of tags.
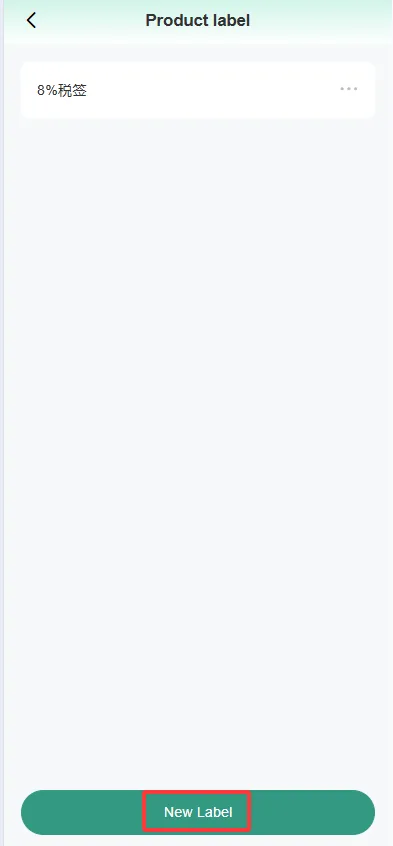
New Label
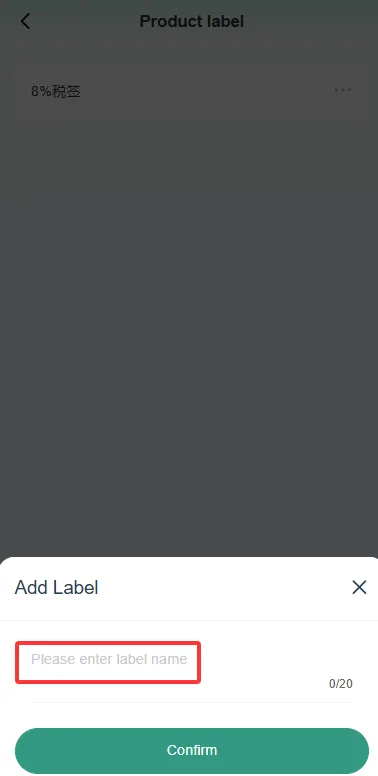
- Click the "Add New Tag" button on the page, and the Add New Tag dialog box will pop up.
- Enter the following information in the dialog box:
- Label Name: Enter the name of the label (e.g., "Taxable Goods", "Tax-Free Goods", etc.).
- Label Order: Fill in the display order of the labels.
- After filling out, click the "Save" button, and the label will be added to the label list.
Edit Label
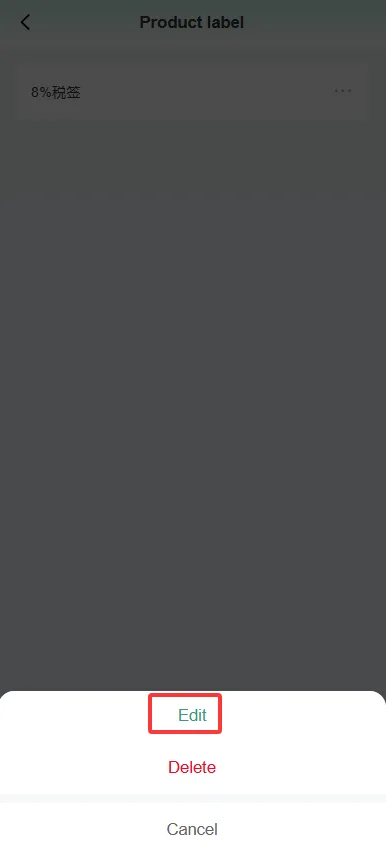
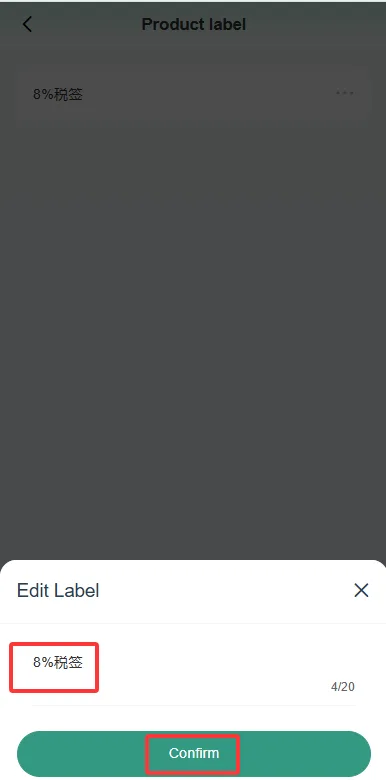
- Find the label that needs to be modified in the label list, and click the "Edit" button on the right.
- In the pop-up edit dialog box, modify the label name or usage description.
- After the modification is completed, click the "Save" button to update the label information.
Delete Label
- Find the label to be deleted in the label list, and click the "Delete" button on the right.
- The system will pop up a confirmation dialog box, and after confirmation, the label will be permanently deleted.
Note
Label and Tax Management
- On the product management page, you can add tags to products.
- If a product is tagged with "tax-included product", the system will automatically calculate and collect additional taxes based on the preset tax rate.
- Tax rules need to be pre-configured in the system settings, and labels are only used to identify products subject to applicable taxes.
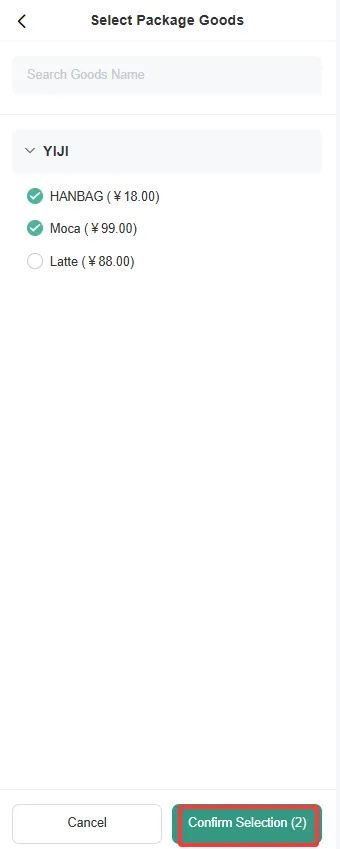
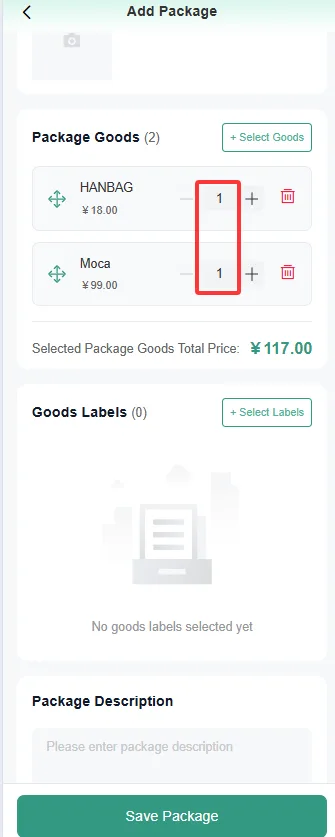
Create Package
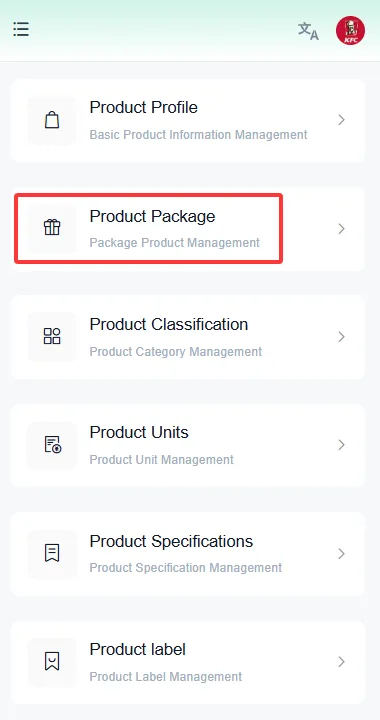
- Click the dish combo menu to open the combo management page;
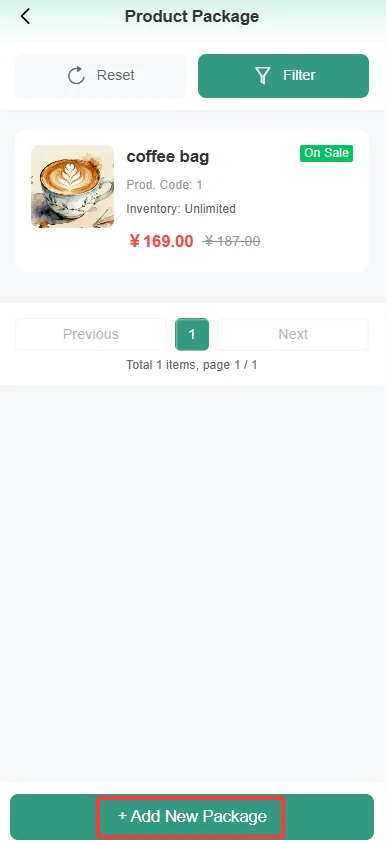
Click 【Add Package】 at the bottom of the page;
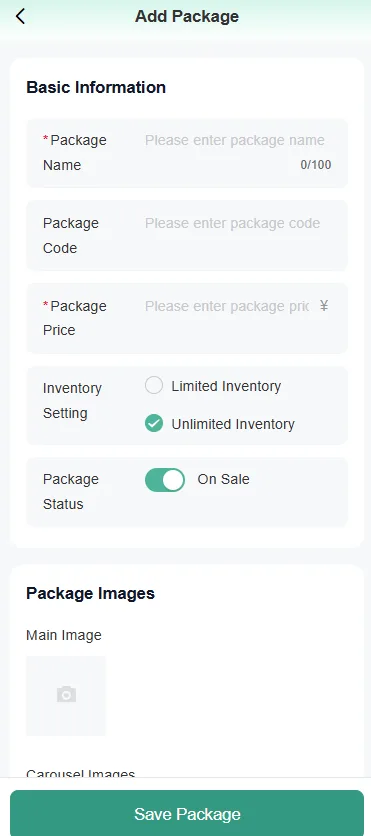
Fill in the basic information of the package on a new page;
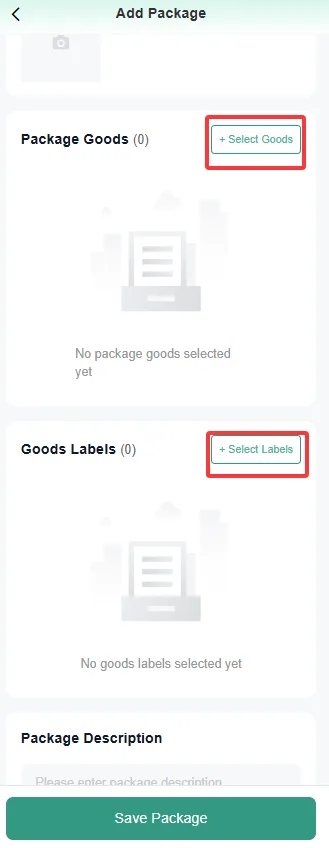
Click the "Select" button after selecting the package product.
Set information such as the quantity of the added dishes;
Create Dining Table
- To meet the demand for ordering by table, we need to create table information on the management platform;
- To create a dining table, we first need to create basic information such as area (the space where the dining table is placed, such as the front hall, private room, etc.), table type (such as the number of seats), etc.;
Note
- The created dining tables will be displayed in the form of table numbers on Android POS, ordering tablets, and mobile phone ordering systems;
- The table number created does not necessarily correspond to the number of a real dining table; it can also be a meal number. That is, instead of numbering the tables, a meal number is provided to guests after they place their orders. Guests can choose their own dining tables to sit and dine, and service staff will serve the meals according to the meal number in the guests' hands. After the meal is served, the meal number is taken back and continues to be used for ordering at the cashier counter.

Create Area
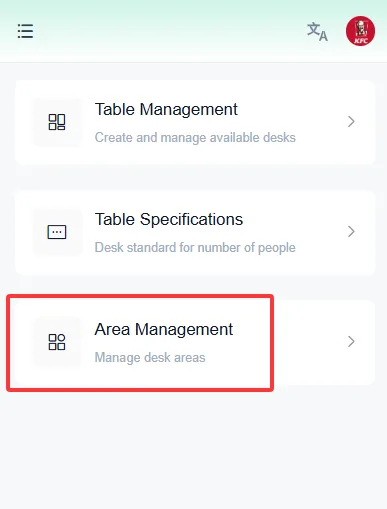
- Click the "Area Management" menu to enter the Area Management page;
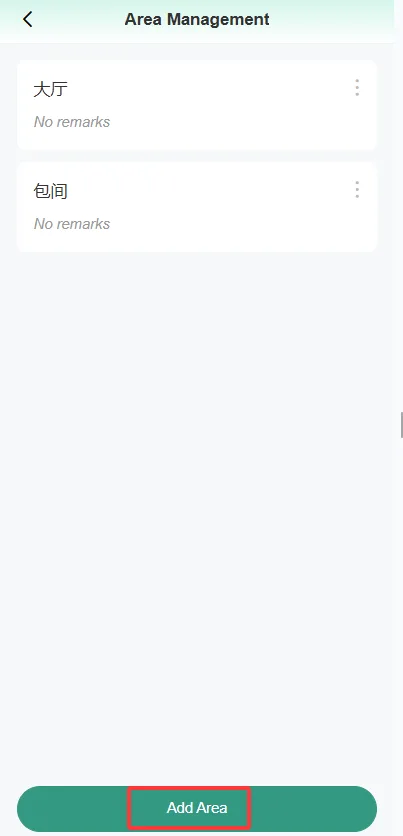
- Click the Add button at the bottom of the page;
- Enter the name of the new area in the pop-up window, and click [Save] to complete the addition of the area;
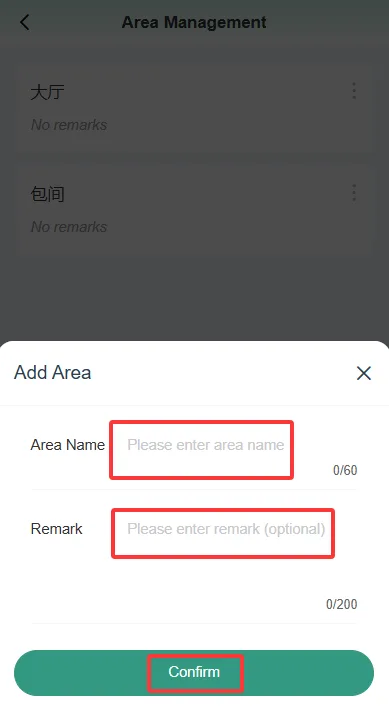
- Add all the required regions according to the above method.
Create Table Type
- Click the "Table Type" menu to open the type management page;
- Click the Add button at the bottom of the page;
- Enter the name of the pop-up setting type, select the number of people that this type of dining table can accommodate, and click [Save] to complete the creation of this type;
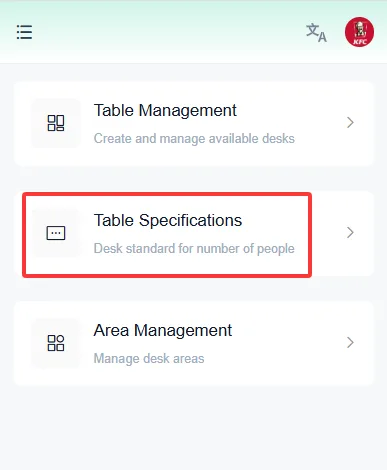
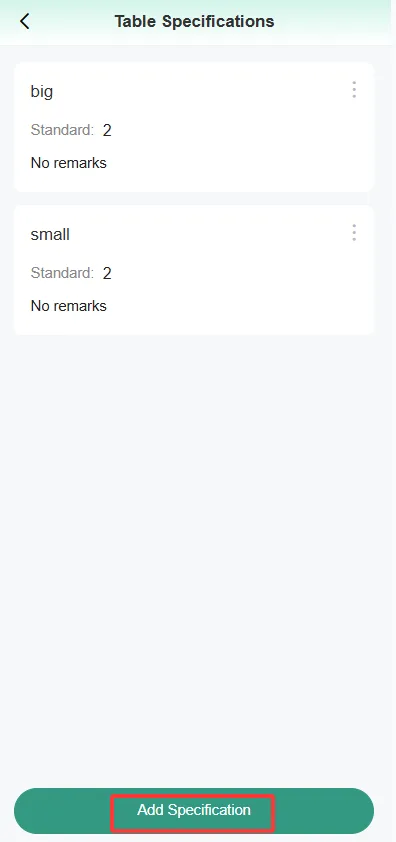
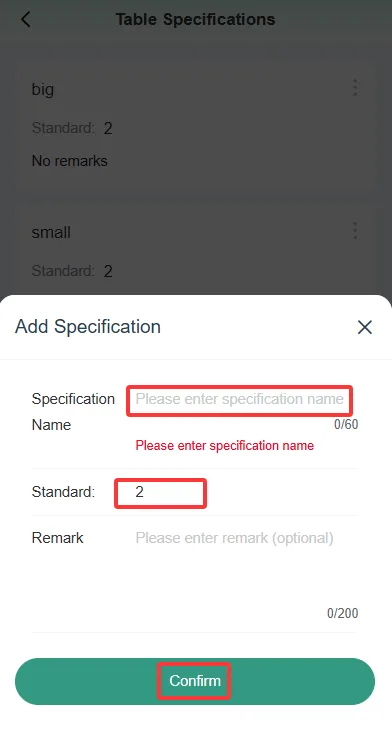
- Create all the required types according to the above method.
Create Dining Table
- Click the "Table Management" menu to enter the Table Management page;
- Click the Add button at the bottom of the page;
- After setting the table number, selecting the area where the table is located, and choosing the table type in the pop-up window, click [Save /Save] to complete the creation of the table;
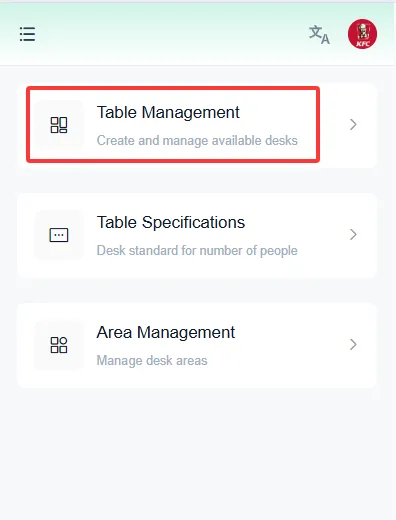
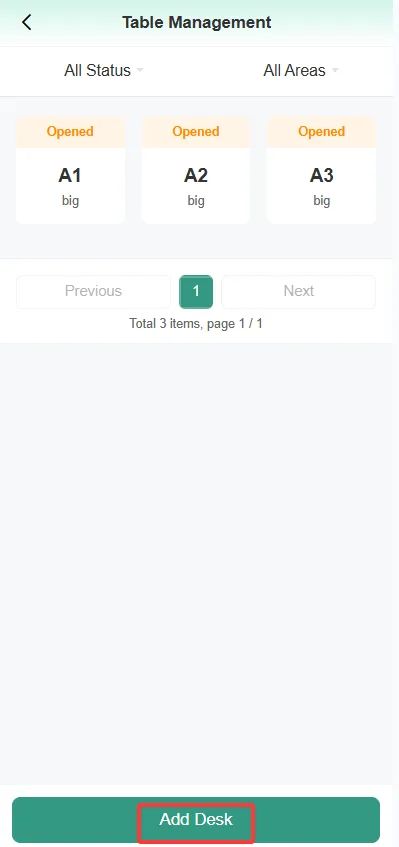
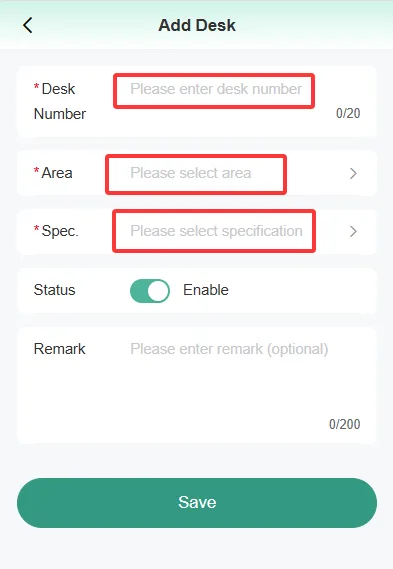
- Create all dining tables according to the above operations.
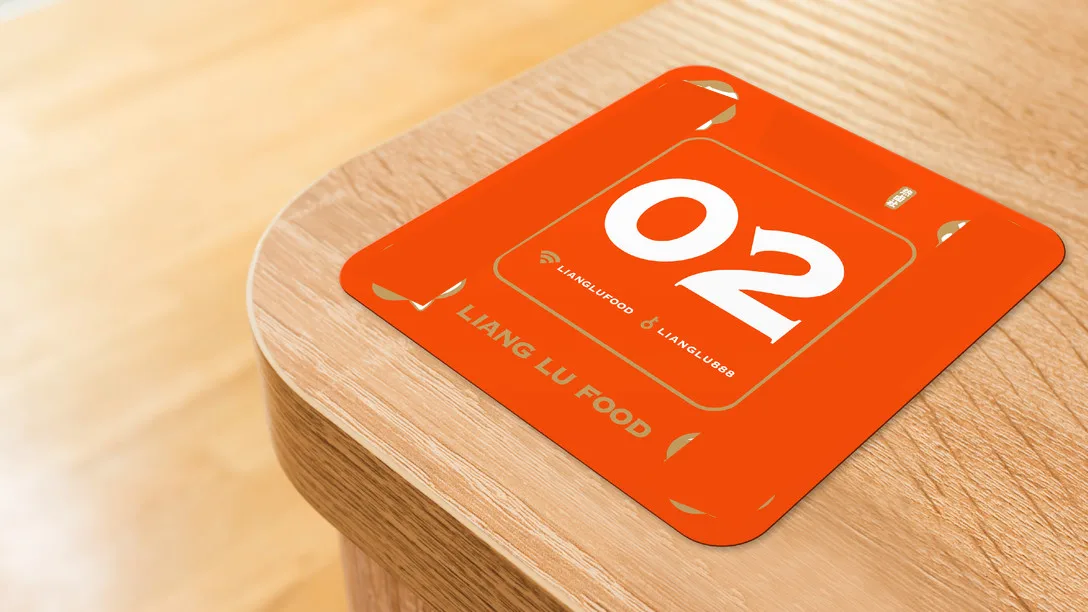
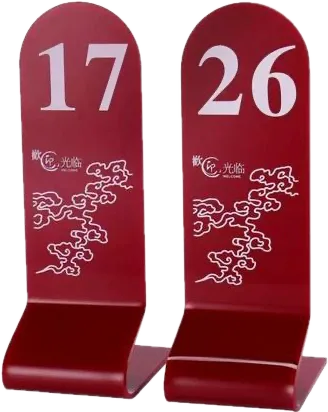
Download the table QR code
- The QR code on the dining table can be scanned by guests to place orders.
- Select the dining table to download, and click [Download QR Code] in the list operations;
- After downloading, you can print it out and paste it on the corresponding dining table, or make it into a stand and place it on the table.
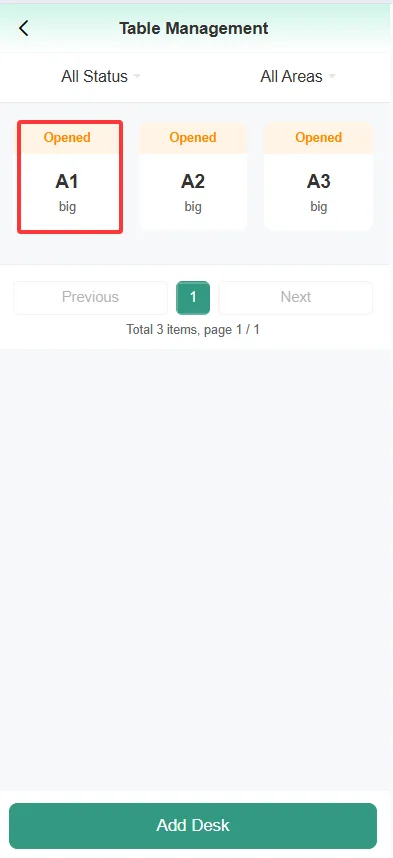
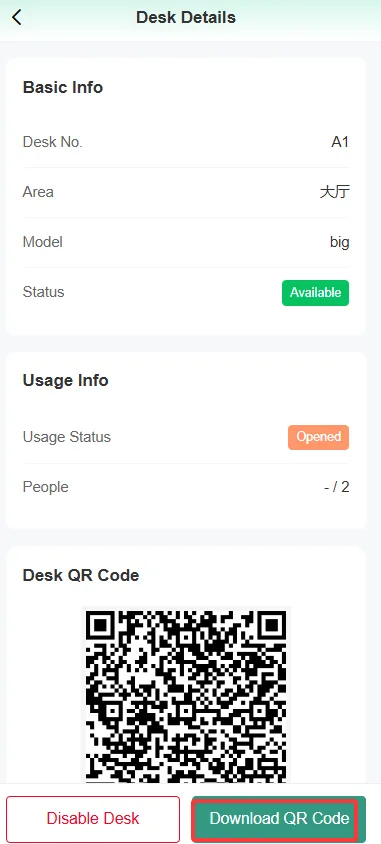
Note
- When saving files, please name them after the table number for easy management and identification;
- You can use the downloaded QR code image to make some design enhancements according to the store style before printing and using it, such as adding store information, table numbers, promotional slogans, scan code prompts, etc.
- It is recommended to use materials such as acrylic for production, which has strong durability.

Create Employee Account
- Employee accounts are used to log in to Android POS and ordering tablets;
- There are two roles, cashier and waiter, and the devices that can be logged in with these two roles are different;
- Cashiers use Android POS, while waiters use ordering tablets;
- Click the "Employee Management" menu to open the Employee Management page;
- Click the add button at the bottom of the page;
- in the pop-up window
- Fill in the employee's name;
- Set the account password (for logging in to the device);
- Employee ID (can be filled in according to certain rules without special requirements);
- Select identity roles: cashier or waiter/waitress, multi-selection supported;
- Click 【Save】 to complete the creation of this employee account.
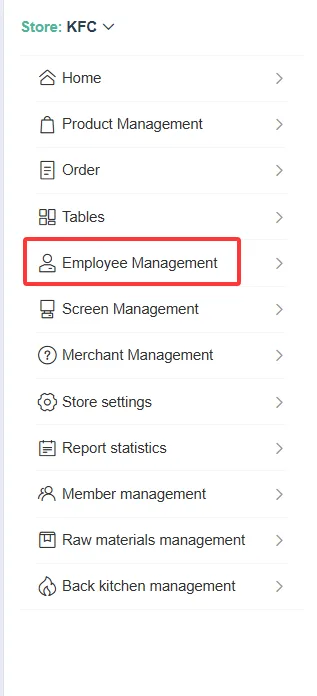
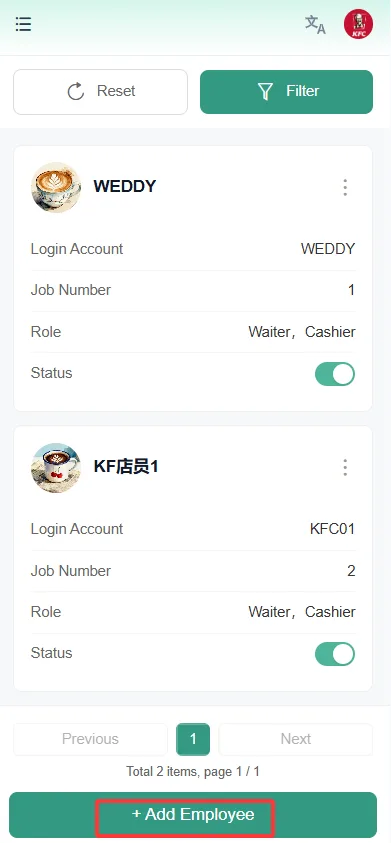
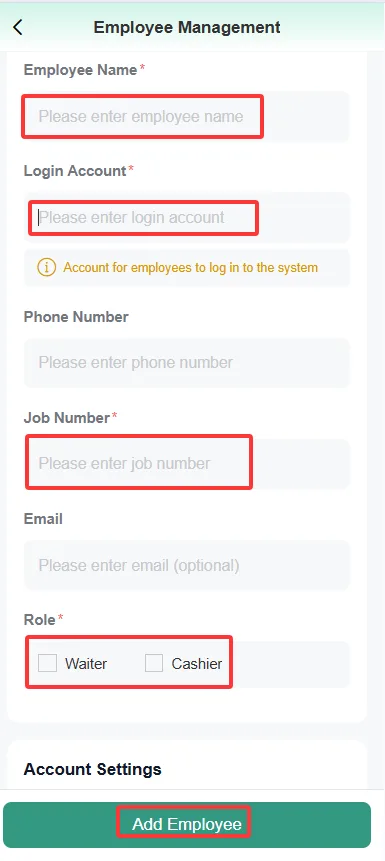
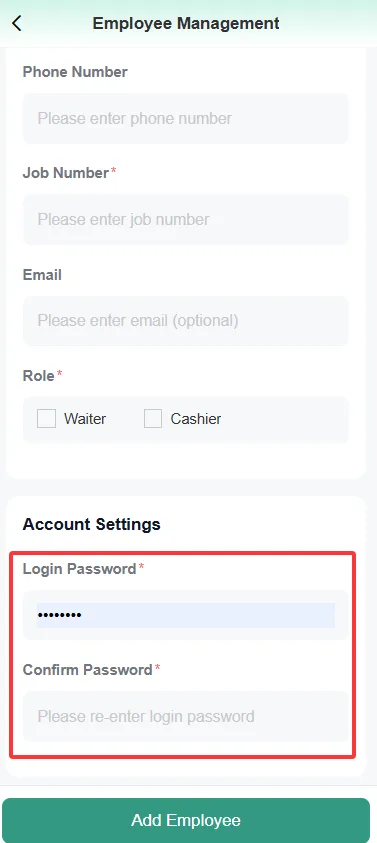
- Create the employee account information for all employees who need to use the equipment according to the above method.
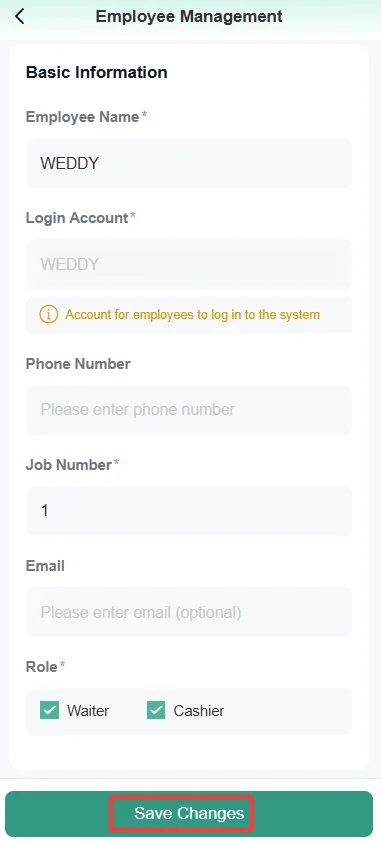
- To edit employee information, click the button on the right side of the employee, select the edit button, enter the edit page, modify the relevant information, and click Save.
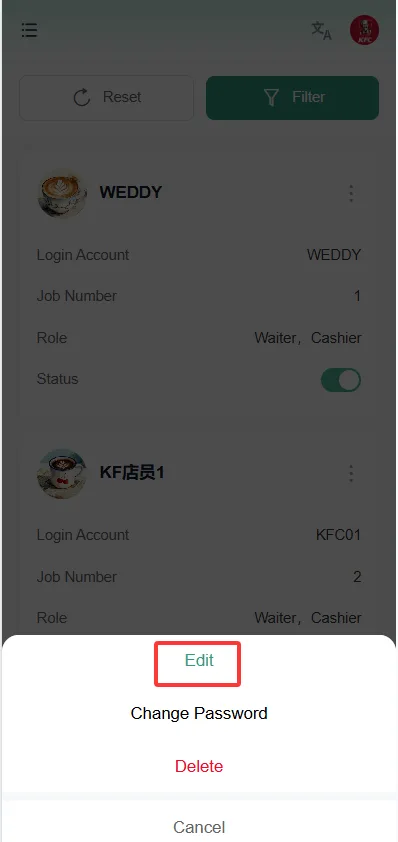
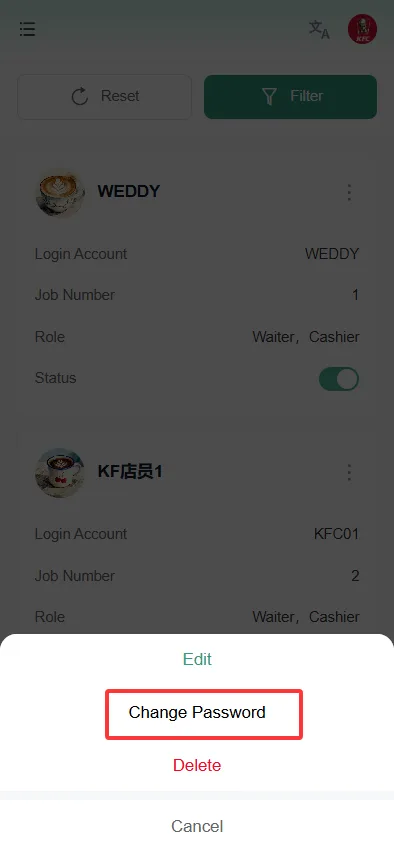
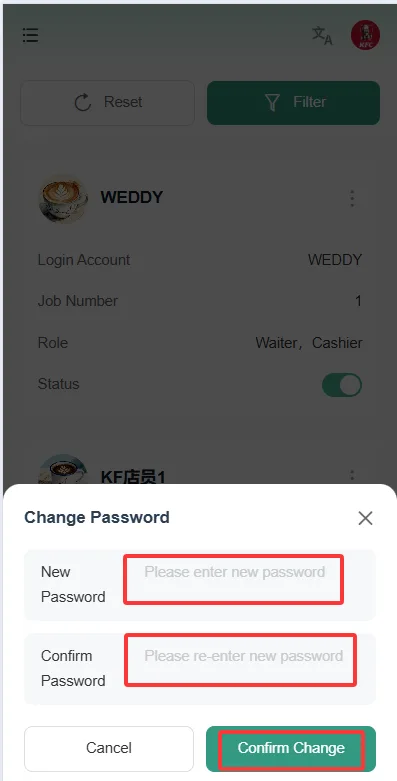
- To change your password, click the "Change Password" button, enter your new password, confirm the password, ensure that the passwords entered twice are consistent, and you can successfully change your password. Employees can then log in using the new password.
Order Management
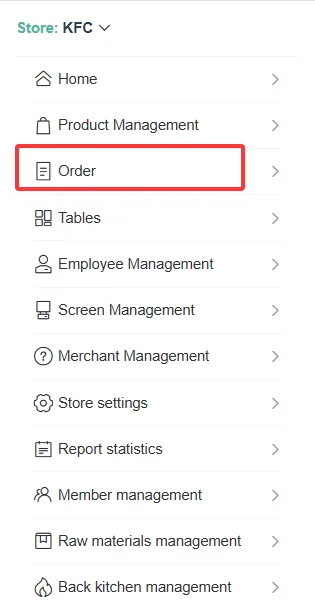
- Click the "Order" menu to enter the order management page;
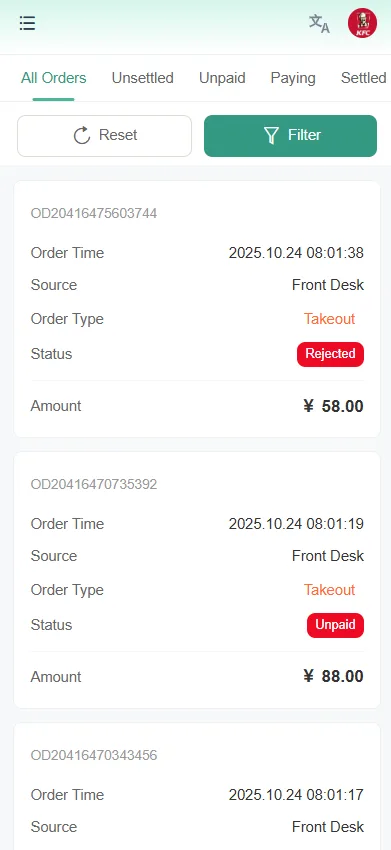
- All order information can be viewed on the order management page;
- Supports viewing orders with multiple condition filters;
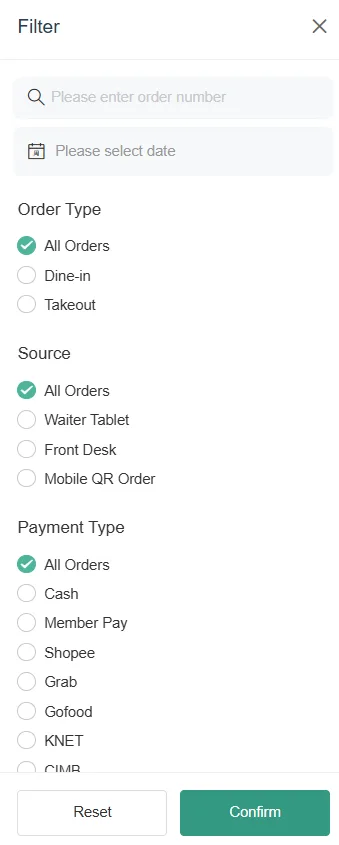
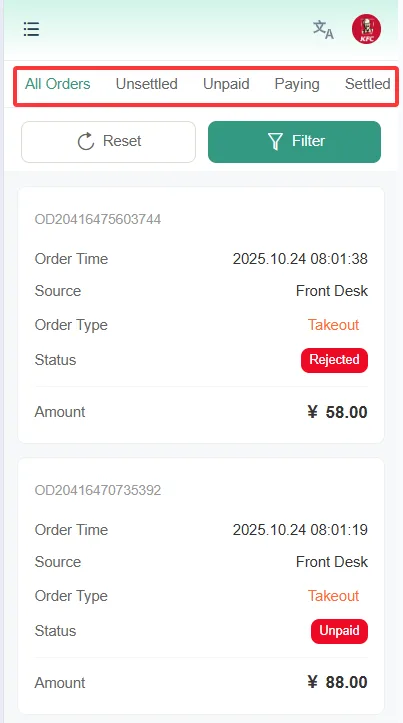
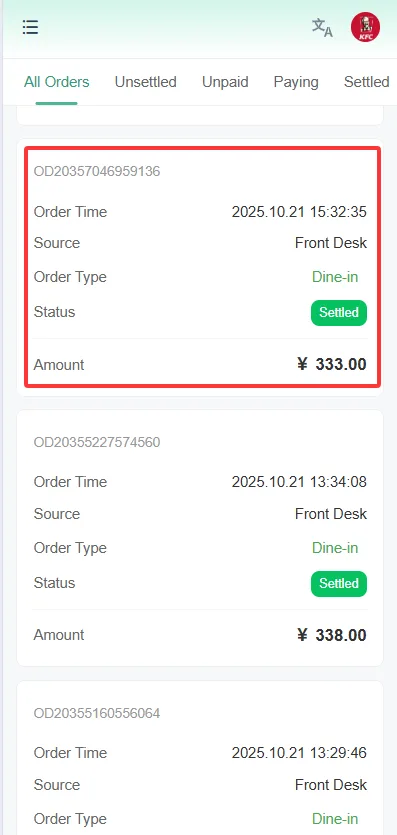
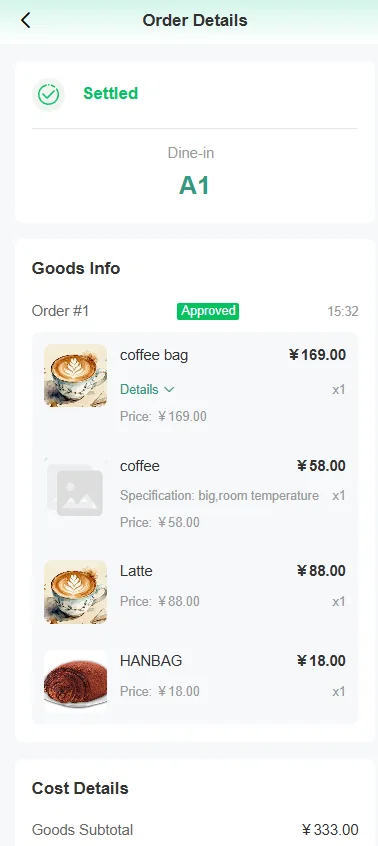
- Clicking on a specific order can lead to the order details page, where you can view the detailed information of the order.
Advertising Management (New)
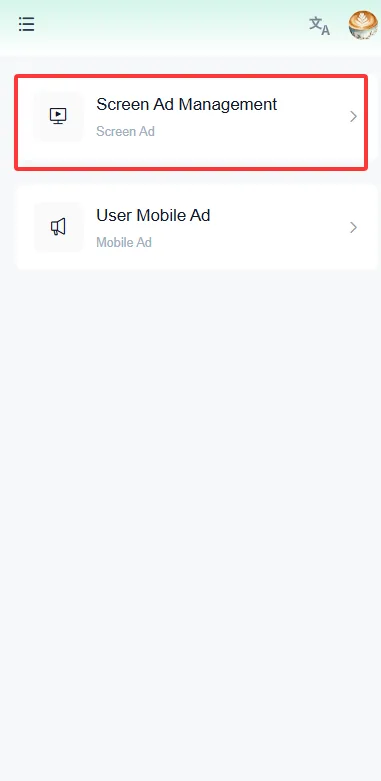
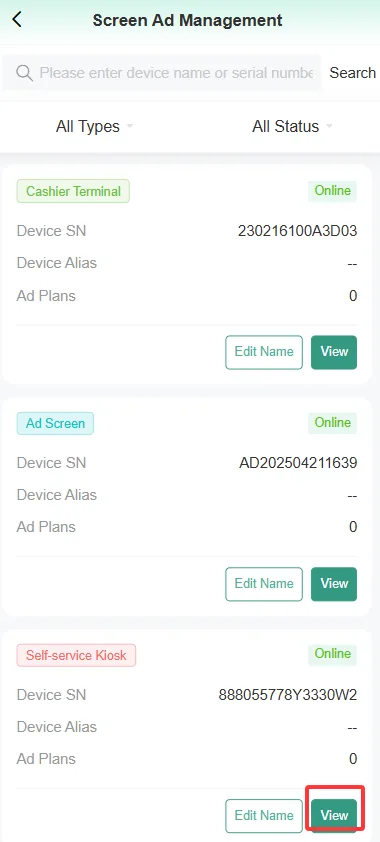
Screen Advertising Management
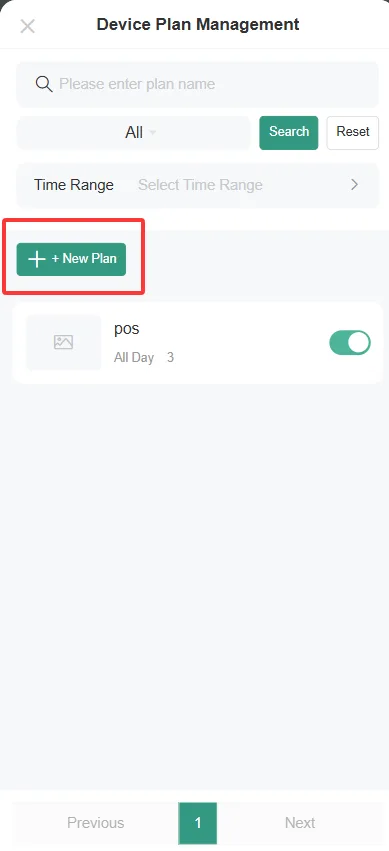
The function of setting up advertising playback plans for devices such as POS, self-service kiosks, and AD machines, enabling the configured videos and images to play on these devices. The page supports the query function.
New Plan
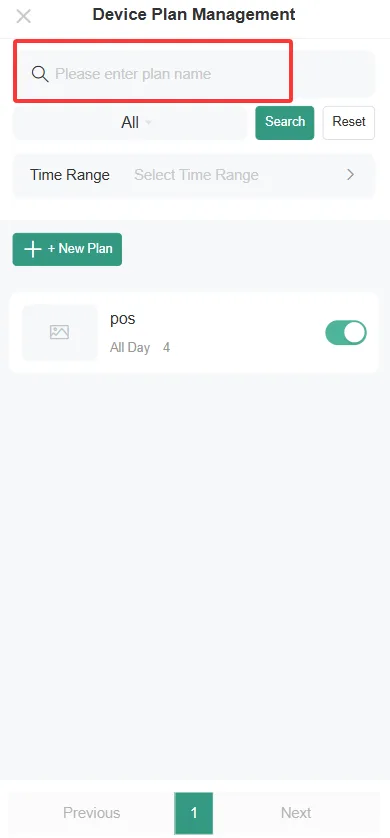
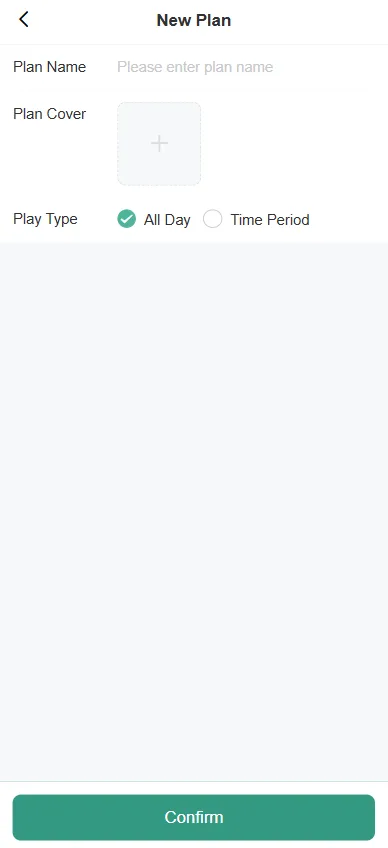
Enter the device details page, click the Add New Plan button, enter the plan name, select the cover, choose the play time, click Confirm, and the plan will be successfully added.
Add videos and images to the plan
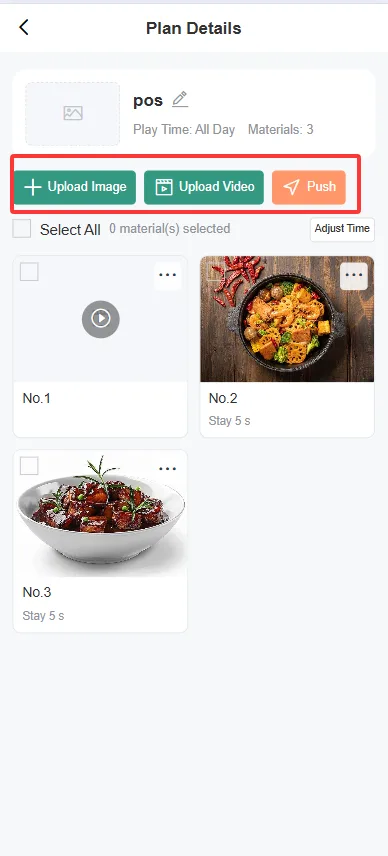
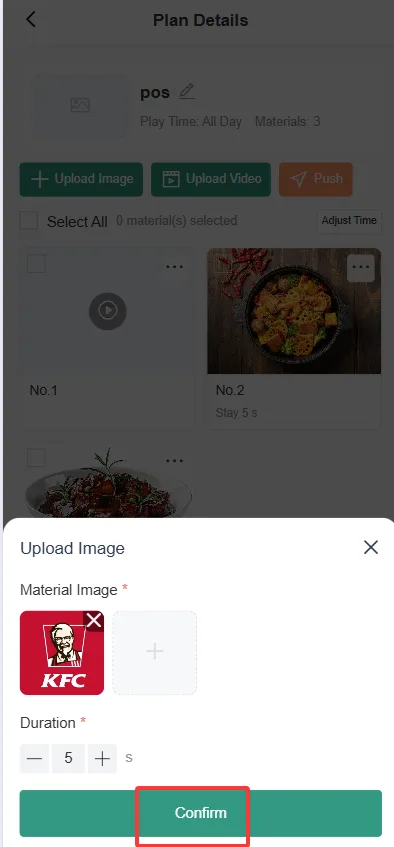
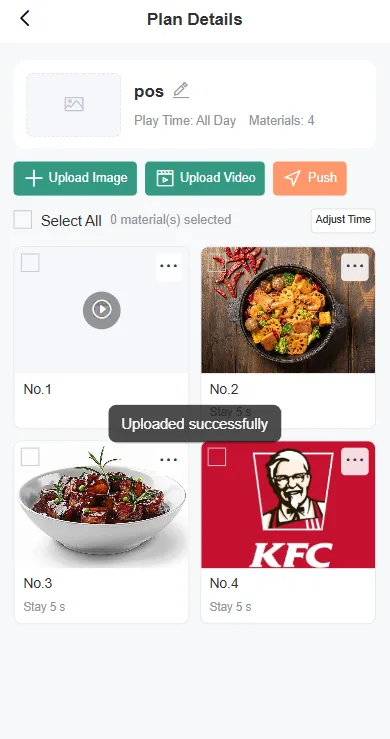
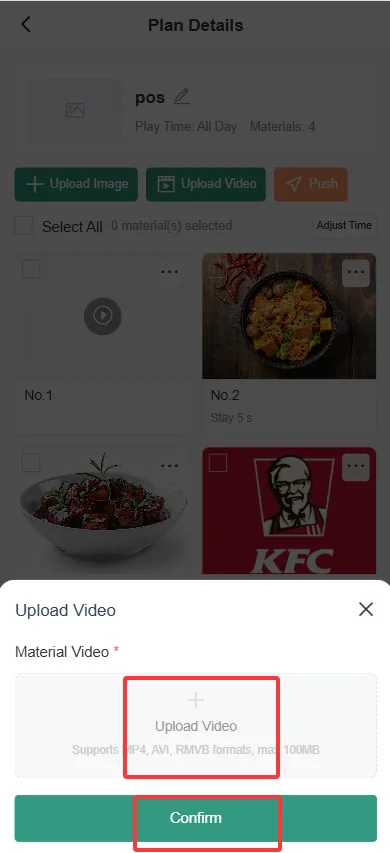
Click the plan details, and you can upload images and videos separately. After the upload is completed, click the push button, and the device will play the images and videos in sequence. When uploading images, you can select the playback time of the images.
Enable and Disable
If you do not need to play this scenario, you can click the disable button, and the scenario will not play. When you need to play it again, just click the enable button. 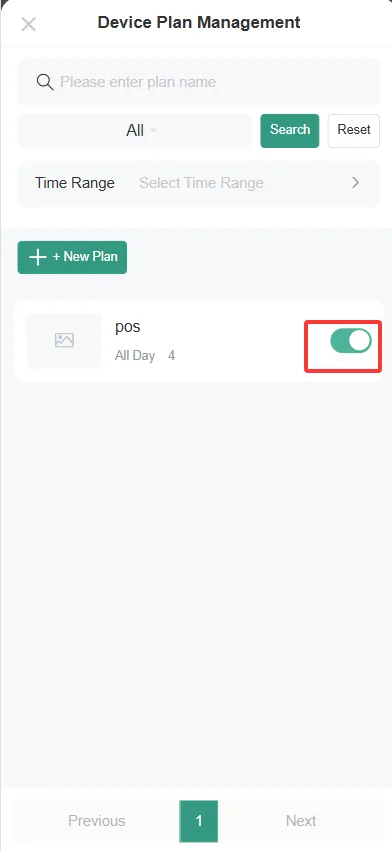
Delete Scheme
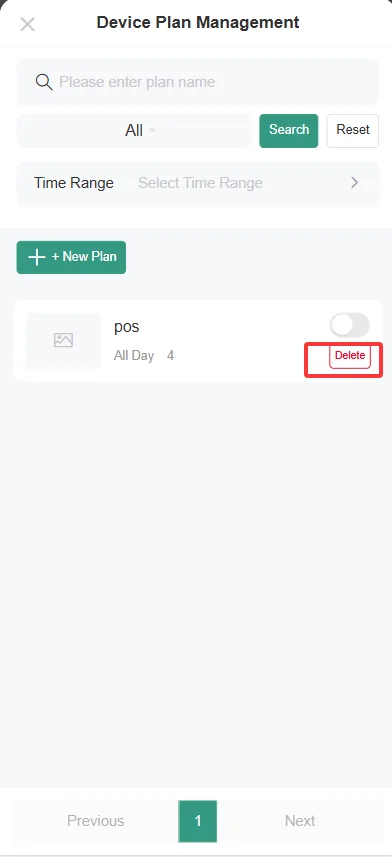
- Disabled options can be deleted by clicking the delete button.
Adjust playback time
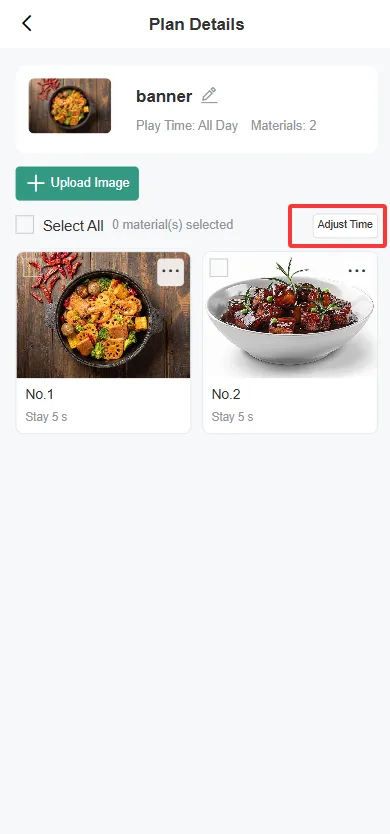
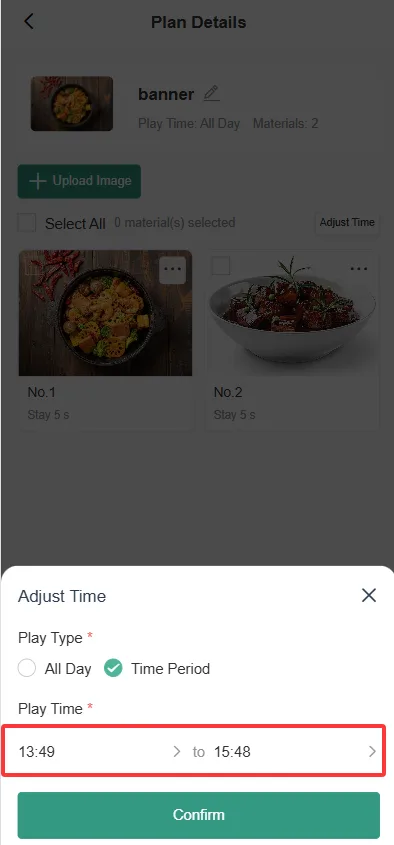
If you only want to play during a specific time period, click the Adjust Time button and reselect the time period on the page. 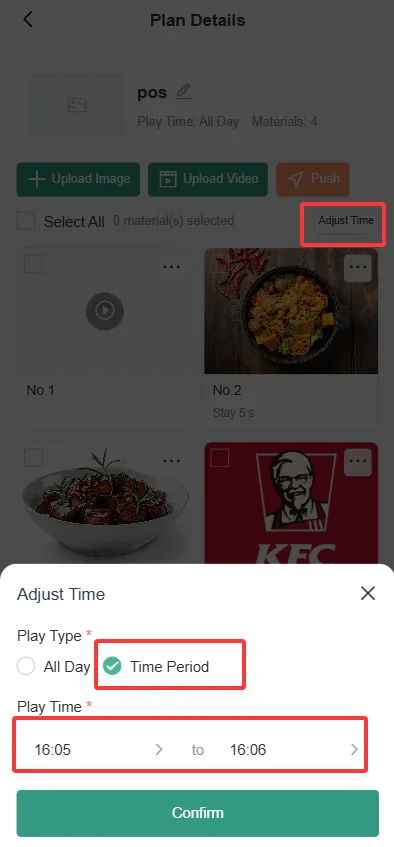
Batch Delete
If you need to delete multiple photos or videos, check the multi-select box and click the batch delete button to delete them. 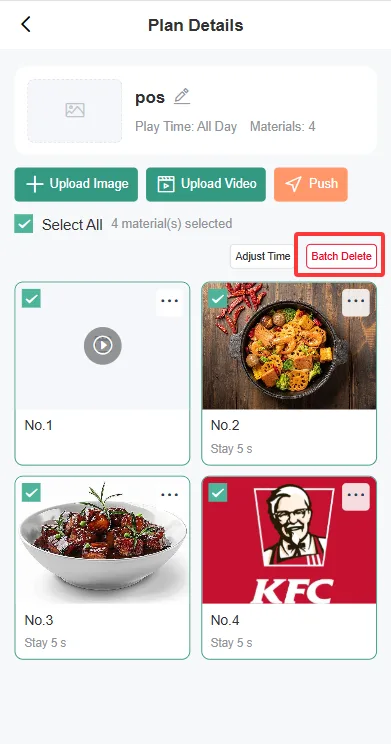
Modify the name of the solution
Click the modify button behind the solution name and re-enter the name.
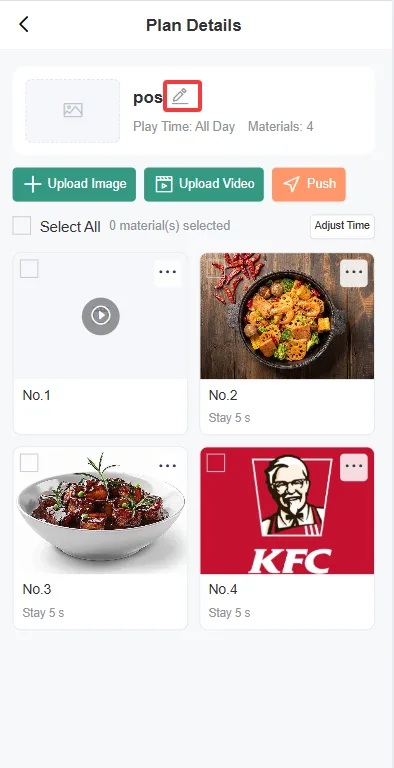
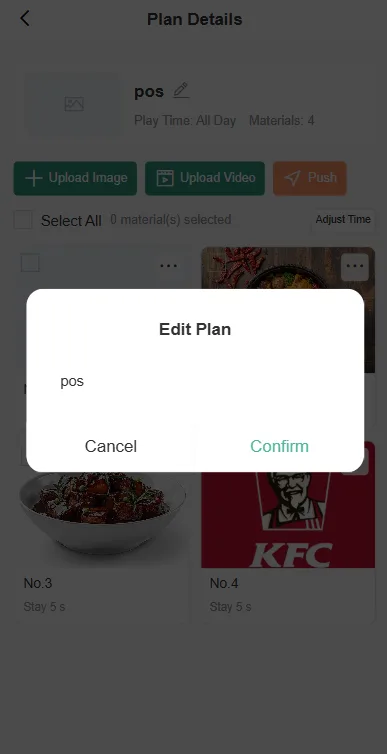
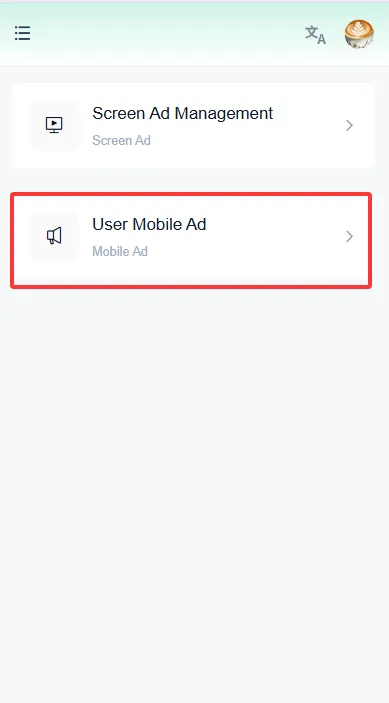
User Mobile Advertising
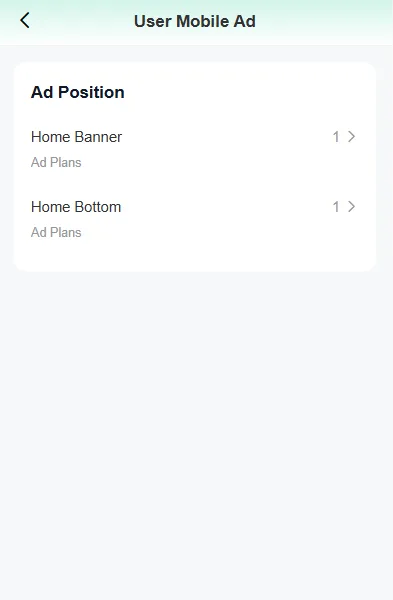
Manage the advertisement configuration at the top and bottom of the home page of the mobile member login system.
New Solution
Click the New button, enter the plan name, upload a cover (optional), select whether the playback time is all day or a specific time interval, and then click OK. 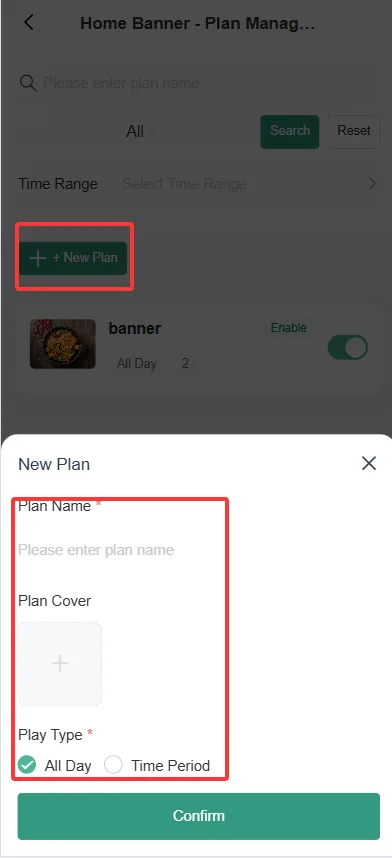
Plan Details
Enter the solution details, click "Upload Image", and you can upload 10 images at a time.
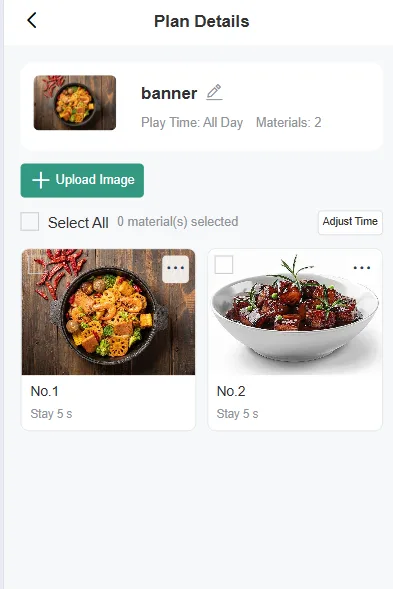
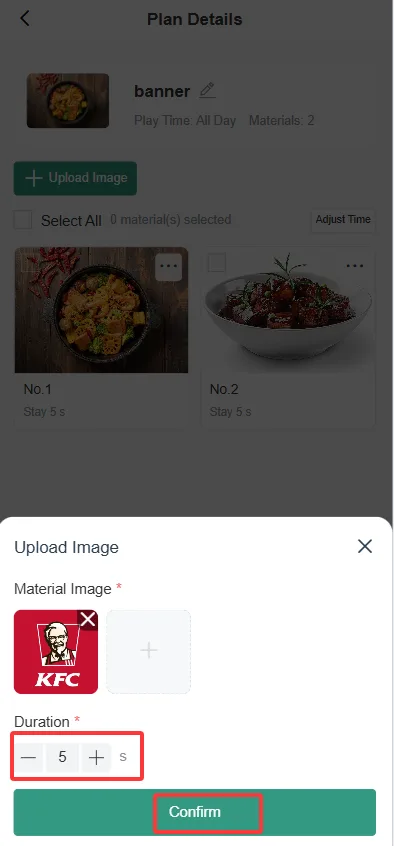
Adjust playback time
Release Electronic Advertising Screen Advertisement (Old)
Add Advertising Machine
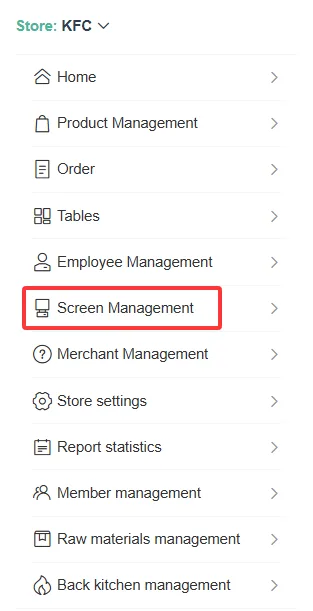
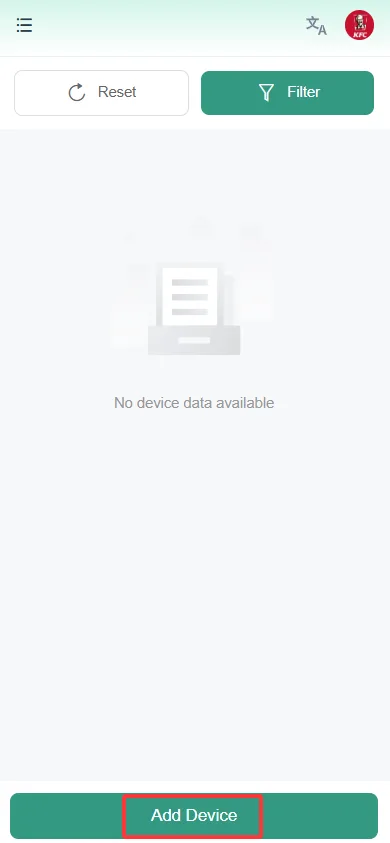
- Click the "Screen Management" menu to enter the screen management page;
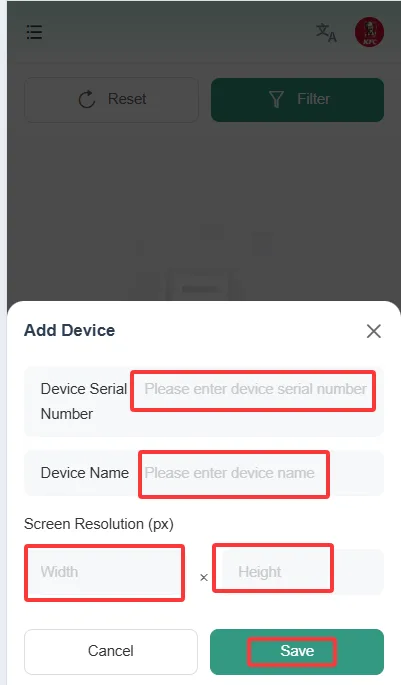
- Click 【Add ad machine】 at the bottom of the page;
- After entering information such as the advertisement's serial number, screen resolution, device name, etc. in the pop-up window, click [Save/Save];
Note
- The device serial number can be viewed on the sticker on the back of the device, or by accessing the device system settings - About This Device information.
Published Content
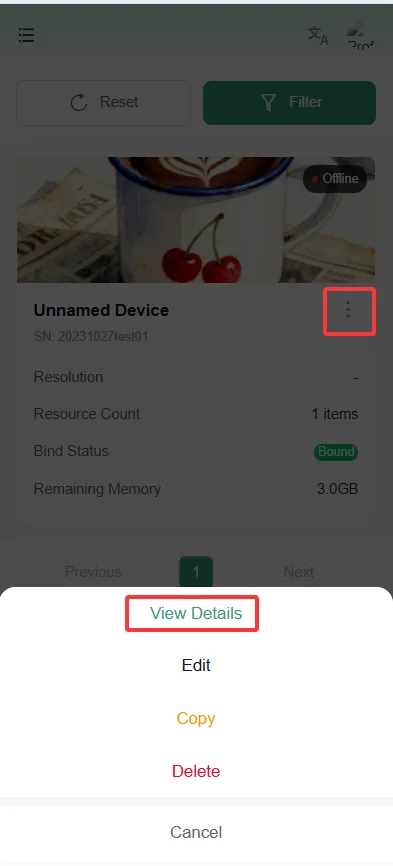
- On the selection screen, click [View Program] to enter the content management page;
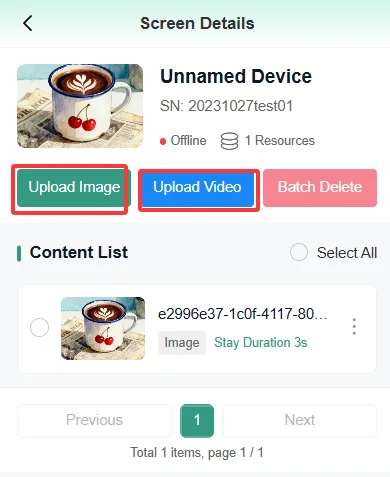
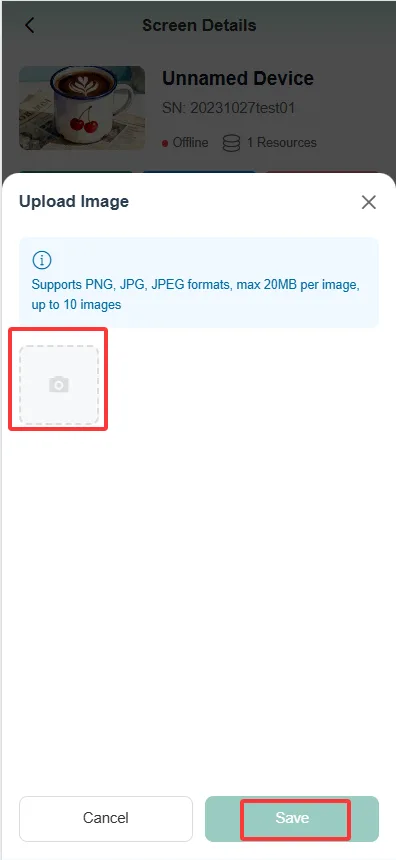
- Supports uploading multiple images. After uploading, the names of the images will be displayed in the circled area below. After uploading is complete, click [Save] in the bottom right corner to finish the upload, and the uploaded images will be automatically updated to the corresponding advertising screen.
Upload Video
Click [Upload Video] in the top left corner;
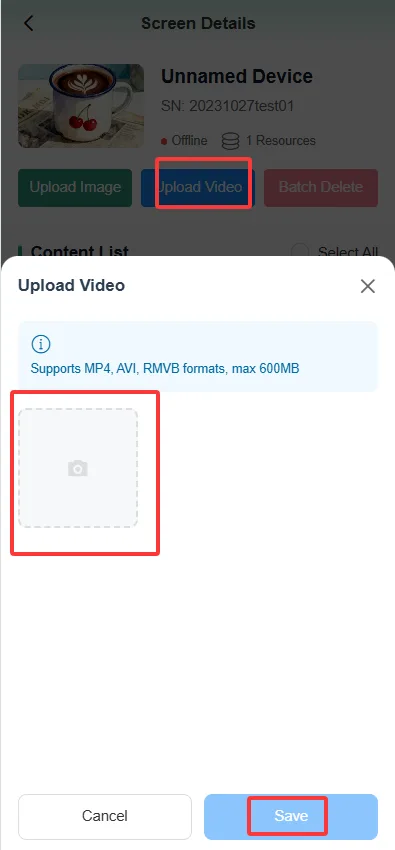
After uploading, the video name will be displayed in the area circled in the figure below. After the upload is completed, click [Save] in the bottom right corner to finish the upload, and the uploaded video will be automatically updated to the corresponding advertising screen.
Content Editing - Sorting/Image Duration Setting
Picture pause time setting
Move the mouse to any position on the image to be set, and an edit button (three dots) will appear in the upper right corner of the image.
Move the mouse over the three dots, and operation options will pop down;
Click to select [Dwell Time];
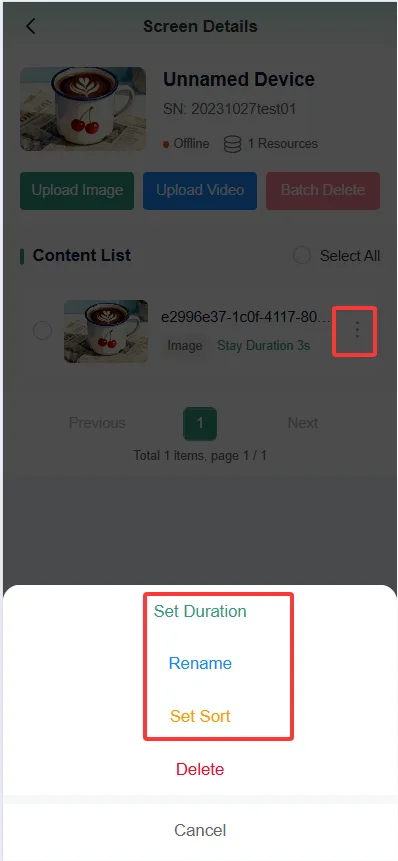
Set the Time Stay of this image in the pop-up window, click [Save], and complete the setting
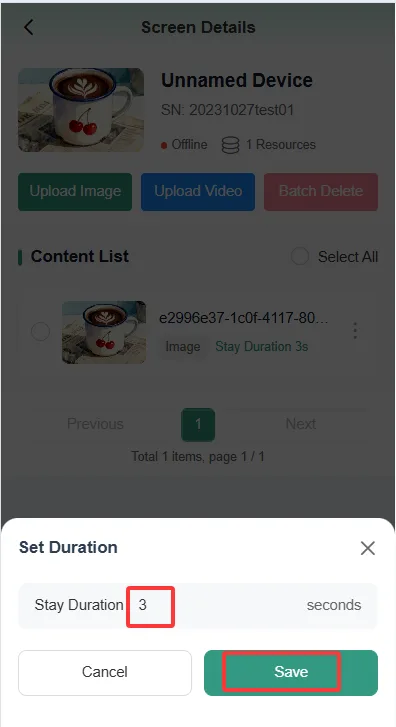
Note
- This time refers to: switch to the next image/video after xx seconds;
- The Time Stay of a video is determined based on its own duration and does not support customization
Content Sorting
Repeat the above operation to trigger the editing function, and select [Sort Order];
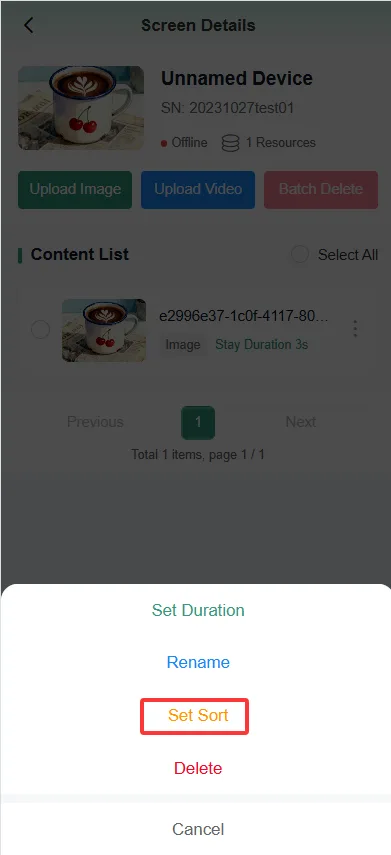
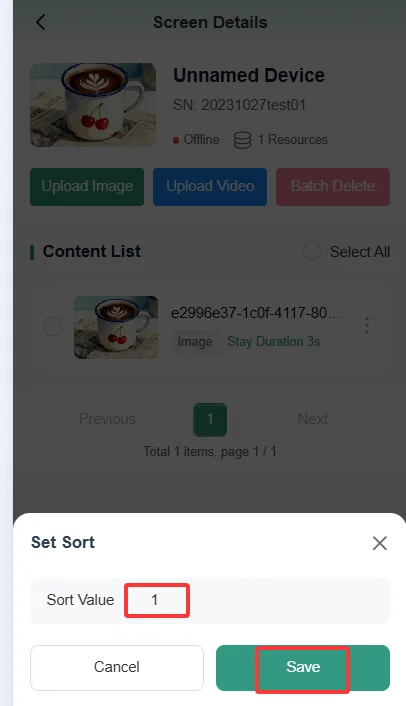
Set the display order of the current content in the pop-up window, that is, the position of this content when the advertising screen plays the content;
After the settings are completed, click [Save] to finish the setup.
Member Management
Member List
Function Overview
- The membership list function is used to view and manage the membership information of the store, including members' basic profiles, status, balance, etc. Through this function, users can conveniently maintain membership data and promote membership relationship management.
Operation Steps
- View Member Information
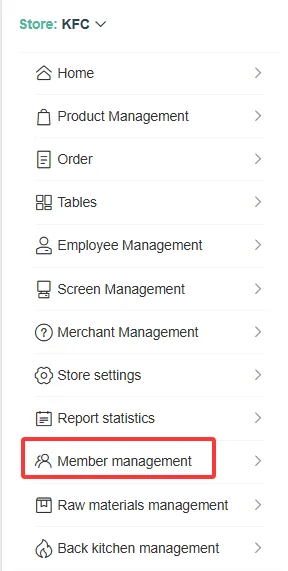
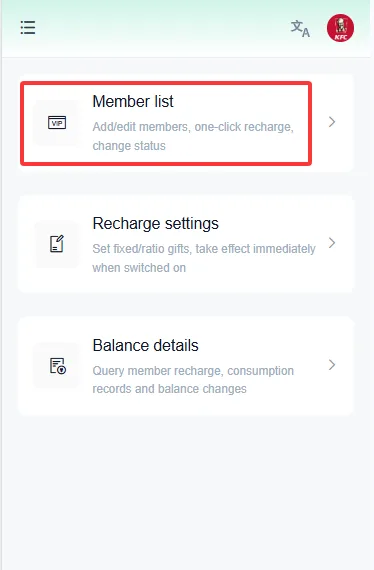
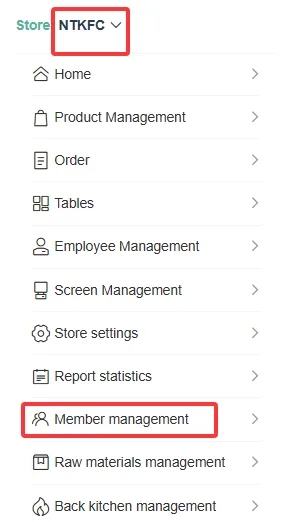
- Enter Member List: Select "Member List" in the main menu to access the current page.
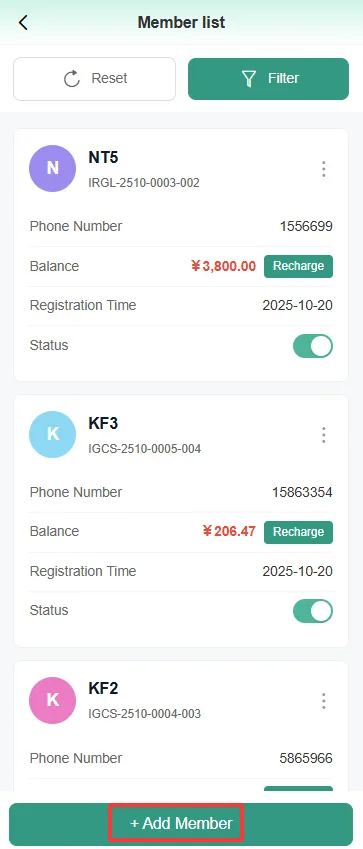
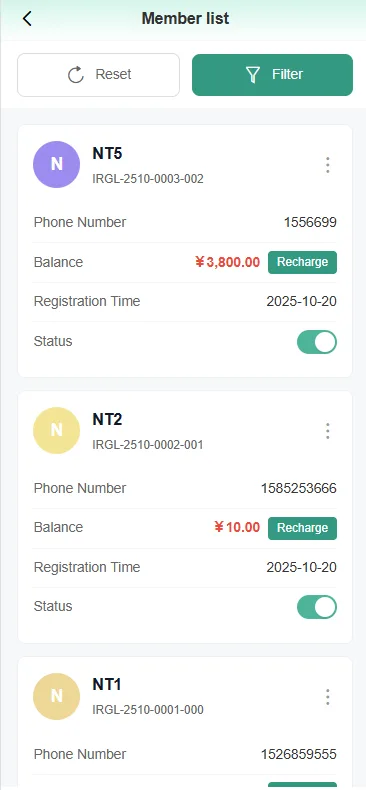
- Browse Member Information: The page will display detailed information of all members, including member number, name, mobile phone number, balance, registration time, and status.
- Add Member
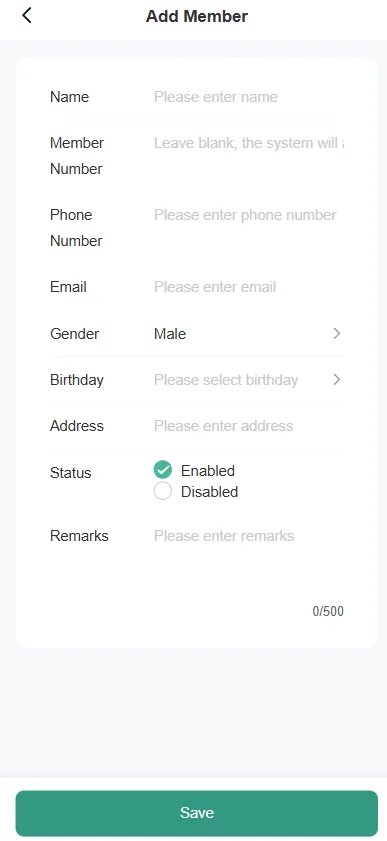
- Click the add button at the bottom of the page, fill in the relevant information, the membership number will be automatically generated, and then click save.
- Edit Member
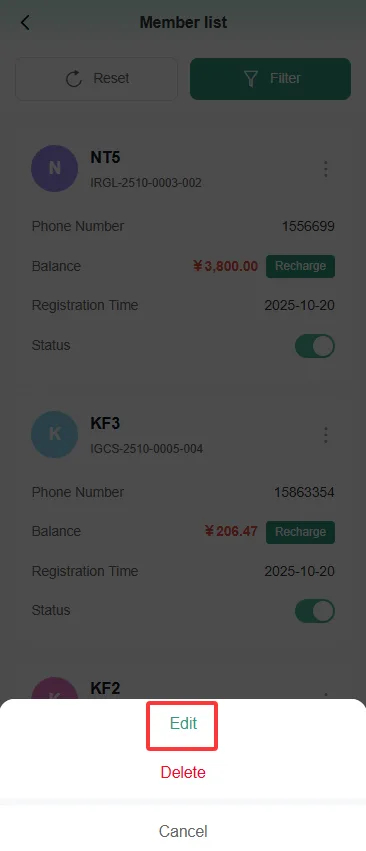
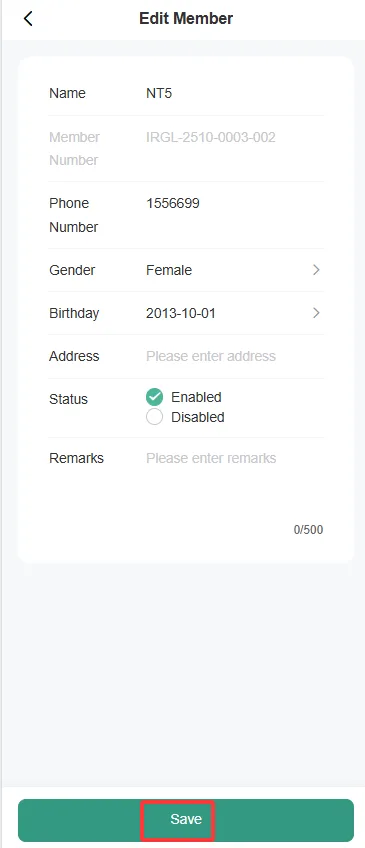
- Click the edit button, modify the relevant information, and click save.
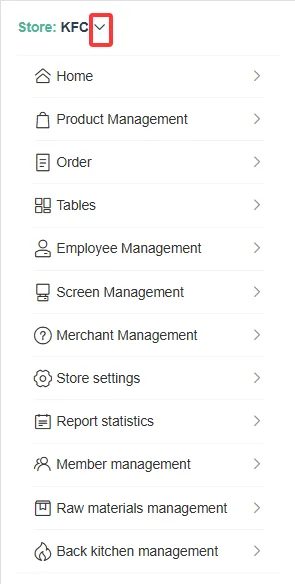
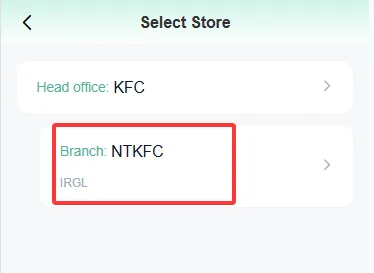
- If the store is a chain store, both the headquarters and branches can view all member information. The headquarters can see the members of itself and its branches, while the branches can see the members of themselves, other branches, and the headquarters.
- Switch stores in the upper left corner and select the corresponding branch.
- Enter the member management page, where the member list displays members from the main store, other branch stores, and one's own store.
- The branch store account login system displays members from the head office, other branch stores, and its own store in the member list.
Recharge Settings
Function Introduction
- The Member Recharge Settings feature allows you to create flexible recharge rules for members, including bonus gifts based on a percentage or fixed amount, to enhance members' recharge experience and loyalty. This feature is mainly used on the POS (Point of Sale) terminal (ordering and cashiering machine) and supports member recharge on the device.
- If it is a chain store, the head store displays the recharge settings page, while branch stores do not have a recharge settings page. Recharge settings are uniformly managed and configured by the head store.
Operation Steps
- Enter the recharge settings page
- After logging into the system, click "Recharge Settings" in the left navigation bar to enter the function page.
- Configure Recharge Rules
- Proportionate Gift:
- In the "Proportion" option, enter the bonus ratio (for example, 10% means a 10 yuan bonus for every 100 yuan recharge).
- After the confirmation ratio is set, the system will automatically calculate the gift amount.
- Fixed Amount Gift:
- In the "Fixed" option, enter the recharge amount and the corresponding fixed bonus amount (for example, recharge 100 yuan and get 20 yuan as a bonus).
- The system will directly display the gift amount according to the settings.
- Add multiple recharge plans
- You can add multiple recharge bonus plans according to different store activities.
- When a service staff member tops up a member's account on the point-of-sale cash register, they should select an appropriate top-up bonus plan based on the current store promotion.
- Enter member information and recharge amount, and the system will automatically apply the bonus rules of the selected plan.
- Enable or disable the function
- In the "On Status" option, select "On" to activate the recharge bonus feature, or select "Off" to temporarily deactivate it.
- After closing, the recharge function will not be affected
- Save Settings
- After completing the rule configuration, click the "Save" button to ensure the settings take effect.
- The system will automatically apply the new rules, and members can enjoy corresponding discounts when recharging on the cashier device.
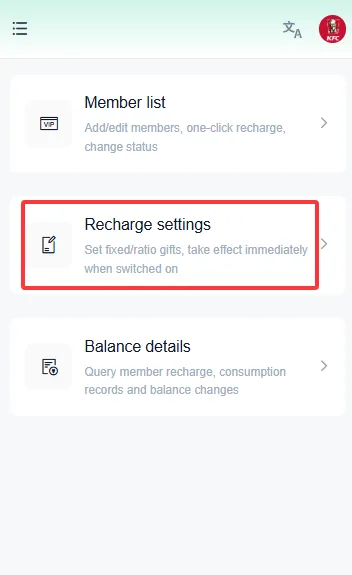
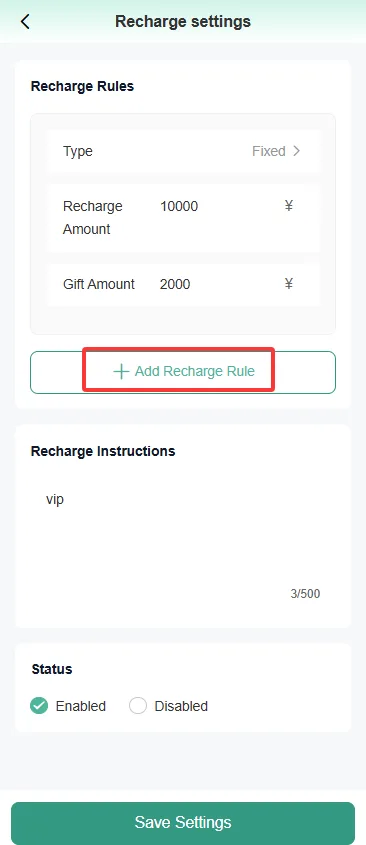
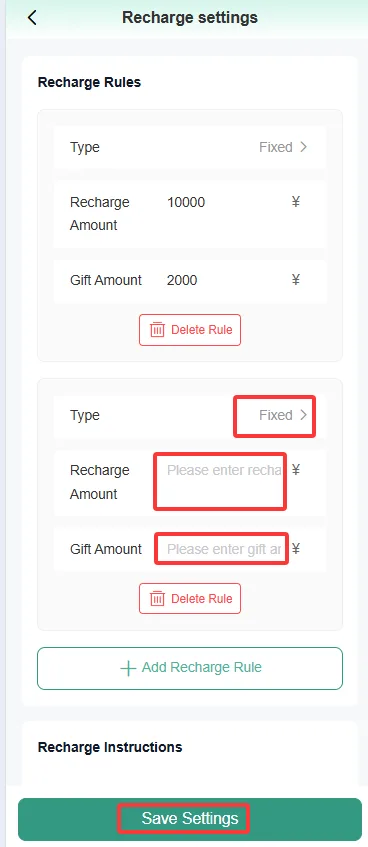
Balance Details
Function Introduction
- The balance details function is used to record and query the fund changes in member accounts, including operations such as recharge, consumption, and refund. Through this function, users can clearly understand the account fund flow of each member, facilitating financial management and customer service.
Operation Steps
- Enter the balance details function
- In the system main menu, find and click the "Member Management" module.
- On the member management page, select the "Balance Details" function to enter the balance change record page.
Query member balance records
Search for members:
- Enter the member's ID or mobile phone number in the search box, click the "Search" button, and the system will display the member's balance change records.
View Record:
- The system will list all balance change records of the member, including transaction time, change amount, and change reason.
- A positive change amount indicates a recharge or refund, while a negative amount indicates consumption or deduction.
- The reason for the change will indicate the specific details of each transaction, such as "order refund" or "consumption deduction".
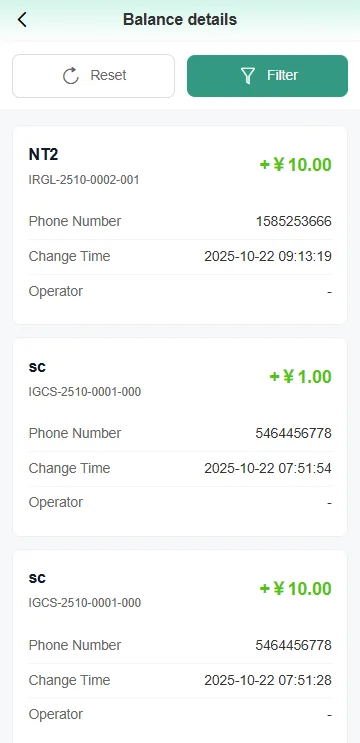
If the store is a chain store, both the headquarters and branches can see all member recharge and consumption records. The headquarters can see the member recharge and consumption records of itself and its branches, while the branches can see the member recharge and consumption records of themselves, other branches, and the headquarters.
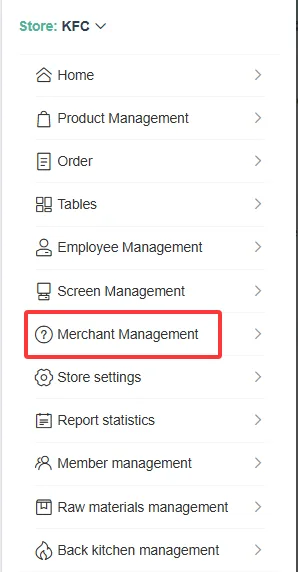
Merchant Management
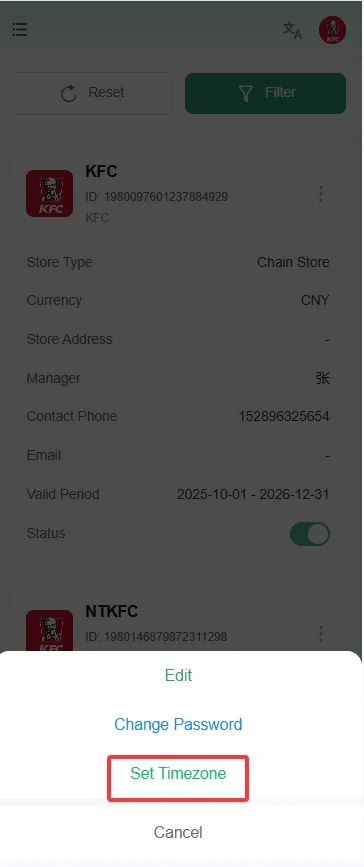
- Chain stores create branches, modify branches, change branch passwords, and set branch time zones.
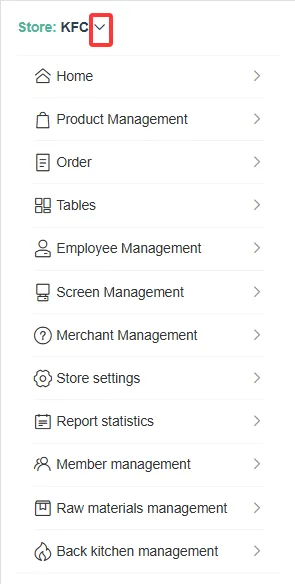
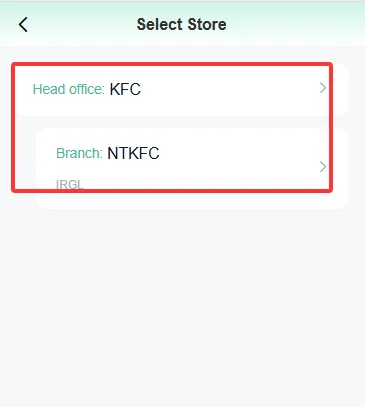
- Enter the store list via the store dropdown box in the upper left corner to freely switch between stores.
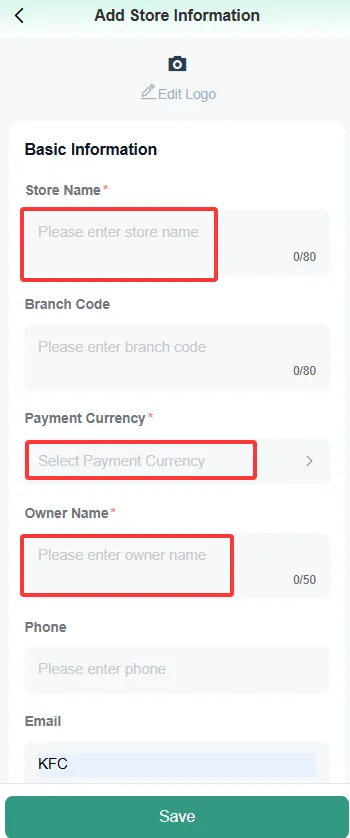
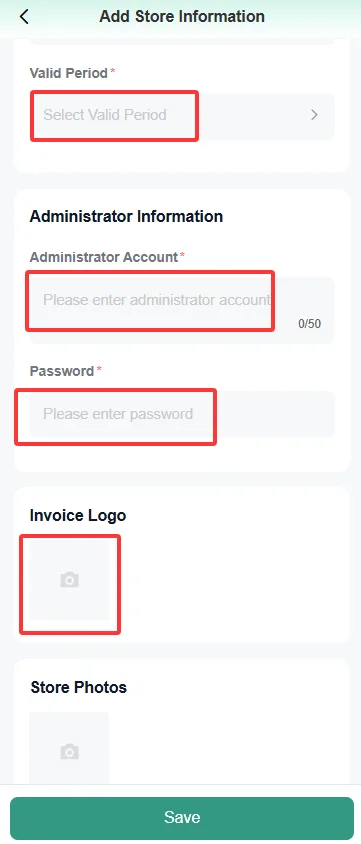
Add Branch Store
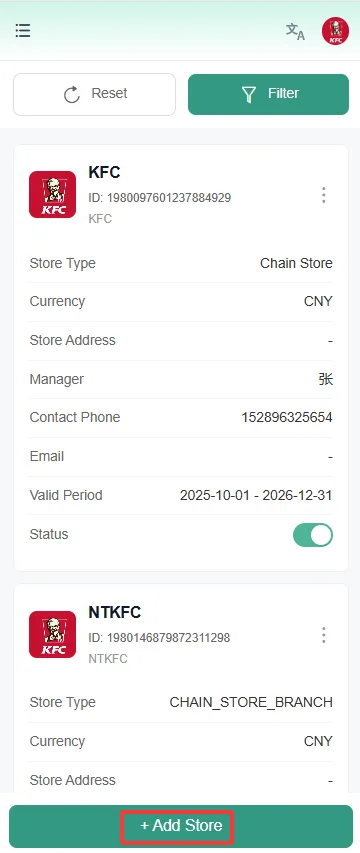
- Click the Add Store button, and enter the basic information of the store and the branch number;
- Information such as invoice title;
- Account and password, click Save, and the branch store is successfully created.
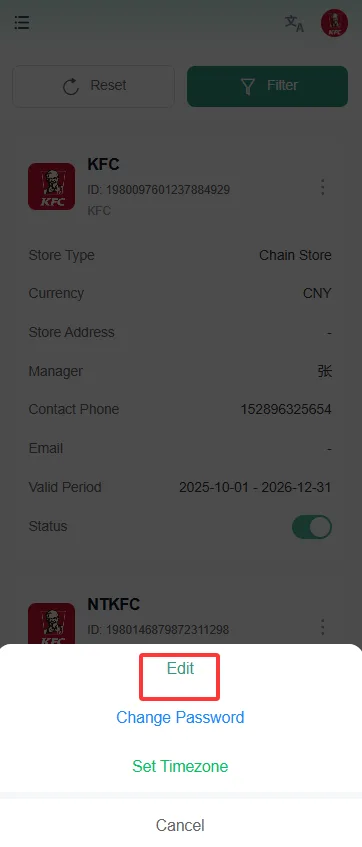
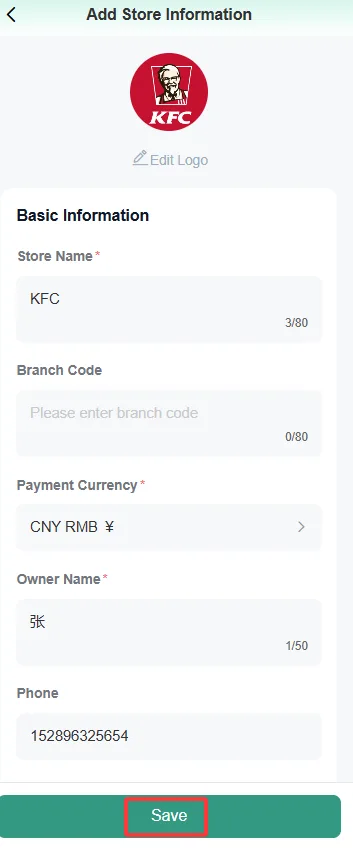
Edit branch store information
- Click the edit button, modify the relevant information, and click save.
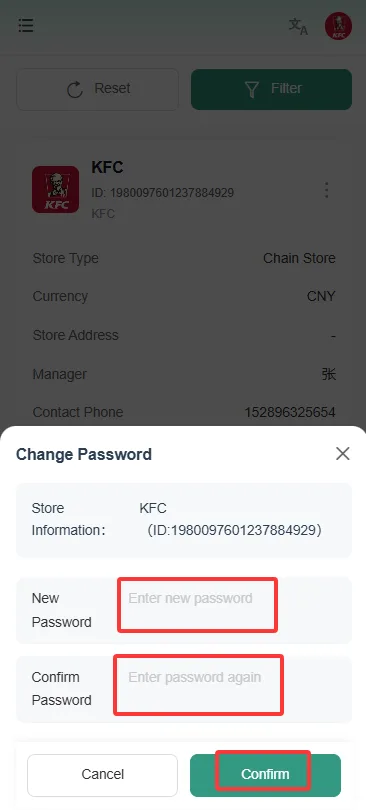
Modify Store Password
- Click the "Change Password" button, enter the new password, confirm the new password, and then save it.
Set Time Zone
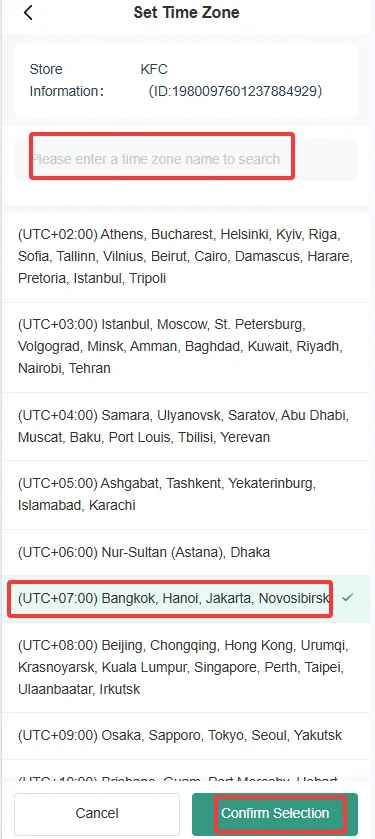
- Click the time zone button, enter the time zone selection page, search for the corresponding time zone, select it, and save.
Report Statistics
Overview of Dishes
Function Introduction
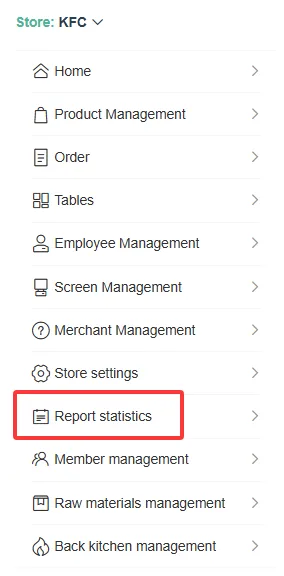
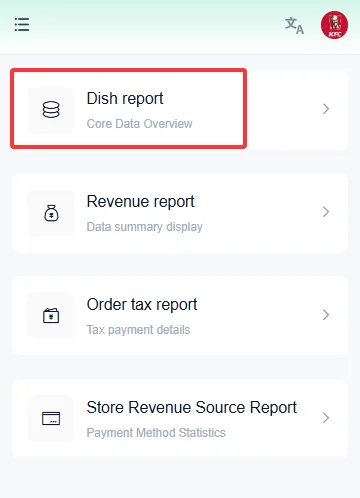
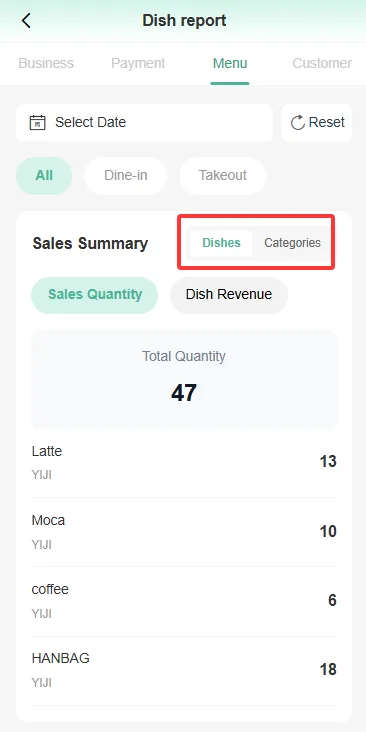
- This page is divided into two tag pages, namely Dish Summary: specifically displaying the sales volume and selling price of dishes; Category Summary: calculating the sales amount and quantity based on the primary and secondary classifications of dishes.
Revenue Report
Function Introduction
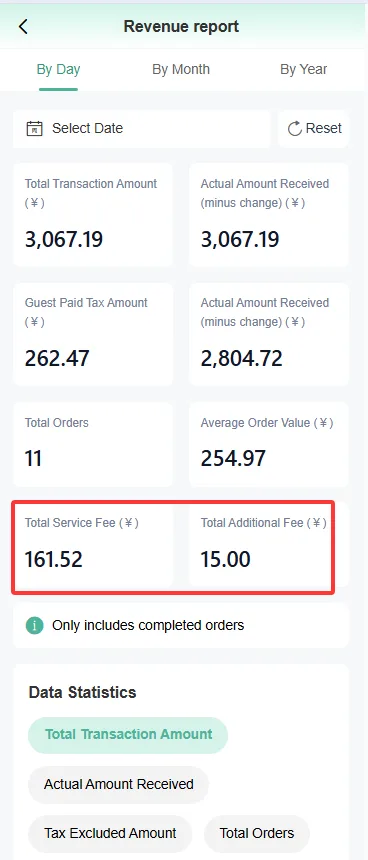
The revenue report function is used to calculate and display the daily revenue of merchants, including information such as total transaction amount, actual received amount, actual received amount after deducting customer taxes and fees, number of customer transactions, and average per customer transaction. This function helps users intuitively understand business operations, facilitating financial analysis and decision-making.
Operation Steps
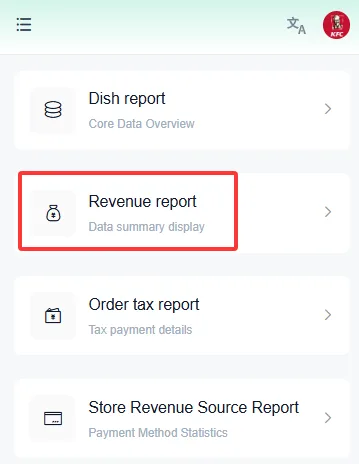
- Access revenue report
- After logging in successfully, find the "Report Statistics" module in the left menu.
- Click "Revenue Report" to enter the revenue statistics page.
- Switch Report View
- At the top of the revenue report page, there are toggle buttons for "Daily", "Monthly", and "Yearly".
- Users can choose to view daily reports, monthly reports, or annual reports as needed:
- Daily Report: Displays daily revenue data.
- Monthly Report: Summarizes monthly revenue to facilitate the observation of monthly trends.
- Annual Report: Presents an overview of annual revenue, facilitating long-term planning and analysis.
- View revenue data
- Date Selection: The page will default to displaying the most recent revenue data. Users can select a specific date to view the revenue situation for that date.
- Data Interpretation:
- Total Transaction Amount: The total amount of all transactions within that date.
- Actual Receipt Amount: The actual income after deducting refunds.
- Actual amount received after deducting guest taxes: The actual income after deducting guest taxes.
- Number of customer orders: The number of valid orders on the day, excluding refunds and cancellations.
- Average per customer transaction: The average amount of consumption after excluding refunds, cancellations, and taxes.
- Taxes and Fees: Taxes and fees generated by the order.
- **Surcharge:**Such as packing fees and the like.
Order Tax Report
Function Introduction
The Order Tax Report function is used to display all tax information of merchants within a specific time period, including tax names, tax amounts, and total amounts. This function helps users clearly understand the tax situation of each order, facilitating financial audits and compliance management.
Operation Steps
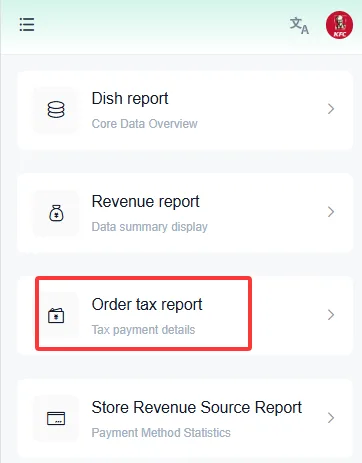
- Access Order Tax Report
- After logging in successfully, find the "Report Statistics" module in the left menu.
- Click "Order Tax Report" to enter the order tax statistics page.
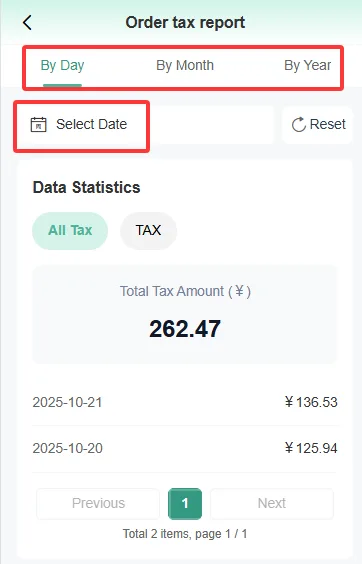
- Switch Report View
- At the top of the order tax report page, there are toggle buttons for "Daily", "Monthly", and "Yearly".
- Users can choose to view tax reports for different time ranges as needed:
- Daily: Displays daily tax data.
- Monthly: Summarize monthly tax and fee information.
- Annual: Displays the annual overview of taxes and fees for easy long-term analysis.
- View tax data
- Total Amount: The total amount of all taxes and fees within the specified time period is displayed at the top of the page.
- Data Interpretation:
- Date: Records the specific date when the tax occurred.
- Tax Name: Corresponding tax type or name.
- Tax Amount: The tax amount within this date range.
Report on In-store Payment Methods
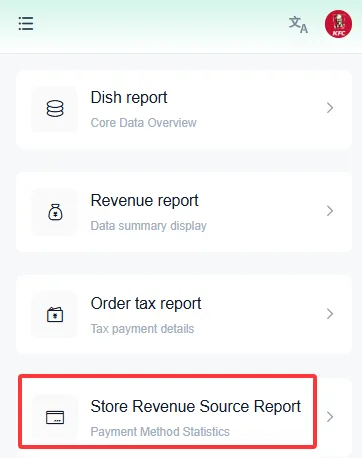
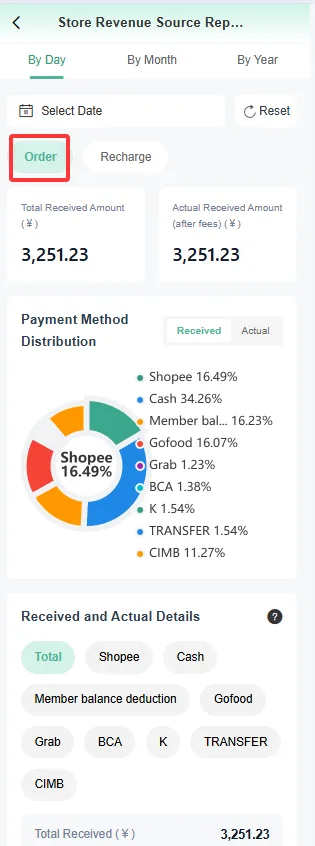
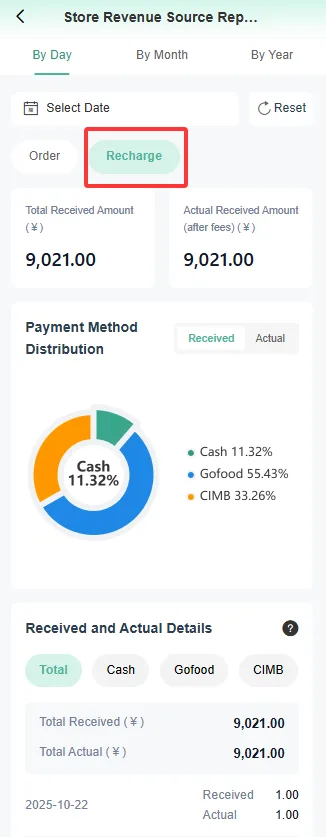
- This page accurately calculates the actual received amount of payment for catering stores, determines the calculation logic for the actual received amount in two modes based on the status of the "Payment Method Settings" function, and provides functions such as data filtering, display, and export. It supports data filtering by daily, weekly, monthly, quarterly, and annual periods, and also allows customizing the start and end dates for queries, meeting the data statistical analysis needs of different periods, such as viewing the monthly actual received payment status of a store.
According to the order collection statistics
- Payment methods (cash, member balance, static QRIS accounting, QRIS Cashlez, EDC, etc.) classify and display the amount received and the actual amount received, clearly presenting the fund flow of each checkout method on different dates.
- Supports filtering data by day, week, month, quarter, and year.
- Export the report.
According to the recharge collection statistics
- For POS member recharge, select different payment methods, count the receipts from different payment methods, and classify the payment methods (cash, member balance, static QRIS accounting, QRIS Cashlez, EDC, etc.)
- Supports filtering data by day, week, month, quarter, and year.
- Export the report.
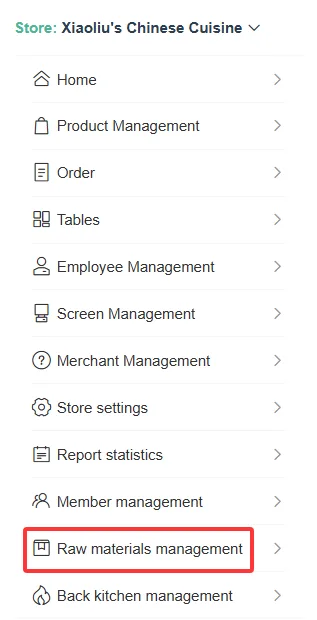
Raw Material Management
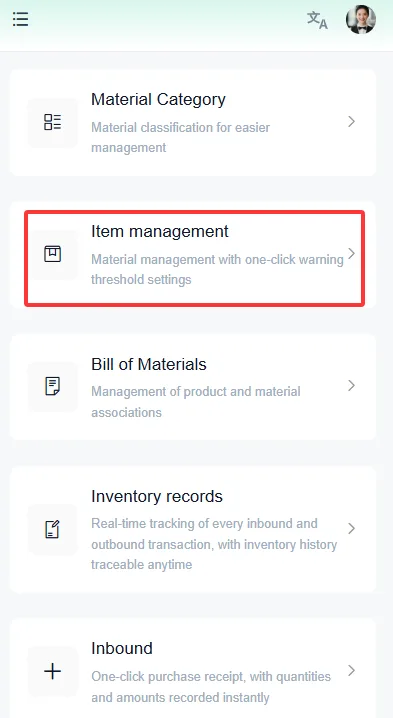
Item Management
Function Overview
- Raw Material Management - The Item Management Module is a function in the catering management system used to manage information about restaurant raw materials. Through this module, users can view, add, edit, and delete raw materials for various dishes in the restaurant.
- Meanwhile, users can regularly check the inventory status of raw materials, replenish out-of-stock raw materials in a timely manner, and ensure the normal operation of the restaurant.
Function Introduction
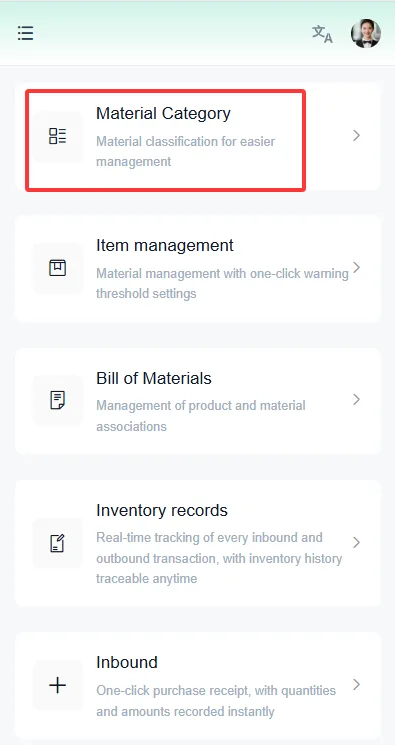
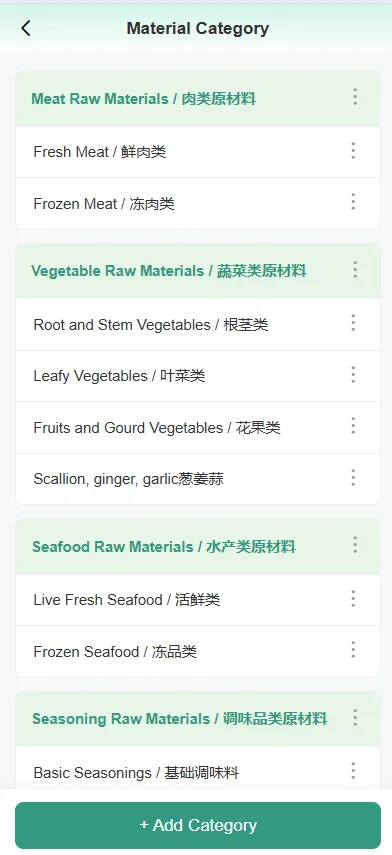
- Item Classification
- Item classification is used to classify and manage various raw materials in restaurants, facilitating easy search and management.
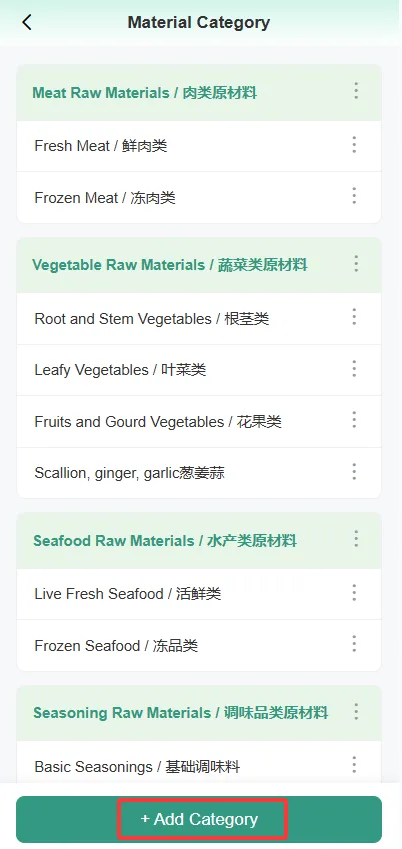
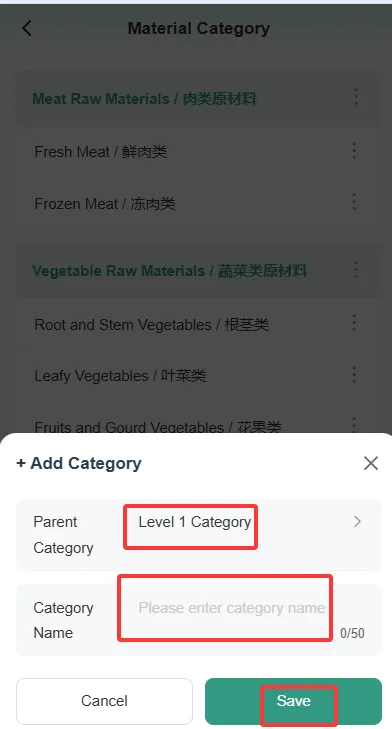
- Users can click "+ Add Category" on the "Add New Raw Material" page to add a new category.
- Classification information includes the classification name and the superior classification, and users can maintain it according to the actual situation.
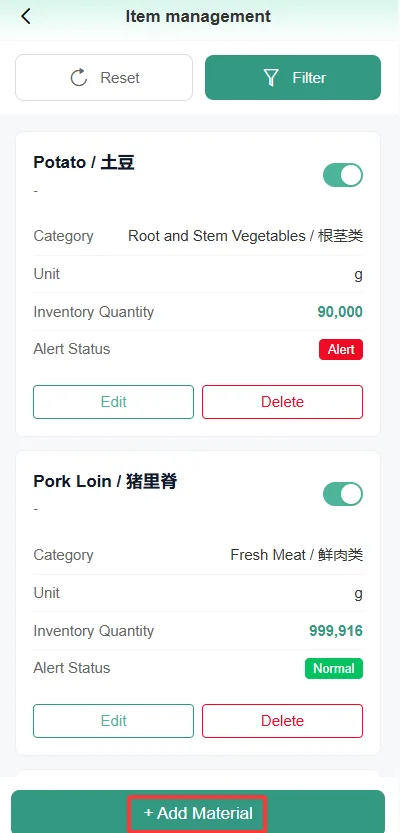
- Raw Material List
- Displays all current raw material information of the restaurant, including name, category, number, inventory, unit, etc.
- can search for and paginate through raw material information.
- Provides a "New Raw Material" button, which can be used to enter the New Raw Material page.
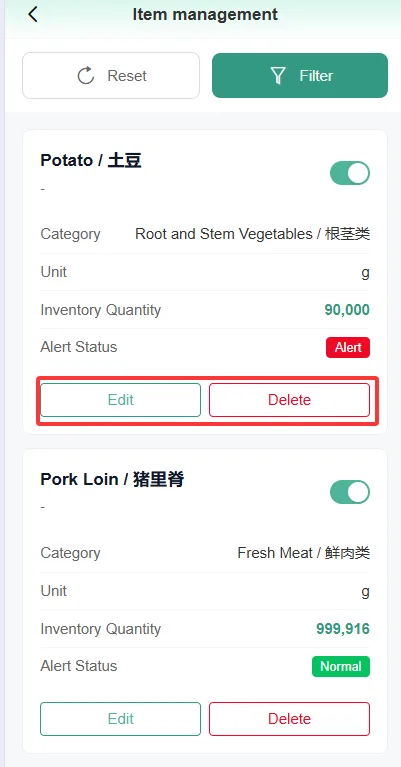
- For existing raw materials, you can click the "Edit" or "Delete" button in the action bar to perform the corresponding operations.
- Add New Item Category After clicking the "New Category" button, a new category page will pop up, where you can select a parent category to create a secondary category, or directly create a primary category without selecting a parent category.
- New raw materials
- After clicking the "Add New Raw Material" button, a page for adding new raw materials will pop up.
- On this page, users can fill in information such as the name, classification, number, and unit of new raw materials.
- If there is no suitable option in the raw material classification list, you can click "+ New Classification" to add a new classification.
- After filling out, click the "OK" button to save the newly added raw material information.
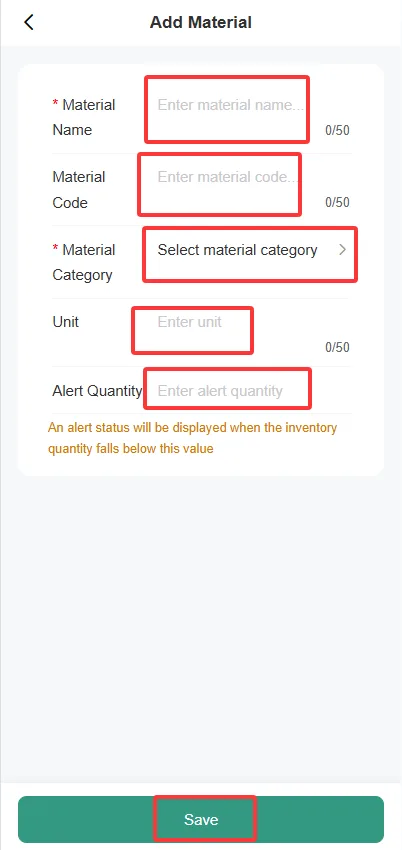
- Edit raw materials
- On the raw material list page, click the "Edit" button in the action bar.
- Pop up the page for editing raw materials, where users can modify the name, classification, number, and unit information of raw materials.
- After the modification is completed, click the "OK" button to save the updated raw material information.
- Delete raw materials
- On the raw material list page, click the "Delete" button in the action column.
- The system will pop up a confirmation box, and the user can delete the raw material after confirmation.
Precautions
- The main purpose of the raw material management function is to assist operators in monitoring inventory status and reminding them to replenish stock when necessary. When a dish is ordered, the system will automatically reduce the corresponding quantity of raw material inventory. However, it should be noted that even if the raw material inventory is insufficient, this will not prevent the cashier counter from continuing to accept customer orders. This is because the restaurant may choose to use alternative raw materials to prepare dishes, and such a decision usually requires manual judgment and operation, which the system itself cannot handle on its own.
- To ensure a smooth service process and customer satisfaction, please note the following suggestions:
- Timely Inspection and Replenishment: Regularly check the inventory status of raw materials and promptly replenish the required supplies to avoid any impact on food supply due to shortages.
- Estimated Inventory Setting: For dishes that rely on potentially scarce raw materials, an estimated inventory can be set at the cashier counter. Once the estimated inventory is depleted, the dish will no longer appear on the available menu, thus avoiding order issues caused by insufficient raw materials.
- If, during the operation, certain dishes cannot be normally provided due to insufficient raw materials, please promptly remove these dishes from the ordering cash register to avoid inconveniencing customers or causing unnecessary trouble in order processing. By following the above suggestions, service efficiency can be effectively improved and the quality of the customer experience can be ensured.
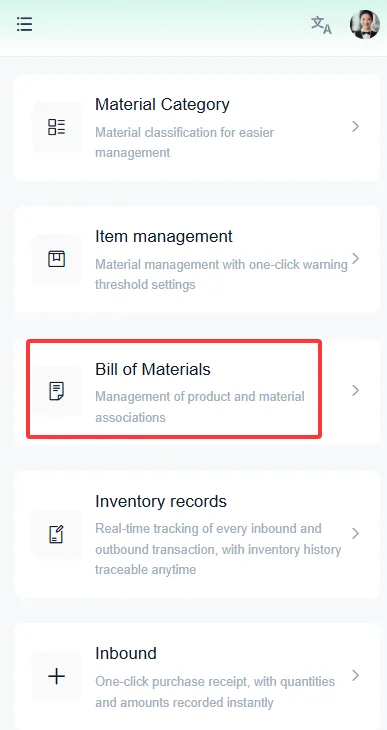
Bill of Material
Function Overview
The Bill of Material module is used to bind the relationship between restaurant dishes and raw materials, ensuring that restaurants can effectively manage inventory and accurately record the raw materials and their quantities required for each dish. When placing an order, the system will automatically deduct the relevant inventory, helping operators keep track of the usage of raw materials in real time.
Function Description
Page Layout
- Product List: Displays all dishes in the store, including the following information:
- Product Number
- Product Name
- Specification information (if the dish has multiple specifications, all specifications will be displayed, and the corresponding specification content will be shown in the specification information, e.g., "Small - Spicy")
- Commodity Unit
- Whether to configure
- Operating Time
- Operation buttons (used for editing, copying, or configuring raw materials)
Operating Steps
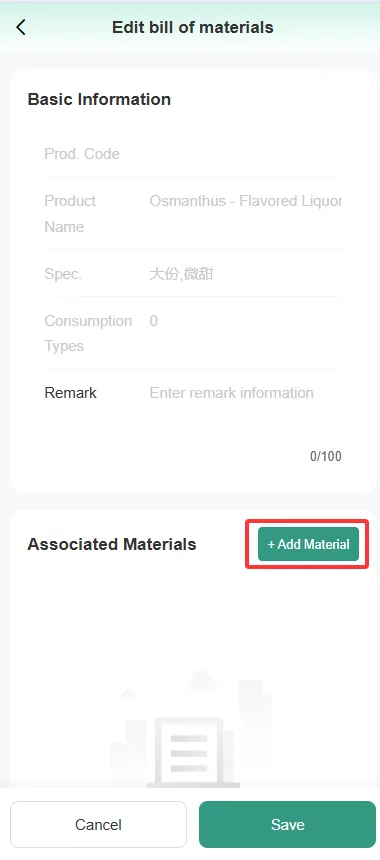
- Select dishes for configuration:
- In the product list, browse all dishes and find the dish that needs to have its raw materials configured.
- Click the "Configuration" button to enter the raw material configuration page.
- Multi-specification Configuration: If a dish has multiple specifications, the system will display raw material configuration items for each specification separately. This is because different specifications may require different combinations of raw materials to meet the different needs of customers. Please ensure that the correct raw material information is configured for each specification.
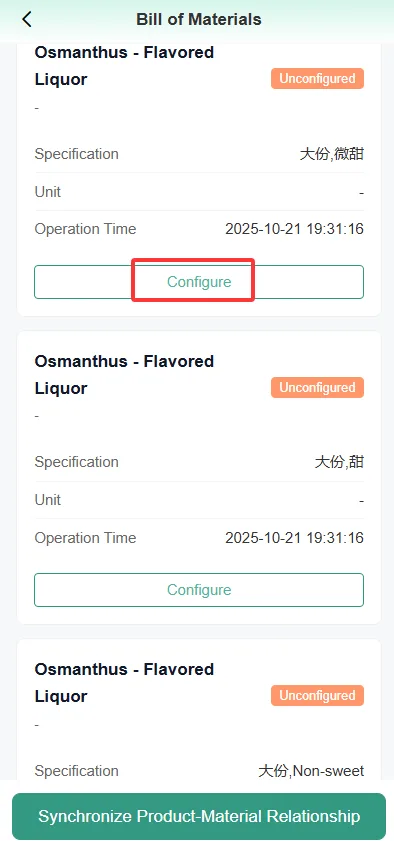
- Configure raw material information:
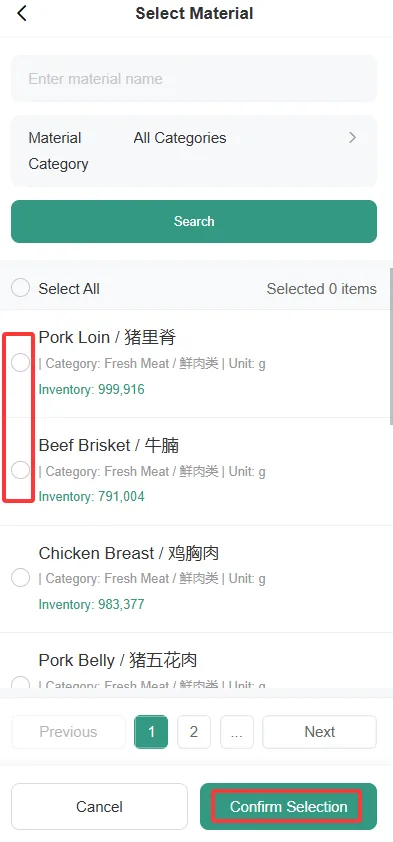
- On the configuration page, you can see the list of all available raw materials.
- Select the raw materials to be added and fill in relevant information such as quantity, unit, etc.
- The system will prompt a list of available raw materials to ensure the selection of appropriate raw materials.
- Net material quantity and gross material quantity:
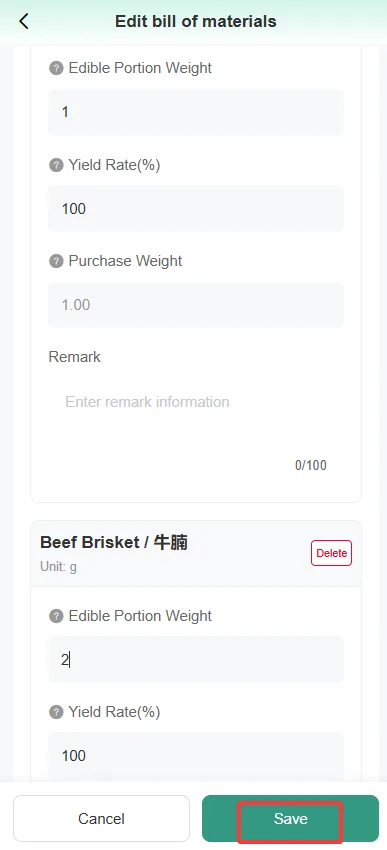
- Net material quantityrefers to the weight of the usable part of raw materials after initial processing. For example:
- For beverages that do not require processing, the net quantity should be filled in as 1.
- For vegetables, the net quantity should be filled in according to the estimated value after cleaning and processing.
- Calculation formula: Net material quantity = Gross material quantity × Net material rate.
- Gross Material Quantity: The system will calculate the actual quantity of raw material inventory to be deducted based on the net material quantity and net material rate.
- Save Configuration:
- After completing the selection of raw materials, click the "Save" button to save the configuration.
- The system will automatically update the raw material information of dishes and deduct inventory when placing an order.
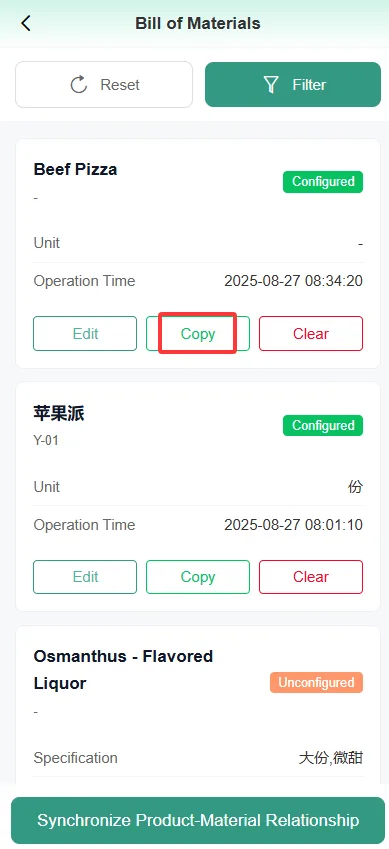
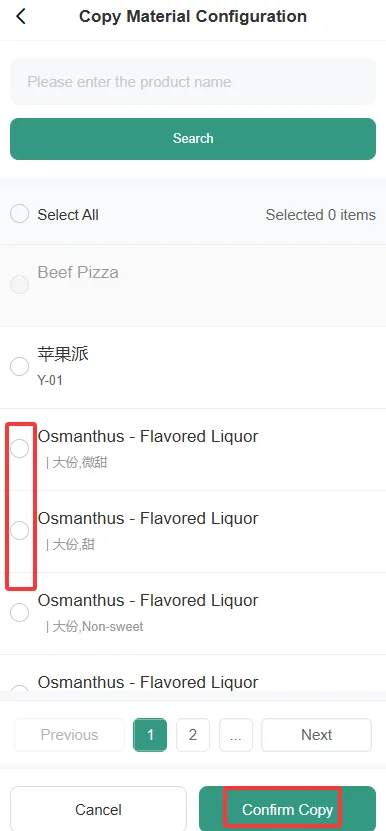
- Use the copy function:
- On the configuration page, select the target dish whose raw material information needs to be copied.
- Click the "Copy" button to overwrite the ingredient information of the current dish onto the selected dish for quick configuration of the list. This feature can significantly save time, especially when dealing with multiple similar dishes.
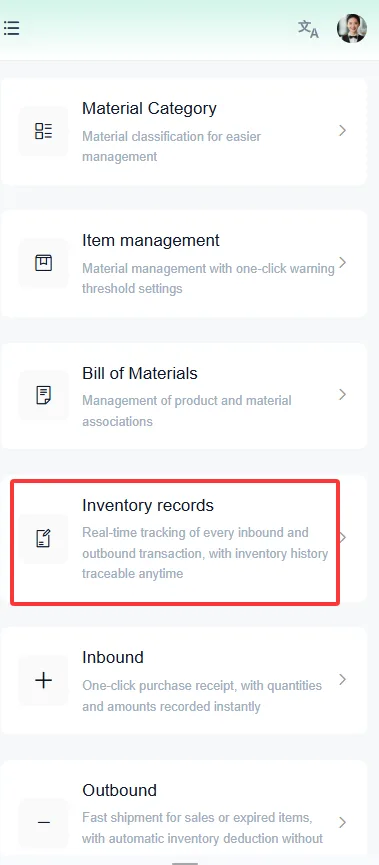
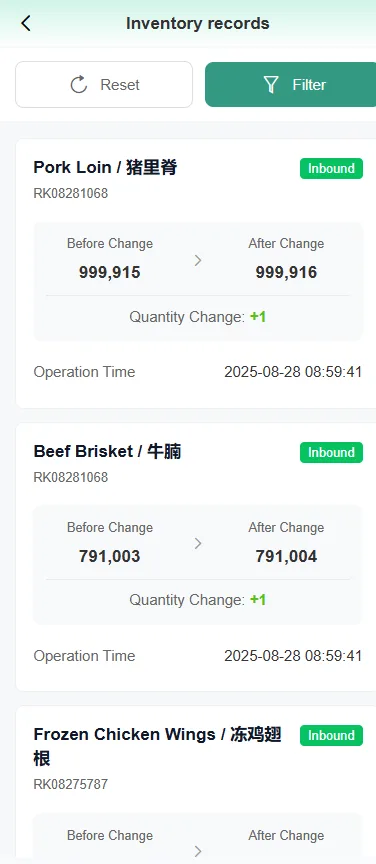
Inventory Record
- Record the increase or decrease of raw material inventory following the order.
Warehousing
Function Overview
The raw material warehousing module is one of the core functions of the catering store system. This module can assist merchants in managing the warehousing processes of raw materials, such as procurement, production, and returns (returned dishes warehousing), ensuring the accuracy and traceability of raw material inventory. Through this module, merchants can keep track of the inventory status of raw materials in real time and replenish procurement in a timely manner according to demand.
Function Description
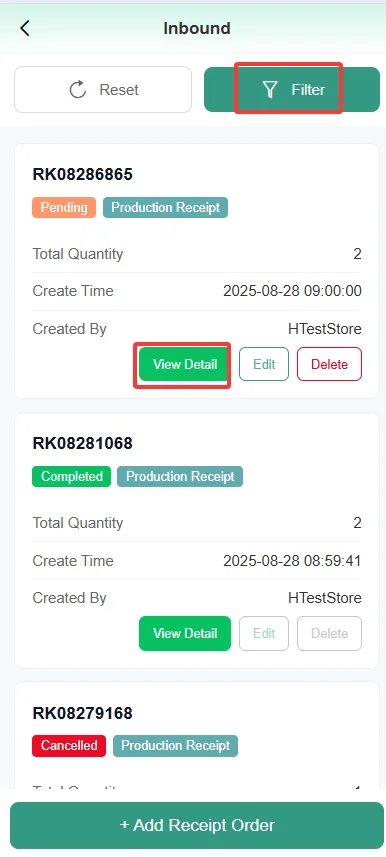
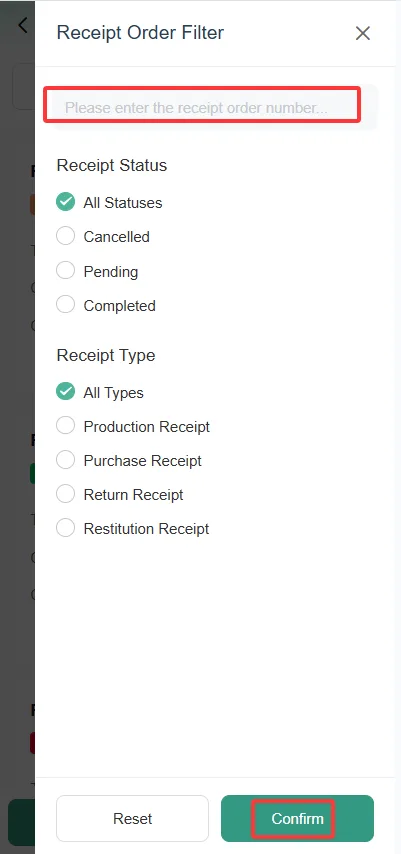
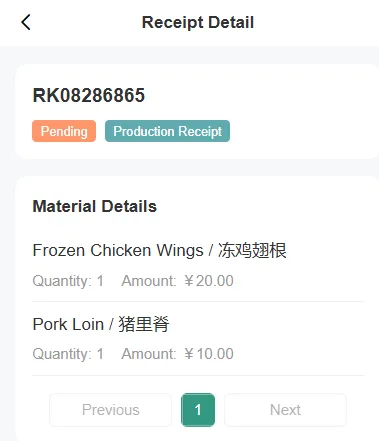
Warehouse Receipt Query and Management:
- On the stock-in document list page, you can filter and query based on conditions such as document number, inbound status, inbound type, etc.
- Click the stock-in document to view detailed item information.
- For stock-in document pending completion, cancellation operations can be performed. Documentation that has already been completed is not allowed to be modified.
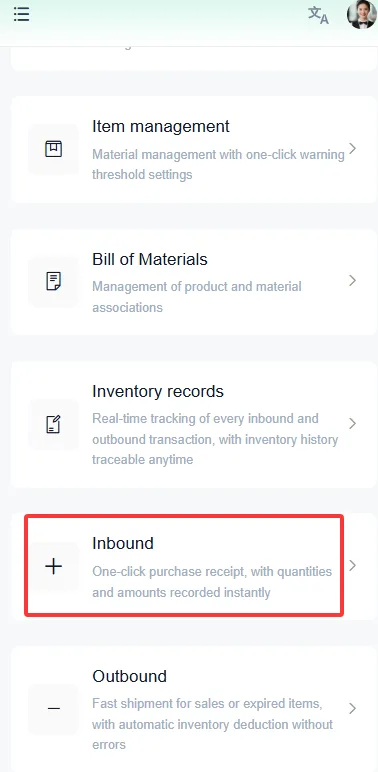
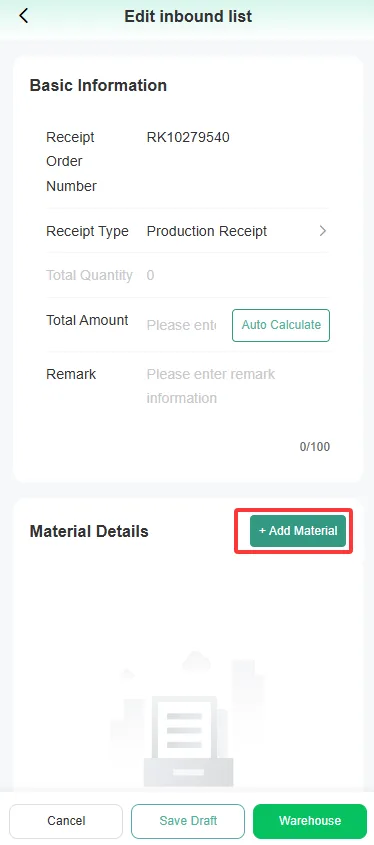
New Incoming Stock:
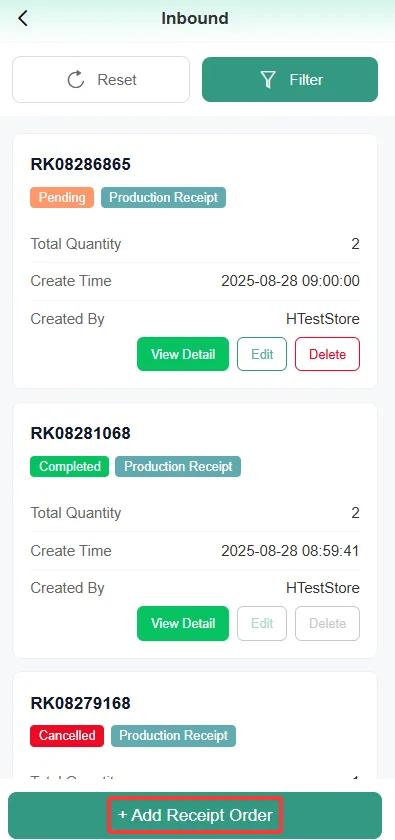
- Click the "Warehousing" menu to enter the stock-in document list page.
- Click the "New Stock-In Document" button, fill in the information of the stock-in document, such as the incoming stock type
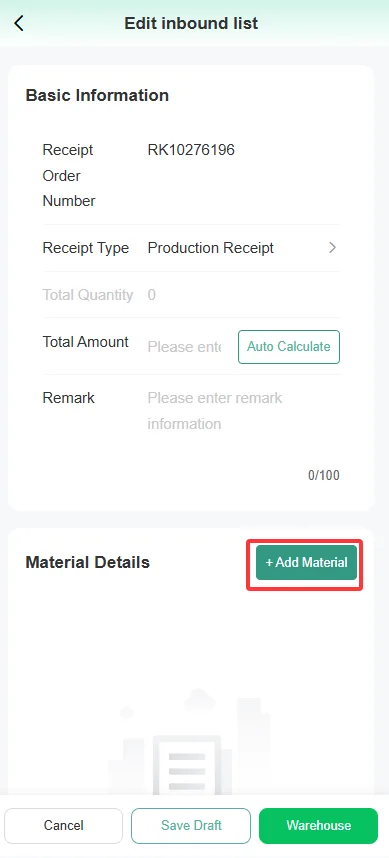
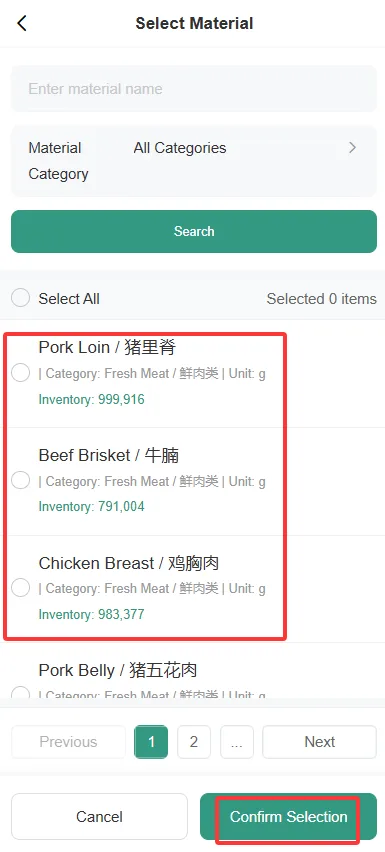
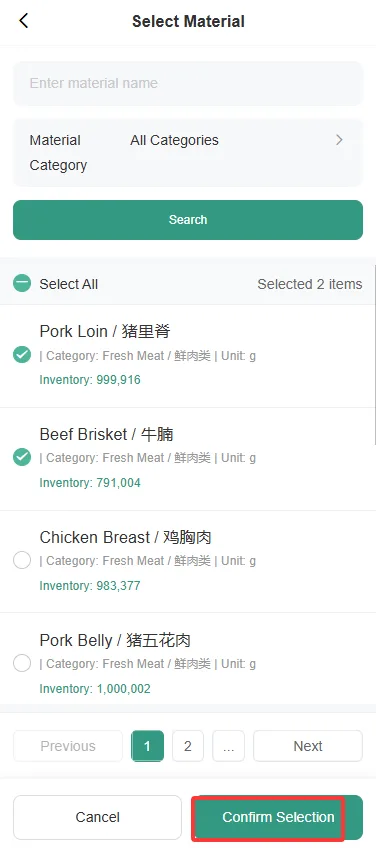
- Click "Add Item" and select the raw materials to be put into storage:
- Item Selection: Click the "Item Selection" button to select the items to be stored from the existing item list in the system.
- Item Information: After selecting an item, the system will automatically populate the basic information of the item, such as item name, item number, specification, etc.
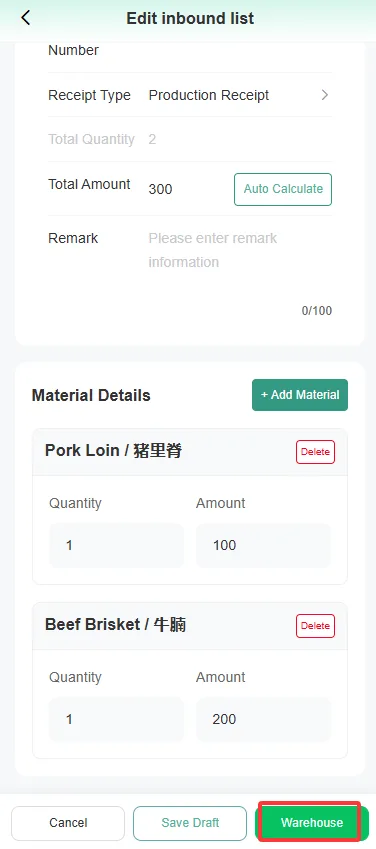
- Quantity: Enter the incoming quantity of the current item.
- Add: After completing the item information, click the "Add" button to add the item to the stock-in item details.
- Save: After adding all items, click the "Save" button to submit the stock-in document.
- Click Complete Stock-In to save the stock-in document. The system will automatically update the inventory quantity of the corresponding items.
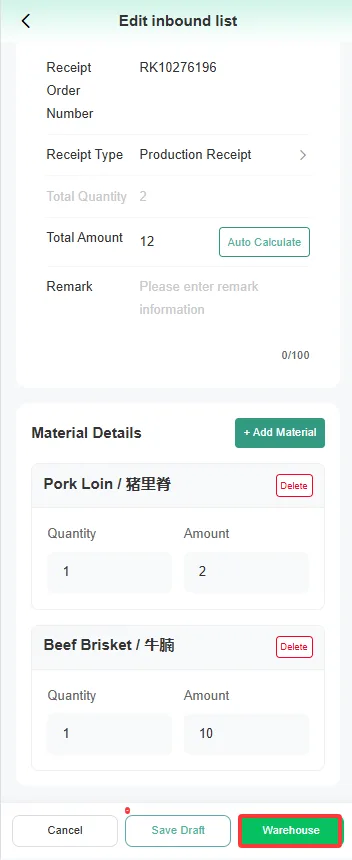
- If you click Save Temporarily, the stock-in is not completed and the document can still be edited.
Outbound operation
1 Function Overview
The raw material outbound module is one of the core functions of the catering store system. This module helps merchants manage stock-out processes for production and sales, returns, expiration, and spoilage, ensuring accurate and traceable raw material inventory. Through this module, merchants can monitor raw material inventory in real time and replenish stock when needed. When users place dish orders, the system can also generate the corresponding production/sales stock-out document automatically.
1 Function Description
Stock-out document query and management:
- On the stock-out document list page, you can filter and query by document number, outbound status, and outbound type (production and sales, returns, expiration and deterioration, etc.).
- Click the stock-out document to view detailed item information.
- Pending stock-out documents can be cancelled. Completed stock-out documents cannot be modified.
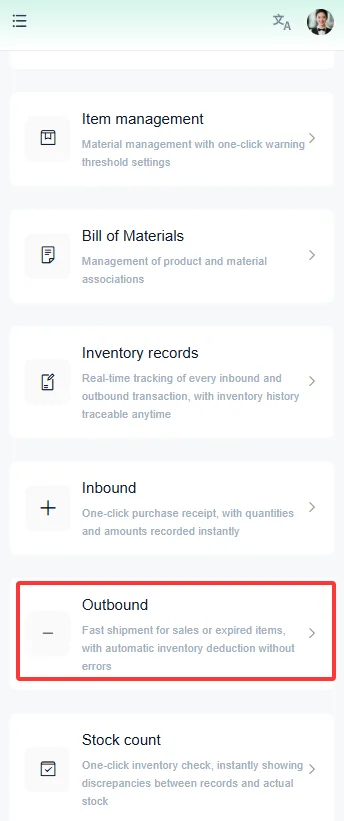
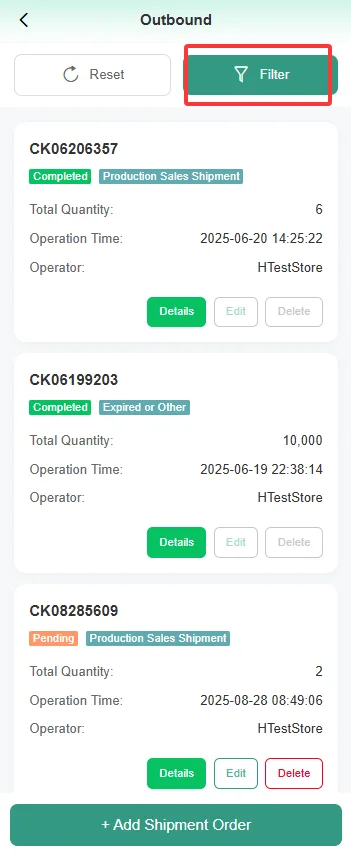
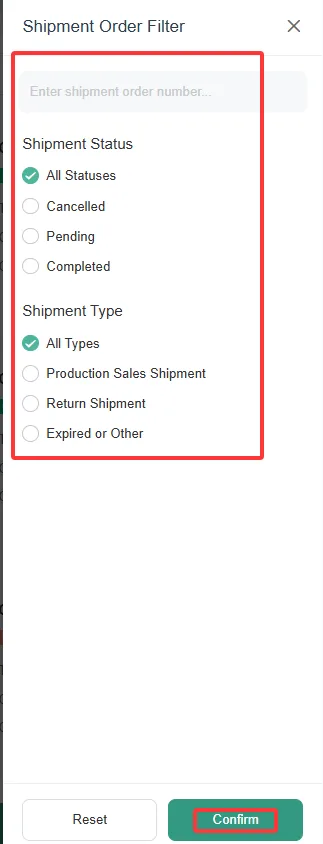
New Outbound Delivery:
- Click the "Outbound" menu to enter the stock-out document list page.
- Click New Stock-Out Document and select the stock-out type, such as production/sales, return, expiration, or spoilage.
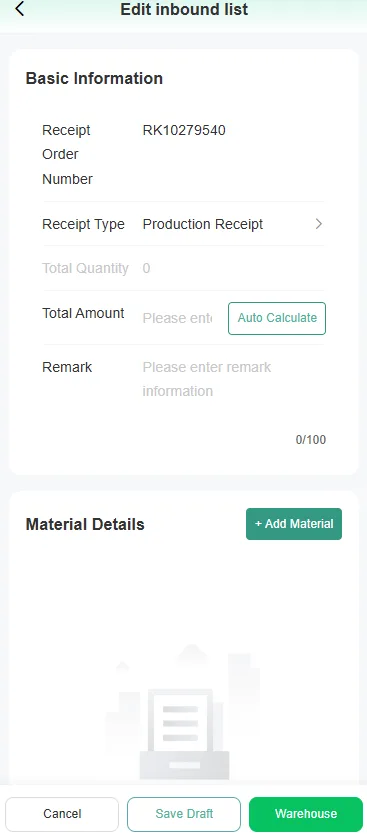
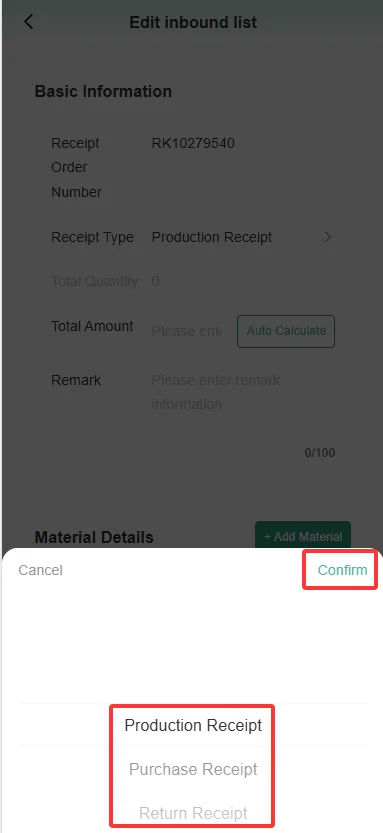
- Click "Add Item" and select the raw materials to be issued from storage:
- Click "Complete Stock-Out" to save the outbound order, and the system will automatically update the inventory quantity of the corresponding items.
- Item Selection: Click the "Item Selection" button to select the items to stock out from the existing item list in the system.
- Item Information: After selecting an item, the system will automatically populate the basic information of the item, such as item name, item number, specification, etc.
- Quantity: Enter the outbound quantity of the current item.
- Add: After completing the item information, click the "Add" button to add the item to the outbound order details.
- Save: After completing the addition of all items, click the "Save" button to submit the outbound order.
- If you click Save Temporarily, the stock-out is not completed and the document can still be edited.
- When a user places an order for a dish, the system will automatically generate the corresponding production, sales, and outbound delivery note, helping merchants better manage the outbound of raw materials.
Inventory Management
Function Overview
Inventory checking is the process by which catering enterprises regularly conduct actual verifications of raw material inventory, with the following objectives:
- Verify the consistency between book inventory and actual inventory, identify and correct inventory errors.
- Understand the actual consumption of raw materials to provide a basis for decision-making in production, procurement, etc.
- Prevent the loss and consumption of raw materials, and improve inventory management levels. Through regular inventory checks, merchants can promptly identify and resolve issues in inventory management, optimize the utilization efficiency of raw materials, and improve the overall operational efficiency of the enterprise.
Function Description
Inventory Count Sheet List
- At the top of the page, status filters such as "All", "Pending Inventory Check", "Completed Inventory Check", and "Voided" are provided, allowing users to view inventory check sheets in different statuses as needed.
- The list displays key information such as the inventory check form number, status, profit and loss amount, operation time, operator, remarks, etc.
- Users can search by order number or other criteria to quickly locate the inventory check order they need to view.
- On the right side of the list, operation entries such as "View", "Edit", and "Delete" are provided.
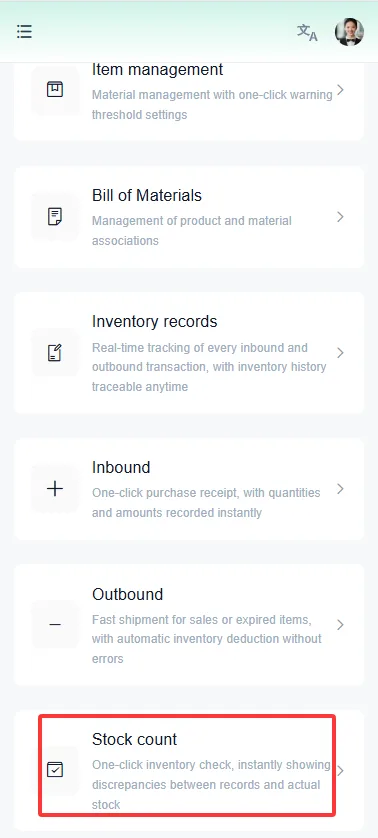
New Inventory Check
- Users can enter the new inventory page by clicking the "New Inventory" button at the top of the page.
- On the newly added page, the system will default to displaying all material information that needs to be inventoried, including item name, affiliated warehouse, item number, book quantity, etc.
- Users can fill in the actual quantity of each material based on the actual inventory count, and the system will automatically calculate the profit and loss amount.
- At the bottom of the page, there is also a "Add New Inventory" button, where users can add new material information and include it in this inventory count.
- Click Complete Inventory Count to save the inventory count document, and the system will automatically update the actual inventory quantity of the corresponding items.
- If you click Save Temporarily, the inventory count is not completed and the document can still be edited.
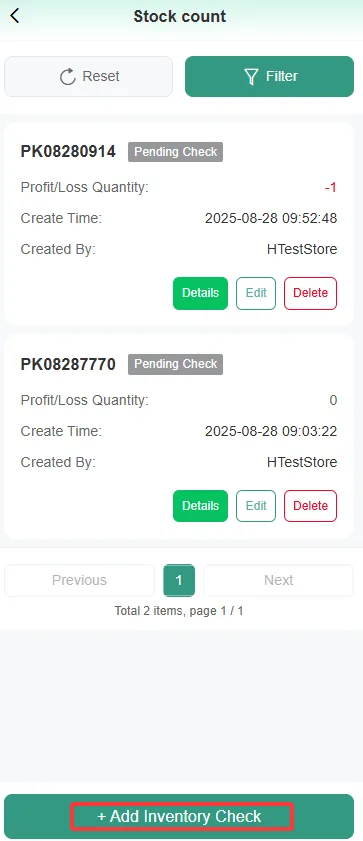
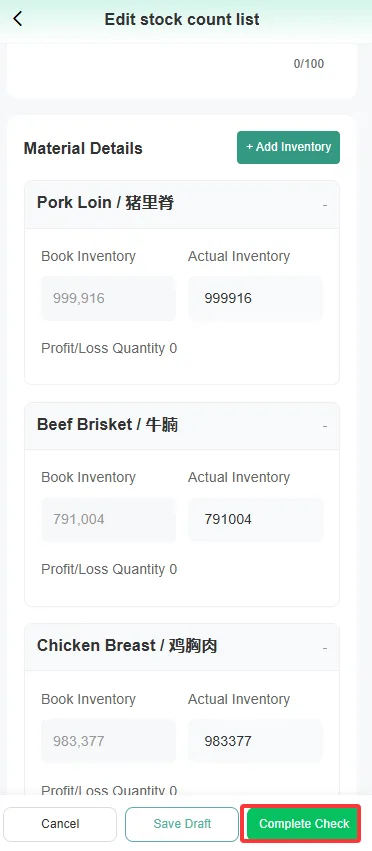
Edit inventory count document
- For pending inventory count documents, users can click Edit to open the edit page.
- On the editing page, users can modify information such as profit and loss quantity, remarks, etc., to complete the adjustment of the inventory count results.
- Completed inventory count documents cannot be edited.
View inventory count document details
- When the user clicks the "View" button in the list, they can enter the details page of the inventory count document.
- The details page displays information about all items involved in this inventory check, including item name, affiliated warehouse, item number, book quantity, actual quantity, profit and loss quantity, and remarks.
- Users can carefully check the inventory results of each item.
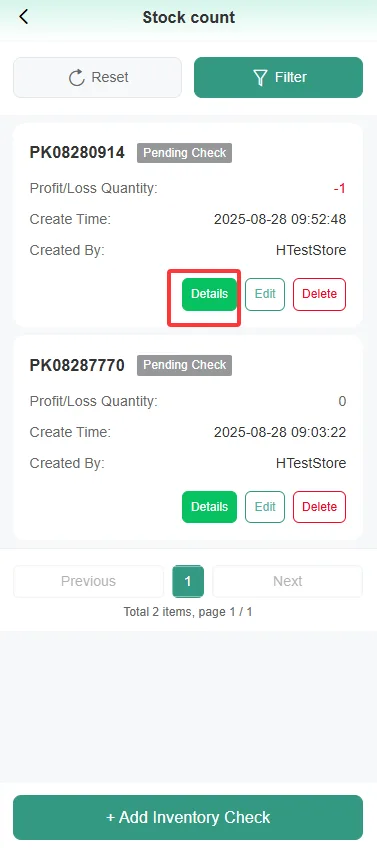
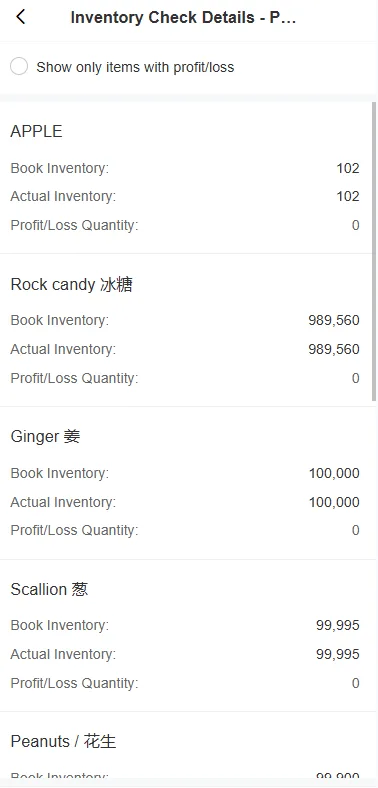
Delete inventory count document
- For pending inventory count documents, users can click Delete to remove the document from the system.
- Completed inventory count documents cannot be deleted.
Kitchen Management
Stall Management
Function Overview
- Implements the splitting, targeted printing, and display of orders by stalls, improving the speed and accuracy of food delivery.
NewFilePort
- Enter the stall page.
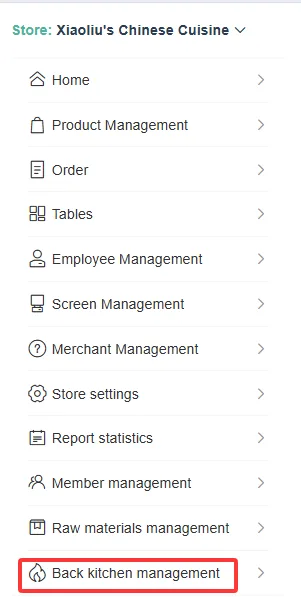
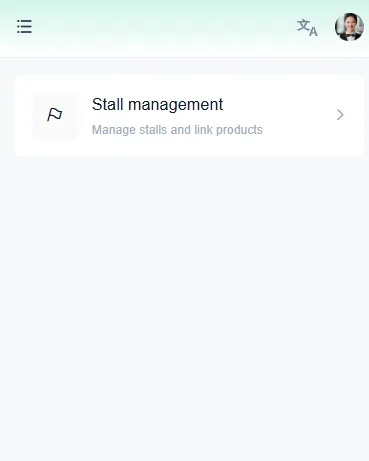
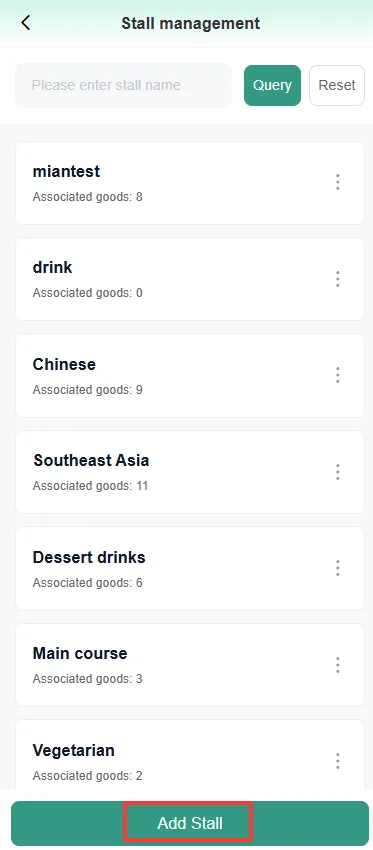
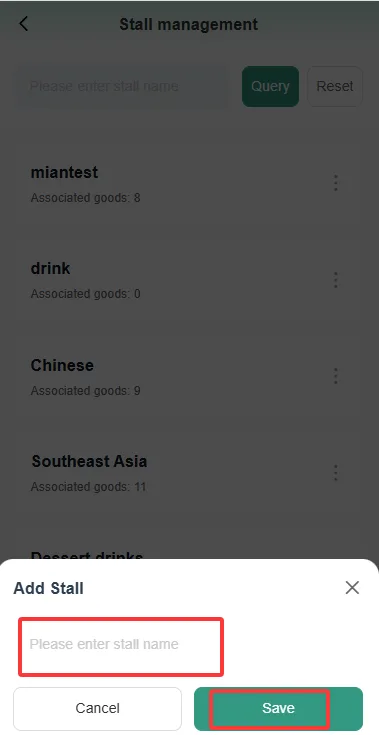
- Click the Add Stall button, enter the stall name, and click Save.
Edit Document
- Click the edit button, modify the stall name, and click save.
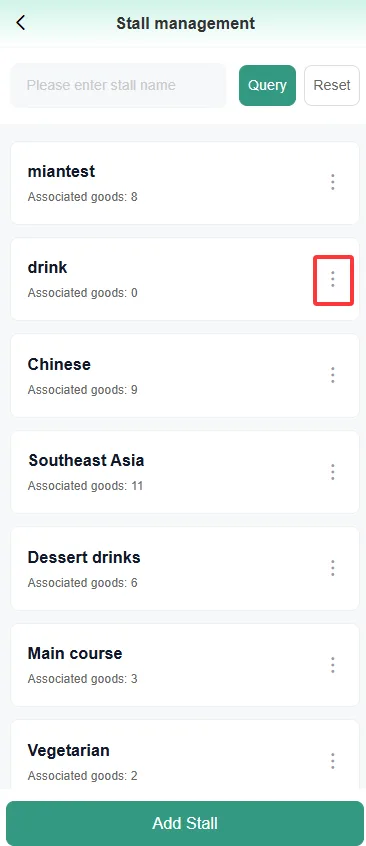
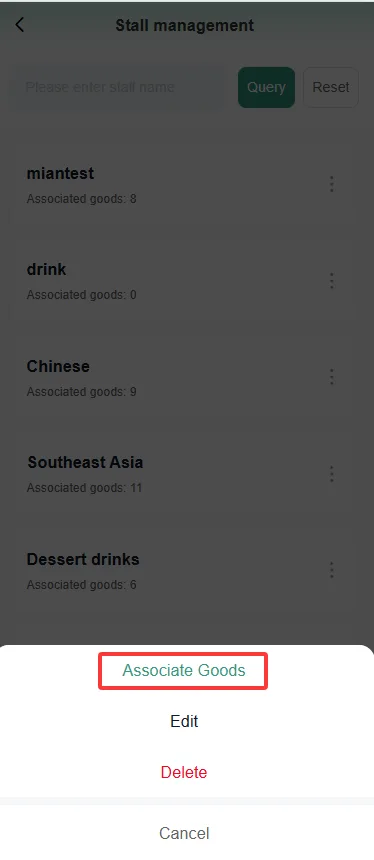
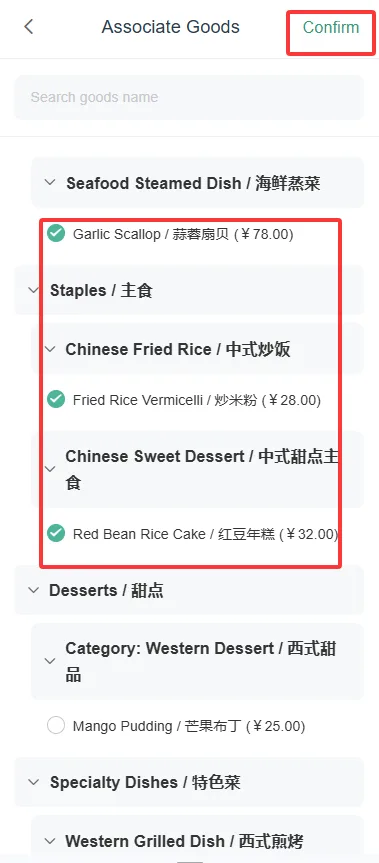
Set Associated Products
- Click the button to set associated products, check the products to be associated, and click OK. Select associated dishes (supports multi-selection and search). The stall can then be selected on the POS and KDS. One product can only be associated with one stall.
Delete stall
- When a stall is associated with products, it cannot be deleted. Clicking the delete button will prompt that there are associated products and deletion is not allowed. If you need to delete the stall, you must first unassociate the products from the stall before you can delete it.
Query
- Enter the stall name and click Query.